1997 RHD Land Rover Disco I Project
#11
 09-18-2014, 09:39 AM


Pro Wrench
I cant believe they sold any in Japan. Especially with the V8. Looks like your tackling the bugs quick. I have disabled my alarm and my central locking. If i could find a way to have roll up windows id do that too. Im still on the lookout for manual seats.My tailgate lock still acts up when locked. But I live with it. I think the less you depend on Lucas the happier you will be.
#12
09-19-2014, 02:19 PM

Mudding
Rover (parent company of Landrover) had a long tie-up with Honda. So not only were Discoverys sold in Japan, some D1 were also badged as the Honda Crossroad. Honda were also using Rover diesel engines in their cars because they didn't have any decent diesel themselves.
Honda Crossroad - Wikipedia, the free encyclopedia

Rover L-Series engine - Wikipedia, the free encyclopedia
The 2 litre L-series engine was developed into the 2.5 litre 5 cylinder TD5 used in the D2.
Honda Crossroad - Wikipedia, the free encyclopedia
Rover L-Series engine - Wikipedia, the free encyclopedia
The 2 litre L-series engine was developed into the 2.5 litre 5 cylinder TD5 used in the D2.
#13
09-22-2014, 02:49 AM

cigar lighter fixed. 20A fuse in the driver fascia was blown. also, after going over the circuit diagrams for a while, I decided the cigar lighter not working was tied to the rear windows. seems some of the interior lights, electric windows, clock, and cigar lighter are all a part of the same circuit. lo and behold, with the cigar lighter back in action, the rear windows work like a charm. power has also been restored to the clock LED.
Managed to trace down connector 2073 which is in the RH footwell far away from the window ECU in the LH fascia. glad that I didn't need to tap that white green wire on C2073.
got the cruise control switch from my guy, drained all the capacitance from the system by leaving the headlight switch on while I debugged the cigar lighter and windows. bout an hour later, took out that driver airbag. my first time doing that kind of thing. gotta say it was pretty nerve racking to be holding an explosive. got that new switch in there and put it all back together. haven't had a chance to test it out, but I will tomorrow.
to top it all off, all of this occurred after I came out this morning to a completely flat LH rear tire. drove it back 350km from fiordland yesterday. noticed it was looking a little under inflated when I got home, but didn't expect the leak to be that bad. managed to pump it up to a driveable pressure using a bike pump my flatmate had and drive it to the local tire shop. $31 later, fixed tire.
gotta say, I'm a little embarrassed I neglected to check the fuses carefully before. found that the headlight washer fuse was also blown. one more thing for my shrinking list which is basically down to
1. slow oil leak, but it's so slow I don't know if its worth fixing
2. completely drain the coolant, replace t-stat and do a small flush of the radiator if coolant looks dirty.
3. take a look at the t-case linkage and lube it up
4. remove LH alpine window and seal. do some minor rust repair and rust proofing. pretty up the LH roof line. lay down some primer. get some sealant in that LH roof gutter.
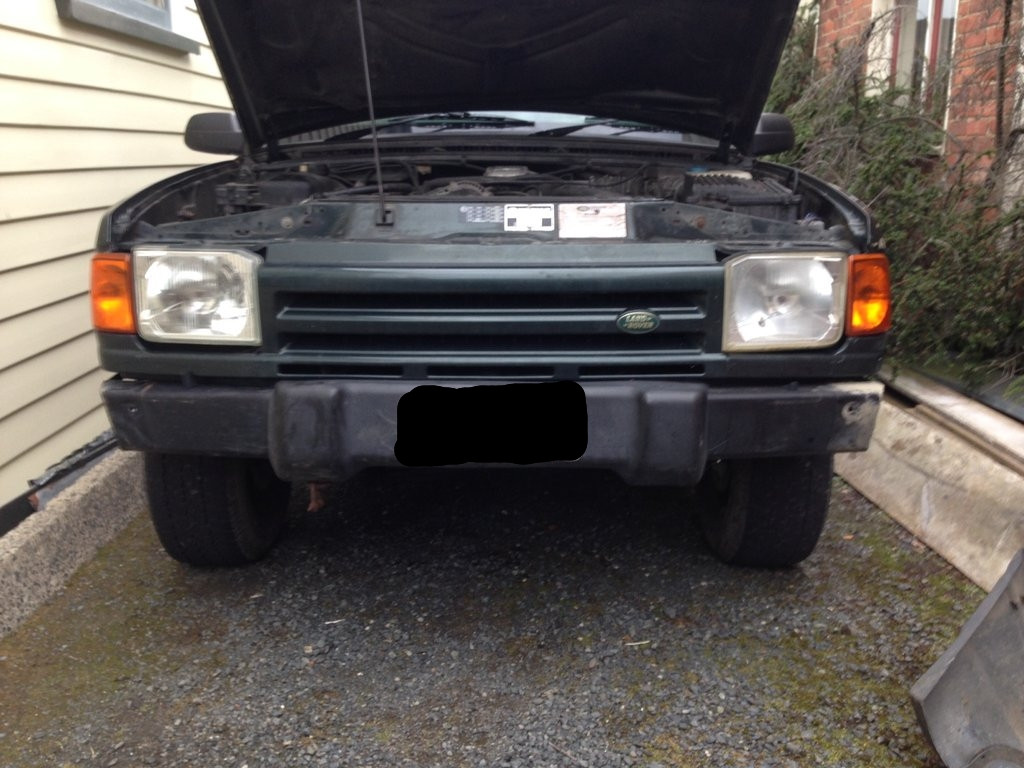
5. get that plastic bumper off
6. driver window. regulator moves great when I take off that trim panel (rollers are in great shape). the arm seems to be seized in the motor. gonna pull the motor and take a look at its teeth along with the arm's teeth.
besides doing a respray of the peeling panels, that's about all I could think of doing before I sell this guy to a new loving owner.
Managed to trace down connector 2073 which is in the RH footwell far away from the window ECU in the LH fascia. glad that I didn't need to tap that white green wire on C2073.
got the cruise control switch from my guy, drained all the capacitance from the system by leaving the headlight switch on while I debugged the cigar lighter and windows. bout an hour later, took out that driver airbag. my first time doing that kind of thing. gotta say it was pretty nerve racking to be holding an explosive. got that new switch in there and put it all back together. haven't had a chance to test it out, but I will tomorrow.
to top it all off, all of this occurred after I came out this morning to a completely flat LH rear tire. drove it back 350km from fiordland yesterday. noticed it was looking a little under inflated when I got home, but didn't expect the leak to be that bad. managed to pump it up to a driveable pressure using a bike pump my flatmate had and drive it to the local tire shop. $31 later, fixed tire.
gotta say, I'm a little embarrassed I neglected to check the fuses carefully before. found that the headlight washer fuse was also blown. one more thing for my shrinking list which is basically down to
1. slow oil leak, but it's so slow I don't know if its worth fixing
2. completely drain the coolant, replace t-stat and do a small flush of the radiator if coolant looks dirty.
3. take a look at the t-case linkage and lube it up
4. remove LH alpine window and seal. do some minor rust repair and rust proofing. pretty up the LH roof line. lay down some primer. get some sealant in that LH roof gutter.
5. get that plastic bumper off
6. driver window. regulator moves great when I take off that trim panel (rollers are in great shape). the arm seems to be seized in the motor. gonna pull the motor and take a look at its teeth along with the arm's teeth.
besides doing a respray of the peeling panels, that's about all I could think of doing before I sell this guy to a new loving owner.
Last edited by sfkickz; 09-22-2014 at 02:56 AM.
#14
10-16-2014, 01:16 AM
t-case selector cleaned, unseized and lubed up. the selector works great now. it was quite the adventure, losing pins and plastic bushes. thank god for the pull n pay. also, tip for others, take pictures as you go. it'll make it much easier to re-assemble.
The linkages themselves are still a bit tight, so I'll hit them with some penetrating oil every day for the next couple days and see if I can't loosen it up some.
replaced the diff-lock bulb, which now illuminates. checked all the other bulbs while I was in there. got extra bulbs for the next owner
cleaned all the switches on the instrument panel and replaced one with a broken bulb with one I picked up. all nice and functional in the driver's seat now.
did a little diagnosing of the cruise control. all vacuum lines are good. I only did this in park with the switch on, so I'm not sure whether it should have created one, but there was no vacuum from the pump. I've tried to get it to work a bunch on the highway to no avail. I think its either gotta be the actuator or the pump. I haven't checked this against RAVE, but I suppose a broken brake switch (to purge the vacuum) could prevent the whole system from working as a failsafe. Unfortunately, I've lost patience with the cruise control, so I'll give all the information I got to the next owner and let them decide if they want to fix it. Plus the donor I've been using doesn't have cruise control. It did have a TPS and brake inhibitor switch which I snagged just in case. Someone had already beat me to the IACV, MAF and radiator, along with the little plastic gears for the cup holder.
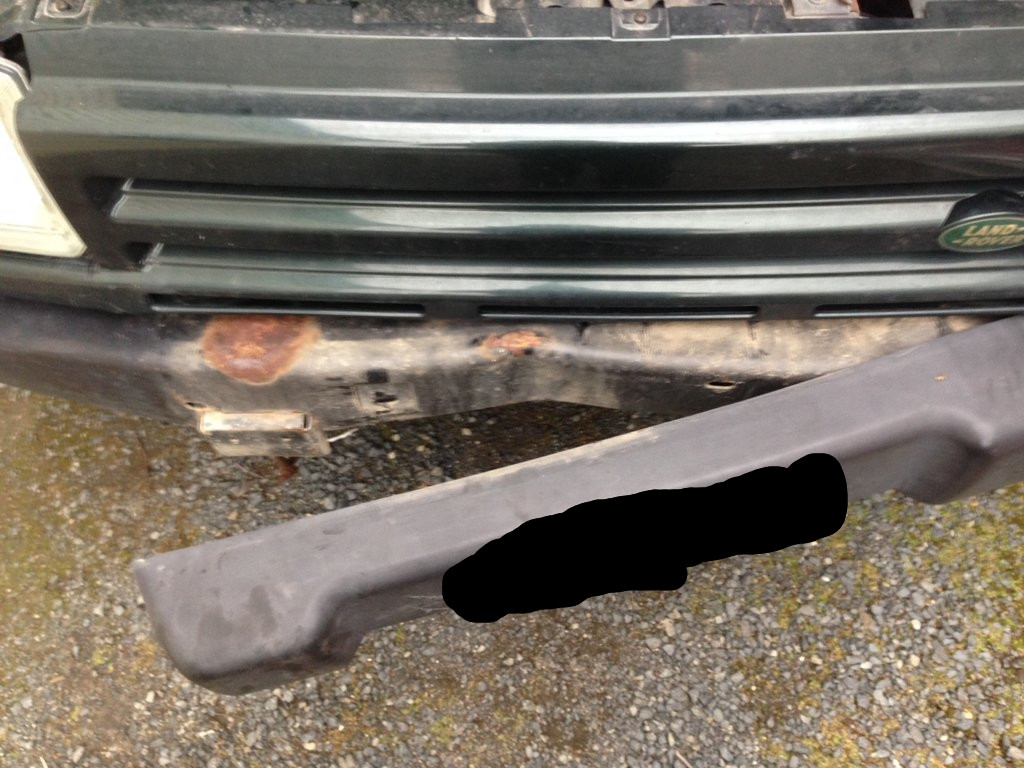
removed the front spoiler and found a little secret behind the plastic license plate holder. was planning on pulling the bumper and painting it, to pretty it up, but don't think paint could make that dent look pretty.
I've added a couple more things to the list. steering still catches on very sharp right turns. I was able to take my hand off the wheel as the wheel somehow held itself in position for a 180* turn. I want to think its a bad TRE somewhere in the steering system. Is there a way to check this without separating the joints? Any other likely culprits? Steering shaft? the box itself? bad upper or lower swivel pin bearings?
New issue number two: After going over a bump, the truck levels itself, but after that, theres a small clunk in the rear. feels like it might be the a-frame lagging behind the rest of the suspension. Think I'll switch out that ball joint and all the rear bushings. Noel's letting me use his shop if I need it. In people's experience, will I need a press if I go with poly bushes? Will I need to replace the bushes on the shock at the same time or can I leave those be? I know that I will for sure need a press to get out that ball joint.
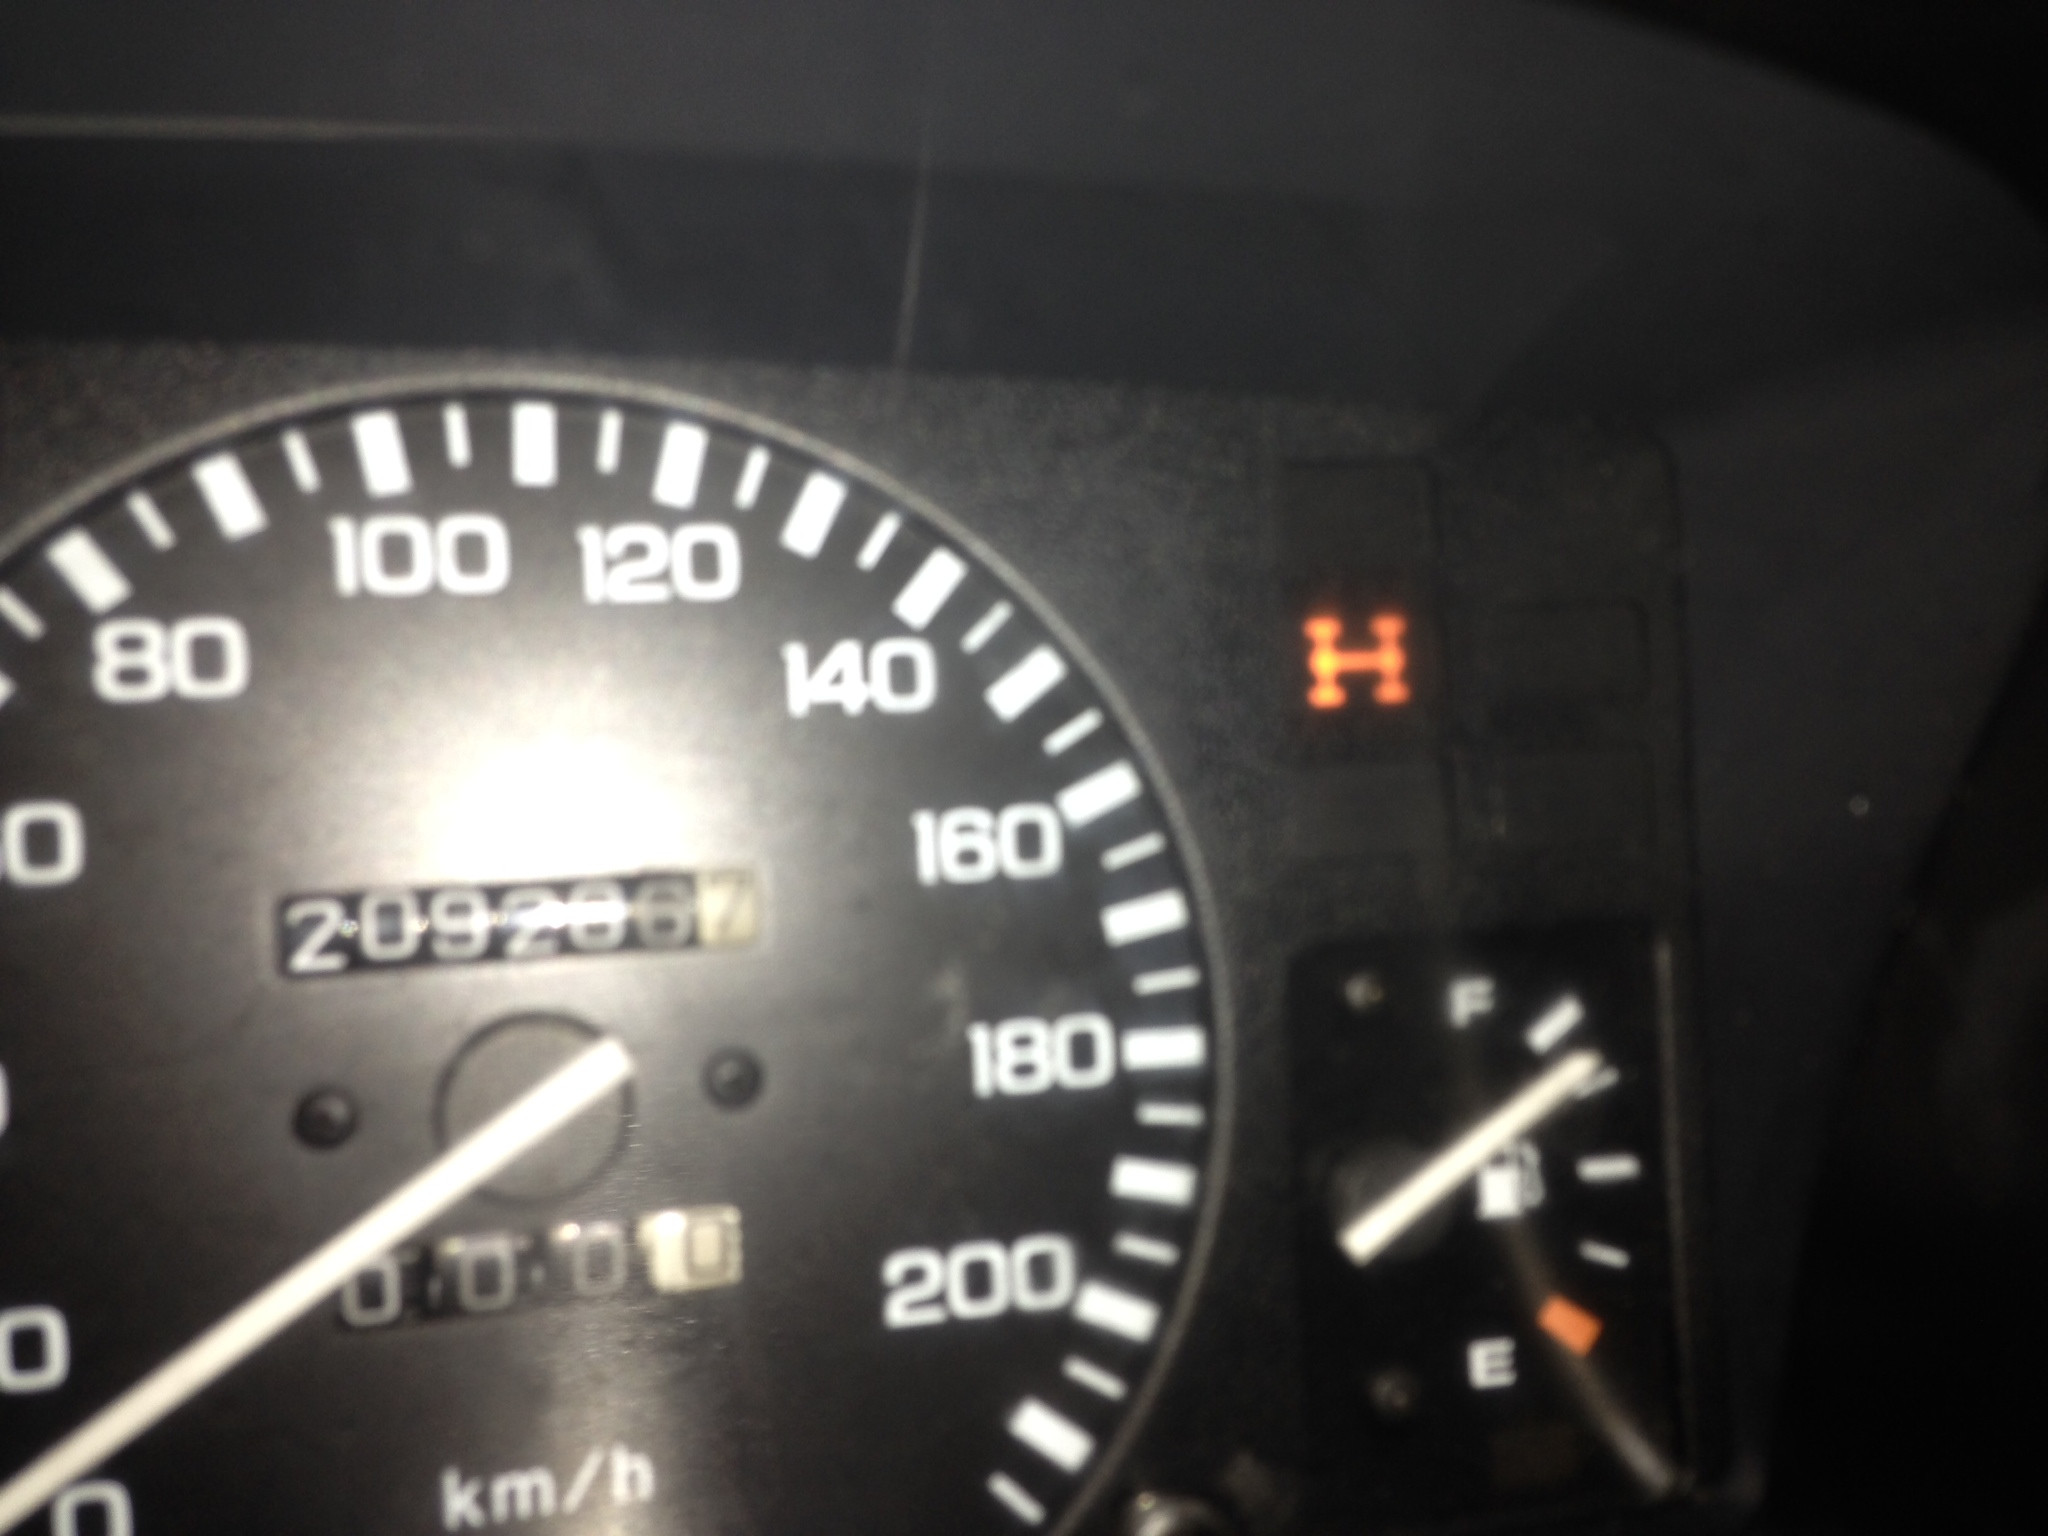
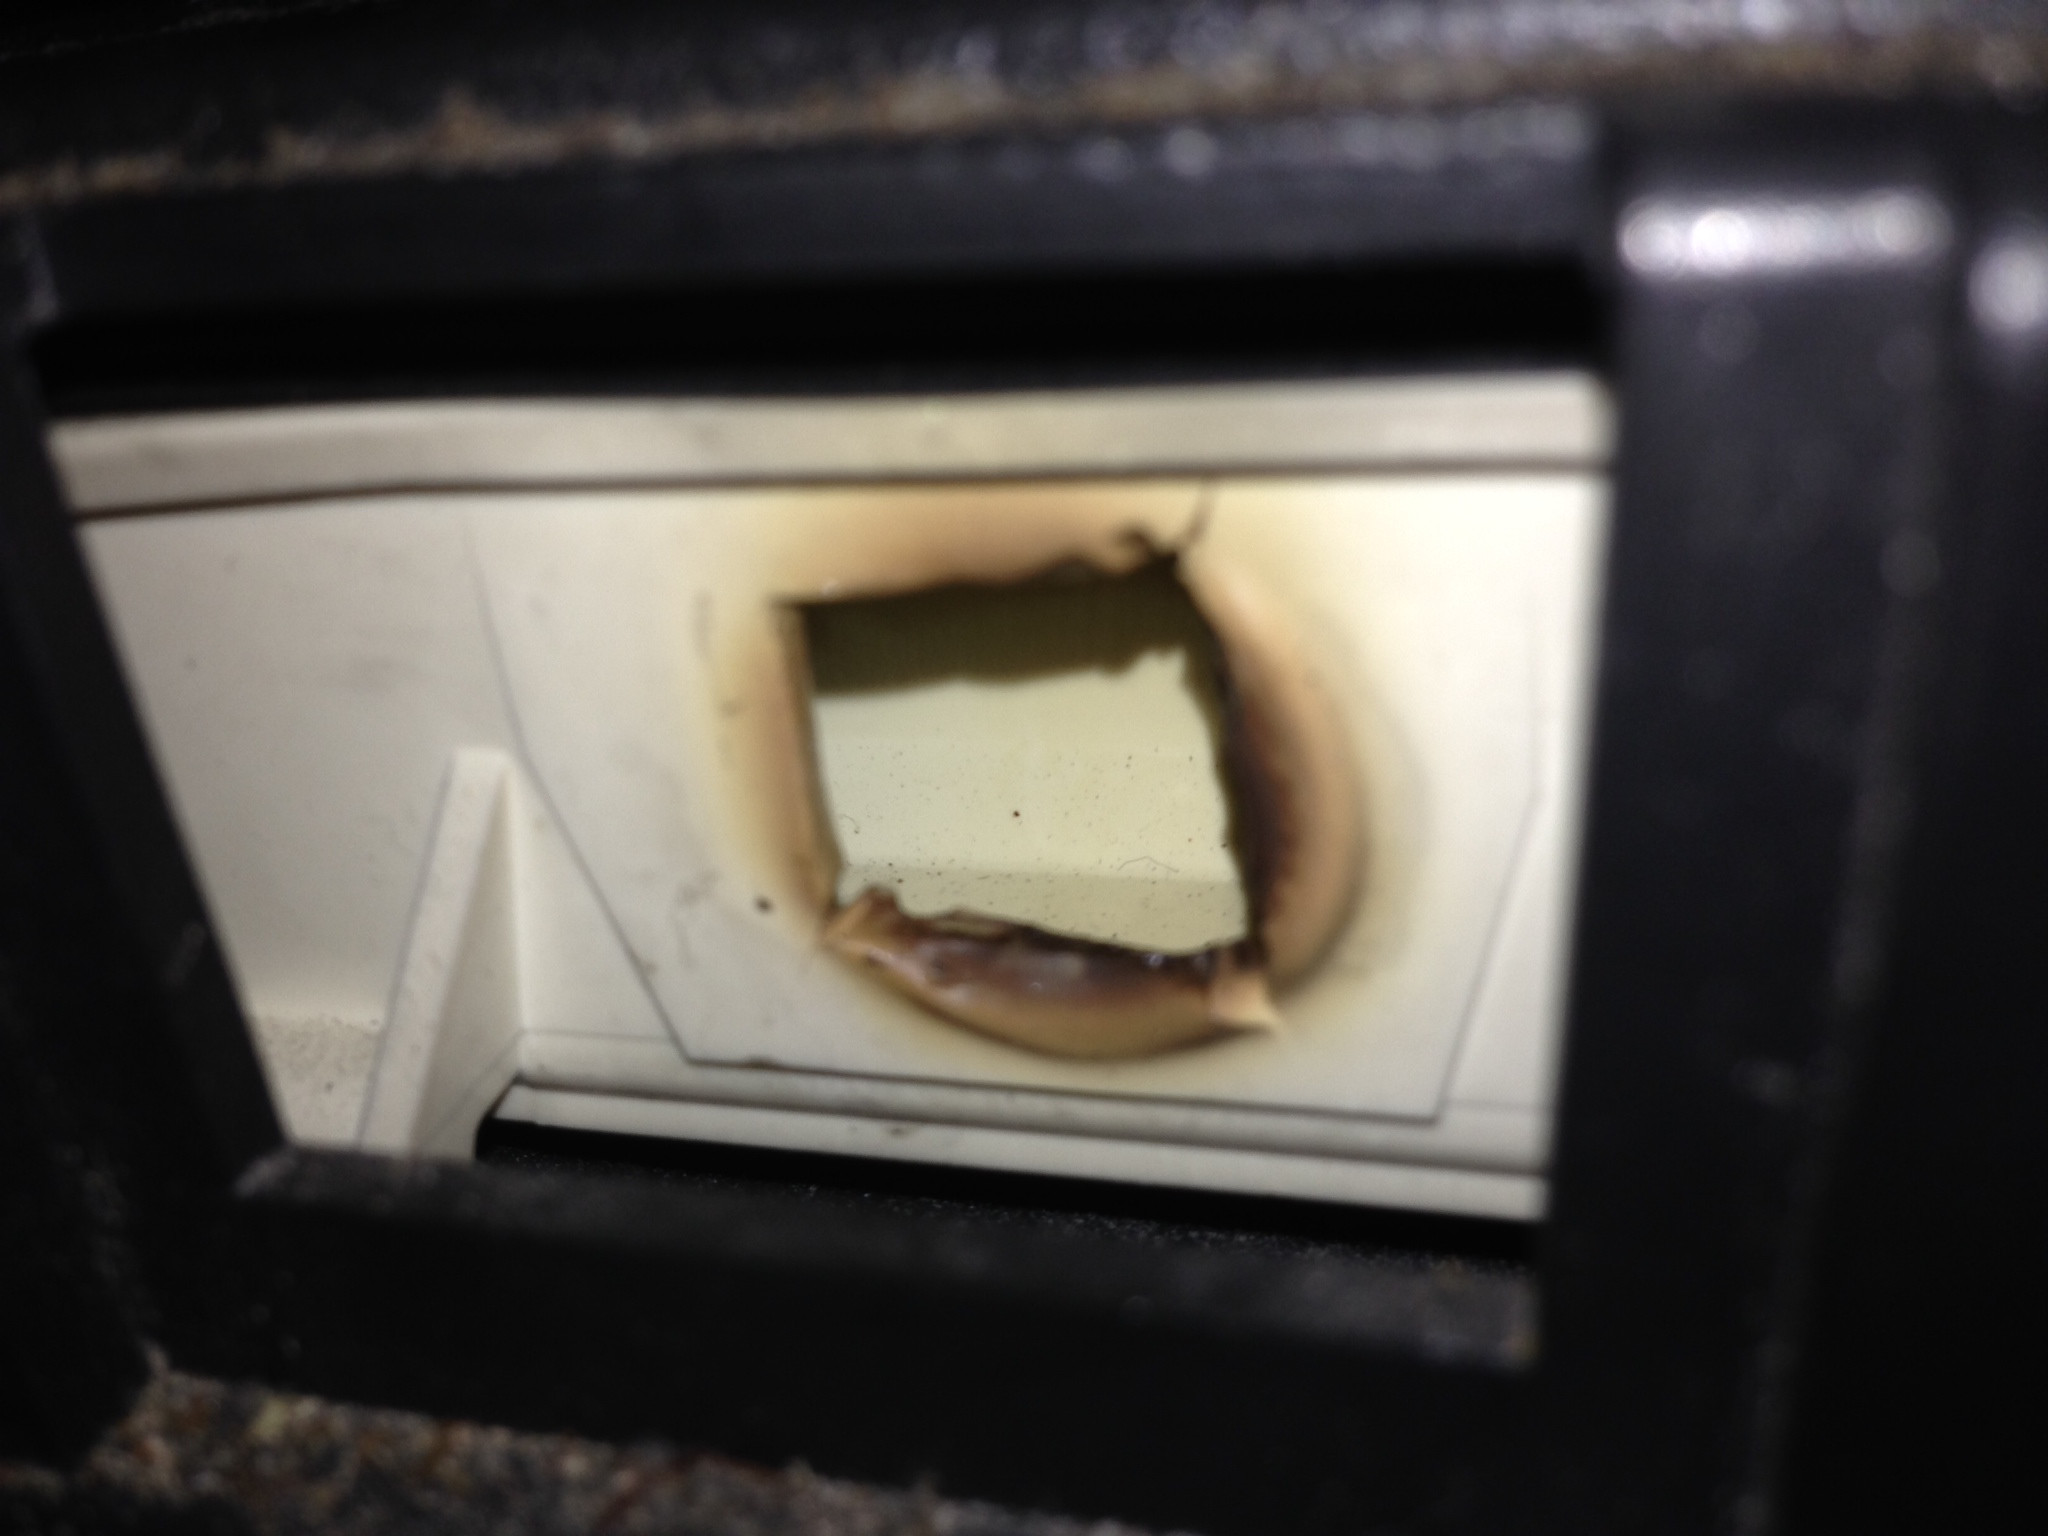
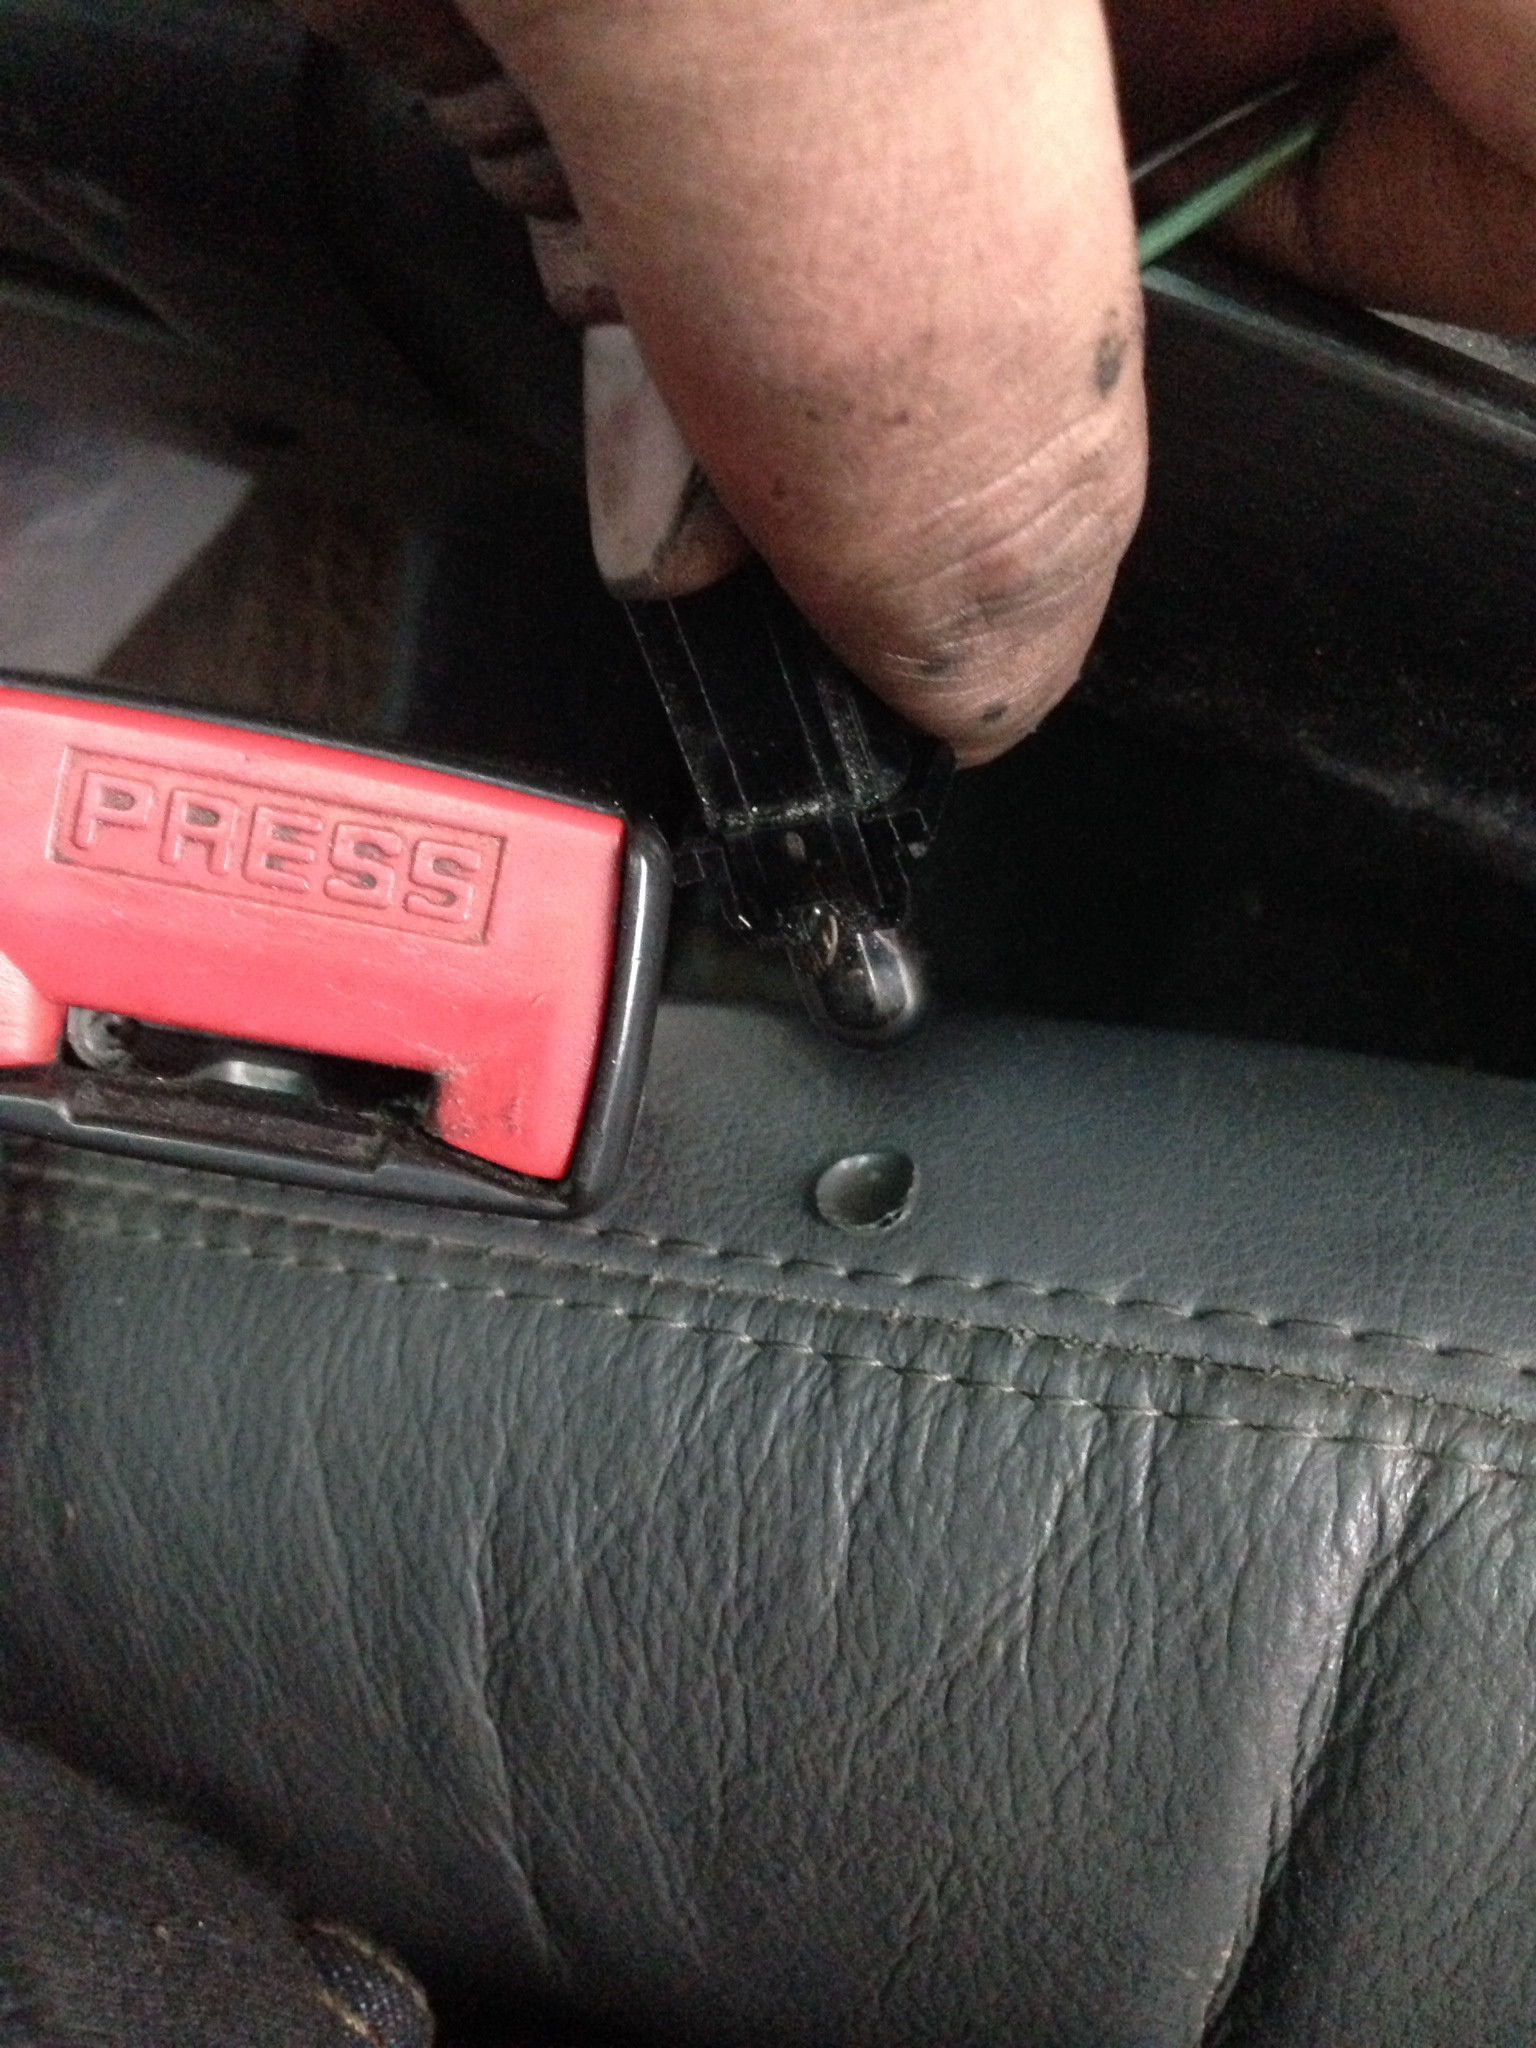
BONUS: we've all heard that the gear selector bulbs generate a little bit too much heat. behold, the reason my gear selector says I'm one half in neutral and one half in reverse. ALSO pay attention when you have the centre console out or one of those bulbs may melt a neat little hole in your seat.
The linkages themselves are still a bit tight, so I'll hit them with some penetrating oil every day for the next couple days and see if I can't loosen it up some.
replaced the diff-lock bulb, which now illuminates. checked all the other bulbs while I was in there. got extra bulbs for the next owner
cleaned all the switches on the instrument panel and replaced one with a broken bulb with one I picked up. all nice and functional in the driver's seat now.
did a little diagnosing of the cruise control. all vacuum lines are good. I only did this in park with the switch on, so I'm not sure whether it should have created one, but there was no vacuum from the pump. I've tried to get it to work a bunch on the highway to no avail. I think its either gotta be the actuator or the pump. I haven't checked this against RAVE, but I suppose a broken brake switch (to purge the vacuum) could prevent the whole system from working as a failsafe. Unfortunately, I've lost patience with the cruise control, so I'll give all the information I got to the next owner and let them decide if they want to fix it. Plus the donor I've been using doesn't have cruise control. It did have a TPS and brake inhibitor switch which I snagged just in case. Someone had already beat me to the IACV, MAF and radiator, along with the little plastic gears for the cup holder.
removed the front spoiler and found a little secret behind the plastic license plate holder. was planning on pulling the bumper and painting it, to pretty it up, but don't think paint could make that dent look pretty.
I've added a couple more things to the list. steering still catches on very sharp right turns. I was able to take my hand off the wheel as the wheel somehow held itself in position for a 180* turn. I want to think its a bad TRE somewhere in the steering system. Is there a way to check this without separating the joints? Any other likely culprits? Steering shaft? the box itself? bad upper or lower swivel pin bearings?
New issue number two: After going over a bump, the truck levels itself, but after that, theres a small clunk in the rear. feels like it might be the a-frame lagging behind the rest of the suspension. Think I'll switch out that ball joint and all the rear bushings. Noel's letting me use his shop if I need it. In people's experience, will I need a press if I go with poly bushes? Will I need to replace the bushes on the shock at the same time or can I leave those be? I know that I will for sure need a press to get out that ball joint.
BONUS: we've all heard that the gear selector bulbs generate a little bit too much heat. behold, the reason my gear selector says I'm one half in neutral and one half in reverse. ALSO pay attention when you have the centre console out or one of those bulbs may melt a neat little hole in your seat.
#15
10-16-2014, 01:20 AM
PS I want to clean my IACV. what's the sealing washer made of? Mine seems to be disintegrating rather well.
Also, any tips on changing the coolant? should I just follow RAVE? The coolant is clean and the temp gauge hasn't gotten close to 9 o'clock. It seems to be running fine in that regard. I'm one of those "don't fix it unless it's broken" kind of types and I'm psyching myself out of changing the coolant and t-stat. worried I'll muck it up somehow and make a problem where there is none.
Also, any tips on changing the coolant? should I just follow RAVE? The coolant is clean and the temp gauge hasn't gotten close to 9 o'clock. It seems to be running fine in that regard. I'm one of those "don't fix it unless it's broken" kind of types and I'm psyching myself out of changing the coolant and t-stat. worried I'll muck it up somehow and make a problem where there is none.
#16
10-16-2014, 05:23 AM

The steering can be any or all of what you listed. Best to just get the wheels off the ground and either have someone turn the steering wheel while you watch or hands at 9 and 3 and move the wheels through their full lock to lock motion. I get the impression something is binding, over extending. Holding the wheel at 12 and 6 will tell how bad the swivel pins are. Should not feel or hear a thing, rock solid. Any grinding or popping while wheels up are not cool. Wheel bearings, hubs, CV's, gearbox drop arm nut being loose, gearbox mounting bolts loose (common), alignment (easy), track rod bushes (common). One thing to look at is the position of the drop arm, should be pointing dead nuts straight forward. If that is off to one side or the other it can be why the steering isn't self centering......
IACV gasket can be made of notebook cover stock, wax both sides (candle wax) and it won't stick when you remove your homemade to install the real one......
I wouldn't mess with the coolant right now, seems good the way it is. Once warmer weather comes just keep an eye on the gauge or use your bt app. The big deal with the cooling system is the viscous clutch. Need to feel some cold resistance when hand spun. If it rotates freely like a pin wheel by hand it's useless. Keep that in mind when it gets warmer......
#17
10-20-2014, 04:19 AM
thanks for the help scouts, gonna leave the coolant alone.
pulled a 12 hour marathon on the body work yesterday. started around 2pm, finished up around 2am in the dark. lots of handing sanding with a small block.
pulled the alpine window, repaired the rust. it was just some small pitting, but seemed prudent to neutralize it at such an early stage. prettied up the repairs I had already done. sanded that whole side of the roof line and filled in some imperfections. hit the bare metal with some etch primer, then two coats of filler primer on top of that. then I started working with some blade putty to fix the smaller imperfections to smooth it out. it was dark at this point and the putty was drying very slowly. was only able to use each piece of wet 320 grit at most three times before it needed to be cleaned. I finally got fed up and tired. hit the whole thing with two more thin coats of filler primer. it was forecast to storm today (it did) so I needed to get that window back in. That alone took a little over an hour. what a pain in the A$$. also pretty sure I put the strip in upside down. can't wait to take it out and put it right side up /s.
It's looking much better, but I'm still gonna need one more session. was originally gonna just leave it at priming and let the next owner decide if they want to respray. Im out of the country in december. can't justify getting it painted professionally. but I might see if I can find a nice can of paint that matches the epsom green.
sorry, no pictures

Thread
Thread Starter
Forum
Replies
Last Post
Linoge
Retired - Private For Sale/Trade Classifieds
14
10-07-2014 12:08 PM
Corrigan
Retired - Private For Sale/Trade Classifieds
0
04-26-2013 02:38 PM
Chuck R
Retired - Private For Sale/Trade Classifieds
0
03-29-2008 09:48 PM
rchrds
Retired - Private For Sale/Trade Classifieds
0
08-04-2005 01:45 AM