Homemade D2 Dual Battery Box


#12
 05-21-2015, 09:17 PM

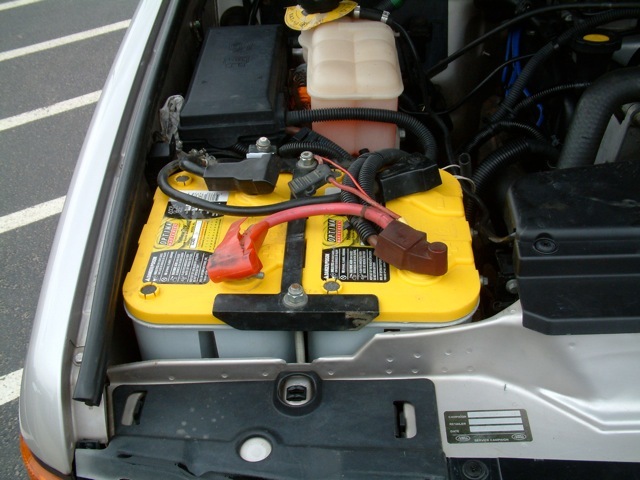
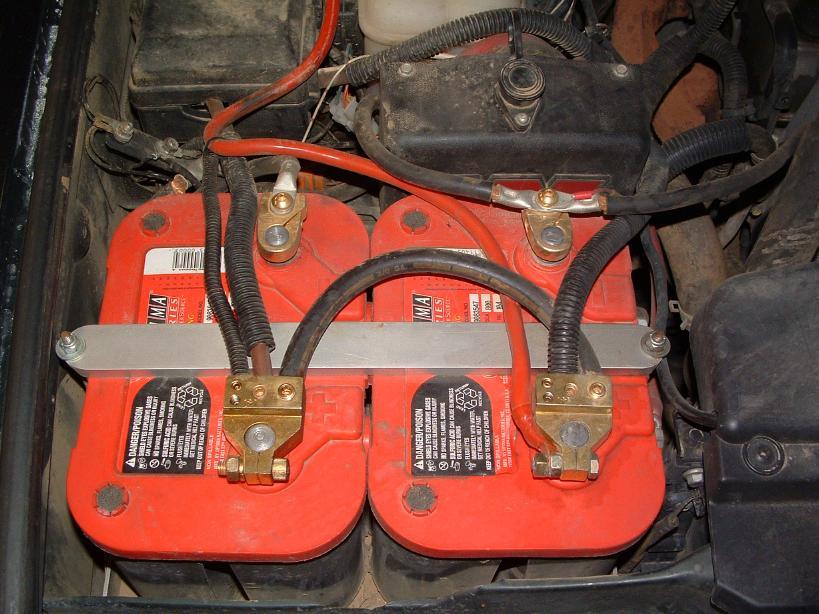
Here is a link showing DiscoMike's dual batteries installed in his D2 to show you how the batteries will be installed side by side with long side front to back. This link on this forum also shows a possible battery hold down solution or the other option is a hold down left to right like the other picture I found of an install posted below.
https://landroverforums.com/forum/mo...-system-39938/
https://landroverforums.com/forum/mo...-system-39938/


Last edited by Rover_Hokie; 05-25-2015 at 09:51 AM.

#14
05-22-2015, 10:40 PM
Proceed at your own risk! This is just me sharing what worked for me, no guarantees here. Again I used 24" x 24" .090" aluminum. I believe it was 6061 type aluminum, but not sure, not that big a deal here, but .090" allows the sheet to be something I had a prayer at bending with hand tools.
Bracket for the front mount is 5.5" long x 1.5" wide. 90 degree bend at 2.5". That 2.5" portion is the horizontal part that goes under front center top of the battery tray base, extending .5" forward of the battery tray once the lip bend is complete up front, leaving 2" under the tray. That leaves 3" down the bracket. Drill hole near the bottom of the 3" portion to line-up with factory battery tray front mount point and use factory bolt here. Sorry, but my bracket is in and not sure exactly the exact distance down to the bolt location, but I think it was about .5" center of the mount hole up from the bottom end, but check for sure. There has to be some challenges for you in this, there were plenty for me.
Top left rear mounting point will require 4 washers or equivalent spacer between the vertical side bracket and the body mount point inside the fender wall, and require a longer bolt than the factory bolt and using the factory mount point. Use the factory bolt to assist you in obtaining the correct bolt size and thread size needed, and then go 1" longer in length. I used a washer under the bolt head as well. Drill mounting hole to align with factory mount point for this bracket as well.
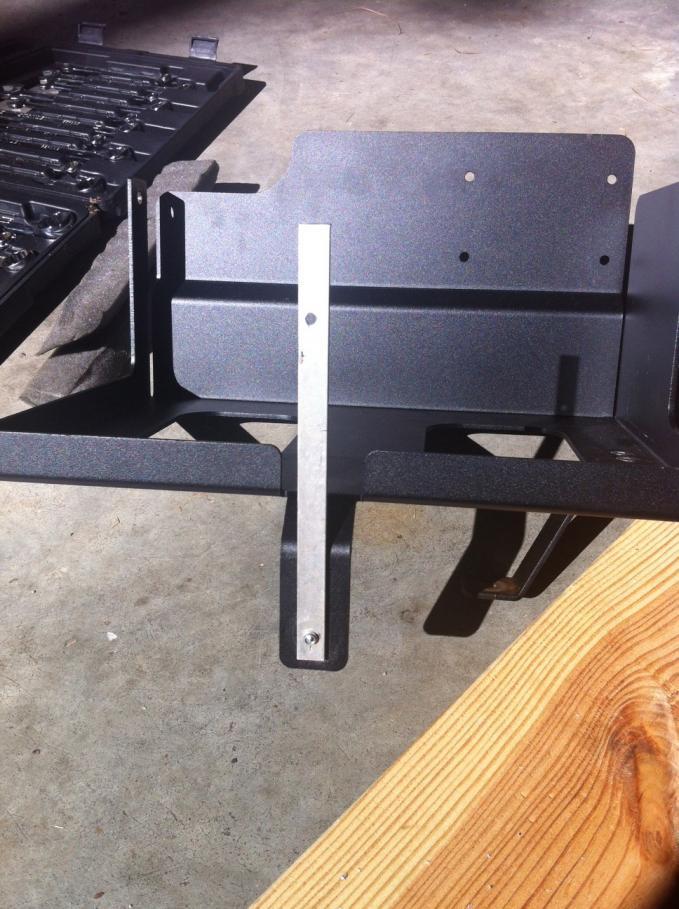
The bottom right rear bracket is the fun one. I cannot give much advice except drill a large hole over the factory mount point on the right rear bottom area of the battery tray. I believe I used a 2" hole saw. Then fiddle with the length and the angle to get your bracket in there. I used some 1"x1" aluminum angle to make the bracket. The exact location where you contact the bottom of the tray is not all that critical, so get the hole lined up on the bottom at the body for the factory mount point and bolt, and then play with the length and the angle towards the engine edge of the bottom of the tray to provide support for that corner of the dual battery tray. Here is a link from another thread on this forum of the Columbia Overland bottom bracket for your review to give you an idea of what you should be trying to accomplish for this bottom bracket. Ignore the long bracket up the front in this picture, this is a mod to allow the Columbia Overland tray to mount in the '03-'04 as the bottom mount point area has some interference issues with the face-lift lights.
The right rear bracket is the one you want to look at in the picture below. They used flat aluminum for the bracket, where I just used 90 degree angle aluminum for mine that I had on hand and seemed to provide more support with the angle and not just flat aluminum stock.
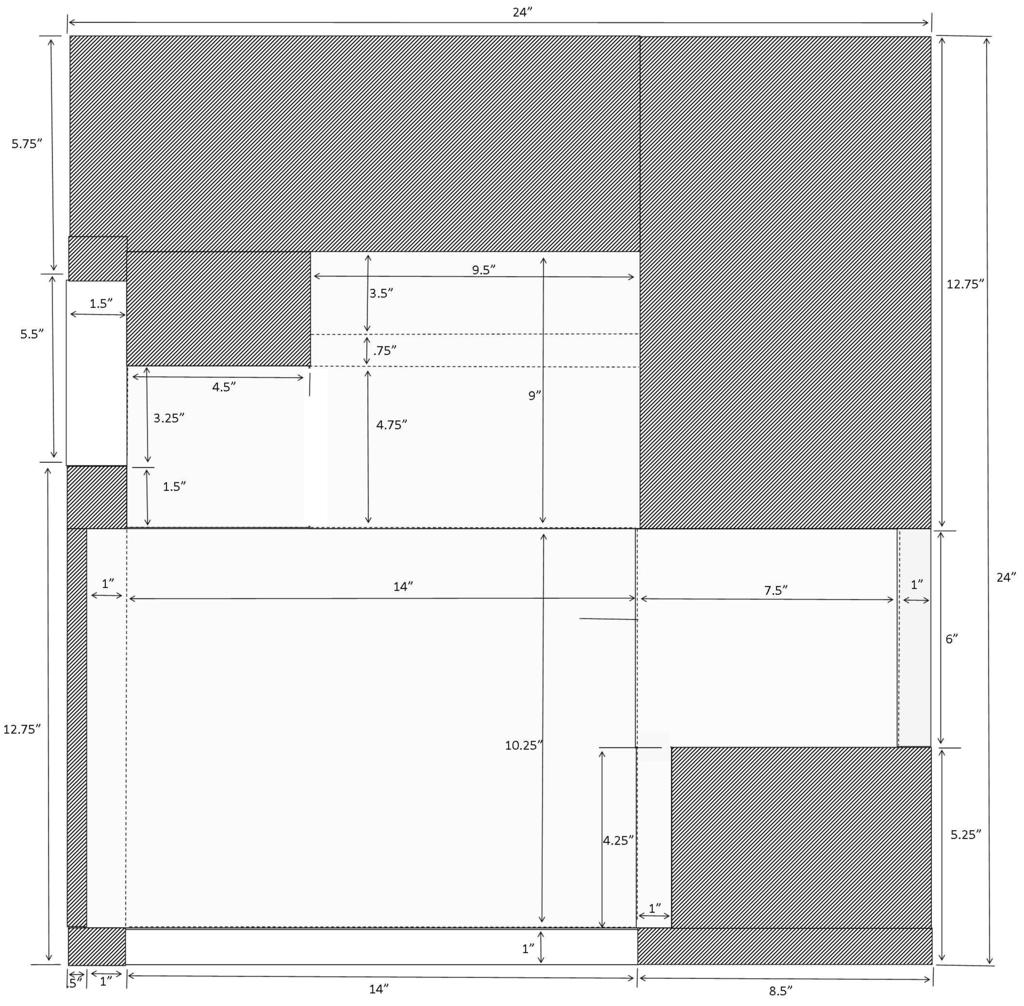
Note that this is more of a good sketch than an exact diagram below. The most important measurement to test fit is the battery tray front to back with your battery before you bend both the front and back at the bottom. I recommend bending the front, and then place your battery with long side front to back to make sure the base fits before you bend the back. These bends do take up about 1/8" of the sheet, but not that big a deal on the edges of the box or the side panels either. Some lines do not appear exact and the lines/boxes are not proportional, but the measurements are correct!
Pizza box is your friend if you want put together a model, which I recommend, so you can make some personal mods, and may be helpful in designing that bottom mounting bracket. The patterned line fill-in area is the portion of the 24"'x 24"' aluminum to cut away. NOTE that you need to use some of that cut-away to make the front bracket, so do not hack it up I used pop rivets to attach the front and bottom brackets to the battery tray.
Bracket for the front mount is 5.5" long x 1.5" wide. 90 degree bend at 2.5". That 2.5" portion is the horizontal part that goes under front center top of the battery tray base, extending .5" forward of the battery tray once the lip bend is complete up front, leaving 2" under the tray. That leaves 3" down the bracket. Drill hole near the bottom of the 3" portion to line-up with factory battery tray front mount point and use factory bolt here. Sorry, but my bracket is in and not sure exactly the exact distance down to the bolt location, but I think it was about .5" center of the mount hole up from the bottom end, but check for sure. There has to be some challenges for you in this, there were plenty for me.
Top left rear mounting point will require 4 washers or equivalent spacer between the vertical side bracket and the body mount point inside the fender wall, and require a longer bolt than the factory bolt and using the factory mount point. Use the factory bolt to assist you in obtaining the correct bolt size and thread size needed, and then go 1" longer in length. I used a washer under the bolt head as well. Drill mounting hole to align with factory mount point for this bracket as well.
The bottom right rear bracket is the fun one. I cannot give much advice except drill a large hole over the factory mount point on the right rear bottom area of the battery tray. I believe I used a 2" hole saw. Then fiddle with the length and the angle to get your bracket in there. I used some 1"x1" aluminum angle to make the bracket. The exact location where you contact the bottom of the tray is not all that critical, so get the hole lined up on the bottom at the body for the factory mount point and bolt, and then play with the length and the angle towards the engine edge of the bottom of the tray to provide support for that corner of the dual battery tray. Here is a link from another thread on this forum of the Columbia Overland bottom bracket for your review to give you an idea of what you should be trying to accomplish for this bottom bracket. Ignore the long bracket up the front in this picture, this is a mod to allow the Columbia Overland tray to mount in the '03-'04 as the bottom mount point area has some interference issues with the face-lift lights.
The right rear bracket is the one you want to look at in the picture below. They used flat aluminum for the bracket, where I just used 90 degree angle aluminum for mine that I had on hand and seemed to provide more support with the angle and not just flat aluminum stock.
Note that this is more of a good sketch than an exact diagram below. The most important measurement to test fit is the battery tray front to back with your battery before you bend both the front and back at the bottom. I recommend bending the front, and then place your battery with long side front to back to make sure the base fits before you bend the back. These bends do take up about 1/8" of the sheet, but not that big a deal on the edges of the box or the side panels either. Some lines do not appear exact and the lines/boxes are not proportional, but the measurements are correct!
Pizza box is your friend if you want put together a model, which I recommend, so you can make some personal mods, and may be helpful in designing that bottom mounting bracket. The patterned line fill-in area is the portion of the 24"'x 24"' aluminum to cut away. NOTE that you need to use some of that cut-away to make the front bracket, so do not hack it up
I used pop rivets to attach the front and bottom brackets to the battery tray.
Last edited by Rover_Hokie; 08-12-2015 at 07:21 PM.
#15
05-23-2015, 01:21 PM
The bottom left measurement is .5", the decimal is kind of hard to see.
I am using these military style battery clamps for my install.
http://www.ebay.com/itm/331537297111...%3AMEBIDX%3AIT
I am using these military style battery clamps for my install.
http://www.ebay.com/itm/331537297111...%3AMEBIDX%3AIT
Last edited by Rover_Hokie; 05-25-2015 at 09:55 AM.

#17
01-12-2017, 11:49 PM
Hokie:
I love it! Can you just post the dimensions for all of us? I need to make one!!! Two questions; I have a Td5, not sure what you have, but where exactly under the hood did you mount this? Second, what did you use to secure the battery? I drive ROUGH trails, this battery would bounce around pretty badly. Did you make a hold down bracket too?
Thanks for sharing!

Thread
Thread Starter
Forum
Replies
Last Post