How-to: Window Regulator / Window Motor Repair
#1
 09-20-2010, 10:20 PM


Window Regulator / Window Motor Repair
I had the “lucky” fortune to fix the motor in my driver’s side window and then have the regulator break on my passenger’s side window. Since it was my second go, I decided to document the repair. Hopefully this write-up will help others to tackle the job themselves. It’s pretty easy, but slow and requires patience. There’s no need to pay the Land Rover dealer to fix the windows.
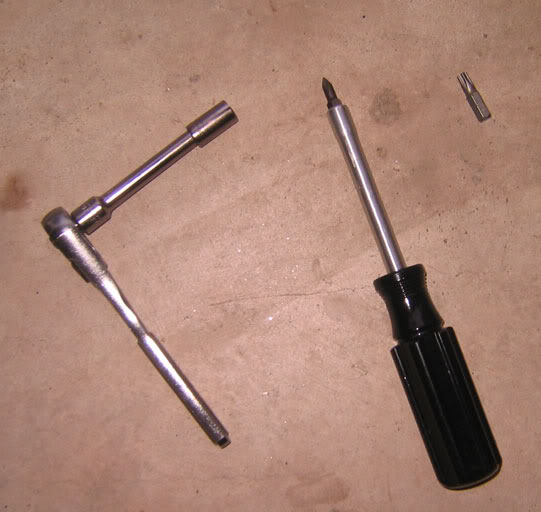
Tools Needed
5/16” ratchet (1/4” drive) or similar
Philips head screwdriver (magnetic head is nice)
Torx bit attachment for ratchet (T-30)
Also helpful:
Painters tape (for holding up window)
Duct tape or similar for repairing torn plastic sheeting
Panel removal tool
Nitrile gloves (the door adhesive is kind-of goopy)
Patience
Parts Needed (Mail order, eBay or Land Rover dealer)
Broken motor: if you can hear a clicking sound when you depress the window switch but the window doesn't budge there's a good chance your motor is broken. There are two connectors in the OEM motor: a door harness connector and a harness-to-motor connector. The latter was much easier for me to reach. Be warned, though, that the Proline motors don’t have this connector (they are hardwired). So, unless you’re comfortable getting to the door harness connector (which I wasn't) you might want to buy the OEM (Land Rover) motor.
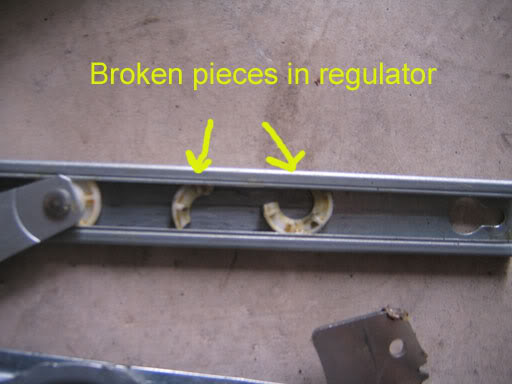
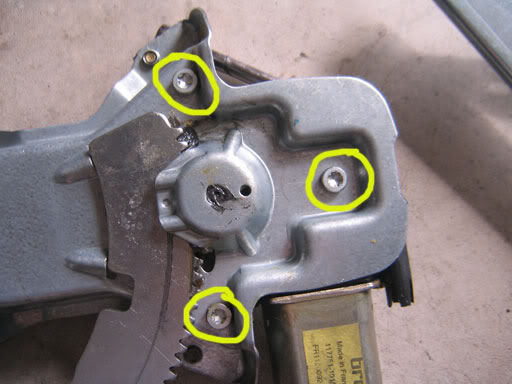
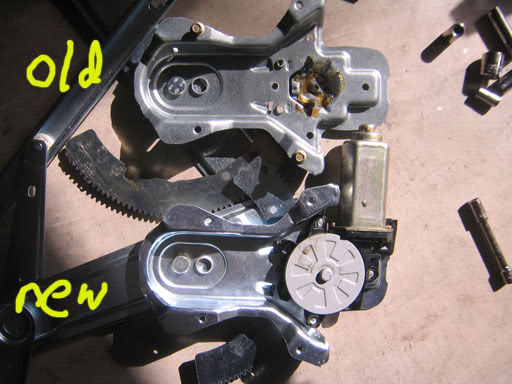
Window regulator: if you hear your motor moving but the window movement is jerky, doesn't move all the way, or makes a cracking sound you probably need a new regulator. There's a left-hand and right-hand version, so make sure you order the correct one. I used the less expensive Proline regulator, and so far it appears to work fine. This photo shows the part that commonly breaks in the regulator.
Both parts are readily available at Rovers North and Atlantic British.
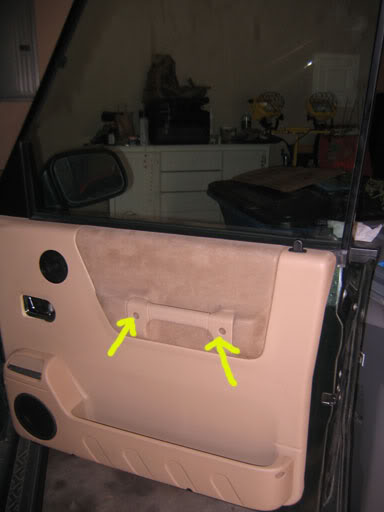
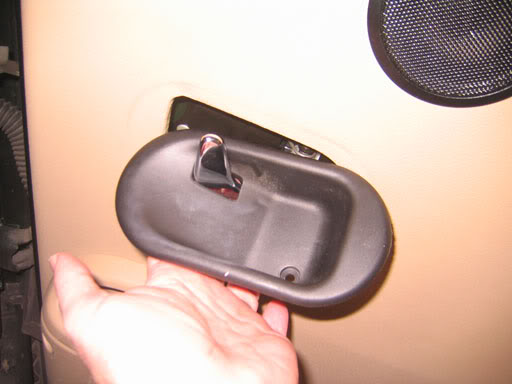
Remove the two Philips head screws in the door handle
Step #2
Remove the four Philips head screws from the bottom of door map pocket
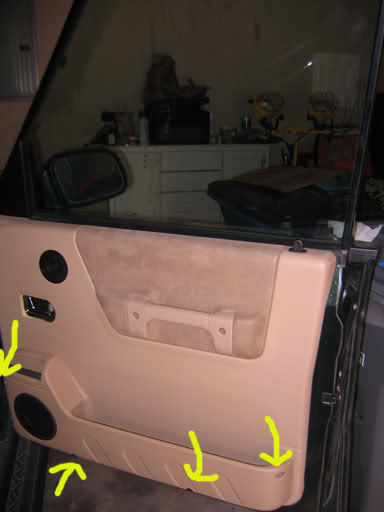
Step #3
Remove one Philip head screw from behind escutcheon (pull back the door handle to get to it). Keeping the door handle pulled back, twist out the escutcheon and remove it
Step #4
Using panel removal tool, putty knife or brute force (at your own risk) carefully pry off the panel from the door. In general, you can use more force than you think you should be able to (don’t be afraid of breaking it). Note Step #5, as you’ll have to do both in succession.
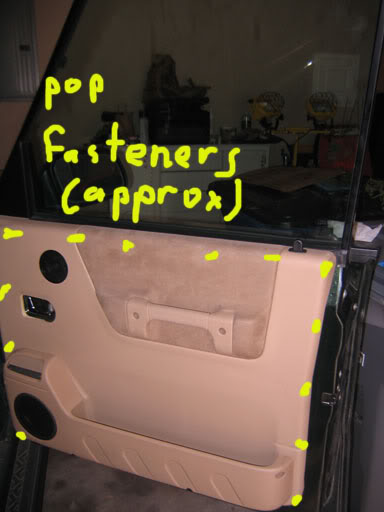
Step #5
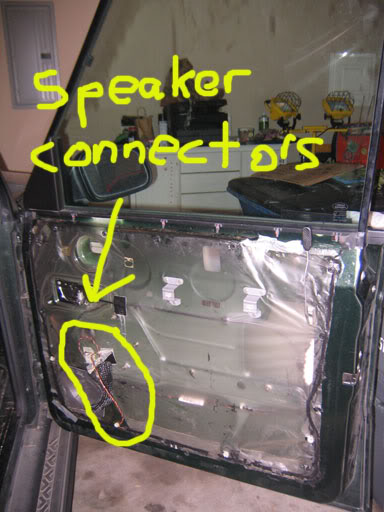
Carefully unclip the woofer and (if available) tweeter plug so that you can fully remove the door panel.
Step #6
Carefully peel back the plastic sheeting from the bottom of the door (see photo). I tore it from around the round fasteners – maybe there’s a better way, I don’t know… You only need to be able to get to the bottom section of the door. Once it’s cleared, you might want to use some painters tape to hold it out of the way.

Step #7
Using the ratchet with 5/16” head, remove the 4 bolts shown in the pictures
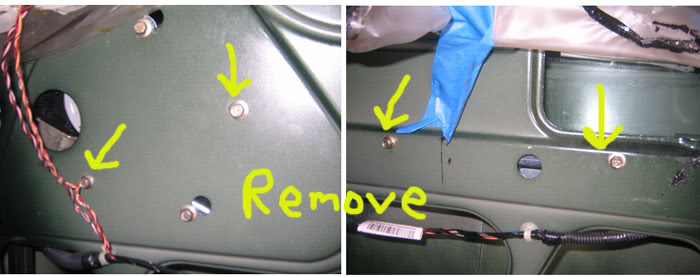
Step #8
Again using the ratchet, loosen the 2 bolts shown in the picture (loosen about 80% of the way)
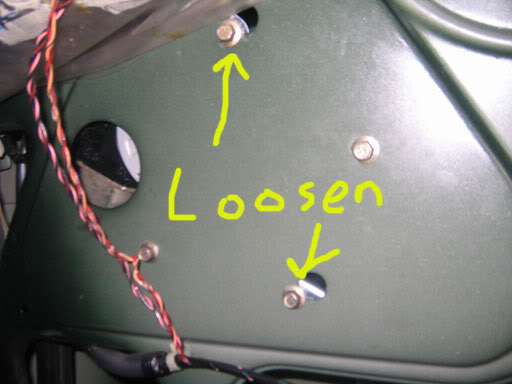
Step #9
You may want to tape the window in a middle position to make things easier. Slide the two remaining regulator bolts over and out of the retaining holes. The regulator will be hanging freely off the window at this point.
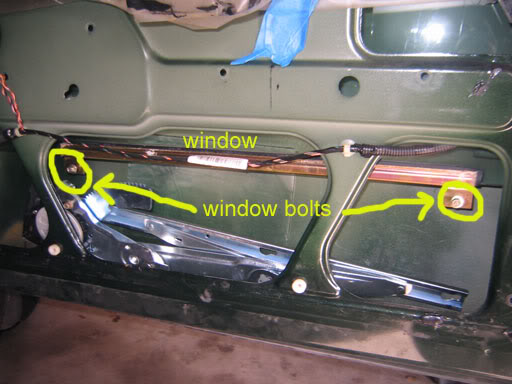
Step #10
Remove the tape and carefully let the window slide down toward the bottom of the door until you can see the two window bolts holding the regulator to the window. Carefully loosen these two bolts (again with 5/16” ratchet).
Step #11
You might want to lift the window 2-3” and again tape it in place. Carefully slide the regulator window track to the right to remove the assembly from the window bolts.
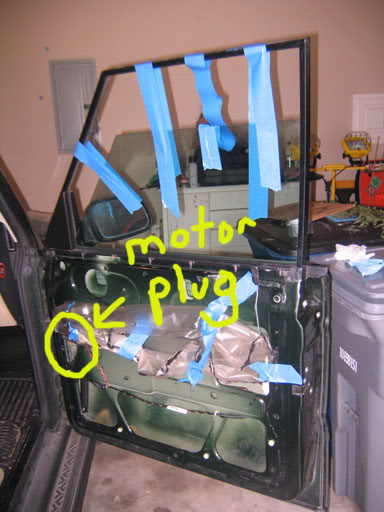
Step #12
Remove the plug from the window motor to release it from the wiring harness. I’ve marked on the photo where the plug is located. You can now carefully collapse the regulator assembly and carefully remove it from the bottom hole in the door.
Step #13
Depending upon whether you are replacing the regulator or the motor, use a torx bit to remove the 3 torx screws from the existing motor.
Step #14
Swap the motor/regulator (whichever is broken) to the new motor (or new regulator) reusing the existing torx screws.
Step #15
Work backwards starting with Step #14 above steps to reinstall everything. You might want to use duct tape or a similar sealant to repair tears in the plastic sheeting if you made a mess of the removal.
Step #16
Test out your newly repaired window. Take pride in a job well done. Drive around the block with the windows down and smile.
I had the “lucky” fortune to fix the motor in my driver’s side window and then have the regulator break on my passenger’s side window. Since it was my second go, I decided to document the repair. Hopefully this write-up will help others to tackle the job themselves. It’s pretty easy, but slow and requires patience. There’s no need to pay the Land Rover dealer to fix the windows.
Tools Needed
5/16” ratchet (1/4” drive) or similar
Philips head screwdriver (magnetic head is nice)
Torx bit attachment for ratchet (T-30)
Also helpful:
Painters tape (for holding up window)
Duct tape or similar for repairing torn plastic sheeting
Panel removal tool
Nitrile gloves (the door adhesive is kind-of goopy)
Patience
Parts Needed (Mail order, eBay or Land Rover dealer)
Broken motor: if you can hear a clicking sound when you depress the window switch but the window doesn't budge there's a good chance your motor is broken. There are two connectors in the OEM motor: a door harness connector and a harness-to-motor connector. The latter was much easier for me to reach. Be warned, though, that the Proline motors don’t have this connector (they are hardwired). So, unless you’re comfortable getting to the door harness connector (which I wasn't) you might want to buy the OEM (Land Rover) motor.
Window regulator: if you hear your motor moving but the window movement is jerky, doesn't move all the way, or makes a cracking sound you probably need a new regulator. There's a left-hand and right-hand version, so make sure you order the correct one. I used the less expensive Proline regulator, and so far it appears to work fine. This photo shows the part that commonly breaks in the regulator.
Both parts are readily available at Rovers North and Atlantic British.
--------------------------------------
These are my experiences – use at your own risk!!! If you’re not comfortable with this then pay someone to do it!!!
--------------------------------------
Step #1Remove the two Philips head screws in the door handle
Step #2
Remove the four Philips head screws from the bottom of door map pocket
Step #3
Remove one Philip head screw from behind escutcheon (pull back the door handle to get to it). Keeping the door handle pulled back, twist out the escutcheon and remove it
Step #4
Using panel removal tool, putty knife or brute force (at your own risk) carefully pry off the panel from the door. In general, you can use more force than you think you should be able to (don’t be afraid of breaking it). Note Step #5, as you’ll have to do both in succession.
Step #5
Carefully unclip the woofer and (if available) tweeter plug so that you can fully remove the door panel.
Step #6
Carefully peel back the plastic sheeting from the bottom of the door (see photo). I tore it from around the round fasteners – maybe there’s a better way, I don’t know… You only need to be able to get to the bottom section of the door. Once it’s cleared, you might want to use some painters tape to hold it out of the way.
Step #7
Using the ratchet with 5/16” head, remove the 4 bolts shown in the pictures
Step #8
Again using the ratchet, loosen the 2 bolts shown in the picture (loosen about 80% of the way)
Step #9
You may want to tape the window in a middle position to make things easier. Slide the two remaining regulator bolts over and out of the retaining holes. The regulator will be hanging freely off the window at this point.
Step #10
Remove the tape and carefully let the window slide down toward the bottom of the door until you can see the two window bolts holding the regulator to the window. Carefully loosen these two bolts (again with 5/16” ratchet).
Step #11
You might want to lift the window 2-3” and again tape it in place. Carefully slide the regulator window track to the right to remove the assembly from the window bolts.
Step #12
Remove the plug from the window motor to release it from the wiring harness. I’ve marked on the photo where the plug is located. You can now carefully collapse the regulator assembly and carefully remove it from the bottom hole in the door.
Step #13
Depending upon whether you are replacing the regulator or the motor, use a torx bit to remove the 3 torx screws from the existing motor.
Step #14
Swap the motor/regulator (whichever is broken) to the new motor (or new regulator) reusing the existing torx screws.
Step #15
Work backwards starting with Step #14 above steps to reinstall everything. You might want to use duct tape or a similar sealant to repair tears in the plastic sheeting if you made a mess of the removal.
Step #16
Test out your newly repaired window. Take pride in a job well done. Drive around the block with the windows down and smile.
Last edited by RedAustinIX; 09-21-2010 at 07:47 AM.
The following 2 users liked this post by RedAustinIX:
CheeeseSteak (05-19-2015),
TimInNova (04-04-2024)


#4
09-29-2010, 07:40 PM

Thanks much this was a great help!
A few more tips:
1. Perform Step 10 before Steps 7-9. As posted on another thread: "Lower window to align bolts with access holes so regulator can be disconnected from window. Loosen 2 bolts, move slide slightly to disconnect glass from regulator. Raise glass to top of frame and secure in place with duct tape over the top of frame." Same for re-assembly: re-mount the regulator/motor assembly before attaching the window.
2. Look at the picture in Step 8. The motor wire connector is right there inside the round hole!! Flip up the connector tab on top of the connector with a screw driver and the connector slides out to the left. Note: for re-assembly it seemed easier to put the connector on before remounting the regulator/motor assembly.
______________
2002 Discovery SE Westminster 92K
#5
10-06-2010, 03:58 PM

#6
10-06-2010, 08:18 PM

Thanks much this was a great help!
A few more tips:
1. Perform Step 10 before Steps 7-9. As posted on another thread: "Lower window to align bolts with access holes so regulator can be disconnected from window. Loosen 2 bolts, move slide slightly to disconnect glass from regulator. Raise glass to top of frame and secure in place with duct tape over the top of frame." Same for re-assembly: re-mount the regulator/motor assembly before attaching the window.
2. Look at the picture in Step 8. The motor wire connector is right there inside the round hole!! Flip up the connector tab on top of the connector with a screw driver and the connector slides out to the left. Note: for re-assembly it seemed easier to put the connector on before remounting the regulator/motor assembly.
______________
2002 Discovery SE Westminster 92K
A few more tips:
1. Perform Step 10 before Steps 7-9. As posted on another thread: "Lower window to align bolts with access holes so regulator can be disconnected from window. Loosen 2 bolts, move slide slightly to disconnect glass from regulator. Raise glass to top of frame and secure in place with duct tape over the top of frame." Same for re-assembly: re-mount the regulator/motor assembly before attaching the window.
2. Look at the picture in Step 8. The motor wire connector is right there inside the round hole!! Flip up the connector tab on top of the connector with a screw driver and the connector slides out to the left. Note: for re-assembly it seemed easier to put the connector on before remounting the regulator/motor assembly.
______________
2002 Discovery SE Westminster 92K
Can I just grease the hell out of it and leave it as it is (with out the plastic roller)? Or will it cause problems in the future?
#7
10-07-2010, 08:01 AM
That's what mine was doing too. Motor was running fine in both directions (took it out and hot wired to battery). Regulator looked fine. I replaced the motor assembly and it worked; so I conclude it was the round gear housing (comes with the motor) that sits on top of the motor.
Last edited by CoRova; 10-07-2010 at 08:10 AM.
#8
10-07-2010, 11:14 AM

Drifting
Join Date: Sep 2010
Location: Palm Beach County
Posts: 32
Likes: 0
Received 0 Likes
on
0 Posts
#9
10-07-2010, 11:46 AM
That's what mine was doing too. Motor was running fine in both directions (took it out and hot wired to battery). Regulator looked fine. I replaced the motor assembly and it worked; so I conclude it was the round gear housing (comes with the motor) that sits on top of the motor.

#10
10-07-2010, 01:21 PM
hey, i have an ignorant lazy question. As my driver front regulater plastic roller has broken (just the one: the left one if looking frm the inside of vehicle). The window still seals like it should and goes up and down smooth as it should with out the one plastic roller.
Can I just grease the hell out of it and leave it as it is (with out the plastic roller)? Or will it cause problems in the future?
Can I just grease the hell out of it and leave it as it is (with out the plastic roller)? Or will it cause problems in the future?
I think some people have been able to repair the plastic roller (there might be some threads on this forum), but I was lazy and just bought a new one.
My parting comments are: while what you suggested may work, do you really want to risk doing that and then risk being stuck with a window that won't close at some inopportune time (raining, snowing, etc)?
Hope this helps!
Ed (RedAustinIX)