Main/Crank Bearing replacement write up
#1
 03-14-2012, 05:25 PM


Hey.
Background: 2004 Discovery 110K. The customer brought me this car in December. It was clanging loudly at idle, had a massive coolant leak from the head gaskets, stumbled off idle, and had codes for everything in the world from missfires, knock sensor, purge valve, and oxy sensors to shuttle valves, wheel speed sensors................
The customer had poured 2 bottles of motor honey in 100 miles before he dropped it off.
I pulled the motor apart and found multiple flat lifters stuffed with that quag, the rocker shafts were also full of it. At 100 dollars a set, replacing the lifters while doing the valve job is a no-brainer. After reassembly the engine still made noise. Now it was more of a ting ting ting after fully warming up coolant temps in the 205 range. Oil pressure tests revealed 9 psi at hot idle running 5/30 in 30* ambient temps. The switch to a mongo mann filter and rotella 15/40 netted me an increase of 10 psi at idle hot. Now the engine noise was just a slight tick tick tick. I then fitted a stock 99-2002 oil cooler and hoses I had laying around just to see if that would make a difference, it didn't.
I finally scared the customer into letting me replace his oil pump and bearings after telling him the horror stories of shattered front covers and rods sticking out the side of the block.
This is what I found.
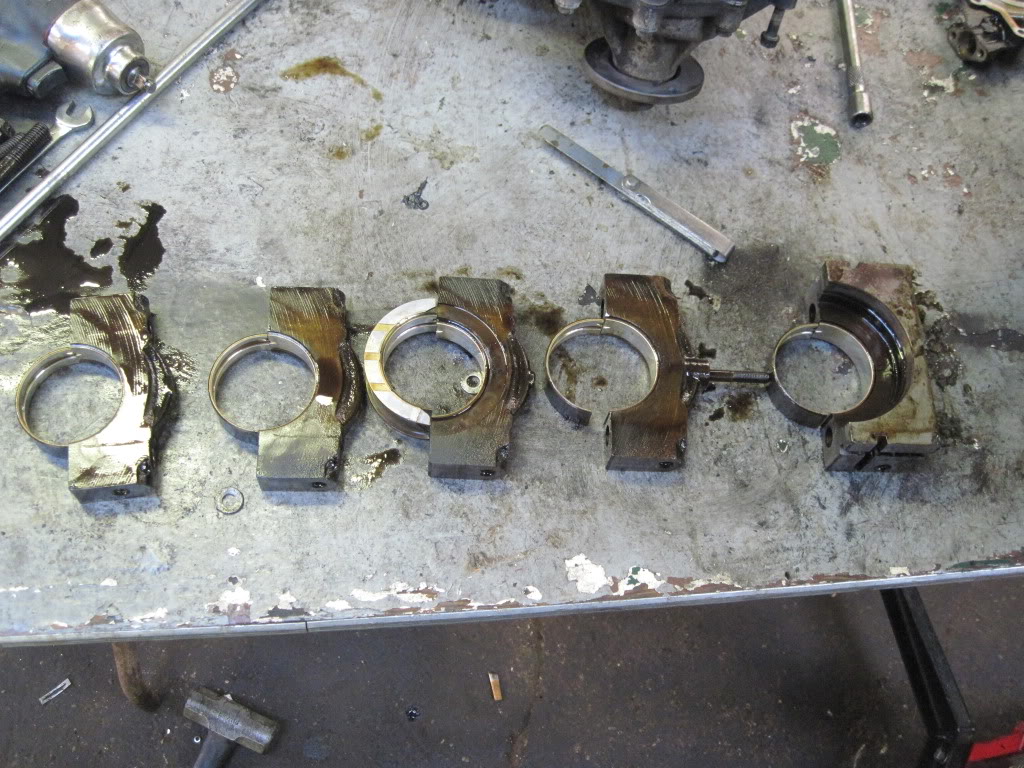
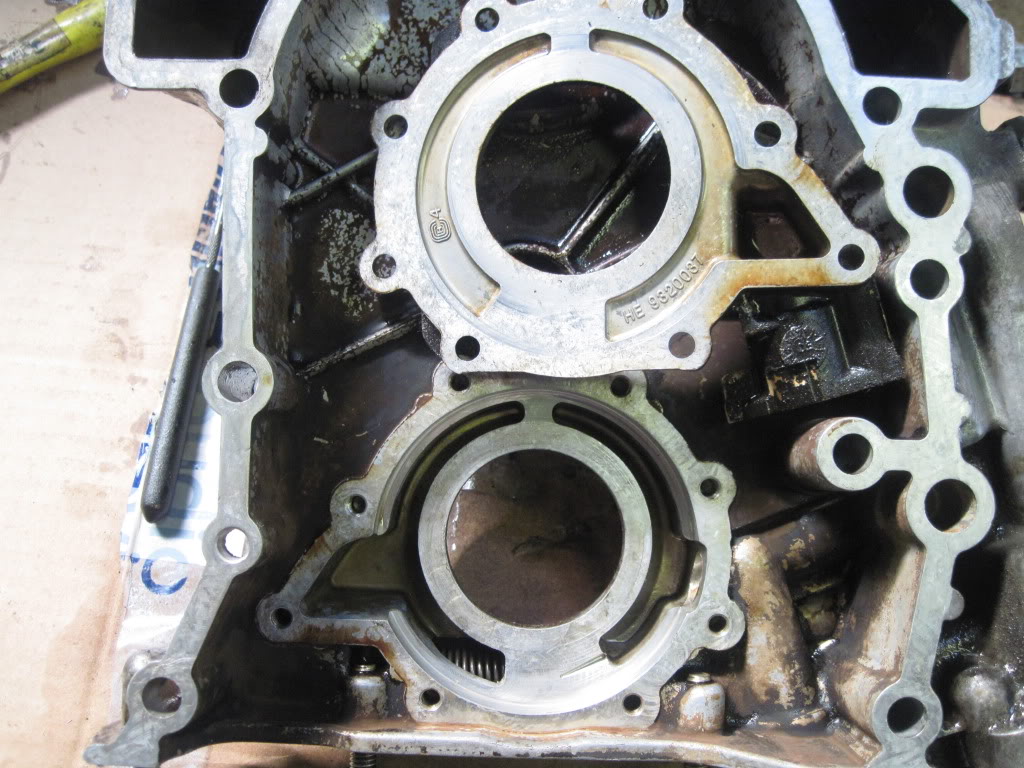
To replace your main bearings, you have to drop the oil pan, starter, crank sensor cover, and timing cover. (the water pump can stay on the cover, you do not have to take it off) The main bearing caps are cross bolted through the side of the engine. The rear main cap has the crusifix seals on the sides of it, it's cross bolts are hidden the heads are 8mm allen.
the rest of the cross bolts are 13mm hex head and are in plain sight. The drivers manifold interferes with one cross bolt, I was able to line a flat on the head up with a flat spot of the manifold, and with a prybar moved the bolt over the length of the head of the bolt, that gave me just enough room to drop that main cap.
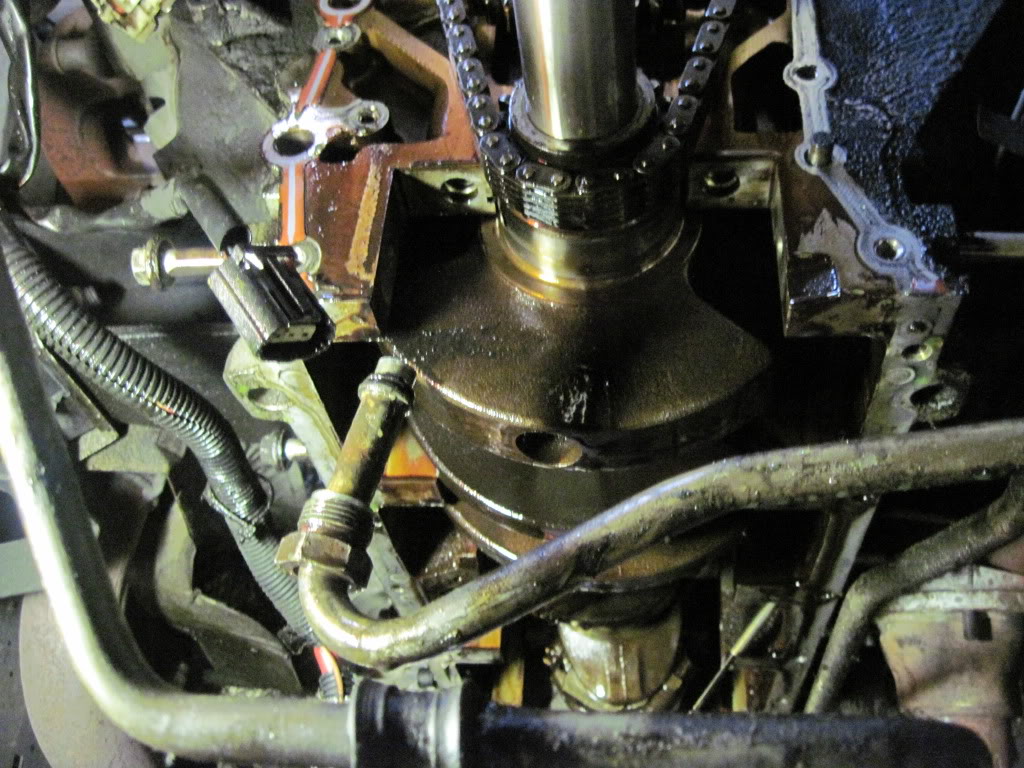
The caps are a pain in the *** to get out. using 2 long 3/8 extentions in the bolt holes you can GENTLY rock the cap back and forth to aid removal.
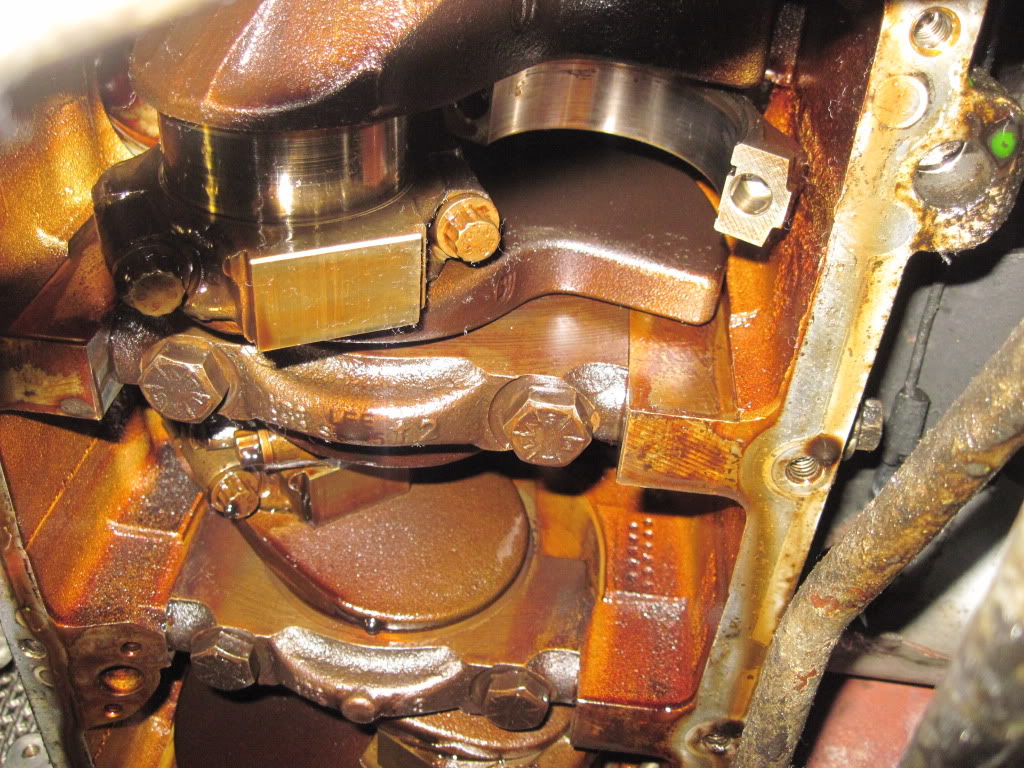
Once you get all the main caps off you will notice the timing chain is tight. that's because its holding the crankshaft in the engine. now you have enough room to replace the top main bearings. I used a feeler gauge to push the bearings around the crankshaft, It was tight, but if you move the crank up a bit with your free hand you will find a sweet spot where the bearings just walk right around the crank easily.
DO NOT OIL THE BEARINGS, they will spin in the bearing block and its game over. DO clean everything with brake clean till its DRY and shiney. Reassembly is just the reverse, place all the caps back with the main bolts tightened to barely tight, then torque them all starting from the middle and working your way out to the ends to 50 ft lbs. now put the cross bolts in hand tight. Starting from the middle again tighten the MAIN bolts to 68 ft lbs. Now tighten the cross bolts to 35 ft lbs or whatever the spec is I forgot...
On to the rod bearings.
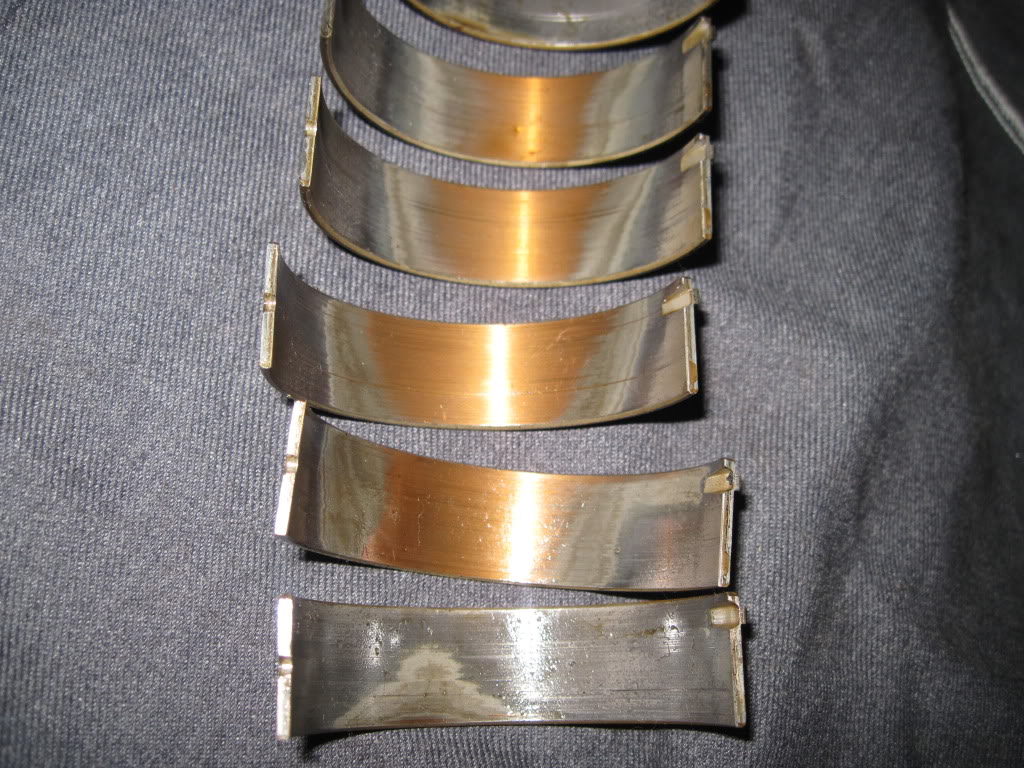
Rod bearings are easy, remove cap, turn crank, move rod into space you made by turning the crank replace the bearings. DO clean and dry both cap and rod with brake clean and an operating room clean rag. DO NOT oil bearing (if you are not going to prime lubrication system, a thin thin thin coating of grease is fine)
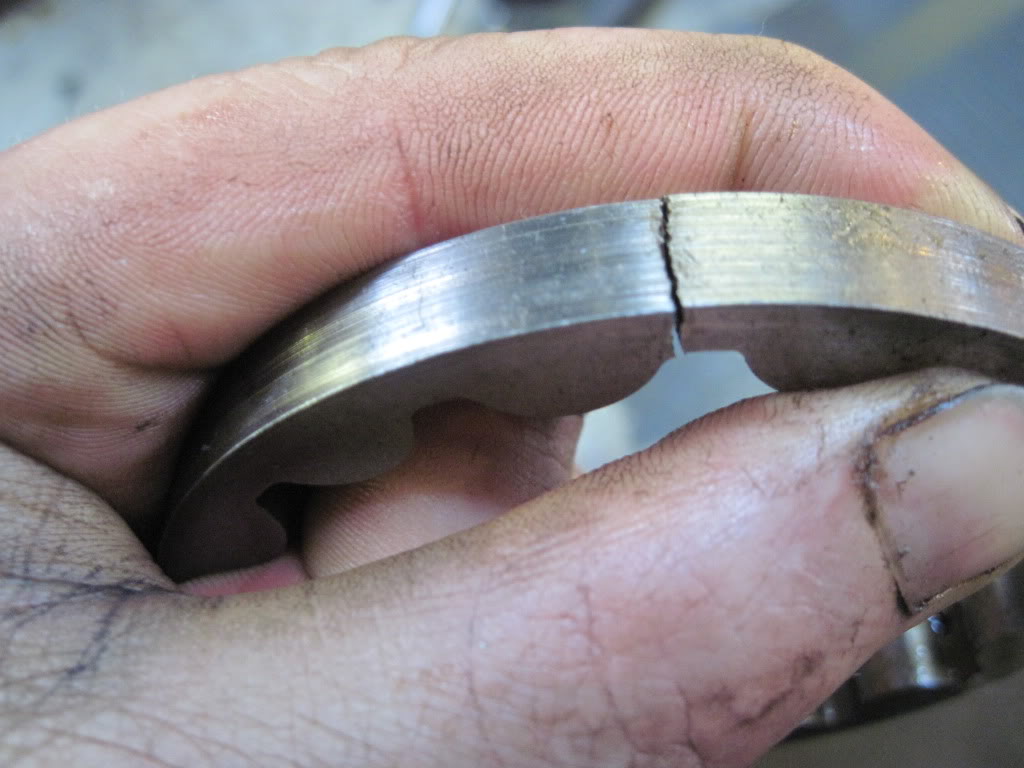
wiped out bearings.... no that's not the camera, the babbitt is gone.
On to the oil pump.
The screws in the pump are pozi-driv #3. You can use a regular #3 but it may jump out
Pump housing was totally fine, no gouges, cracks, abnormal wear. I replaced the gears, removed and checked the valve, replaced the front seal, and replaced the cap orings
Priming the system.
On a Chevy you stick a screwdriver type thing on a drill in the distributor hole and spin the oil pump till you prime the whole system. this is not possible on a land rover. So to prime the system I used a cheap filter, and punched out the anti-drainback valve so that oil flowing backwards could fill the pump, bought a paint sprayer canister from harbor freight, tapped the outlet to 1/8" npt and connected the gauge end of my oil pressure gauge hose to the paint canister, connected the other side to the oil galley via the oil pressure switch port. Filled the canister with 2 gallons of 5/30, cranked it up to 40 PSI and after a min or 2...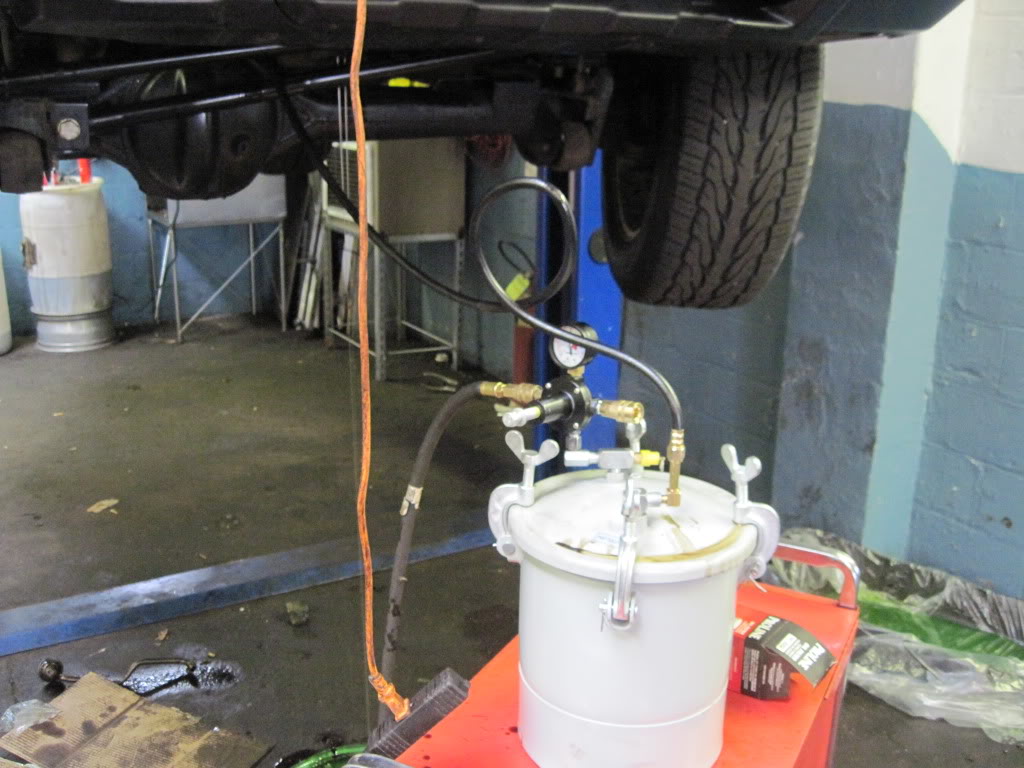
primed up and ready to go, (turn the crank while its pressurized) it's amazing how easily the crank turns while floating on the oil.
Reassembled. Started. Almost instant oil pressure, I mean like one Mississippi, lights out.
A cool 26 PSI at hot idle. No more noise.
Background: 2004 Discovery 110K. The customer brought me this car in December. It was clanging loudly at idle, had a massive coolant leak from the head gaskets, stumbled off idle, and had codes for everything in the world from missfires, knock sensor, purge valve, and oxy sensors to shuttle valves, wheel speed sensors................
The customer had poured 2 bottles of motor honey in 100 miles before he dropped it off.
I pulled the motor apart and found multiple flat lifters stuffed with that quag, the rocker shafts were also full of it. At 100 dollars a set, replacing the lifters while doing the valve job is a no-brainer. After reassembly the engine still made noise. Now it was more of a ting ting ting after fully warming up coolant temps in the 205 range. Oil pressure tests revealed 9 psi at hot idle running 5/30 in 30* ambient temps. The switch to a mongo mann filter and rotella 15/40 netted me an increase of 10 psi at idle hot. Now the engine noise was just a slight tick tick tick. I then fitted a stock 99-2002 oil cooler and hoses I had laying around just to see if that would make a difference, it didn't.
I finally scared the customer into letting me replace his oil pump and bearings after telling him the horror stories of shattered front covers and rods sticking out the side of the block.
This is what I found.
To replace your main bearings, you have to drop the oil pan, starter, crank sensor cover, and timing cover. (the water pump can stay on the cover, you do not have to take it off) The main bearing caps are cross bolted through the side of the engine. The rear main cap has the crusifix seals on the sides of it, it's cross bolts are hidden the heads are 8mm allen.
the rest of the cross bolts are 13mm hex head and are in plain sight. The drivers manifold interferes with one cross bolt, I was able to line a flat on the head up with a flat spot of the manifold, and with a prybar moved the bolt over the length of the head of the bolt, that gave me just enough room to drop that main cap.
The caps are a pain in the *** to get out. using 2 long 3/8 extentions in the bolt holes you can GENTLY rock the cap back and forth to aid removal.
Once you get all the main caps off you will notice the timing chain is tight. that's because its holding the crankshaft in the engine. now you have enough room to replace the top main bearings. I used a feeler gauge to push the bearings around the crankshaft, It was tight, but if you move the crank up a bit with your free hand you will find a sweet spot where the bearings just walk right around the crank easily.
DO NOT OIL THE BEARINGS, they will spin in the bearing block and its game over. DO clean everything with brake clean till its DRY and shiney. Reassembly is just the reverse, place all the caps back with the main bolts tightened to barely tight, then torque them all starting from the middle and working your way out to the ends to 50 ft lbs. now put the cross bolts in hand tight. Starting from the middle again tighten the MAIN bolts to 68 ft lbs. Now tighten the cross bolts to 35 ft lbs or whatever the spec is I forgot...
On to the rod bearings.
Rod bearings are easy, remove cap, turn crank, move rod into space you made by turning the crank replace the bearings. DO clean and dry both cap and rod with brake clean and an operating room clean rag. DO NOT oil bearing (if you are not going to prime lubrication system, a thin thin thin coating of grease is fine)
wiped out bearings.... no that's not the camera, the babbitt is gone.
On to the oil pump.
The screws in the pump are pozi-driv #3. You can use a regular #3 but it may jump out
Pump housing was totally fine, no gouges, cracks, abnormal wear. I replaced the gears, removed and checked the valve, replaced the front seal, and replaced the cap orings
Priming the system.
On a Chevy you stick a screwdriver type thing on a drill in the distributor hole and spin the oil pump till you prime the whole system. this is not possible on a land rover. So to prime the system I used a cheap filter, and punched out the anti-drainback valve so that oil flowing backwards could fill the pump, bought a paint sprayer canister from harbor freight, tapped the outlet to 1/8" npt and connected the gauge end of my oil pressure gauge hose to the paint canister, connected the other side to the oil galley via the oil pressure switch port. Filled the canister with 2 gallons of 5/30, cranked it up to 40 PSI and after a min or 2...
primed up and ready to go, (turn the crank while its pressurized) it's amazing how easily the crank turns while floating on the oil.
Reassembled. Started. Almost instant oil pressure, I mean like one Mississippi, lights out.
A cool 26 PSI at hot idle. No more noise.
Last edited by Spike555; 03-14-2012 at 07:58 PM.
#2
03-14-2012, 05:46 PM

Super Moderator

#4
03-14-2012, 05:51 PM

Administrator
#5
03-14-2012, 09:11 PM
I'm not sure if the crack affected oil pressure, I doubt it. What I do know is if the pump cracked again in the next tooth over the piece would be small enough to go into inlet or outlet , which would have instantaneously grenaded the timing cover. The low oil pressure was from the bearings. The car was probably beaten to death with 10k oil changes, never topping the oil up, and years of NYC "driving" (IE. Idling with the AC on in 100* weather 12 hours a day.) When your bearings wear, flow is increased due to the larger clearance between crank/bearings and/or rods/bearings, as flow goes up pressure in the galley decreases.
#6
03-14-2012, 09:46 PM

Oil pressure is the "resistance" the oil faces while traveling through the engine, the tighter the engine the higher the resistance the higher the PSI numbers.
A worn out engine with low oil pressure can be "saved" with a thicker motor oil, thats what all of those oil additive's do, thicken the oil to a point that it is to thick to flow past the worn out parts effectively filling the gap in the worn out bearings, for example or to thick to get past the piston rings and burn off.
A worn out engine with low oil pressure can be "saved" with a thicker motor oil, thats what all of those oil additive's do, thicken the oil to a point that it is to thick to flow past the worn out parts effectively filling the gap in the worn out bearings, for example or to thick to get past the piston rings and burn off.
#7
03-19-2012, 10:36 PM


#9
05-14-2012, 11:55 PM
#10
05-15-2012, 10:01 AM
Standard bearings, no regrind. No, the dealer would quote you for a new engine and move on to the next guy to quote an engine to. "Low oil pressure? new engine" "ticking noise? new engine" "runs hot? new radiator, hoses, thermostat, and waterpump" "leaky airsprings? 4 new airsprings and a compressor" The dealer is so worried about covering they're asses, they sometimes forget about fixing the car, or quote people out of theirs and into a new one.