Proof of Chevy 350 Conversion on D2


#12
 06-09-2012, 11:58 AM

Recovery Vehicle
How about just put a 700R4 on a 350 and figure out how to mount it to the T-box? OR how bout put a whole blazer drive train in with the t box and everything and have some propeller shafts made up? You could get a Generic TBI motor on the cheap, or for more ***** get a TPI motor and run megasquirt EFI - You could have a trans output shaft made up that would mate the 700R4 right up to the LR transfer box.
#13
06-09-2012, 12:21 PM

This is close
How to fit a Chevy Engine and Gearbox into a Range Rover - No Car accident lawyers here please
Small Block Chevy 350 into Dakar / Range Rover
Here are the details on Chevy 350 engine swap.The conversion is based around mating a GM Turbo Hydramatic TH350 onto Land Rover LT230 transfer box, And now the upgrade to fit a TH700R4
The following sections show how the small block chevy can be fitted into a Range rover (classic) or in my case a Dakar4x4 (rr based) using an adapter that allows the TH350 to be bolted directly on the LT230 without any modifications.
This approach was taken becuase the TH350 bolts directly to the 350 Chevy and is capable of taking the power output from the engine. Also, rebuilding and upgrading the TH350 is cheap and easy (even in the UK - probably even cheaper in the US). I completely re-built the box using a heavy duty re-build kit from Real-Steel. I also fitted a B&M Trans-pack shift kit.
Paul Bishop was the first to complete the conversion in his RR/90 hybrid. This was followed by Andy Gollins in is Bobtail Range Rover (now a series 1 hybrid). Paul had the conversion kit re-manufactured from billet alluminium. Tom Tilley's Dakar uses the same conversion adapter. There are a number of others floating around the world!
These photos are not strictly in chronological order. Basicly I bought the 5.7 engine on a whim. Then I advertised my 3.9 on a whim, and someone bought it - so that forced the issue to get the conversion done. The car sat on the drive for a couple of months between selling the old 3.9 and getting everything ready for the 5.7
Small Block Chevy 350 into Dakar / Range Rover
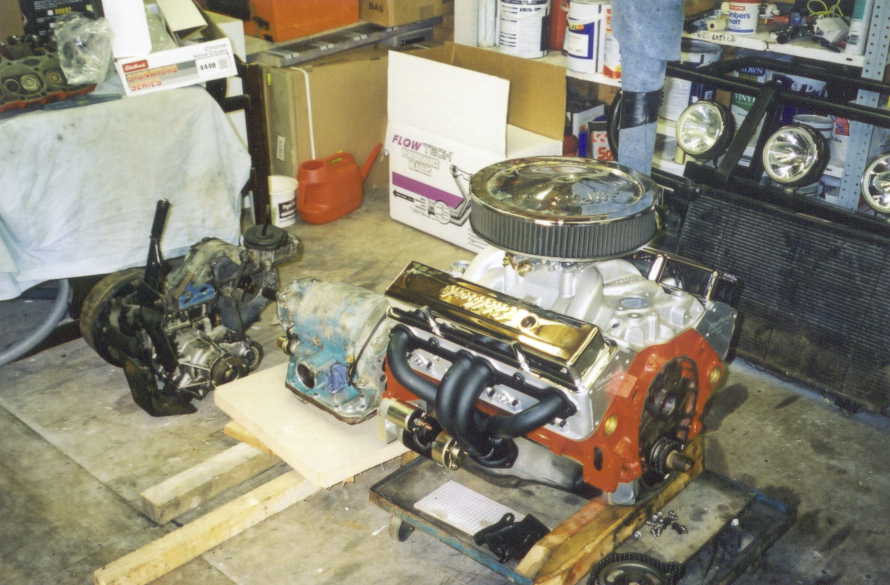
The Engine
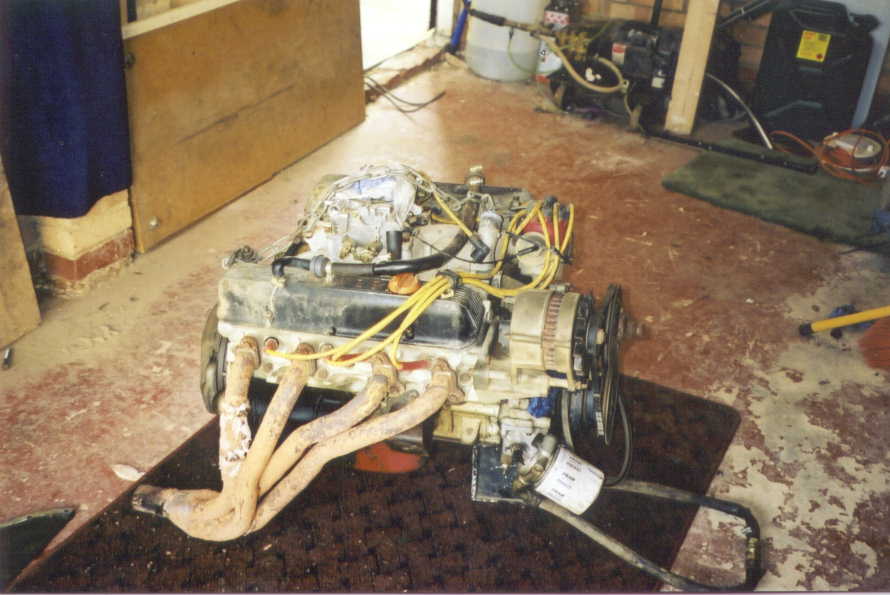
It's a 1979 350 (5.7) 4 bolt block complete with new crank,Pistons,Cam,Manifolds,Carb,Distributor,Exhau st manifolds - basicly AS NEW!
Also included was the TH350 autobox, brand new exhausts, a petrol flymo and a bottle of Co2 (for mig welder) all for only �400!

This is my old 200Bhp 3.9 Rover V8 out, it served me well, but I want MORE power. Getting anything more than 250 BHP from a rover will cost over �5000.
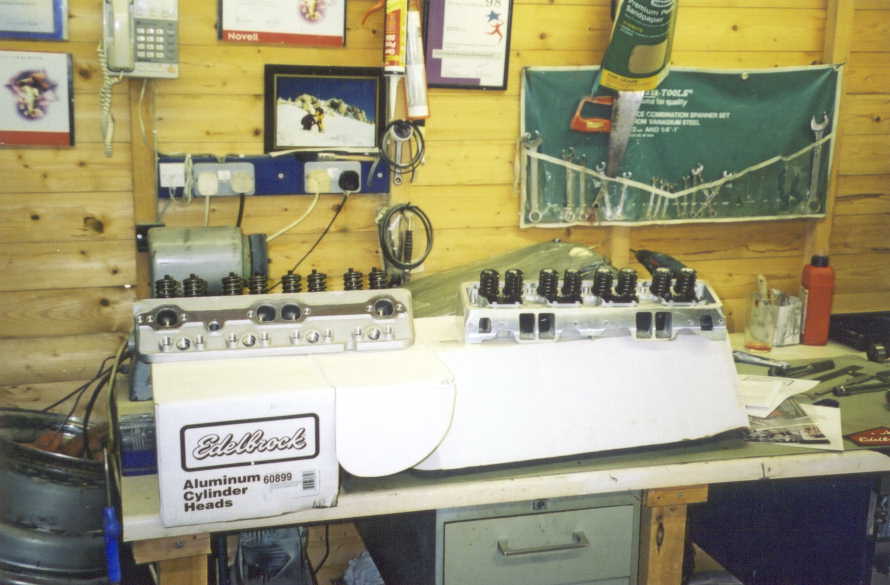
With the proceedes from selling the rover engine (which is now in an MGB somewhere), i bought some nice Edelbrock Aluminium heads:
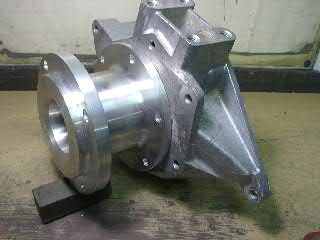
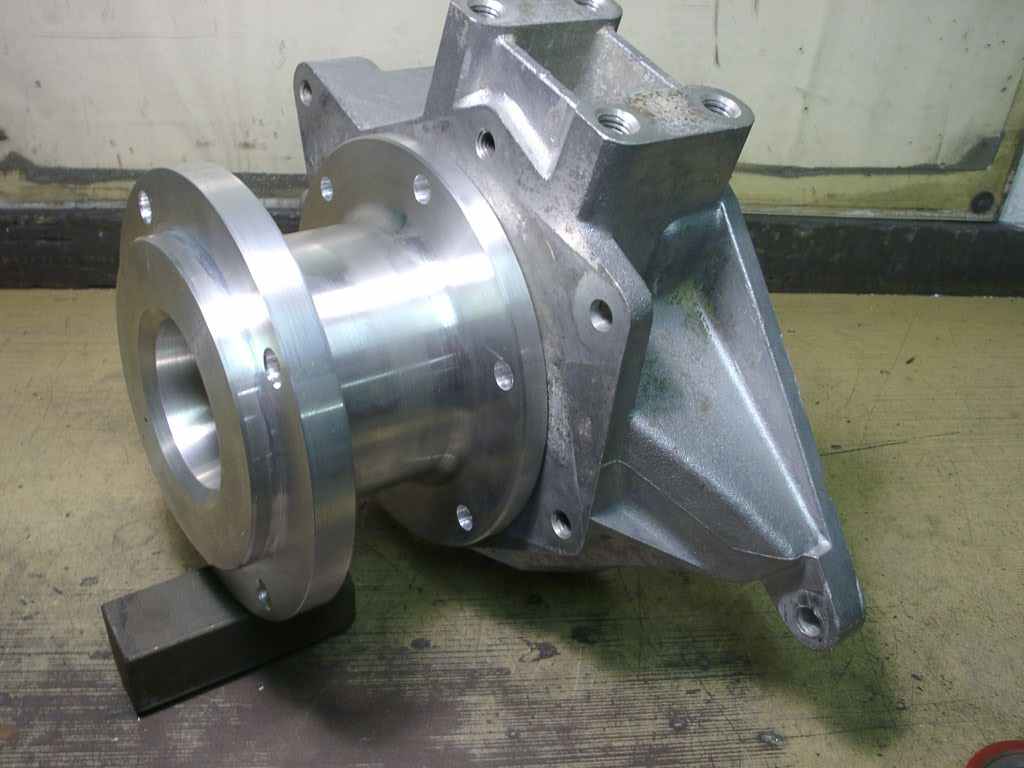
The Adapter Plate
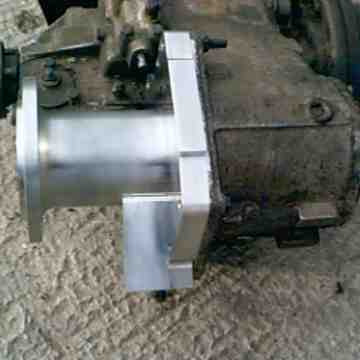
My conversion is based on Pauls original design, but differs in that my adapter bolts directly to the original torqueflite adapter that Land rover made in the early 80's to fit automatic transmission to the range rover. Paul Bishops original Design
The following pictures show pauls adapter. This design benefits from the fact that you don't need to source the original adapter that Land rover used. However, this design dosn't have provision for mounting the high/low/diff lock lever. Paul has this CNC machined from billet ally.
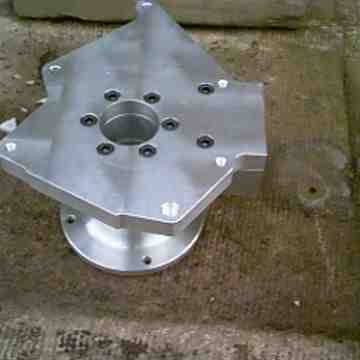 My Version of the Same Design
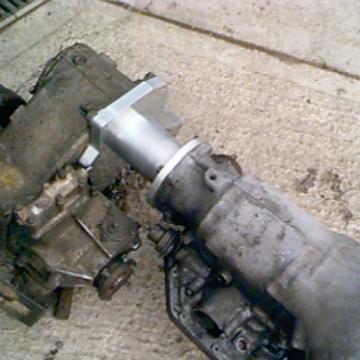
This picture shows what im trying to achieve; namley Small block chevy, TH350 autobox and Land Rover LT230 all coupled together. At this stage, i was trying to take measurements and make sure it was all going to fit.
These pictures show my version of the adapter. To keep things simple we re-used the original RR auto adapter and simply made an adapter for the adapter!. Mine was cheaper to make, because it only required one 5 inch round bar in which it was turned from. This design benefits from the fact that the high/low lever bolts to the original location.
Thanks to my DAD for spinning this masterpiece up for me!
Start with a billet of Aluminium (yes, dad can't spell!)
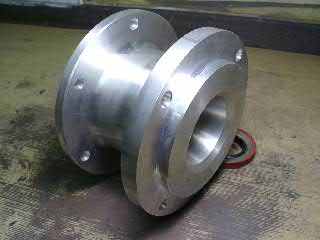
Heres the adapter, the coupling shaft and the all important thinking lubricant (Mmm Beer).
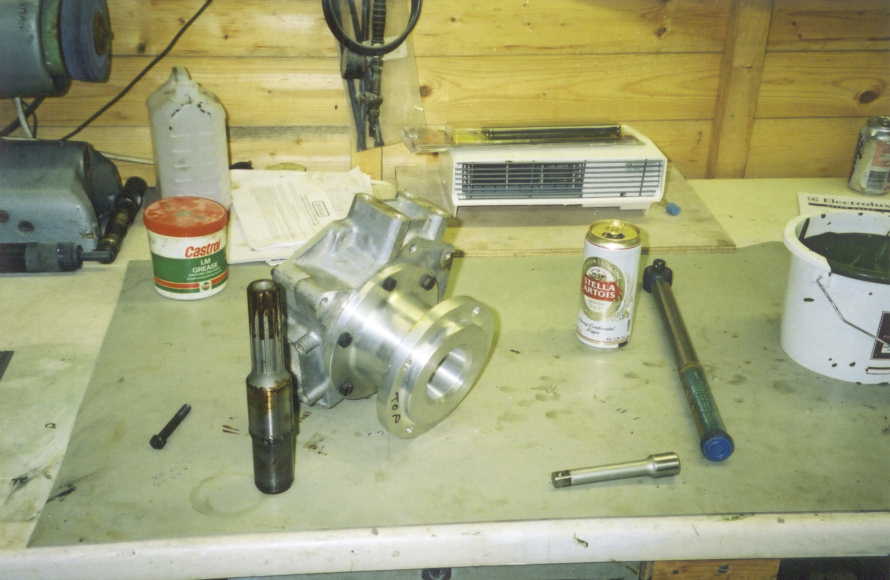
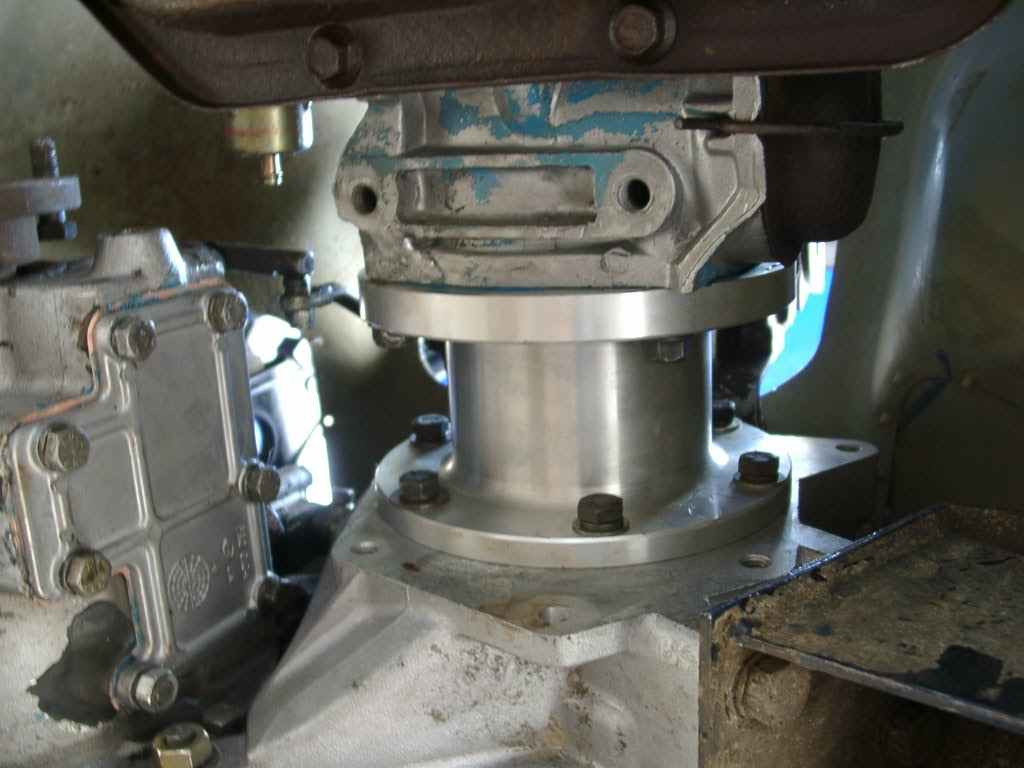
Once the adapter was made, It needed aligning on the original Range rover adapter - This photo shows the process of aligning the LT230 and the TH350 using sprit levels. Once I "spotted" the holes, they were drilled and tapped.
Comments, questions or got answers? Please use the Mez Forums to get in contact or chat about this page.
Small Block Chevy 350 into Dakar / Range Rover
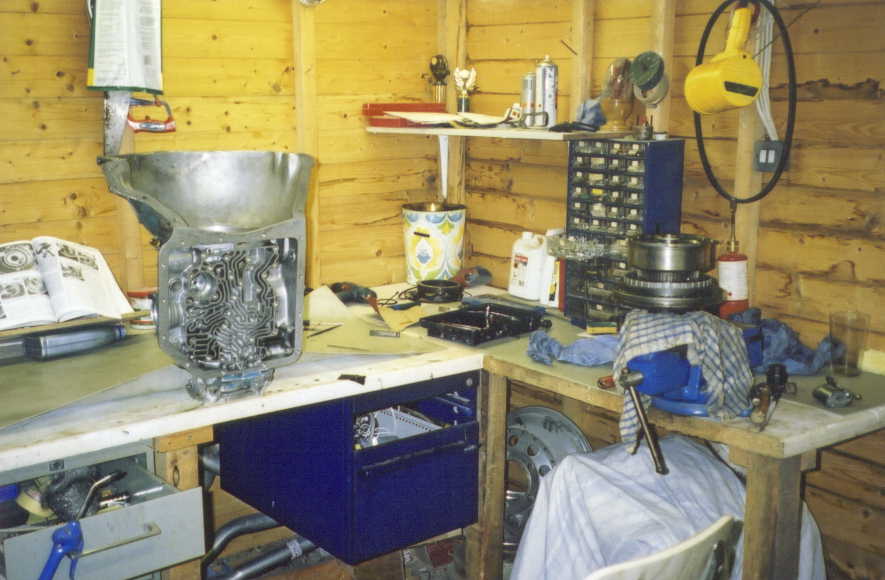
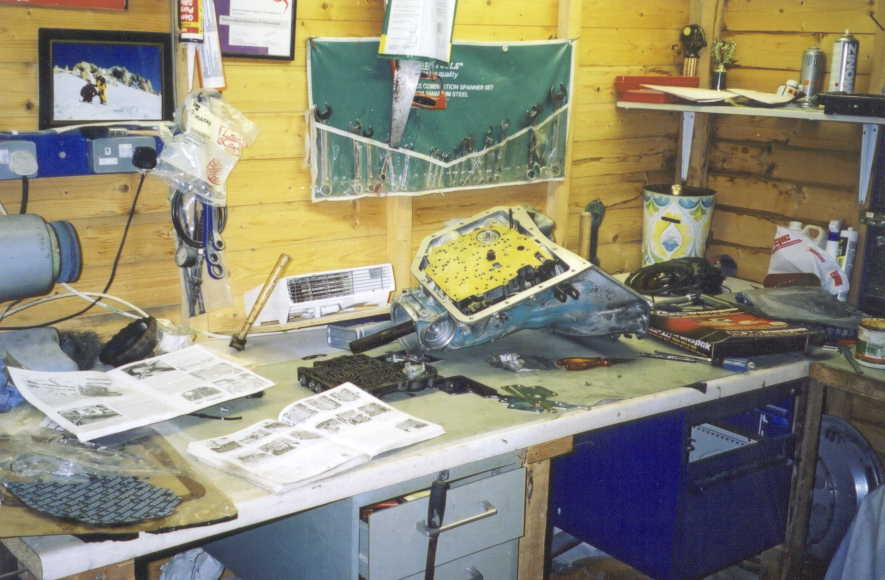
Rebuilding the Automatic Gearbox
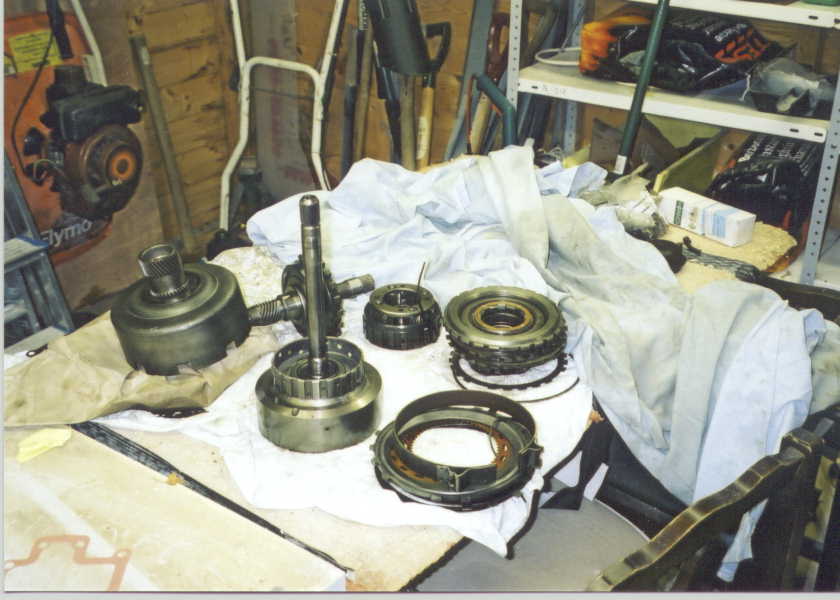
I was originally planning on getting hold of another TH350 autobox, namely becuase my one had a broken case around the rear mounting flange and the shaft was VERY short (TH350's come in different varients, Long shaft or Short shaft or 4WD) - mine was a 4WD version as it came from a 79 Blazer. The only way to change the shaft is to completely strip the box down, given that the box was broken i thought it would be easier to get another one,but my Dad reckoned he might be able to weld the box if it was stripped down, plus my mate paul had the correct shaft handy (after he attemped a re-build and gave up, leaving a big box of bits in the garage!), I had studied a book for a few days and undaunted i decided to strip the box down one sunday afternoon.
Hey, id stripped down motorbike gearboxes when I was nine years old, how hard could it be?. I took the methodical approach of removing each bit and laying it out, this quickly consumed massive amounts of space in the shed!, but it was intresting and at least I know understand how these things work!
This picture shows the three clutch packs. The long shaft is called the stator shaft, thats what the torque convertor attaches to. All the bearings in these things are simple white metal bushes, they were all replaced along with all the oil seals and clutch plates.
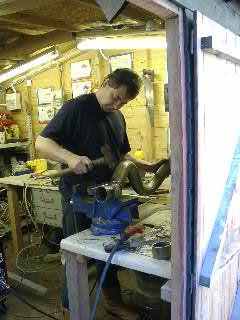
This is the beginings of the re-build after my dad successfully welded the casing up for me. The box itself is bolted to the work bench, plus i drilled a 1" hole into the bench to allow the new "long" output shaft to hang below. The worm-like channels in the casing are the "brains" of the 'box, very clever. The primary and secondary clutches are in the vice.
How to fit a Chevy Engine and Gearbox into a Range Rover - No Car accident lawyers here please
Small Block Chevy 350 into Dakar / Range Rover
Here are the details on Chevy 350 engine swap.The conversion is based around mating a GM Turbo Hydramatic TH350 onto Land Rover LT230 transfer box, And now the upgrade to fit a TH700R4
The following sections show how the small block chevy can be fitted into a Range rover (classic) or in my case a Dakar4x4 (rr based) using an adapter that allows the TH350 to be bolted directly on the LT230 without any modifications.
This approach was taken becuase the TH350 bolts directly to the 350 Chevy and is capable of taking the power output from the engine. Also, rebuilding and upgrading the TH350 is cheap and easy (even in the UK - probably even cheaper in the US). I completely re-built the box using a heavy duty re-build kit from Real-Steel. I also fitted a B&M Trans-pack shift kit.
Paul Bishop was the first to complete the conversion in his RR/90 hybrid. This was followed by Andy Gollins in is Bobtail Range Rover (now a series 1 hybrid). Paul had the conversion kit re-manufactured from billet alluminium. Tom Tilley's Dakar uses the same conversion adapter. There are a number of others floating around the world!
These photos are not strictly in chronological order. Basicly I bought the 5.7 engine on a whim. Then I advertised my 3.9 on a whim, and someone bought it - so that forced the issue to get the conversion done. The car sat on the drive for a couple of months between selling the old 3.9 and getting everything ready for the 5.7
Small Block Chevy 350 into Dakar / Range Rover
The Engine
It's a 1979 350 (5.7) 4 bolt block complete with new crank,Pistons,Cam,Manifolds,Carb,Distributor,Exhau st manifolds - basicly AS NEW!
Also included was the TH350 autobox, brand new exhausts, a petrol flymo and a bottle of Co2 (for mig welder) all for only �400!
This is my old 200Bhp 3.9 Rover V8 out, it served me well, but I want MORE power. Getting anything more than 250 BHP from a rover will cost over �5000.
With the proceedes from selling the rover engine (which is now in an MGB somewhere), i bought some nice Edelbrock Aluminium heads:
The Adapter Plate
My conversion is based on Pauls original design, but differs in that my adapter bolts directly to the original torqueflite adapter that Land rover made in the early 80's to fit automatic transmission to the range rover. Paul Bishops original Design
The following pictures show pauls adapter. This design benefits from the fact that you don't need to source the original adapter that Land rover used. However, this design dosn't have provision for mounting the high/low/diff lock lever. Paul has this CNC machined from billet ally.
My Version of the Same DesignThis picture shows what im trying to achieve; namley Small block chevy, TH350 autobox and Land Rover LT230 all coupled together. At this stage, i was trying to take measurements and make sure it was all going to fit.
These pictures show my version of the adapter. To keep things simple we re-used the original RR auto adapter and simply made an adapter for the adapter!. Mine was cheaper to make, because it only required one 5 inch round bar in which it was turned from. This design benefits from the fact that the high/low lever bolts to the original location.
Thanks to my DAD for spinning this masterpiece up for me!
Start with a billet of Aluminium (yes, dad can't spell!)
Heres the adapter, the coupling shaft and the all important thinking lubricant (Mmm Beer).
Once the adapter was made, It needed aligning on the original Range rover adapter - This photo shows the process of aligning the LT230 and the TH350 using sprit levels. Once I "spotted" the holes, they were drilled and tapped.
Comments, questions or got answers? Please use the Mez Forums to get in contact or chat about this page.
Small Block Chevy 350 into Dakar / Range Rover
Rebuilding the Automatic Gearbox
I was originally planning on getting hold of another TH350 autobox, namely becuase my one had a broken case around the rear mounting flange and the shaft was VERY short (TH350's come in different varients, Long shaft or Short shaft or 4WD) - mine was a 4WD version as it came from a 79 Blazer. The only way to change the shaft is to completely strip the box down, given that the box was broken i thought it would be easier to get another one,but my Dad reckoned he might be able to weld the box if it was stripped down, plus my mate paul had the correct shaft handy (after he attemped a re-build and gave up, leaving a big box of bits in the garage!), I had studied a book for a few days and undaunted i decided to strip the box down one sunday afternoon.
Hey, id stripped down motorbike gearboxes when I was nine years old, how hard could it be?. I took the methodical approach of removing each bit and laying it out, this quickly consumed massive amounts of space in the shed!, but it was intresting and at least I know understand how these things work!
This picture shows the three clutch packs. The long shaft is called the stator shaft, thats what the torque convertor attaches to. All the bearings in these things are simple white metal bushes, they were all replaced along with all the oil seals and clutch plates.
This is the beginings of the re-build after my dad successfully welded the casing up for me. The box itself is bolted to the work bench, plus i drilled a 1" hole into the bench to allow the new "long" output shaft to hang below. The worm-like channels in the casing are the "brains" of the 'box, very clever. The primary and secondary clutches are in the vice.
#14
06-09-2012, 12:22 PM
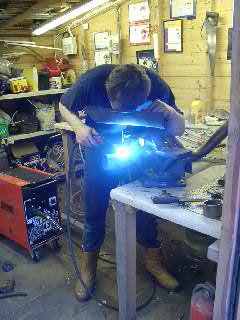
At this stage, the "core" is all re-built. I'm now installing the B&M transpak shift kit. This particular one allows you to select 1st gear, even if youre going too fast. This allows you to select 1st when going down a steep incline. The 'long' shaft is sticking out the back, this is about 10" longer than the short shaft. I'm just about to fit the valve body.
Comments, questions or got answers? Please use the Mez Forums to get in contact or chat about this page.
Getting the gearbox out
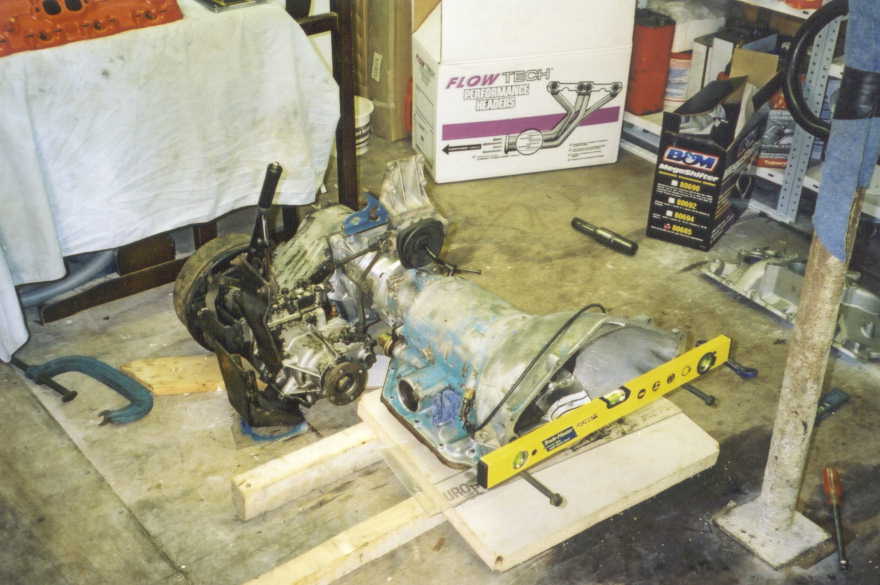
Once the engine had been pulled, it was time to tackle getting that great big LT95 four speed manual out. I've never done it before, and from all accounts there really heavy.
I had a cunning idea; i put a beam accross the roll cage, and used a block and tackle to lower the gearbox down. Notice how much tension is on the ratchet strap.
At the same time, i had 3 ton trolley jack underneath to help out
The gearbox is slowly lowered out...
And finally, it's completely out. I had to jack the car up to get it out from underneath!. These things are really big and heavy.
This is the same box as fitted for a forward control 101 - for lugging squadies around in!
Once everything was out, it leaves a massive empty hole. I took this opportunity to clean and paint the whole car as it was looking a bit scabby after 5 years of abuse..
Comments, questions or got answers? Please use the Mez Forums to get in contact or chat about this page.
Small Block Chevy 350 into Dakar / Range Rover
Installing the Chevy engine
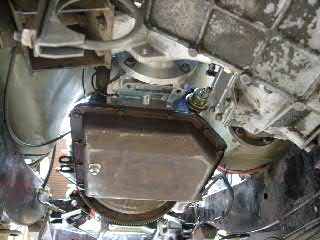
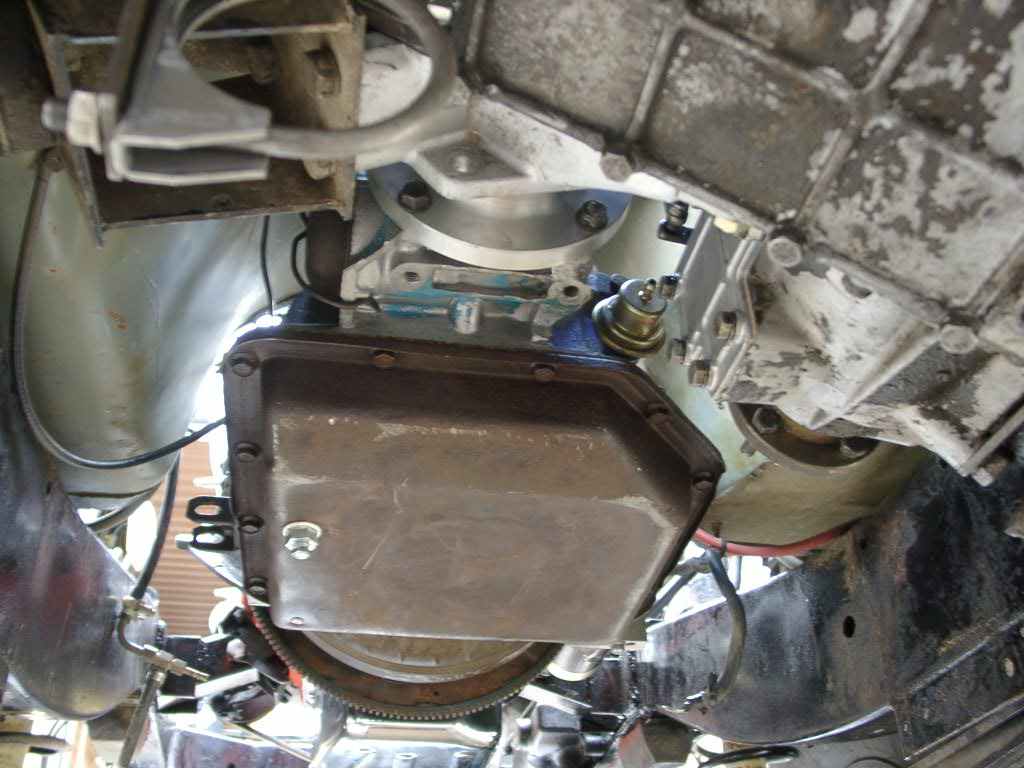
Once the adapter was made, I could fit the LT230 transfer box using its standard mountings. (Its important to remember to get all the brackets and levers when purchasing your LT230) the adapter was bolted to the LT230.
Installing the TH350 was a simply placed on top of the Jack and lifted into position and then bolted up.
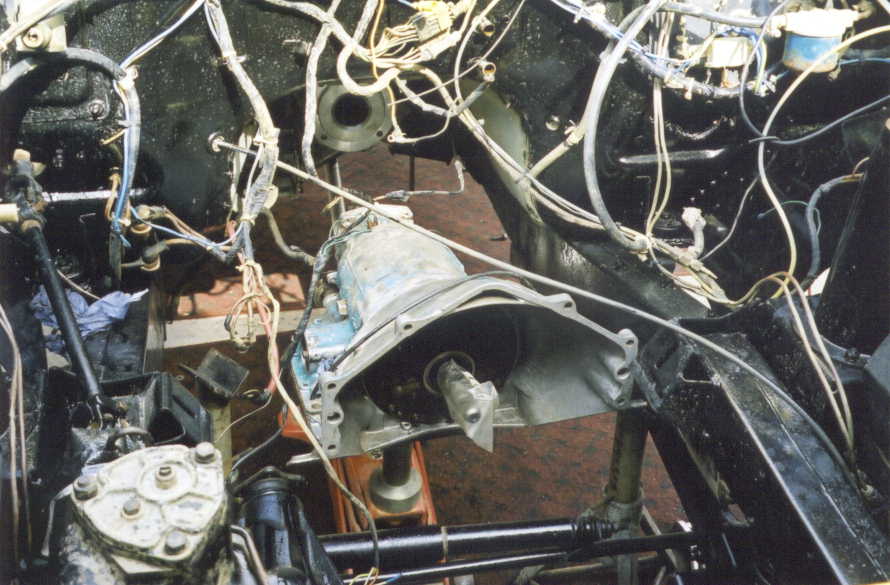
These photos are taken from underneath and show the Transfer and Auto boxes in place.
I'm now ready to trial fit the engine.

Unfortunatley i dont have any photos of next few steps, but the concept is straightforward.
In order to decide what to do about the engine mountings, you need to install the engine temporarily supported on a hoist. You then fit the various anciliaries such as exhausts and starter motor, to see how much room you have.
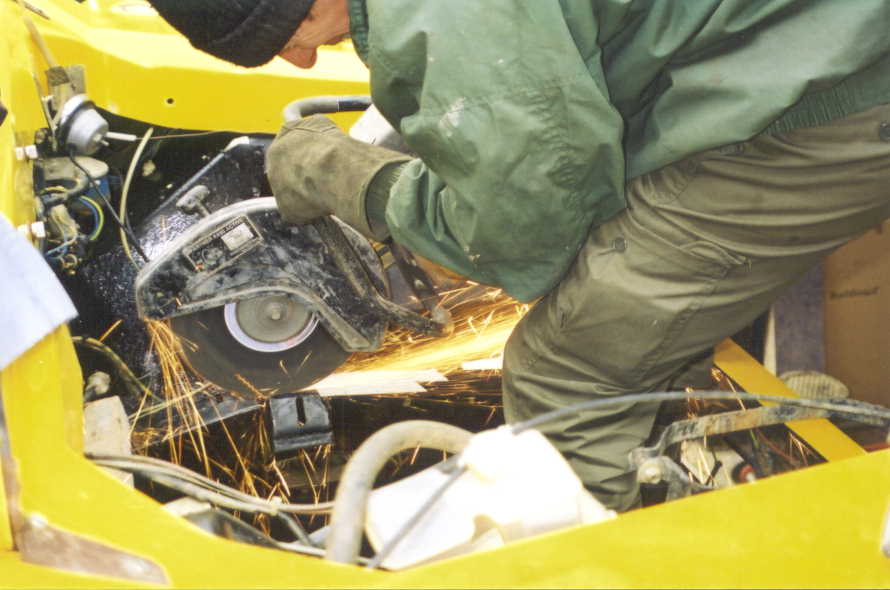
I was thinking about keeping the original engine mounting brackets, and making adapters between old and new(Barry done this on the 440 dakar). However once the engine was suspended in the bay, it quickly became apparent that they were in the way..
And so they were removed in true scrap-heap sytle, with the help of "Angle-Grinder-Andy" and his petrol disk cutter:
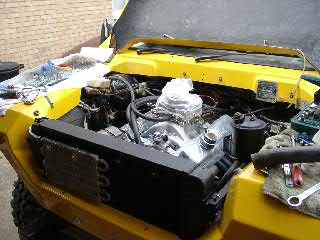
This is what it looked like shortly after getting the engine fitted.
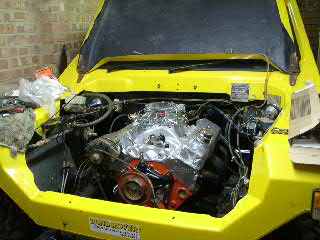
Again, a number of photos are missing detailing all the fiddly work that can take weeks to sort out. At this stage all the plumbing and electrical work needed doing. Brackets for alternator and power steering pumps needed making. We even had to make the water pump pulley
Other fiddly tasks, included shortening the front propshaft by about an inch.
And making adapter to fit Oil sender sensors to new engine (More work for daddy)
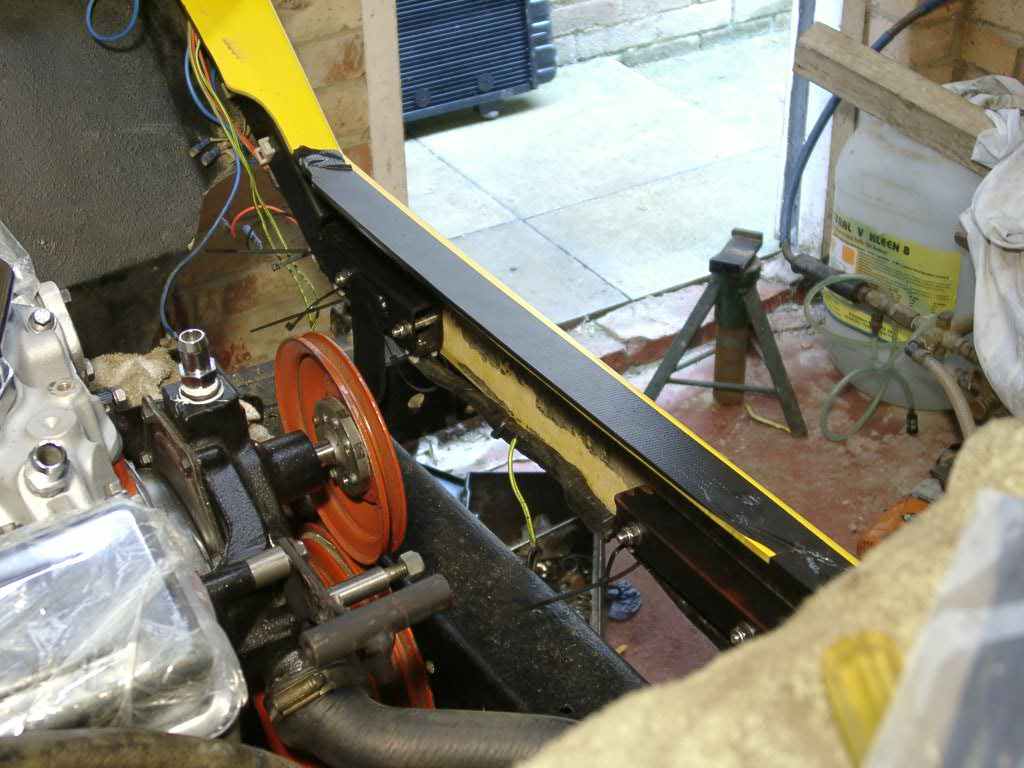
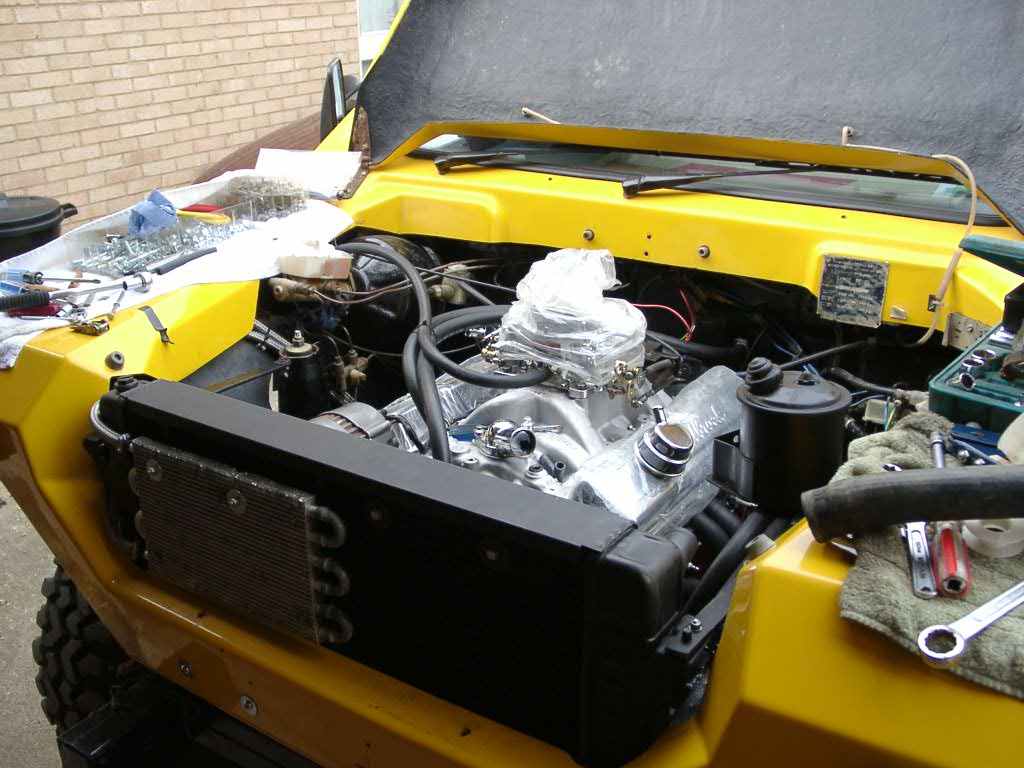
The old rover had an oil cooler fitted to the front bumper, which was ok when driving at speed, when when going slow it was next to useless. therefore i wanted to put it in front of the radiator where the fans would pull air through it. I ditched the old Dakar front body mounting and made a two piece design, and also removed the bottom lip of the fibre glass to allow the oil cooler to fit, between the body and the radiator.
I stopped short of actually cutting the body, instead i'm waiting to see if i actually *need* and oil cooler (so far i havn't - lucky i didn't cut a great big hole in the front!)

the shaft replacing)
Comments, questions or got answers? Please use the Mez Forums to get in contact or chat about this page.
Getting the gearbox out
Once the engine had been pulled, it was time to tackle getting that great big LT95 four speed manual out. I've never done it before, and from all accounts there really heavy.
I had a cunning idea; i put a beam accross the roll cage, and used a block and tackle to lower the gearbox down. Notice how much tension is on the ratchet strap.
At the same time, i had 3 ton trolley jack underneath to help out
The gearbox is slowly lowered out...
And finally, it's completely out. I had to jack the car up to get it out from underneath!. These things are really big and heavy.
This is the same box as fitted for a forward control 101 - for lugging squadies around in!
Once everything was out, it leaves a massive empty hole. I took this opportunity to clean and paint the whole car as it was looking a bit scabby after 5 years of abuse..
Comments, questions or got answers? Please use the Mez Forums to get in contact or chat about this page.
Small Block Chevy 350 into Dakar / Range Rover
Installing the Chevy engine
Once the adapter was made, I could fit the LT230 transfer box using its standard mountings. (Its important to remember to get all the brackets and levers when purchasing your LT230) the adapter was bolted to the LT230.
Installing the TH350 was a simply placed on top of the Jack and lifted into position and then bolted up.
These photos are taken from underneath and show the Transfer and Auto boxes in place.
I'm now ready to trial fit the engine.
Unfortunatley i dont have any photos of next few steps, but the concept is straightforward.
In order to decide what to do about the engine mountings, you need to install the engine temporarily supported on a hoist. You then fit the various anciliaries such as exhausts and starter motor, to see how much room you have.
I was thinking about keeping the original engine mounting brackets, and making adapters between old and new(Barry done this on the 440 dakar). However once the engine was suspended in the bay, it quickly became apparent that they were in the way..
And so they were removed in true scrap-heap sytle, with the help of "Angle-Grinder-Andy" and his petrol disk cutter:
This is what it looked like shortly after getting the engine fitted.

Again, a number of photos are missing detailing all the fiddly work that can take weeks to sort out. At this stage all the plumbing and electrical work needed doing. Brackets for alternator and power steering pumps needed making. We even had to make the water pump pulley
Other fiddly tasks, included shortening the front propshaft by about an inch.
And making adapter to fit Oil sender sensors to new engine (More work for daddy)
The old rover had an oil cooler fitted to the front bumper, which was ok when driving at speed, when when going slow it was next to useless. therefore i wanted to put it in front of the radiator where the fans would pull air through it. I ditched the old Dakar front body mounting and made a two piece design, and also removed the bottom lip of the fibre glass to allow the oil cooler to fit, between the body and the radiator.
I stopped short of actually cutting the body, instead i'm waiting to see if i actually *need* and oil cooler (so far i havn't - lucky i didn't cut a great big hole in the front!)
the shaft replacing)
#15
06-09-2012, 12:22 PM
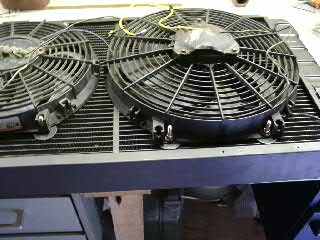
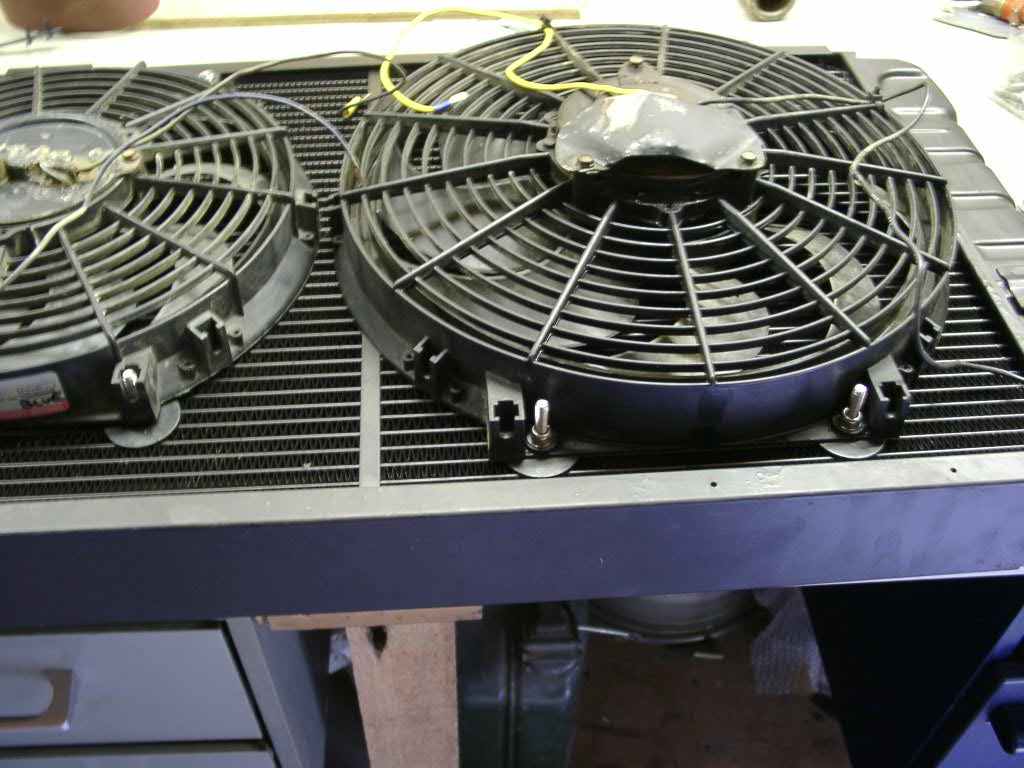
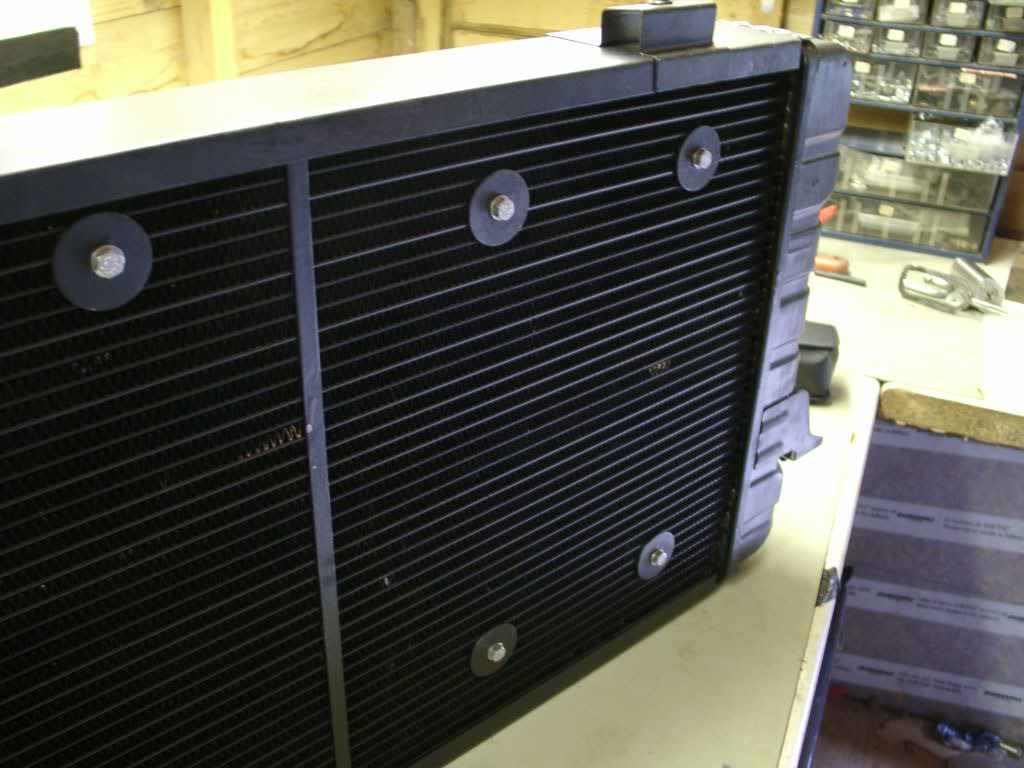
Due to the bigger engine size,The radiator was sent to kempston radiators to have an extra core fitted to it. Whilst it was there they noticed that i had fitted fans to the core, they said they could solder proper spacers into the core that allow the fans to be properly mounted. This is a really nice solution to fan mounting problems.
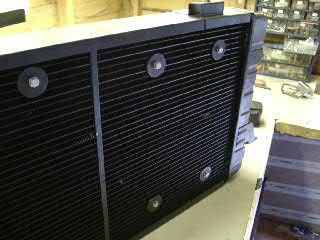
This shows things moving on further, Ive also made the Radiator sit vertical in the engine bay, rather than at a slant.Still more plumbing to be done!
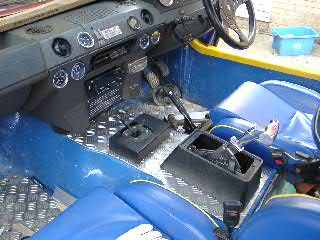
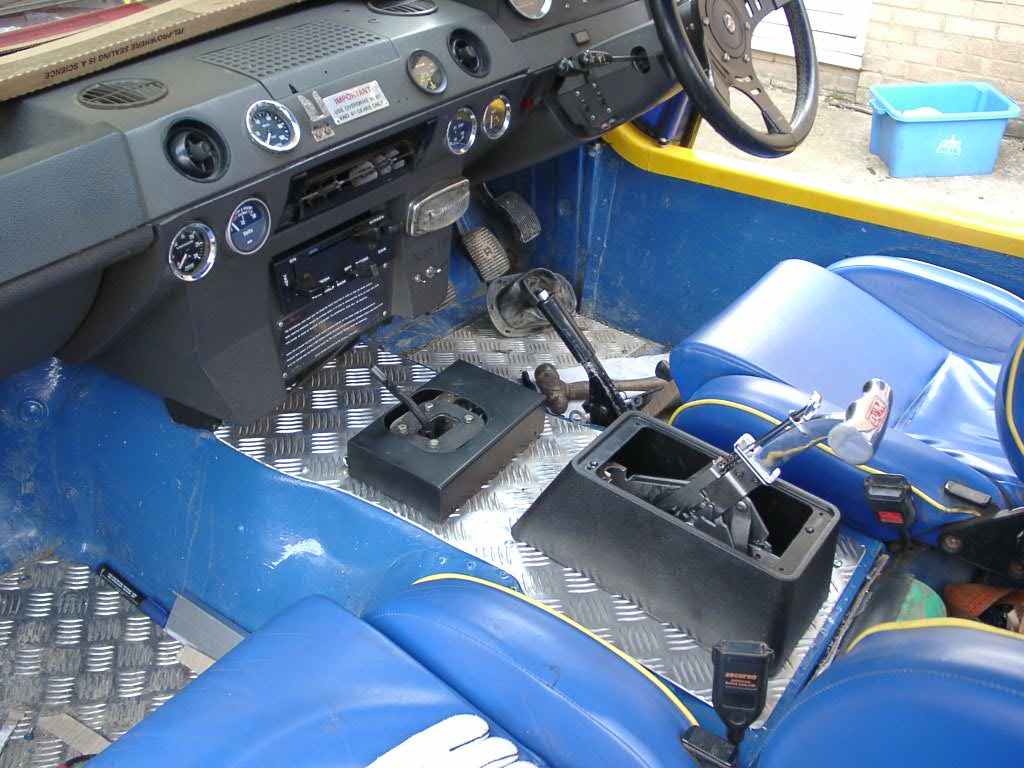
Interally, i needed to fit the B & M mega shifter, ally checker plate was require to cover up the gaping whole left by the old engine.
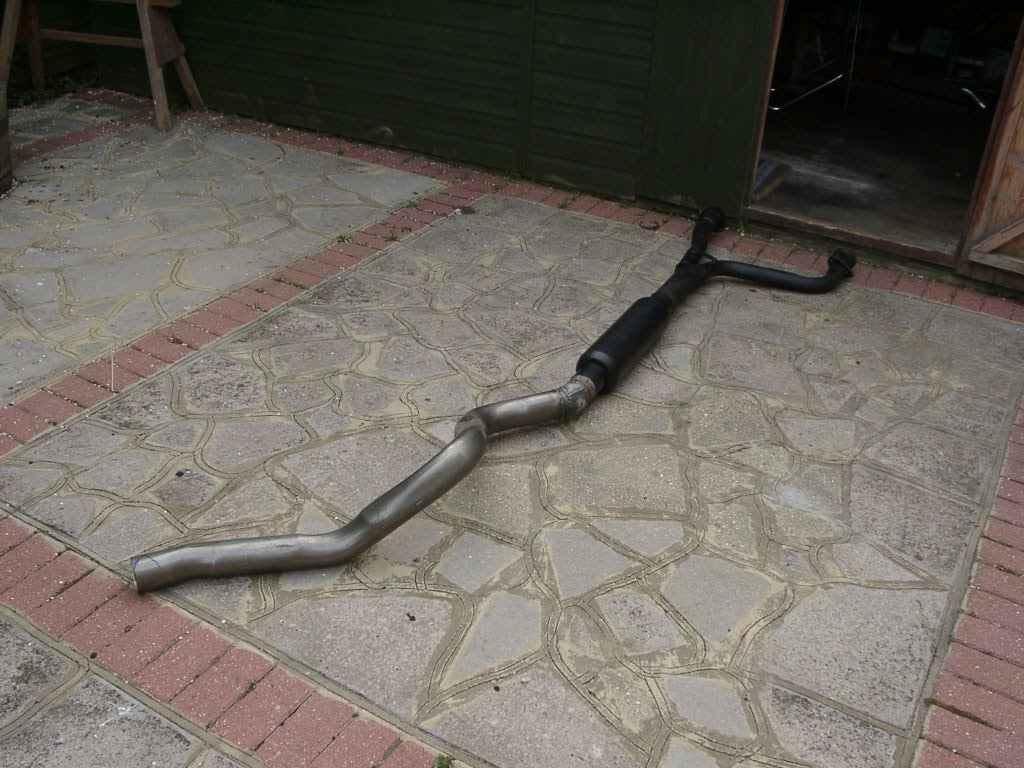
Making the Exhaust
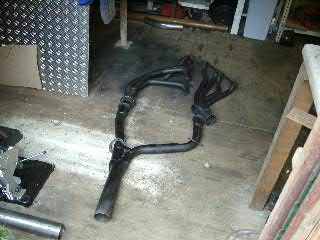
Exhaust systems for engine swaps can be a complete pain in the @rse. I purchased some short stubby headers, which were very similar to a set on Andys chevy conversion, but they didn't fit.
So I then turned to the chevy blazer headers i got free with the engine with a view to cutting them up to make them fit. To my amazement, when i slid them in the engine bay they fitted perfectly. The offside header fouled my gear reduction starter, but its adjustable, so i just turned it round a bit (well, i actually drilled and tapped it!) and then the headers fitted.
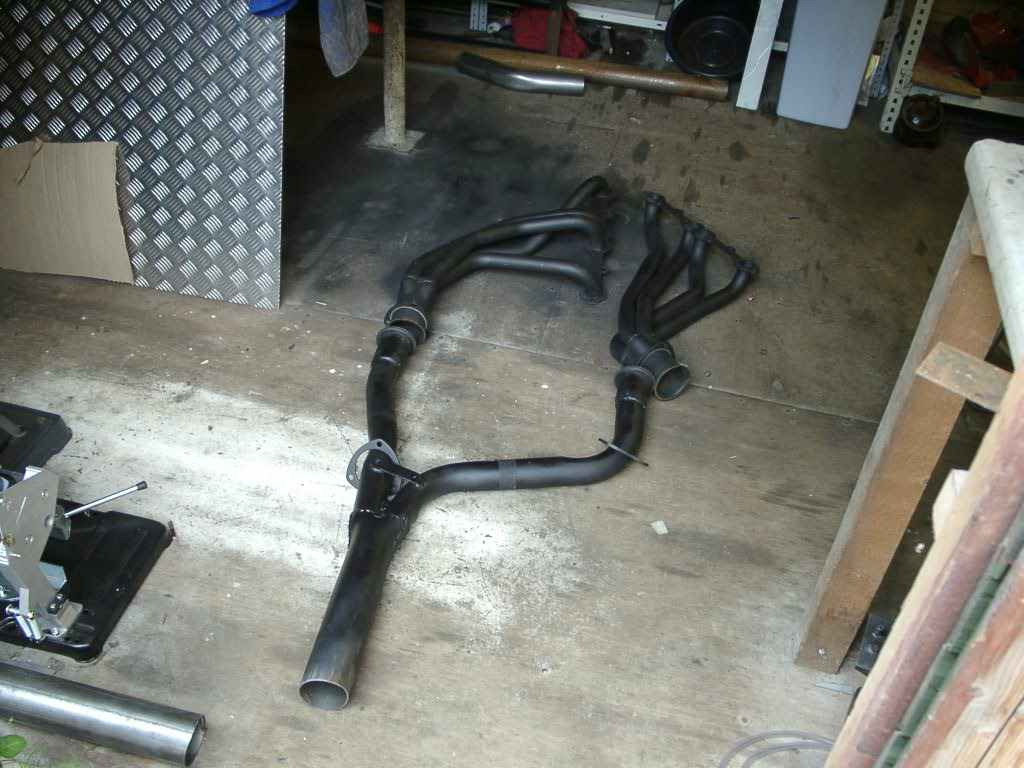
My old Rover sounded loverly on a Single straight through exhaust, and i wanted to duplicate the same on the chevy. So i got underneath with loads of bits of pipe to make the Y pipe that would join the two headers into one 3" outlet.
This took me nearly all day to make!. This shows the blazer headers and my fabricated Y pipe.
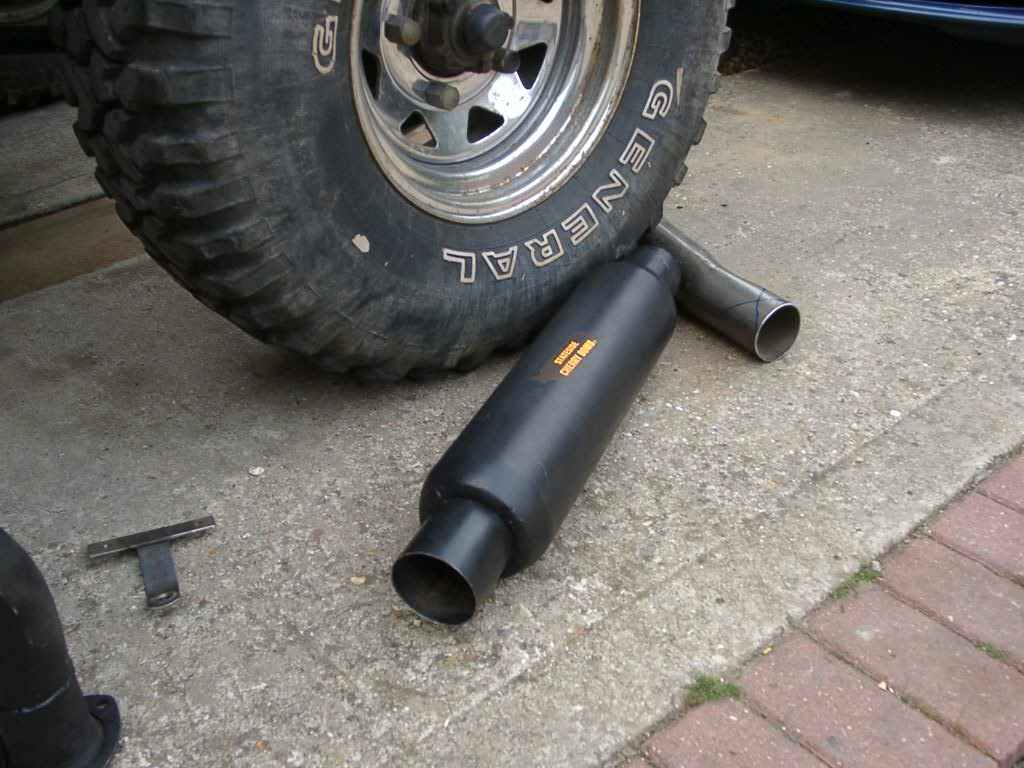
The Y pipe connects to the chery bomb. I'm actually on my third cherry bomb: I drove all the way to stonleigh to collect a 3" cherry bomb and then when home. The next day when it came to fitting said 3" cherry bomb, i discovered that 3" is the measurement of the body of the bomb, not the actual inlet/outlet! doh!, so that one was sent back to be exchanged for a 5" one that has a 3" pipe size. The nice chap on the phone at custom chrome said "A single cherry bomb on 5.7 chevy? - that will sound quite throaty sir!" I said "good" - send it out.
So my second one turned up and i fitted it. However a few weeks later when i got it started, turns out Mr Cherry Bomb was right, it was bloody LOUD!
So i ordered another one, but with some slight internal baffling - still effectivley straight thru though. It sounds gorgous!.

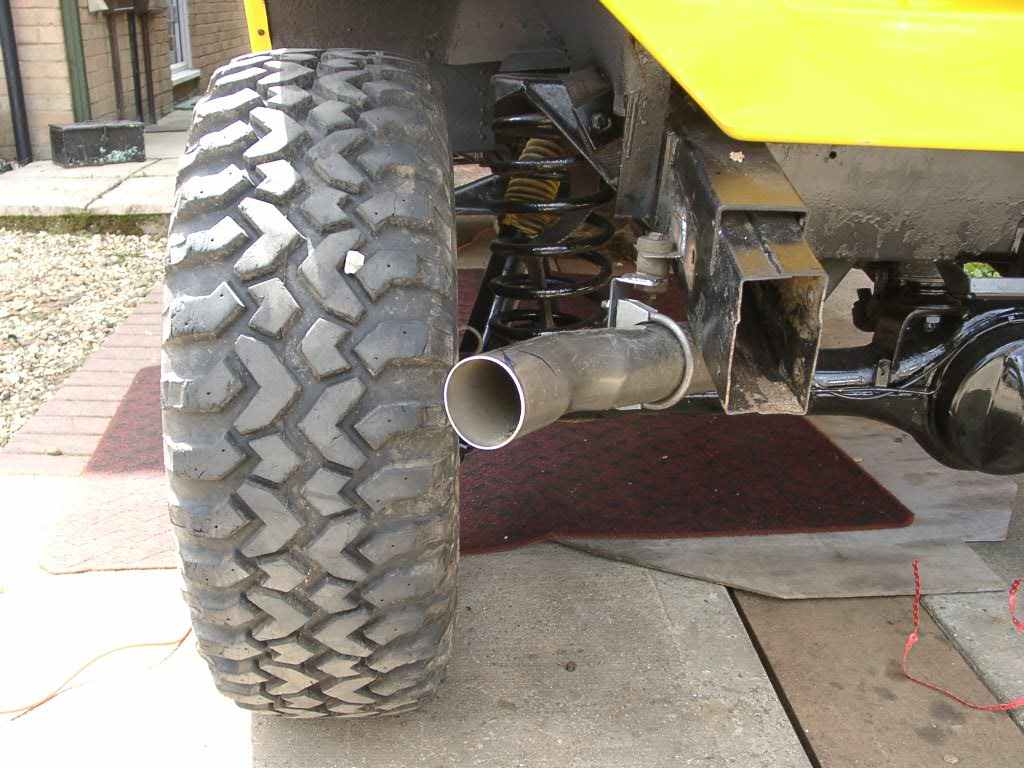
The next step was to make the bit that leads from the cherry bomb out to the back. This needs a hoop in it to go over the rear-axle, it was suggested by the pipe benders to make a template from copper pipe, so i did and gave it to them.
After a week or so, they called me to say they couldn't bend the pipe becuase of its size (3"), it just kept crushing it. They had managed a few curves, but nothing more. I said i would take whatever they had, and i would bodge it up myself. Whilst i was picking up pipe, they showed me a complete rear section for some american truck (pick up to you and me), it had a nice over axle hoop, and it was in 3" pipe. They sold it to me for 45!. This was the second bit of luck, just one cut got me the loop and that just needed finishing of with a tight bend. I made this by hand by segmenting the pipe, and then patching over the holes.
This photo shows me fabricating the rear section of the pipe:
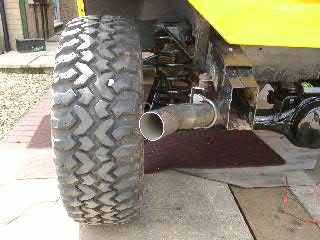
This is the rear outlet. Small children have been lost up it!, ive also set-off car alarms with it!
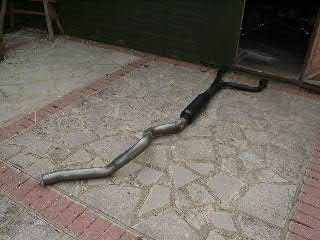
This is the complete article:
Snags and updates
Solution to the carb blowback problem
This has been doing my head in since i got i built, it would run fine upto around 2500rpm, but anything above that, it would blow all the petrol back out the carb. I tried everything:timing, mixture, exhaust, lifter pre load,coil, condensor, distrubutor.
Turns out i got the Cam timing wrong. Picture shows how its supposed to be, I timed it against the wrong dot. (click to enlarge)
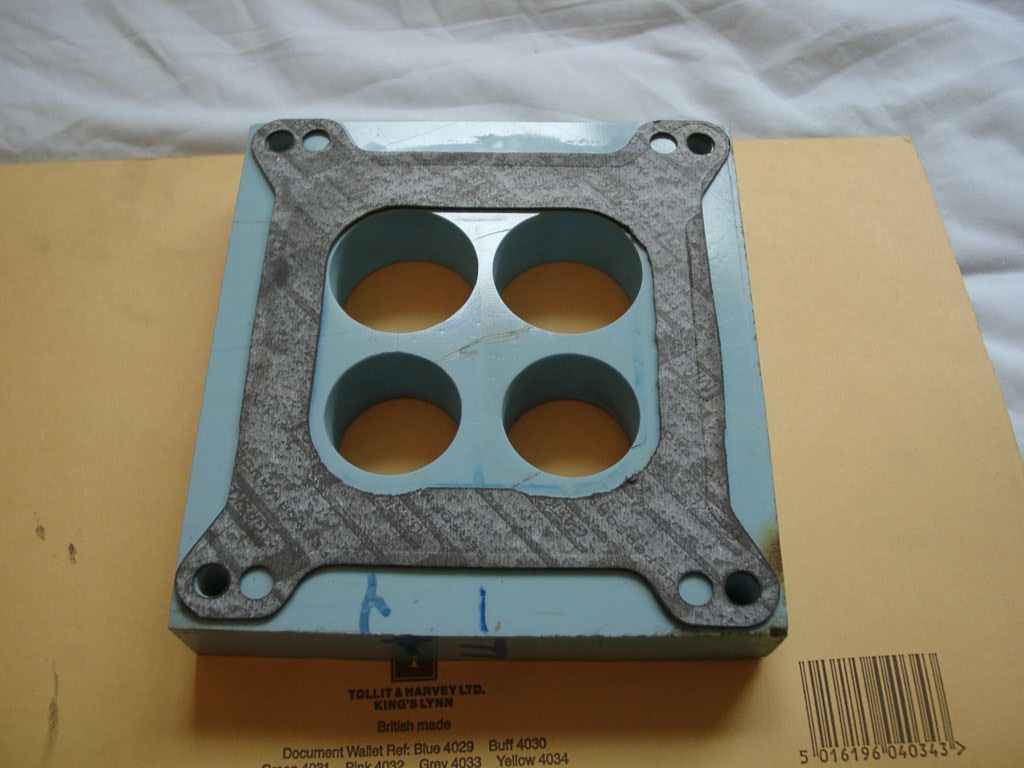
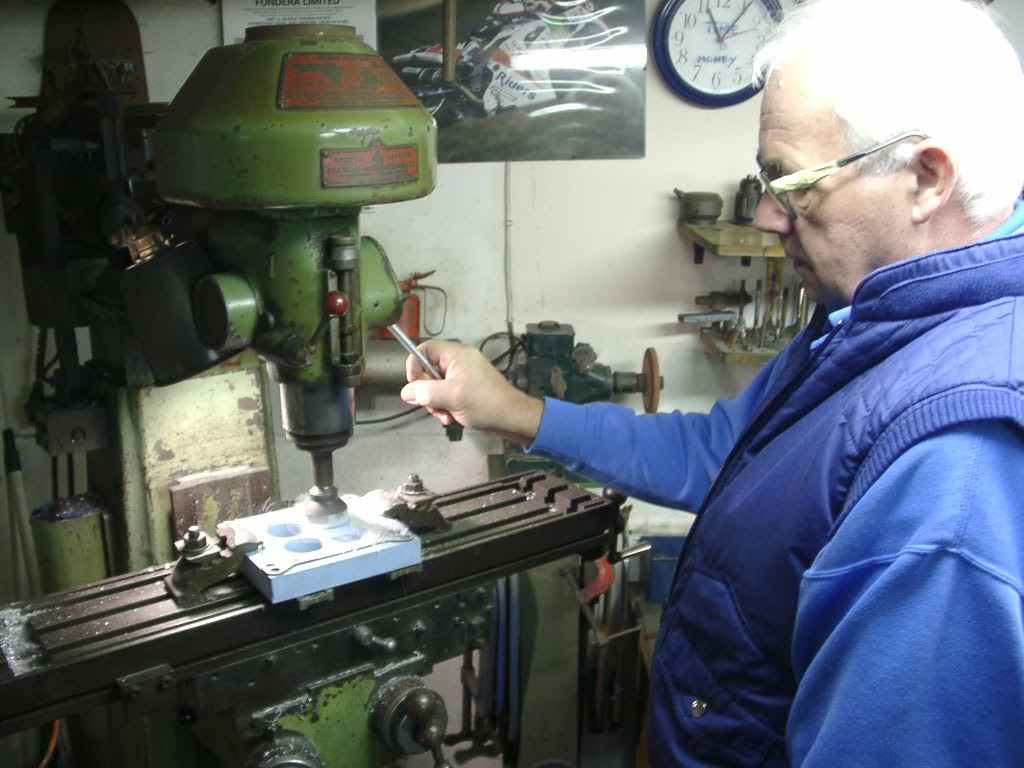
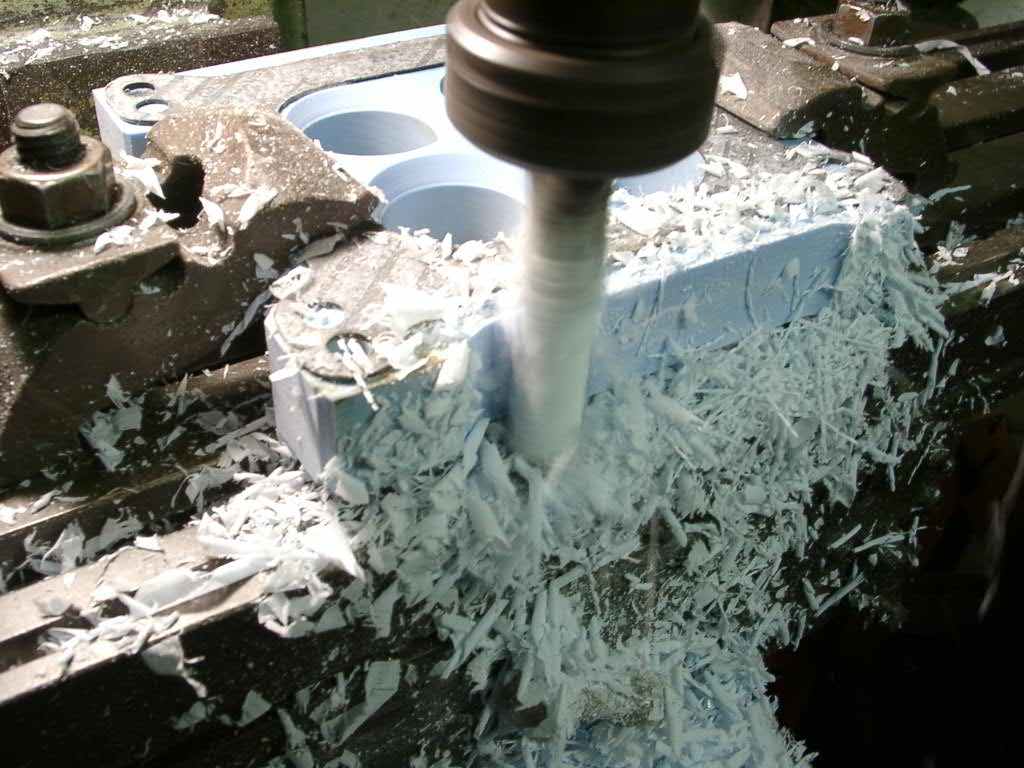
 Home made Carb spacer
The carb tends to get very hot because there is no heat spacer between the manifold and carb. You can purhcase proper spacers, but i just made my own. Most companies sell "phonelic" spacers, but i found some nylon in the shed, and machined it following the gasket as a template. This is the prototype spacer,To improve airflow, we radius the two small holes. (That's Dad!).

The outside is then shaped to follow the outline of the carb
The Range Rover / Landrover Gearbox Swap information Page
Ive created a dedicated page to try and collect as much info as possible about the different gearbox combinations that can be used or considered in a range rover. If you have any relevant information or photos, please send them in. Comments, questions or got answers? Please use the Mez Forums to get in contact or chat about this page.
FAQ - Updated 16/07/2011
Q)Can I use a 2WD box with a propshaft?
A) Possibly - take a look at this website: Rakeway Engineering They make some lovely parts for the LT230, which includes parts to allow you to attach a 2wd box using a UJ and also parts to shorten the box by 70mm - which may save moving the box any further back (4L80e conversion). Q)Can I use a TH400 automatic gearbox?
A)Possibly. You need to check if the front prop will hit the gearbox.
Having made a 4l80e fit, a th400 should fit also.
Q)Can I use a 4L80e automatic gearbox?
A)Yes! - Using a Marks 4WD adapters. Photos of the adapter can be found on my 4l80e information page
2008 Update: I'm also making my own adapter for the 4L80e, information can be found here:
Q)Can I use a TH350 Automatic gearbox?
A)YES -Ive done it - see See my conversion
Q)Can I use a TH700R4 Automatic gearbox?
A)YES. You need to extend the distance between the box and transfer case to get the front prop to clear the side of the case. This means (at least in two cases i know of) you need to move the transfer box backwards and extend the front prop and shorten the rear prop. If you had enough room at the front, you could just move the engine forwards (3") I have successfully fitted one see:700r4 upgrade
Main issue with the 700r4 is that it doesn't handle high toque / horsepower very well (Did I mention that i'm running twin turbos on a 5.7L V8). Im now rebuilding my third box using 5 pinion planetaries and the Torque drive Engineering (TDE) drum and shell package. Details Here
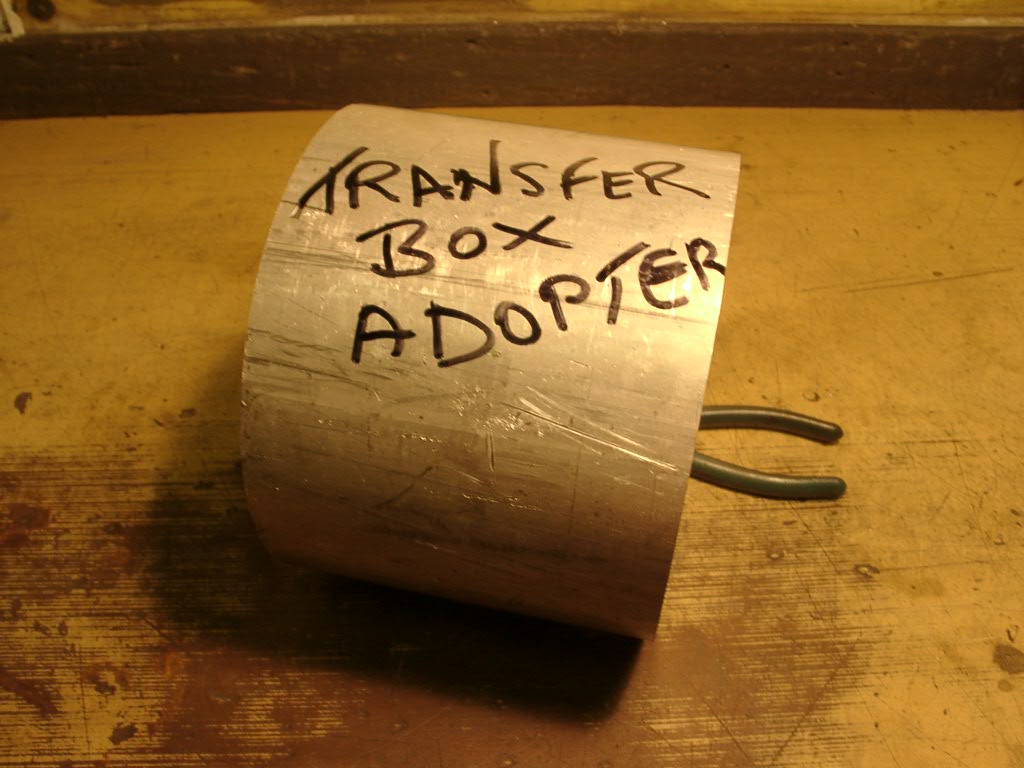
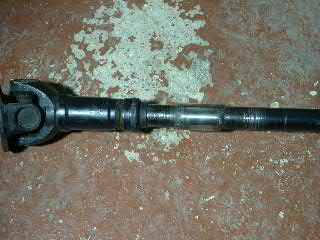
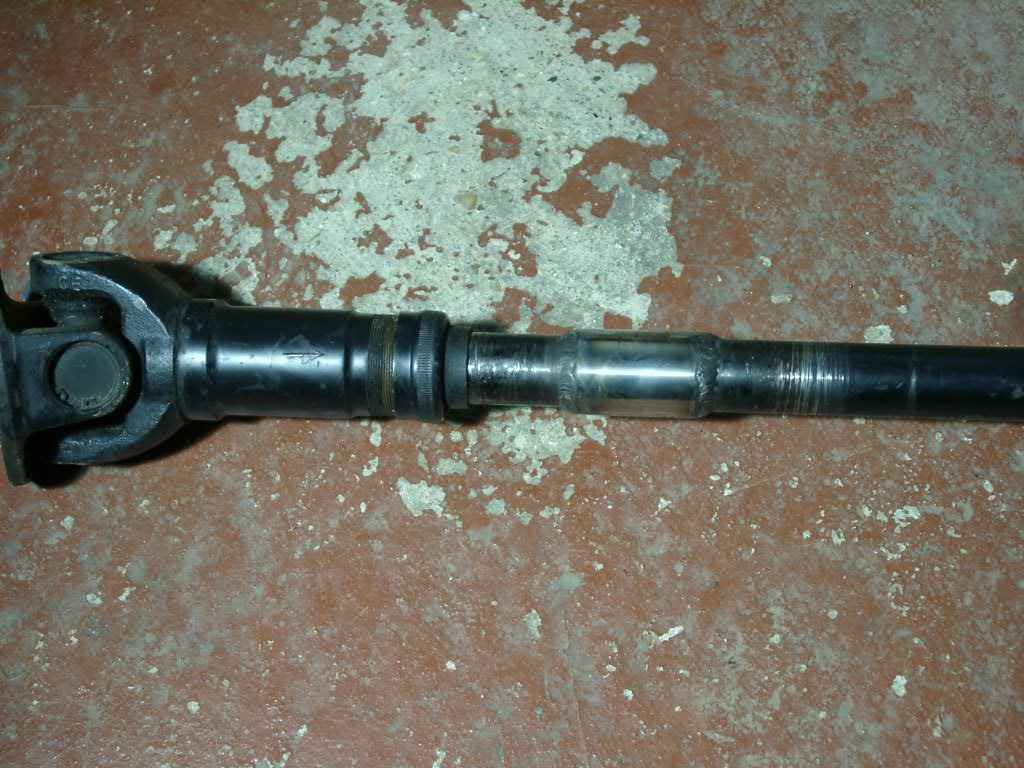
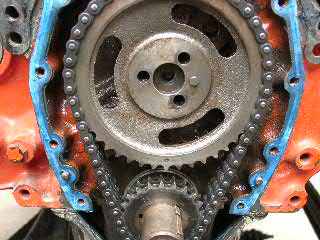
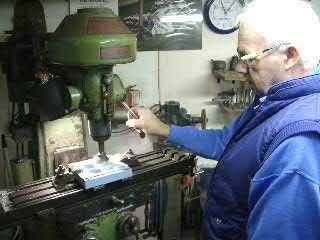
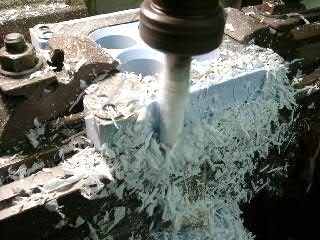
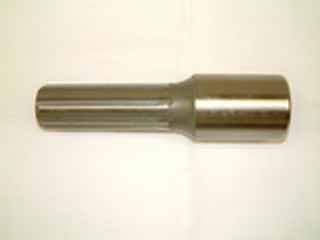
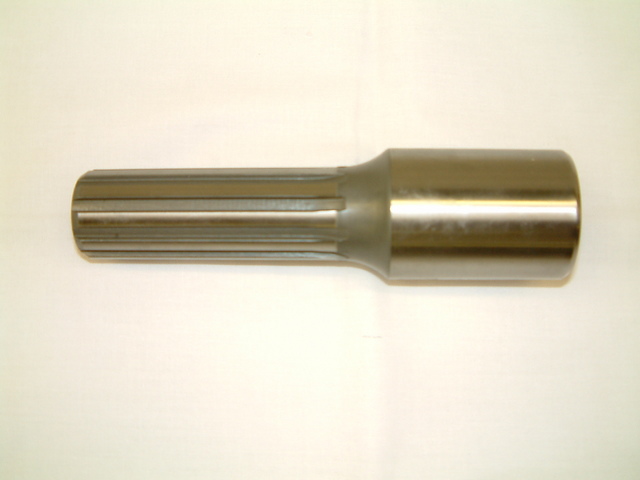
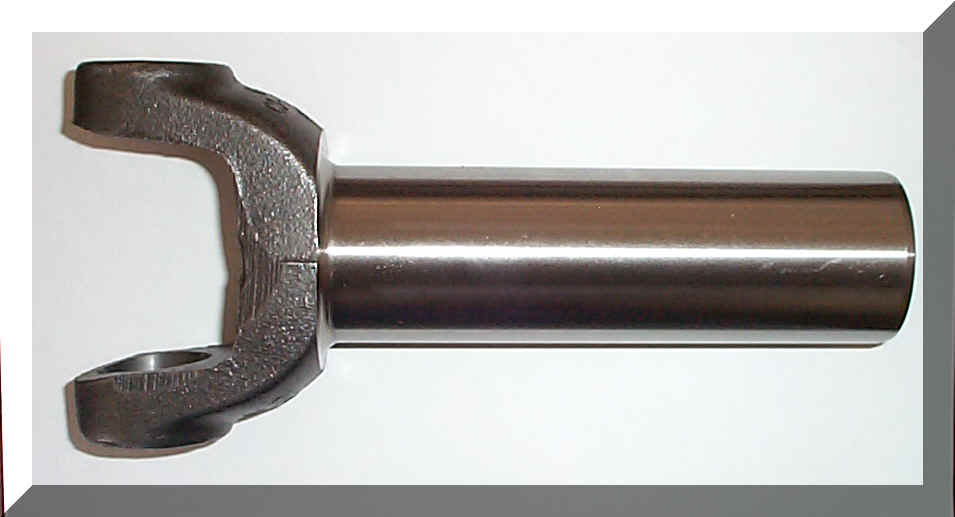
How do you make the coupler shaft?
This is essentially the 'trick' to the conversion. You get a LT230 coupler shaft then machine and weld it to a TH350 propshaft yoke. I'm now posting the information, for the benefit of others - plus I stumbled accross the orginal box with the part number for the shaft the otherday.
You need an FTC5090 coupler shaft:
And either a splined yoke or an old propsaft with the correct splines for the gearbox:
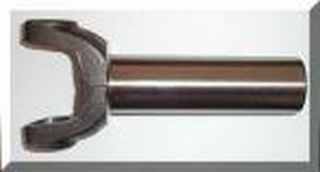
you cut the splined section from the Yoke and then machine the internal diameter of the couple shaft so the splined yoke section slides in a little to provide a register. Then TIG weld it all the way round. It should look like this:
Sounds very easy, but that coupler shaft is hardened and is difficult to turn on the lathe. So now you know the 'secret'
Q)What about the HP22 4 Speed auto-box and a chevy?
A)The HP22 only handles 280FT/Lb (Nm?) of torque. Also, the later ones relied on the ECU to manage gear changes. (you need a 1991-1994 non electronic box i think)
Q)Which transfer Box?
A)I used a 1003:1 LT230 Box that came from the 3 speed Range rover (which had the torque-flyte? box in it). With 35" tyres the gearing is quite tall. 3000RPM is about 75-80MPH. I think any LT230 box will do though. I'm also now trying a 1.19:1 transfer box in it with the 700r4 to see how it goes. The Later borg-warner chain-drive box looks different, so i dont know if you could use it.
Q)Can i purchase the adapter from you?
A)No.
Please dont email me asking to sell the conversion, its quite easy to make your own following the details in these pages.
Consider the following:
My adapter requires the original adapter that Landrover used to fit the 3 speed auto to the 3.5 Range rover circa 1982 onwards. I also used the LT230 transfer box from this vehicle (1003:1) ratio. Click Here to see a picture of it
I believe the part number is FRC5622.
You need to change the front prop-shaft to the thin solid type. If you dont, the prop may hit the transmission oil pan.
You need to fabricate the exhaust system - i *Belive* my headers are from a '79 chevy blazer(mine came free with the engine and the engine was from a blazer - so i'm only assuming)
You need to Fabricate The engine mountings, plus varios other brackets for alternator, PAS pump etc
Make sure you cooling system is up to scratch - I added an extra row to the standard 3.5 EFI rad.
Think about your brakes - i fitted vented disks to the front
Think about your transmission, i'm running 24spline half shafts and 4 pin diffs
Important:
The output shaft of your TH350 needs to be the "short" type. It sticks out about 3-6" front the end of the box WITH THE EXTENSTION HOUSING REMOVED. Dont confuse this the VERY short 4x4 type that dosn't stick out at all.(This is too short). Also note that the output shaft then needs to have about 1" hack-sawed of the end of the shaft, potentially rendering it useless for other purposes. (Or at least will need
This shows things moving on further, Ive also made the Radiator sit vertical in the engine bay, rather than at a slant.Still more plumbing to be done!
Interally, i needed to fit the B & M mega shifter, ally checker plate was require to cover up the gaping whole left by the old engine.
Making the Exhaust
Exhaust systems for engine swaps can be a complete pain in the @rse. I purchased some short stubby headers, which were very similar to a set on Andys chevy conversion, but they didn't fit.
So I then turned to the chevy blazer headers i got free with the engine with a view to cutting them up to make them fit. To my amazement, when i slid them in the engine bay they fitted perfectly. The offside header fouled my gear reduction starter, but its adjustable, so i just turned it round a bit (well, i actually drilled and tapped it!) and then the headers fitted.
My old Rover sounded loverly on a Single straight through exhaust, and i wanted to duplicate the same on the chevy. So i got underneath with loads of bits of pipe to make the Y pipe that would join the two headers into one 3" outlet.
This took me nearly all day to make!. This shows the blazer headers and my fabricated Y pipe.
The Y pipe connects to the chery bomb. I'm actually on my third cherry bomb: I drove all the way to stonleigh to collect a 3" cherry bomb and then when home. The next day when it came to fitting said 3" cherry bomb, i discovered that 3" is the measurement of the body of the bomb, not the actual inlet/outlet! doh!, so that one was sent back to be exchanged for a 5" one that has a 3" pipe size. The nice chap on the phone at custom chrome said "A single cherry bomb on 5.7 chevy? - that will sound quite throaty sir!" I said "good" - send it out.
So my second one turned up and i fitted it. However a few weeks later when i got it started, turns out Mr Cherry Bomb was right, it was bloody LOUD!
So i ordered another one, but with some slight internal baffling - still effectivley straight thru though. It sounds gorgous!.
The next step was to make the bit that leads from the cherry bomb out to the back. This needs a hoop in it to go over the rear-axle, it was suggested by the pipe benders to make a template from copper pipe, so i did and gave it to them.
After a week or so, they called me to say they couldn't bend the pipe becuase of its size (3"), it just kept crushing it. They had managed a few curves, but nothing more. I said i would take whatever they had, and i would bodge it up myself. Whilst i was picking up pipe, they showed me a complete rear section for some american truck (pick up to you and me), it had a nice over axle hoop, and it was in 3" pipe. They sold it to me for 45!. This was the second bit of luck, just one cut got me the loop and that just needed finishing of with a tight bend. I made this by hand by segmenting the pipe, and then patching over the holes.
This photo shows me fabricating the rear section of the pipe:


This is the rear outlet. Small children have been lost up it!, ive also set-off car alarms with it!
This is the complete article:
Snags and updates
Solution to the carb blowback problem
This has been doing my head in since i got i built, it would run fine upto around 2500rpm, but anything above that, it would blow all the petrol back out the carb. I tried everything:timing, mixture, exhaust, lifter pre load,coil, condensor, distrubutor.
Turns out i got the Cam timing wrong. Picture shows how its supposed to be, I timed it against the wrong dot. (click to enlarge)
 Home made Carb spacer
The carb tends to get very hot because there is no heat spacer between the manifold and carb. You can purhcase proper spacers, but i just made my own. Most companies sell "phonelic" spacers, but i found some nylon in the shed, and machined it following the gasket as a template. This is the prototype spacer,To improve airflow, we radius the two small holes. (That's Dad!).
The outside is then shaped to follow the outline of the carb
The Range Rover / Landrover Gearbox Swap information Page
Ive created a dedicated page to try and collect as much info as possible about the different gearbox combinations that can be used or considered in a range rover. If you have any relevant information or photos, please send them in. Comments, questions or got answers? Please use the Mez Forums to get in contact or chat about this page.
FAQ - Updated 16/07/2011
Q)Can I use a 2WD box with a propshaft?
A) Possibly - take a look at this website: Rakeway Engineering They make some lovely parts for the LT230, which includes parts to allow you to attach a 2wd box using a UJ and also parts to shorten the box by 70mm - which may save moving the box any further back (4L80e conversion). Q)Can I use a TH400 automatic gearbox?
A)Possibly. You need to check if the front prop will hit the gearbox.
Having made a 4l80e fit, a th400 should fit also.
Q)Can I use a 4L80e automatic gearbox?
A)Yes! - Using a Marks 4WD adapters. Photos of the adapter can be found on my 4l80e information page
2008 Update: I'm also making my own adapter for the 4L80e, information can be found here:
Q)Can I use a TH350 Automatic gearbox?
A)YES -Ive done it - see See my conversion
Q)Can I use a TH700R4 Automatic gearbox?
A)YES. You need to extend the distance between the box and transfer case to get the front prop to clear the side of the case. This means (at least in two cases i know of) you need to move the transfer box backwards and extend the front prop and shorten the rear prop. If you had enough room at the front, you could just move the engine forwards (3") I have successfully fitted one see:700r4 upgrade
Main issue with the 700r4 is that it doesn't handle high toque / horsepower very well (Did I mention that i'm running twin turbos on a 5.7L V8). Im now rebuilding my third box using 5 pinion planetaries and the Torque drive Engineering (TDE) drum and shell package. Details Here
How do you make the coupler shaft?
This is essentially the 'trick' to the conversion. You get a LT230 coupler shaft then machine and weld it to a TH350 propshaft yoke. I'm now posting the information, for the benefit of others - plus I stumbled accross the orginal box with the part number for the shaft the otherday.
You need an FTC5090 coupler shaft:
And either a splined yoke or an old propsaft with the correct splines for the gearbox:
you cut the splined section from the Yoke and then machine the internal diameter of the couple shaft so the splined yoke section slides in a little to provide a register. Then TIG weld it all the way round. It should look like this:
Sounds very easy, but that coupler shaft is hardened and is difficult to turn on the lathe. So now you know the 'secret'
Q)What about the HP22 4 Speed auto-box and a chevy?
A)The HP22 only handles 280FT/Lb (Nm?) of torque. Also, the later ones relied on the ECU to manage gear changes. (you need a 1991-1994 non electronic box i think)
Q)Which transfer Box?
A)I used a 1003:1 LT230 Box that came from the 3 speed Range rover (which had the torque-flyte? box in it). With 35" tyres the gearing is quite tall. 3000RPM is about 75-80MPH. I think any LT230 box will do though. I'm also now trying a 1.19:1 transfer box in it with the 700r4 to see how it goes. The Later borg-warner chain-drive box looks different, so i dont know if you could use it.
Q)Can i purchase the adapter from you?
A)No.
Please dont email me asking to sell the conversion, its quite easy to make your own following the details in these pages.
Consider the following:
My adapter requires the original adapter that Landrover used to fit the 3 speed auto to the 3.5 Range rover circa 1982 onwards. I also used the LT230 transfer box from this vehicle (1003:1) ratio. Click Here to see a picture of it
I believe the part number is FRC5622.
You need to change the front prop-shaft to the thin solid type. If you dont, the prop may hit the transmission oil pan.
You need to fabricate the exhaust system - i *Belive* my headers are from a '79 chevy blazer(mine came free with the engine and the engine was from a blazer - so i'm only assuming)
You need to Fabricate The engine mountings, plus varios other brackets for alternator, PAS pump etc
Make sure you cooling system is up to scratch - I added an extra row to the standard 3.5 EFI rad.
Think about your brakes - i fitted vented disks to the front
Think about your transmission, i'm running 24spline half shafts and 4 pin diffs
Important:
The output shaft of your TH350 needs to be the "short" type. It sticks out about 3-6" front the end of the box WITH THE EXTENSTION HOUSING REMOVED. Dont confuse this the VERY short 4x4 type that dosn't stick out at all.(This is too short). Also note that the output shaft then needs to have about 1" hack-sawed of the end of the shaft, potentially rendering it useless for other purposes. (Or at least will need
#16
06-09-2012, 12:45 PM
Recovery Vehicle
#17
06-09-2012, 04:36 PM

Wow..... Guys great posts..... looks like this thread is on the right trac.... I and others appreciat any and all relavent links and other worthy right ups.... basically hard info and no Bull @#%* ....
Relocating mounts and fab work.. expected.....!!! it goes without saying....!! I'm talking like the fact the ecu to the LR tranny won't work, which I knew.. however than someone counters with the link to the stand alone ecu from lucky 8... Thats the info this thread is looking for....
the next big one is still who knows a shop worhty of either (A) producing an adapter plate to mate the 350 to the LR auto trans.. or (B) if adapting the chev trans to the LR t-case is a better solution... big decision maker here is fuctionallity vs $$$
#18
06-11-2012, 06:40 AM

Baja
"looks like this thread is on the right trac...."
Except for the fact that it has absolutely nothing to do with putting an smc into a Disco II.
A RRC and Disco II have about as much in common as Obama and Romney
http://www.marks4wd.com/products/eng...evy-V6-V8.html
Except for the fact that it has absolutely nothing to do with putting an smc into a Disco II.
A RRC and Disco II have about as much in common as Obama and Romney
http://www.marks4wd.com/products/eng...evy-V6-V8.html
Last edited by drowssap; 06-11-2012 at 12:18 PM.
#19
06-11-2012, 03:41 PM
I was doing a phx CL search and found a nice engine complete with accessorys without computer for 1000 bucks... it was a 94 Corvette LT1 engine w/45k mi.... prob is when I showed my mechanic guy he said based on pic that this was a bad choice, he said the distributer cap was designed on the lower, bottom of the front of the engine... not good for on trails with lots of debris or worst of all WATER... that plus he says we might have better luck scoping out a newer doner year engine... So in the next few days we will be scouting wrecking yards for a Chevy/GM based engine either in a 5.3 liter or 5.7 liter complete with accessory's and transmision, to mount to the LR TBox.. trying to keep engine and trans under $1500. and hopefully from as new a vehicle as possible.... hopefully have upate on purchase in a week or so....

Last edited by 22Dirty; 06-11-2012 at 03:47 PM. Reason: added pictures.
#20
06-11-2012, 08:59 PM

Mudding
Join Date: Jun 2011
Location: Canterbury, CT
Posts: 108
Likes: 0
Received 0 Likes
on
0 Posts
Looks good. It may not be as macho but my "What if?" was putting in a GM 3800 as a direct replacement. They are rated at 205 Hp and are absolutely bulletproof. Add the supercharger from a Grand Prix GTP with a tune and headers and your talking more than 260hp. More than factory but not too much damage and plenty of room in the engine bay. Oh and they are dirt cheap.
.02
.02