Totaled my DII & bought it back - just decided to fix her! Many ?'s...


#13
 08-09-2012, 09:49 PM

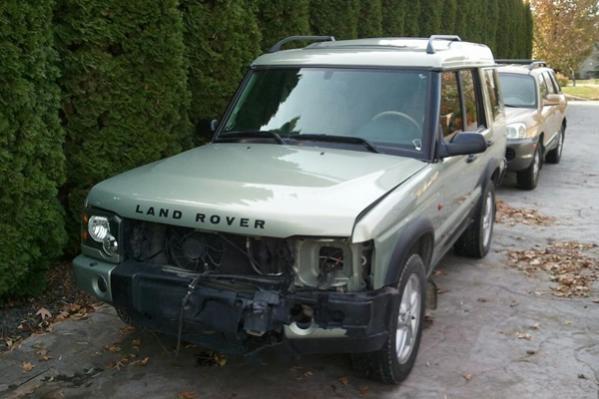
Oh come on, it looks like you hit a bird or something! My entire radiator and core assy. is wrapped around the clutch fan/serpentine belt. assy. 
HOWEVER!! Much to my relief today I went outside at lunch with a motorcycle battery I had laying around the shop, and zip-tied the terminals of the rover to it. Within a few seconds my air suspension came to life (releasing air, auto-leveling.. I have custom solenoids so they're really loud!) and upon inserting the key and turning it to ignition, EVERYTHING WORKS! I was finally able to close all my windows and the sunroof for the first time since the crash! Apparently when the battery was hit, it had slowly failed and was totally dead once I went to shift out of park on the flatbed, requiring me to manually release the shifter safety and struggle to get the key out of the ignition, plus failure of all windows/sunroof.
All of that worked today, as well as the central locking, interior lights, and (apparently) the alarm system.
It's so nice to see some life breathed into the vehicle, I can't even explain it! To see her auto-level when that battery was connected.... it's like she wants to be back on the road again lol. So it's finally sealed up and I could remove all the plastic that I had taped over all the windows and roof to keep the elements out (it's still under a custom waterproof car cover though )
)
HOWEVER!! Much to my relief today I went outside at lunch with a motorcycle battery I had laying around the shop, and zip-tied the terminals of the rover to it. Within a few seconds my air suspension came to life (releasing air, auto-leveling.. I have custom solenoids so they're really loud!) and upon inserting the key and turning it to ignition, EVERYTHING WORKS! I was finally able to close all my windows and the sunroof for the first time since the crash! Apparently when the battery was hit, it had slowly failed and was totally dead once I went to shift out of park on the flatbed, requiring me to manually release the shifter safety and struggle to get the key out of the ignition, plus failure of all windows/sunroof.
All of that worked today, as well as the central locking, interior lights, and (apparently) the alarm system.
It's so nice to see some life breathed into the vehicle, I can't even explain it! To see her auto-level when that battery was connected.... it's like she wants to be back on the road again lol. So it's finally sealed up and I could remove all the plastic that I had taped over all the windows and roof to keep the elements out (it's still under a custom waterproof car cover though
)

#16
08-14-2012, 12:38 PM
I need to take some more pictures - I bent back the core support structure and removed the serpentine belt and the squished battery, threw in an Optima blue top (from my boat, but I'm not using it so it's good for a tough off-road vehicle!).
Turned the key... and she fired right up! Obviously I only ran it for ~5 seconds (didn't have the cooling system connected and no MAF which surprised me...) BUT now I can continue with the project.
Turned the key... and she fired right up! Obviously I only ran it for ~5 seconds (didn't have the cooling system connected and no MAF which surprised me...) BUT now I can continue with the project.
#17
08-15-2012, 09:47 PM
Spent a couple hours ripping everything off the front - no easy task considering how the front support was bent over areas which had the tack welds I needed to get to. I basically cut away piece by piece till I could get to more important parts that released the brackets / mounts I needed to get to.
All that's left tomorrow is removing a couple components from the inner driver fender area and removing the outer fender sheet metal panel, then drilling out spot welds to free up / remove the entire inner fender panel as well. I've got a couple tack welds to drill out on the driver side rearward headlight frame, but that should come out easily.
I need to figure out if I can buy single stage paint (non gloss) to shoot the inside areas of the sheet metal with! The core support structure and inner fender will need to be painted very soon so I can begin reassembly.
#19
11-05-2012, 07:48 AM

#20
11-10-2012, 07:04 PM
Sorry for the slow updates - got a lot going on lately (recently bought a 4 year old horse who has been uhm.. high maintenance. Even by Land Rover standards.)
Recently after my last post I finished removing the damaged sections of the front bulkhead assembly (pass. side headlight surround area, etc) and obviously the damaged driver side outer fender as well as cutting off the INNER fender apron "valance assy." as the 'brits call it.
Not sure if some of you caught my thread from the other day, but the vehicle was parked in an area behind my shop which is flood-prone in quick-hitting rain storms. With hurricane Sandy approaching I was forced to get my Disco at least running so I could move it out of the flood areas (trust me, that entire parking lot has been in 3+ feet of water before.) Well I don't like the idea of running it without coolant, even if it's for 20-30 seconds as it still creates "hot spots" in certain areas of the block and heads.
Sooo I figured I'd need to actually replace the cooling components back to working spec. - I figure I can leave the radiator and transmission / oil coolers and hoses attached while I finish the remainder of the repairs. So I removed the old fan and water pump, replaced the water pump (not the fan yet, the blades were slightly damaged so the old one was trash).
While going to put the belt on I noticed the alternator was removed slightly, not pressed into the arms that hold it. I couldn't remember if this was me or not, but when I looked behind it and noticed both wires disconnected... I got a bad feeling. I pressed on though, it was cloudy and the winds were picking up - starting to get nervous!
Well I got all the hoses in place (all new lower hoses, new heater core hoses, new thermostat, new expansion tank hardline hoses, etc!) bled the system as best I could w/o engine running - but we all know how that works. Would be okay for a few minutes though. Quickly threw the airbox in there (it was just hanging as the fender was removed) and attached the MAF again.
Hopped in and started her up... success!
..till I put it in reverse. And nothing happened. GRRRRR. What the hell?! I put it in park and I get this NASTY clatter/grinding noise?! I leave it in neutral and shut it off, set parking brake. I go under vehicle to break loose trans fill plug to check the level since it might be slightly low after replacing trans cooler. As I'm fumbling around I look up and notice a TOTALLY NAKED front transfer case flange - NO DRIVESHAFT!
I'm livid at this point, as someone obviously stole my front drive shaft. F-it, storm is still coming and I have no hood or anything on it so it's not like I can just continue after it starts raining. I fill the trans up anyways and it was indeed about 1/2 qt. low but whatever. While I'm under there I lock the transfer case (times like this I'm grateful for having a land rover!!!) and jump back in the car.. start it up, put it in reverse, and she moves for the first time in almost 6 months!
So she's safely inside the shop as of now, I drove it up the ramp with no problems.
Unfortunately the brake system was damaged at some point as well. When looking under the hood I noticed the master cyl. reservoir was totally empty. There was a stream of fluid leaking out of the rear bulkhead of the master cyl. where it attaches to the booster. I looked a little closer and discovered a slight mark on the front face of the cylinder... which perfectly matched up with the support bracket for the power steering fluid reservoir (even though they were now a few inches apart - it had happened during the impact though, just enough to break the seal!)
I'm going to replace the master cylinder tomorrow, although I won't be able to bleed the system with TestBook till a little later. Has anyone had ANY success bleeding the system upstream of the modulator without TestBook? Since the modulator-to-master cyl. lines point DOWN there's nothing I can do to prevent fluid leaking out once I remove the old master cylinder. I have a friends system I can borrow though.
Also my air suspension system has a SLOW leak which is bugging me a bit. As some of you know, I totally redesigned the system to use a P38 range rover air tank and a viair compressor instead of the direct-inflate system from before. The SLABS ECU sends the same 12v+ signal out, it just goes to a solenoid valve connected to the air tank line instead of the compressor motor - works much faster and less compressor usage. The tank is inflated with the compressor on a pressure switch that keep it at 120PSI (too low but the only switch I had at the time. I'll change it to 160 as this will cut down on compressor cycles much more once you factor in the volume of air in the tank at the 40 psi difference.)
I also connected pressure sending units to the suspension and air tank supply side, going to a digital gauge that tells me pressures for both sides of the system. With the vehicle just sitting, I get about a 5psi drop per day which is NOT enough to check with the soapy water method. It's also not really enough to worry about since it drops more than that when you stop at a stop light and the system auto-levels the rear lol. BUT if you park for extended periods and the tank pressure drops below the suspension pressure and the computer opens to auto-level, you'll back-feed the system and drain air out of the air bags, causing the truck to sit lower. I still to this day don't know when the system re-checks the air levels. Usually when unlocking a door or something, but it has also done it when I haven't been near it for a while - not documented in RAVE at all.
Besides the brakes and air suspension there don't appear to be any NEW problems beyond the ones I knew about already prior to starting the vehicle.
Luckily I have another spare used front driveshaft that I can have rebuilt again.
...... I still can't believe that. I just got a perfect mental image of a couple guys going under there and f-ing with my truck, removing all those flange nuts and just ripping that thing out of there. I can't BELIEVE some people - my rebuilt driveshaft is on some a$$holes car as I type this.
Why couldn't I have forgotten something at work and randomly driven past there the night they took it and caught them in the act? ..couldn't even imagine what I would have done.
Anyways these are the only images I have at the moment (from my phone.) New inner fender apron will be welded in this week.
QUESTION does anyone know where to order the semi-gloss under hood paint? We have a few different paint supply companies and NONE of them list an under-hood semi-gloss paint variant for Kinversand.
I threw my new fender on there for reference purposes - since half of the inner fender apron was missing it was just to check alignment. With the remaining half's outer fender hole lined up with the new fender's bolt hole, the fender actually lined up almost perfectly with the door!
Other picture shows the new radiator, oil cooler, trans cooler, battery, and the air box sitting in there temporarily so I could get her into the shop.
Recently after my last post I finished removing the damaged sections of the front bulkhead assembly (pass. side headlight surround area, etc) and obviously the damaged driver side outer fender as well as cutting off the INNER fender apron "valance assy." as the 'brits call it.
Not sure if some of you caught my thread from the other day, but the vehicle was parked in an area behind my shop which is flood-prone in quick-hitting rain storms. With hurricane Sandy approaching I was forced to get my Disco at least running so I could move it out of the flood areas (trust me, that entire parking lot has been in 3+ feet of water before.) Well I don't like the idea of running it without coolant, even if it's for 20-30 seconds as it still creates "hot spots" in certain areas of the block and heads.
Sooo I figured I'd need to actually replace the cooling components back to working spec. - I figure I can leave the radiator and transmission / oil coolers and hoses attached while I finish the remainder of the repairs. So I removed the old fan and water pump, replaced the water pump (not the fan yet, the blades were slightly damaged so the old one was trash).
While going to put the belt on I noticed the alternator was removed slightly, not pressed into the arms that hold it. I couldn't remember if this was me or not, but when I looked behind it and noticed both wires disconnected... I got a bad feeling. I pressed on though, it was cloudy and the winds were picking up - starting to get nervous!
Well I got all the hoses in place (all new lower hoses, new heater core hoses, new thermostat, new expansion tank hardline hoses, etc!) bled the system as best I could w/o engine running - but we all know how that works. Would be okay for a few minutes though. Quickly threw the airbox in there (it was just hanging as the fender was removed) and attached the MAF again.
Hopped in and started her up... success!
..till I put it in reverse. And nothing happened. GRRRRR. What the hell?! I put it in park and I get this NASTY clatter/grinding noise?! I leave it in neutral and shut it off, set parking brake. I go under vehicle to break loose trans fill plug to check the level since it might be slightly low after replacing trans cooler. As I'm fumbling around I look up and notice a TOTALLY NAKED front transfer case flange - NO DRIVESHAFT!
I'm livid at this point, as someone obviously stole my front drive shaft. F-it, storm is still coming and I have no hood or anything on it so it's not like I can just continue after it starts raining. I fill the trans up anyways and it was indeed about 1/2 qt. low but whatever. While I'm under there I lock the transfer case (times like this I'm grateful for having a land rover!!!) and jump back in the car.. start it up, put it in reverse, and she moves for the first time in almost 6 months!
So she's safely inside the shop as of now, I drove it up the ramp with no problems.
Unfortunately the brake system was damaged at some point as well. When looking under the hood I noticed the master cyl. reservoir was totally empty. There was a stream of fluid leaking out of the rear bulkhead of the master cyl. where it attaches to the booster. I looked a little closer and discovered a slight mark on the front face of the cylinder... which perfectly matched up with the support bracket for the power steering fluid reservoir (even though they were now a few inches apart - it had happened during the impact though, just enough to break the seal!)
I'm going to replace the master cylinder tomorrow, although I won't be able to bleed the system with TestBook till a little later. Has anyone had ANY success bleeding the system upstream of the modulator without TestBook? Since the modulator-to-master cyl. lines point DOWN there's nothing I can do to prevent fluid leaking out once I remove the old master cylinder.
I have a friends system I can borrow though.Also my air suspension system has a SLOW leak which is bugging me a bit. As some of you know, I totally redesigned the system to use a P38 range rover air tank and a viair compressor instead of the direct-inflate system from before. The SLABS ECU sends the same 12v+ signal out, it just goes to a solenoid valve connected to the air tank line instead of the compressor motor - works much faster and less compressor usage. The tank is inflated with the compressor on a pressure switch that keep it at 120PSI (too low but the only switch I had at the time. I'll change it to 160 as this will cut down on compressor cycles much more once you factor in the volume of air in the tank at the 40 psi difference.)
I also connected pressure sending units to the suspension and air tank supply side, going to a digital gauge that tells me pressures for both sides of the system. With the vehicle just sitting, I get about a 5psi drop per day which is NOT enough to check with the soapy water method.
It's also not really enough to worry about since it drops more than that when you stop at a stop light and the system auto-levels the rear lol. BUT if you park for extended periods and the tank pressure drops below the suspension pressure and the computer opens to auto-level, you'll back-feed the system and drain air out of the air bags, causing the truck to sit lower. I still to this day don't know when the system re-checks the air levels. Usually when unlocking a door or something, but it has also done it when I haven't been near it for a while - not documented in RAVE at all. Besides the brakes and air suspension there don't appear to be any NEW problems beyond the ones I knew about already prior to starting the vehicle.
Luckily I have another spare used front driveshaft that I can have rebuilt again.
...... I still can't believe that. I just got a perfect mental image of a couple guys going under there and f-ing with my truck, removing all those flange nuts and just ripping that thing out of there. I can't BELIEVE some people - my rebuilt driveshaft is on some a$$holes car as I type this.
Why couldn't I have forgotten something at work and randomly driven past there the night they took it and caught them in the act? ..couldn't even imagine what I would have done.
Anyways these are the only images I have at the moment (from my phone.) New inner fender apron will be welded in this week.
QUESTION does anyone know where to order the semi-gloss under hood paint? We have a few different paint supply companies and NONE of them list an under-hood semi-gloss paint variant for Kinversand.
I threw my new fender on there for reference purposes - since half of the inner fender apron was missing it was just to check alignment. With the remaining half's outer fender hole lined up with the new fender's bolt hole, the fender actually lined up almost perfectly with the door!
Other picture shows the new radiator, oil cooler, trans cooler, battery, and the air box sitting in there temporarily so I could get her into the shop.