My P38 Transformation
#1
 07-11-2012, 10:53 AM


This will be the thread I use to post pictures and progress on my transformation from my P38 daily driver to the proper wheeling machine it ought to be.
PLEASE Give me your input and ideas! I want this to be a discussion as much as a showcase.
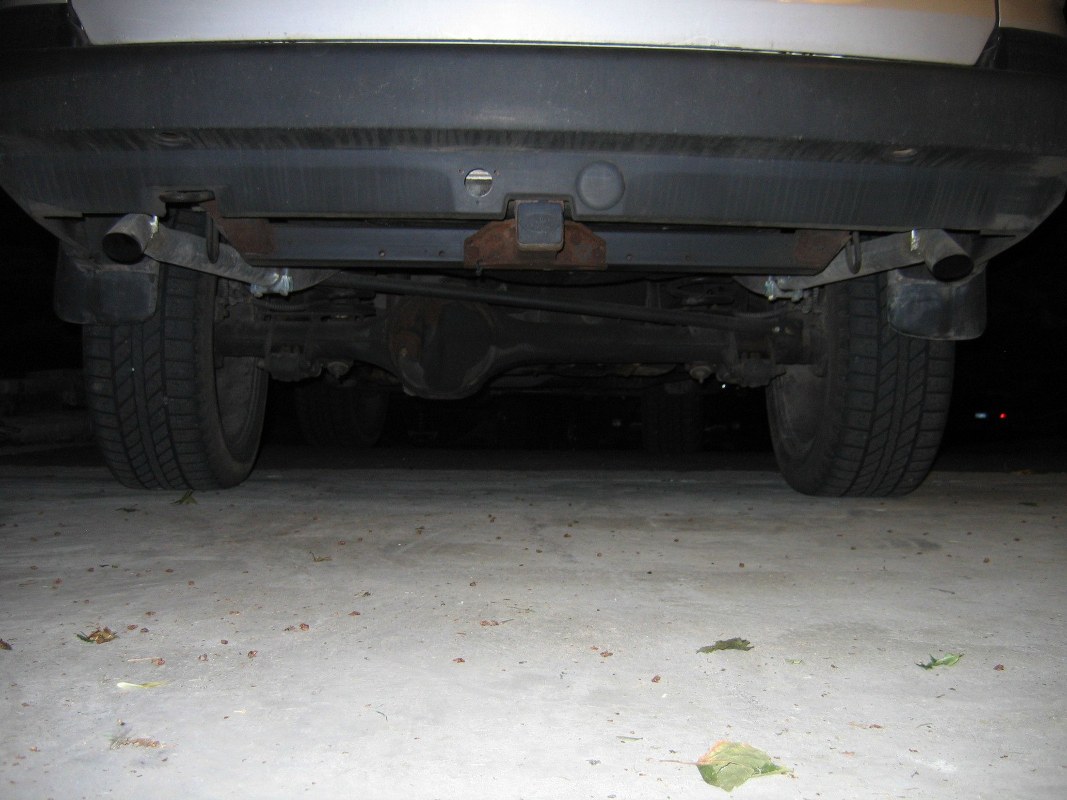
My first step was to remove the running boards, which got pretty bunged up on a wheeling weekend at the end of the summer. Looks much better now. Promptly after that I decided that I didn't want the rear silencers on, so I chopped 'em off and stuck some piping on. Took a couple pics, and a video of the sexy sound it now belts out. Hope you enjoy.
Pics:
Video:

It sounds great IMO. I was looking for something deep and rumbly, rather than something loud with too much 'bark'. This worked out great actually. When just cruising around with the windows down, it sounds much better than before, but not too obnoxious. When highway driving, there is no difference, and with the windows up, there is also no difference.
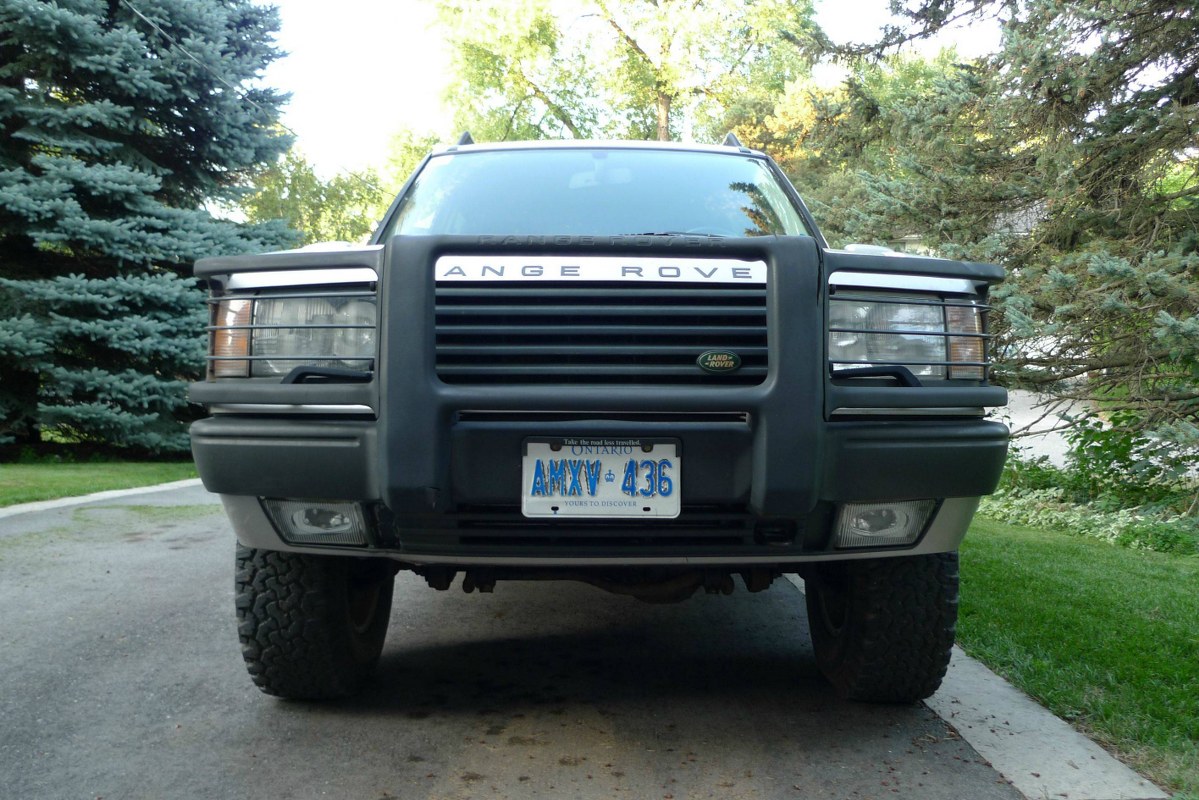
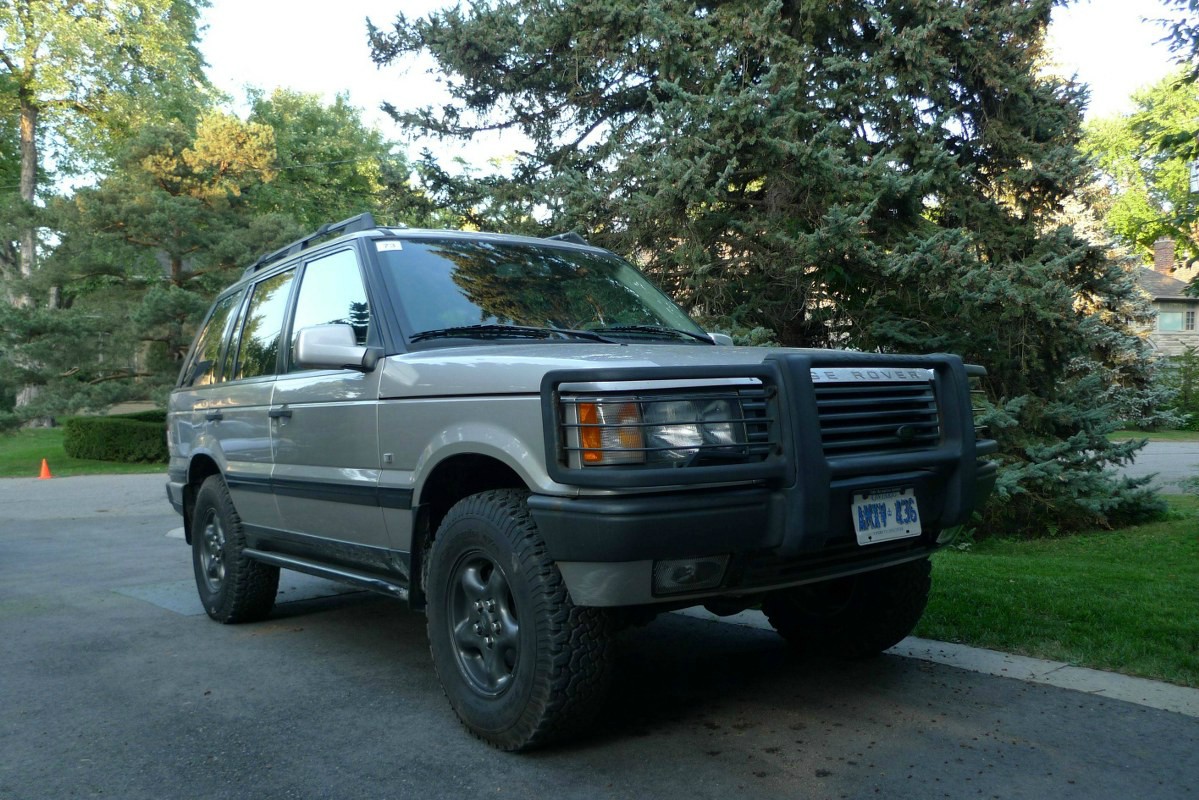
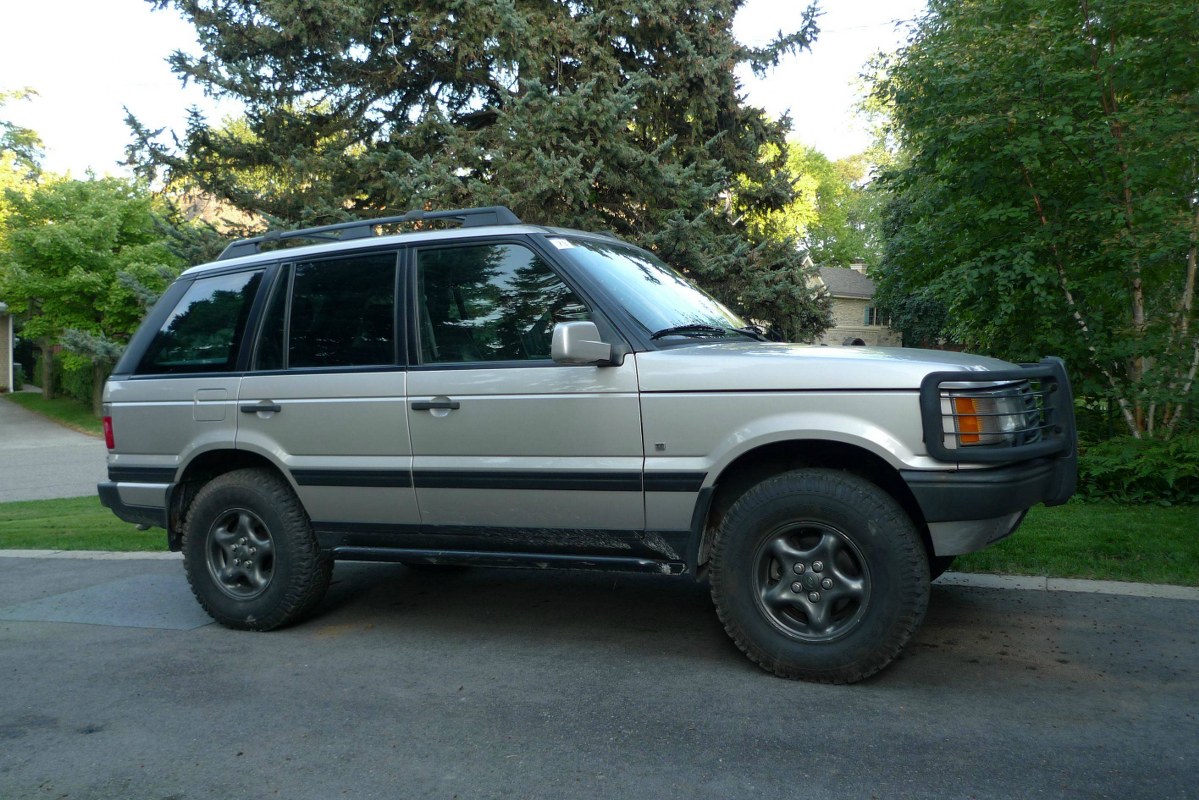
The next step for my project was to get some proper shoes. I looked around, and concluded that a set of 265/75/16's would work well. I picked up a set of five 16" Land Rover rims last summer for $125, and they've been waiting for rubber since then. Earlier this summer, I got my hands on a set of BFG All Terrains. I would have picked something a bit more aggressive, but this is still my daily driver, with which I drive about 100-120km a day. As such, the All Terrains made more sense for now. Once those were fit to the vehicle, it became quite clear that a lift was needed in the near future. They did the trick, but there was some noticeable rubbing from the front tires when cornering, especially if I was turning up into a driveway or onto a curb.
With a lift on my mind, I started looking around for some options. Quite soon afterwards, I was in discussion with Scotty over a set of springs he had from his P38 from when it was on coils. After various e-mail exchanges, I ended up getting Scotty's springs. He was very helpful and a pleasure to deal with. Thanks Scotty!
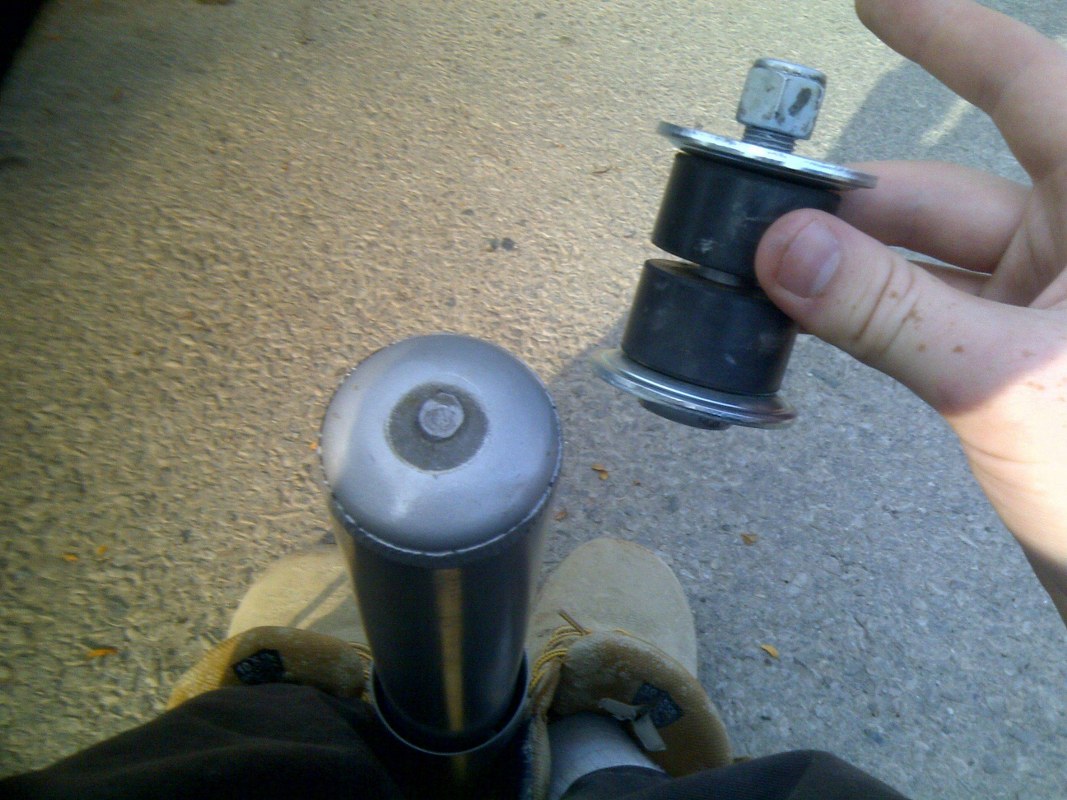
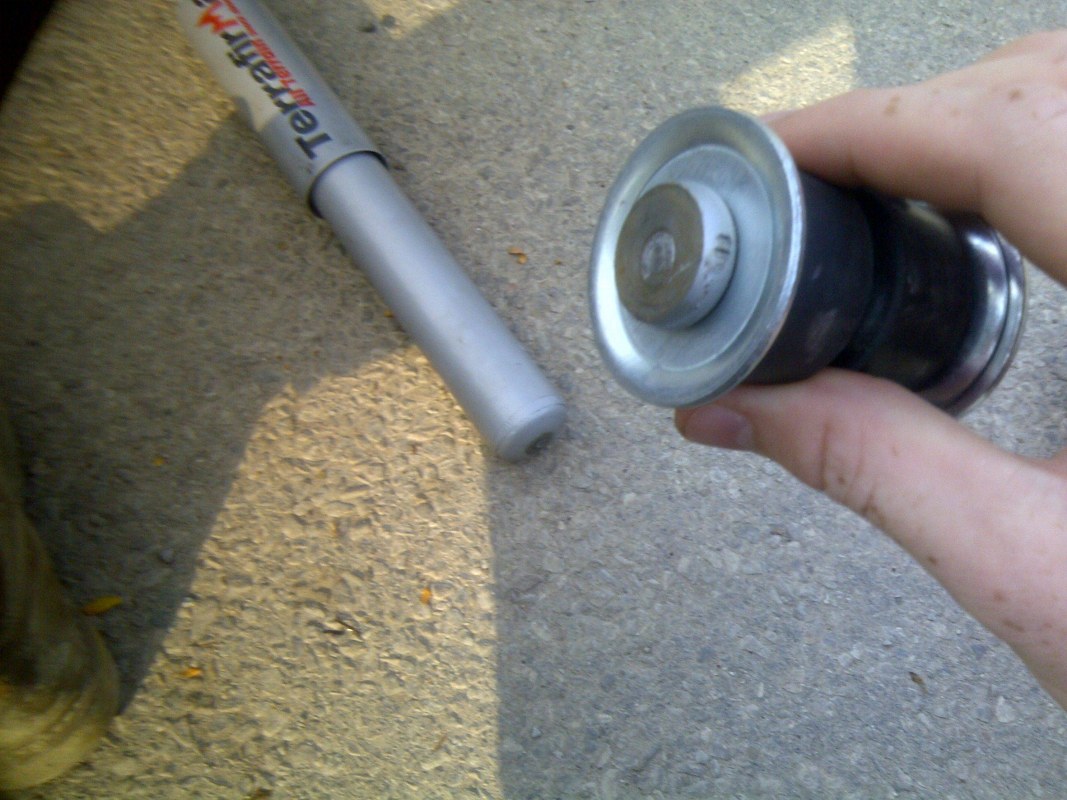
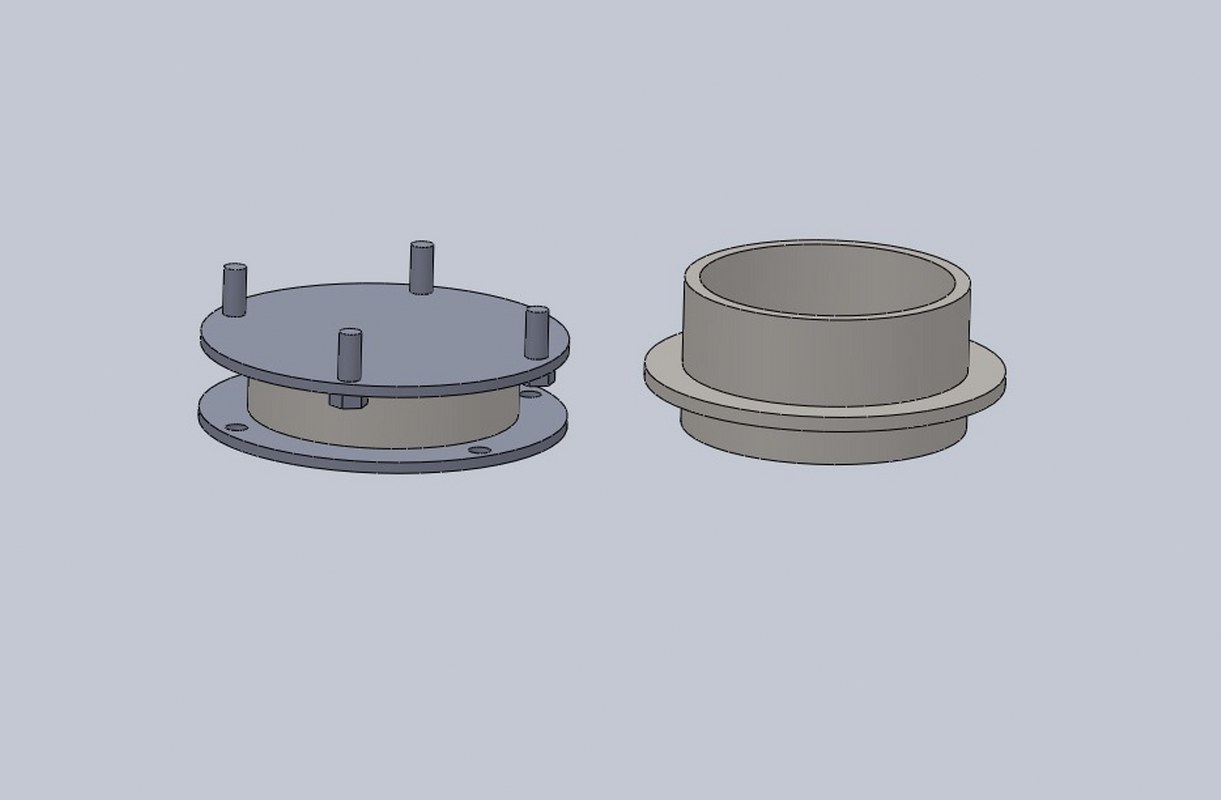
The springs in question are OME 779 for the front, and OME 751 for the rear. They were supposed to give approximately a 2" lift as far as I'm aware. Once installed, it became evident that I would need just a little bit more height in order to get to the position I wanted. As such, I had a set of spacers rigged up to give an extra 1.25" of lift. Once those were in the rig, everything looked just right.
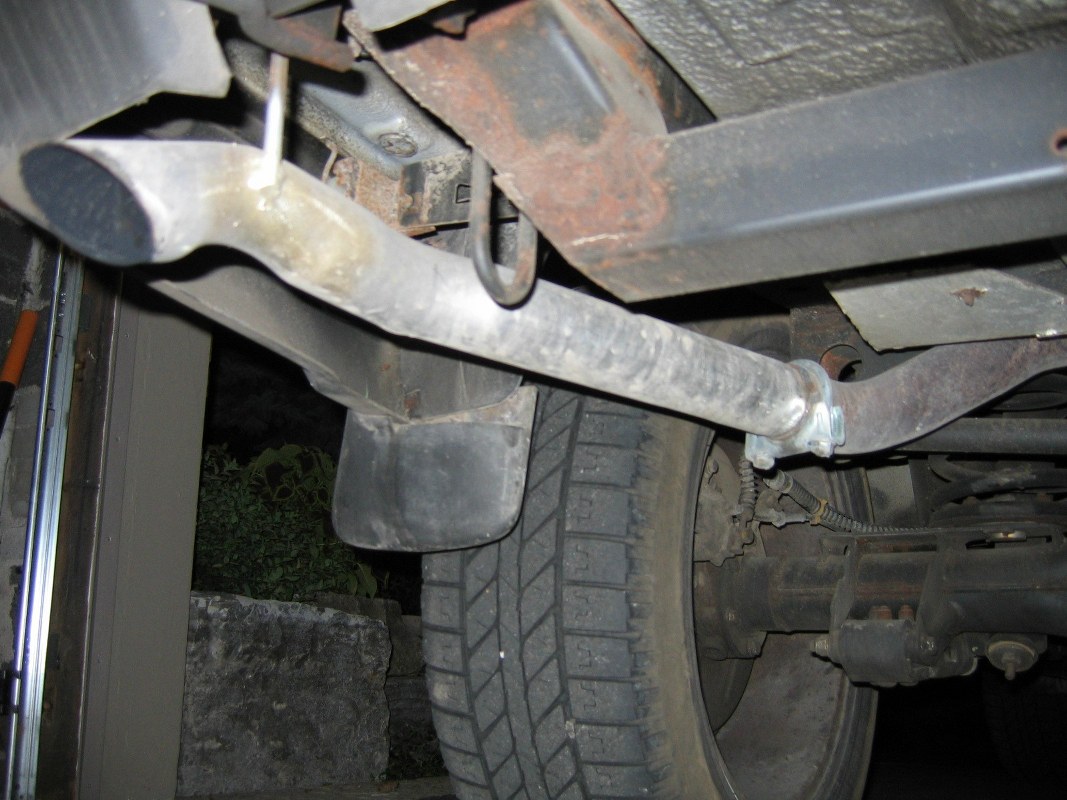
Along with the new springs, I purchased myself a set of Terrafirma TF125 and TF126 shocks for the front and rear of the vehicle, respectively. These units were somewhat hard to come by, as apparently Terrafirma are on backorder worldwide. I sourced a pair down in Texas, but the shipping costs were near the same price as the units themselves and I would have ended up paying upwards of $450 for the set. As such, I kept looking, and luckily I found a set at Lucky8 in NY. They were also very helpful, particularly Justin. I ended up driving down on a Saturday morning to pick them up, and had them back at shop by Saturday evening. They went in smoothly with the springs. However, when I went to remove them in order to install my spacers, the rear-left shock broke. I can only attribute the failure to a bad spot weld. I immediately got in contact with Justin at Lucky8, and within hours he had contacted Terrafirma and arranged for a replacement unit. In the interim, I threw back in my old shock as a quick-fix.
The broken shock:
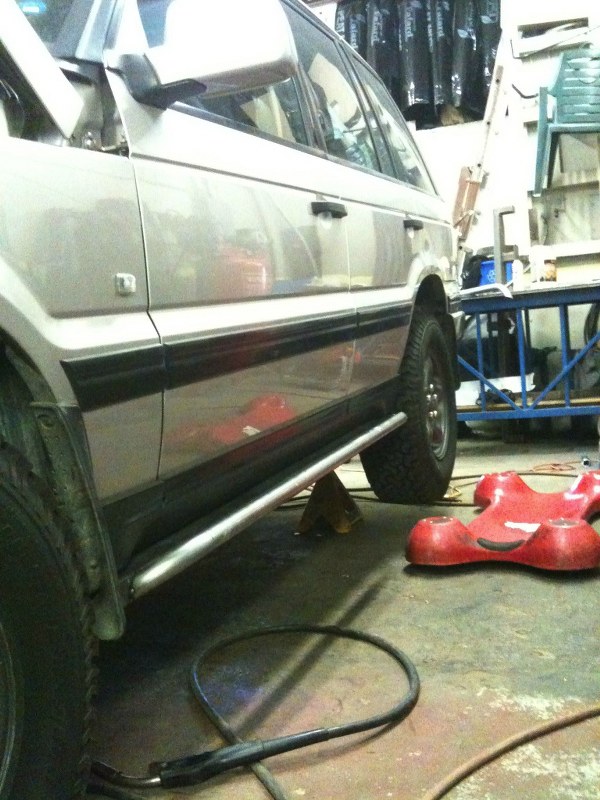
Lastly, I needed a set of sliders made up for the vehicle so that I could properly participate in a local wheeling event on the August long weekend up in Bobcaygeon, ON. The event is called Trailfest, and is run by the London Area Jeep Owners Club if any locals are interested. It's a very well run event, with wonderful people and a large range of trails ranging in difficulty.
Anyway, I spoke to Martin at great length about the sliders. We swapped ideas and drawings so as to come up with something that suited my tastes. In the end, unfortunately, we were unable to follow through with our deal as Martin was very busy down on his end and my deadline was too soon. Thankfully, Martin was of great help explaining his product and helping me with measurements, and even offered to help me find somebody local to try and get the job done! I ended up googling something like "metal fabrication toronto", and luckily stumbled across a shop that does custom Jeep work only 30 minutes from my house. Their name is Staang's Fab for anybody in the Southern Ontario area. They do fantastic work, and have amazing customer service. I couldn't recommend them higher!
I drove out to their shop to meet them and discuss my ideas. They had made many rock-sliders for Jeeps in the past, along with bumpers, roll-cages, roof racks, and various other mechanical modifications. As such, they knew almost exactly what to do. I showed them a couple of sketches, and left the vehicle with them. The next day, they had a unit roughly mocked up for my approval. The following day, the unit was finished and ready for painting. After day 3, I came to pick up the finished, installed product. I was very pleased.
I also installed a set of Carroll Rovers sway-bar disconnects. They proved very handy on the trail and were very simple to install and use!
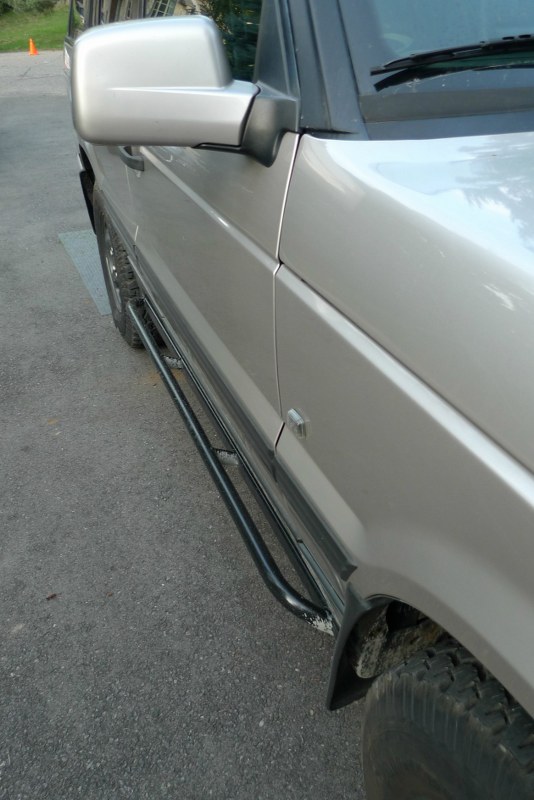
In the drive, with the new shoes, sliders, springs and spacers:
The spacers (design):
The sliders (in shop):
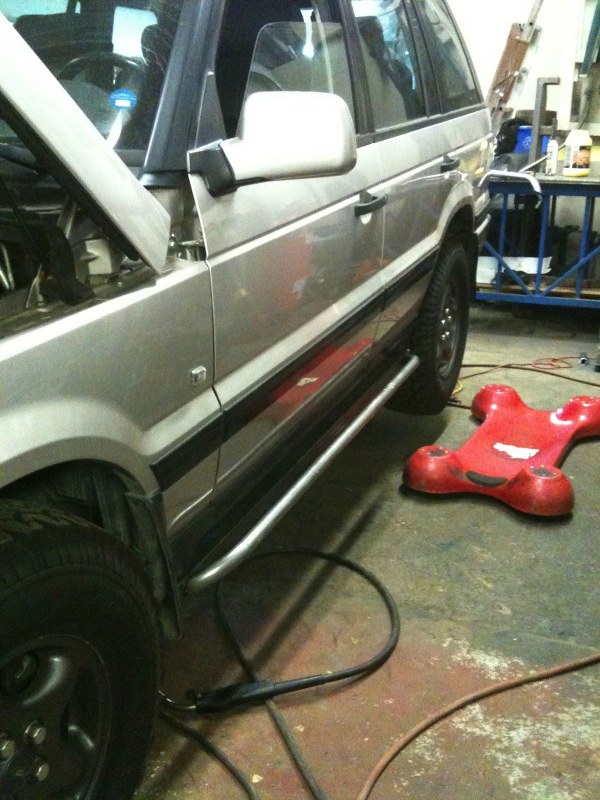
The sliders (final):
PLEASE Give me your input and ideas! I want this to be a discussion as much as a showcase.
My first step was to remove the running boards, which got pretty bunged up on a wheeling weekend at the end of the summer. Looks much better now. Promptly after that I decided that I didn't want the rear silencers on, so I chopped 'em off and stuck some piping on. Took a couple pics, and a video of the sexy sound it now belts out. Hope you enjoy.
Pics:
Video:
It sounds great IMO. I was looking for something deep and rumbly, rather than something loud with too much 'bark'. This worked out great actually. When just cruising around with the windows down, it sounds much better than before, but not too obnoxious. When highway driving, there is no difference, and with the windows up, there is also no difference.
The next step for my project was to get some proper shoes. I looked around, and concluded that a set of 265/75/16's would work well. I picked up a set of five 16" Land Rover rims last summer for $125, and they've been waiting for rubber since then. Earlier this summer, I got my hands on a set of BFG All Terrains. I would have picked something a bit more aggressive, but this is still my daily driver, with which I drive about 100-120km a day. As such, the All Terrains made more sense for now. Once those were fit to the vehicle, it became quite clear that a lift was needed in the near future. They did the trick, but there was some noticeable rubbing from the front tires when cornering, especially if I was turning up into a driveway or onto a curb.
With a lift on my mind, I started looking around for some options. Quite soon afterwards, I was in discussion with Scotty over a set of springs he had from his P38 from when it was on coils. After various e-mail exchanges, I ended up getting Scotty's springs. He was very helpful and a pleasure to deal with. Thanks Scotty!
The springs in question are OME 779 for the front, and OME 751 for the rear. They were supposed to give approximately a 2" lift as far as I'm aware. Once installed, it became evident that I would need just a little bit more height in order to get to the position I wanted. As such, I had a set of spacers rigged up to give an extra 1.25" of lift. Once those were in the rig, everything looked just right.
Along with the new springs, I purchased myself a set of Terrafirma TF125 and TF126 shocks for the front and rear of the vehicle, respectively. These units were somewhat hard to come by, as apparently Terrafirma are on backorder worldwide. I sourced a pair down in Texas, but the shipping costs were near the same price as the units themselves and I would have ended up paying upwards of $450 for the set. As such, I kept looking, and luckily I found a set at Lucky8 in NY. They were also very helpful, particularly Justin. I ended up driving down on a Saturday morning to pick them up, and had them back at shop by Saturday evening. They went in smoothly with the springs. However, when I went to remove them in order to install my spacers, the rear-left shock broke. I can only attribute the failure to a bad spot weld. I immediately got in contact with Justin at Lucky8, and within hours he had contacted Terrafirma and arranged for a replacement unit. In the interim, I threw back in my old shock as a quick-fix.
The broken shock:
Lastly, I needed a set of sliders made up for the vehicle so that I could properly participate in a local wheeling event on the August long weekend up in Bobcaygeon, ON. The event is called Trailfest, and is run by the London Area Jeep Owners Club if any locals are interested. It's a very well run event, with wonderful people and a large range of trails ranging in difficulty.
Anyway, I spoke to Martin at great length about the sliders. We swapped ideas and drawings so as to come up with something that suited my tastes. In the end, unfortunately, we were unable to follow through with our deal as Martin was very busy down on his end and my deadline was too soon. Thankfully, Martin was of great help explaining his product and helping me with measurements, and even offered to help me find somebody local to try and get the job done! I ended up googling something like "metal fabrication toronto", and luckily stumbled across a shop that does custom Jeep work only 30 minutes from my house. Their name is Staang's Fab for anybody in the Southern Ontario area. They do fantastic work, and have amazing customer service. I couldn't recommend them higher!
I drove out to their shop to meet them and discuss my ideas. They had made many rock-sliders for Jeeps in the past, along with bumpers, roll-cages, roof racks, and various other mechanical modifications. As such, they knew almost exactly what to do. I showed them a couple of sketches, and left the vehicle with them. The next day, they had a unit roughly mocked up for my approval. The following day, the unit was finished and ready for painting. After day 3, I came to pick up the finished, installed product. I was very pleased.
I also installed a set of Carroll Rovers sway-bar disconnects. They proved very handy on the trail and were very simple to install and use!
In the drive, with the new shoes, sliders, springs and spacers:
The spacers (design):
The sliders (in shop):
The sliders (final):
Last edited by jmason; 11-07-2012 at 10:28 AM.
#2
07-11-2012, 10:55 AM
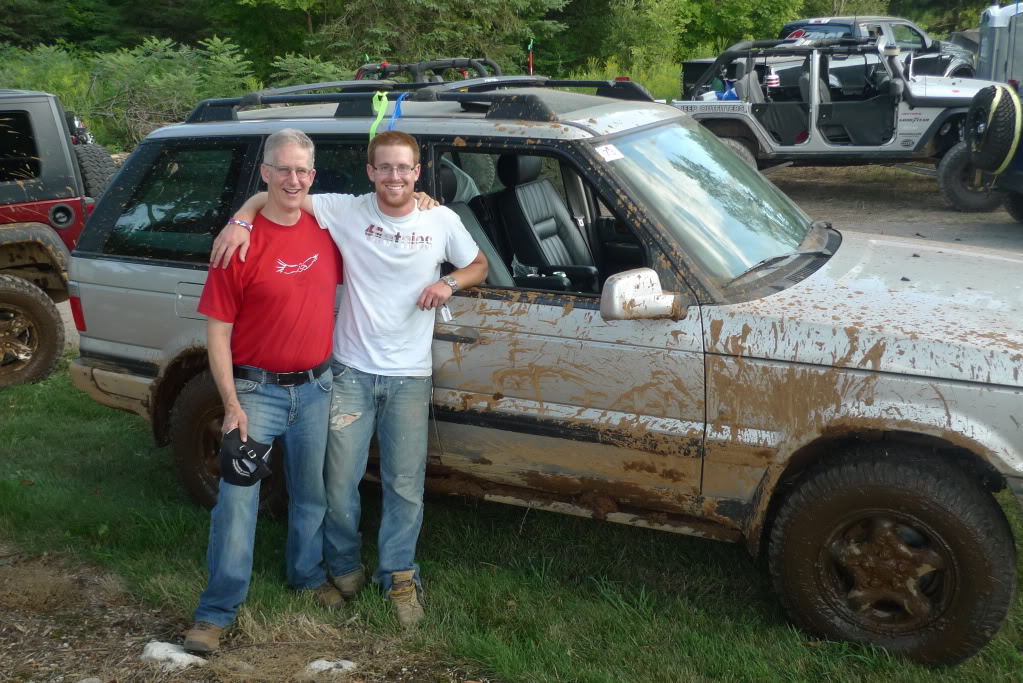
Here are a couple pics (before and after) of a Jeep event my Dad and I attended last year with all of the above modifications. We kept pace with some heavily modified Jeeps, no problems. The only issues we had were the deep sloppy mud, as we didn't have proper tires, nor a winch. One overly confident Jeep proudly stated he would winch us out of a mudpit. I told him he'd have to anchor to something, because I'm a heavy unit. He said his 4-door Jeep and 9,000lb winch would have no issues pulling out the "struggling Land Rover". After everything was hooked up, he started winching. We didn't move one inch, and he dragged himself towards us about 6 feet (full locked wheels) before he was convinced that indeed he wasn't up to the task!
Before:

After:
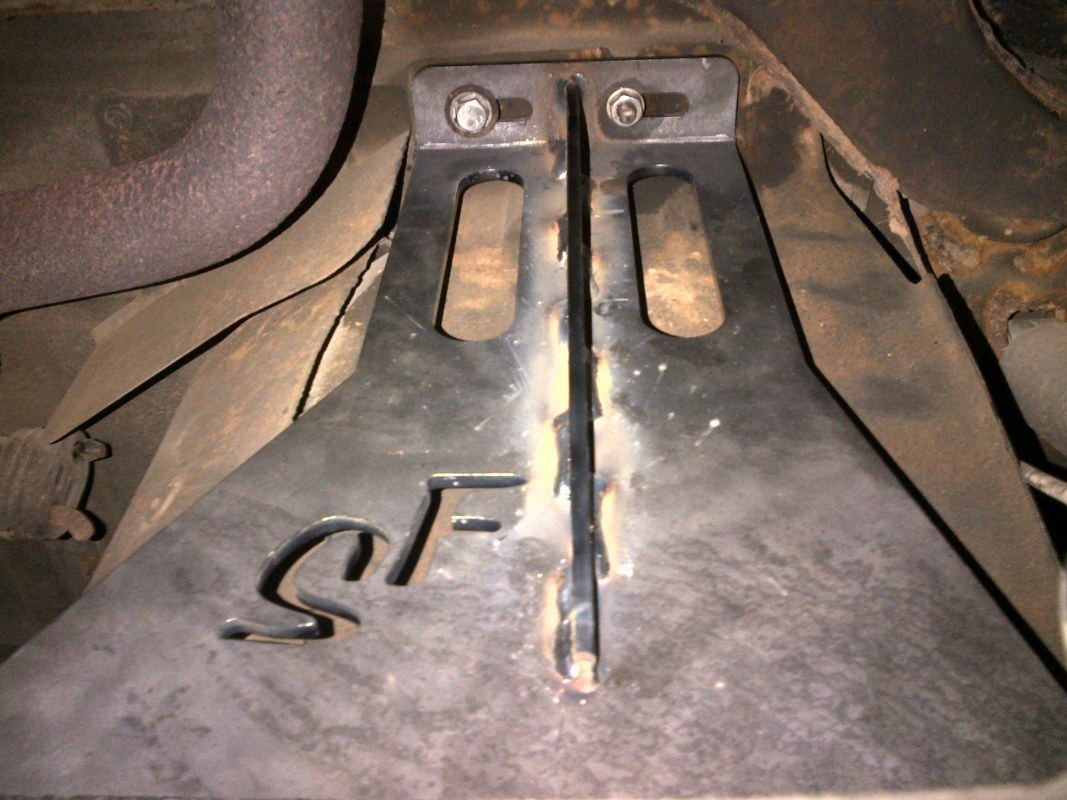
Currently in the works is the undercarriage armor. I decided first to start with a T-Case skid plate. It's fairly large, and attaches in four (4) places. Two brackets are made to attach directly to the frame rails, while two other brackets bolt on to the existing holes in the cross member. The brackets have been made, and the plate itself should be done within a day or two. All material is 1/4" steel.
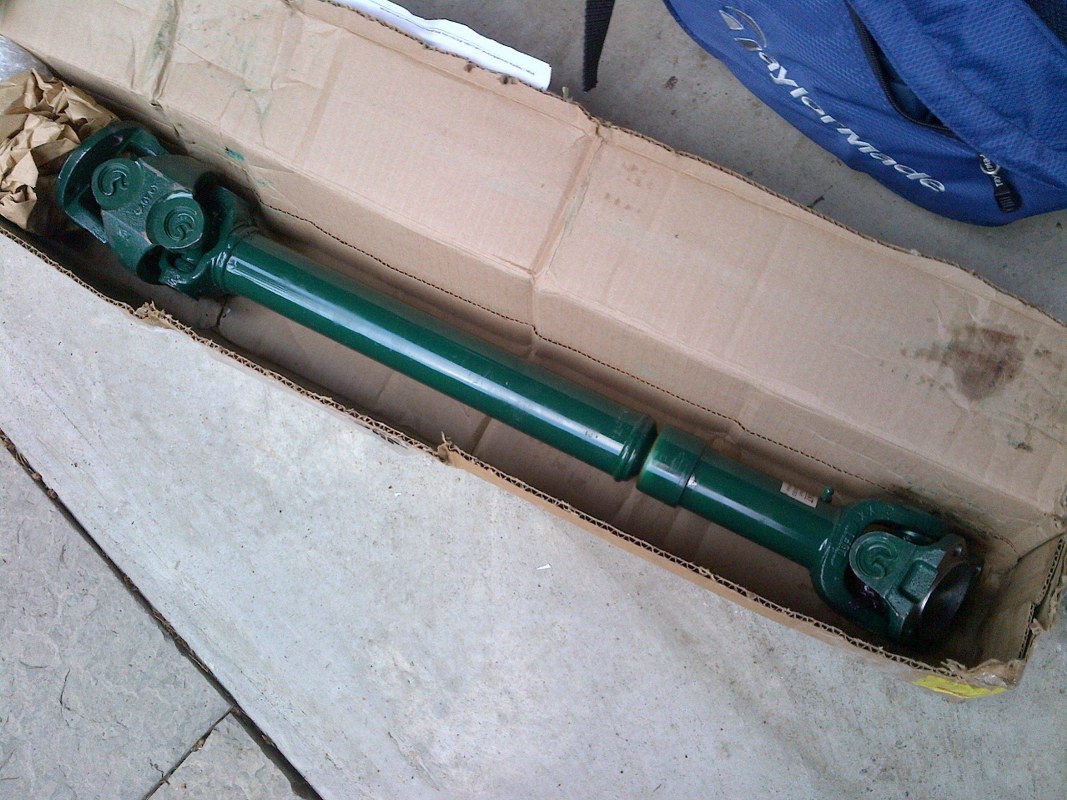
Additionally, I decided to fast-track the diffs and whatnot. I ordered two 3rd members from Bill at GBR. When installed, I will have 4.10 gears front and rear, along with Detroit True Trac's front and rear. I also ordered a Heavy Duty double cardan driveshaft from Bill to cure the vibration my driveshaft is producing at idle throttle.
I'm really excited that things are coming together, much faster than I had initially anticipated!
Here are the four (4) brackets that will hold the T-case skid plate in place:

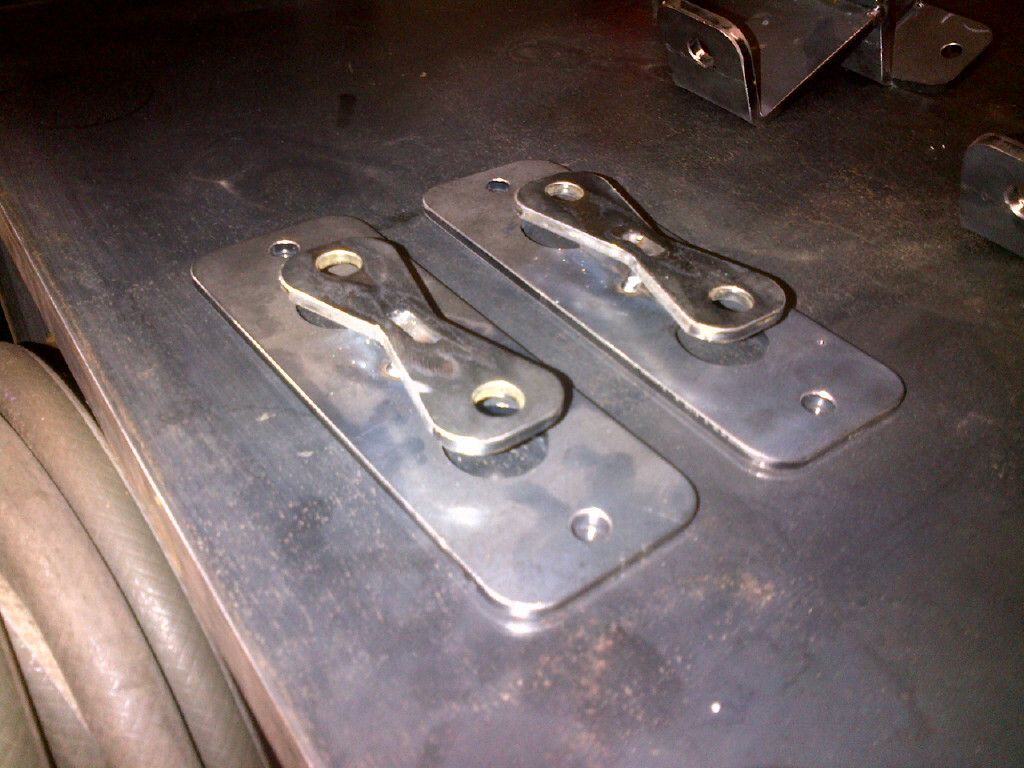

The skid plate itself will mate to the larger portion of the 'flatter' brackets. They will be bolted into the cross member. The others will grasp the frame, and be drilled and bolted into the two frame rails.
I'll get some more pics with the plate in place.
Before:
After:
Currently in the works is the undercarriage armor. I decided first to start with a T-Case skid plate. It's fairly large, and attaches in four (4) places. Two brackets are made to attach directly to the frame rails, while two other brackets bolt on to the existing holes in the cross member. The brackets have been made, and the plate itself should be done within a day or two. All material is 1/4" steel.
Additionally, I decided to fast-track the diffs and whatnot. I ordered two 3rd members from Bill at GBR. When installed, I will have 4.10 gears front and rear, along with Detroit True Trac's front and rear. I also ordered a Heavy Duty double cardan driveshaft from Bill to cure the vibration my driveshaft is producing at idle throttle.
I'm really excited that things are coming together, much faster than I had initially anticipated!
Here are the four (4) brackets that will hold the T-case skid plate in place:
The skid plate itself will mate to the larger portion of the 'flatter' brackets. They will be bolted into the cross member. The others will grasp the frame, and be drilled and bolted into the two frame rails.
I'll get some more pics with the plate in place.
#4
08-13-2012, 10:35 AM
Hi everybody!
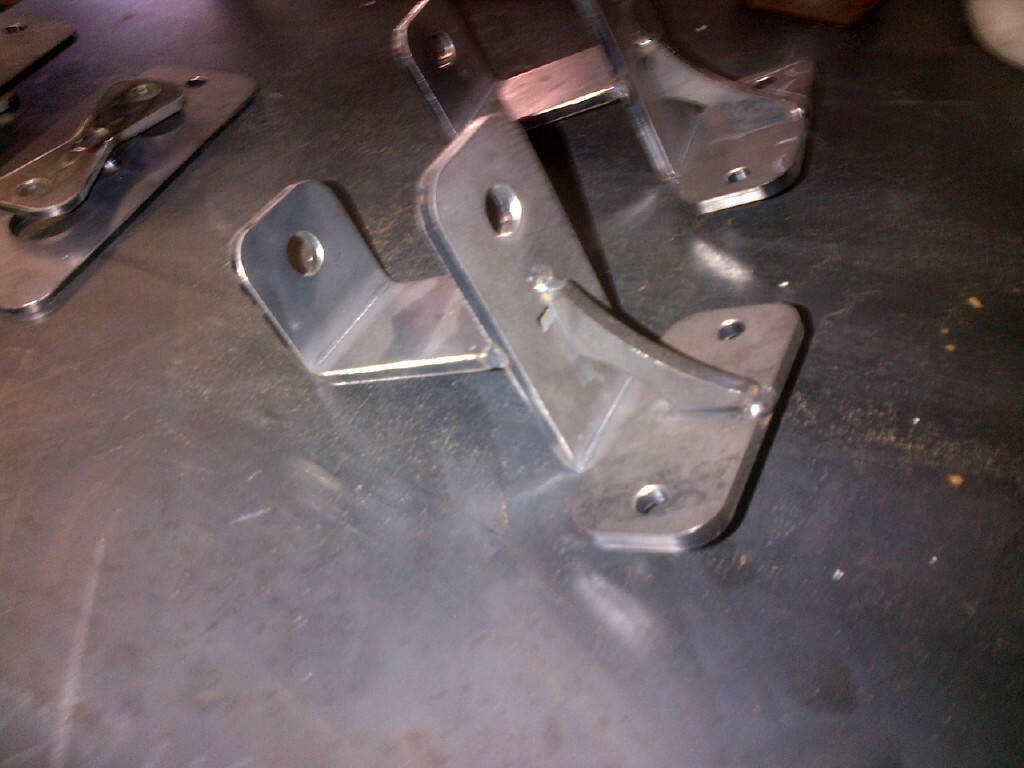
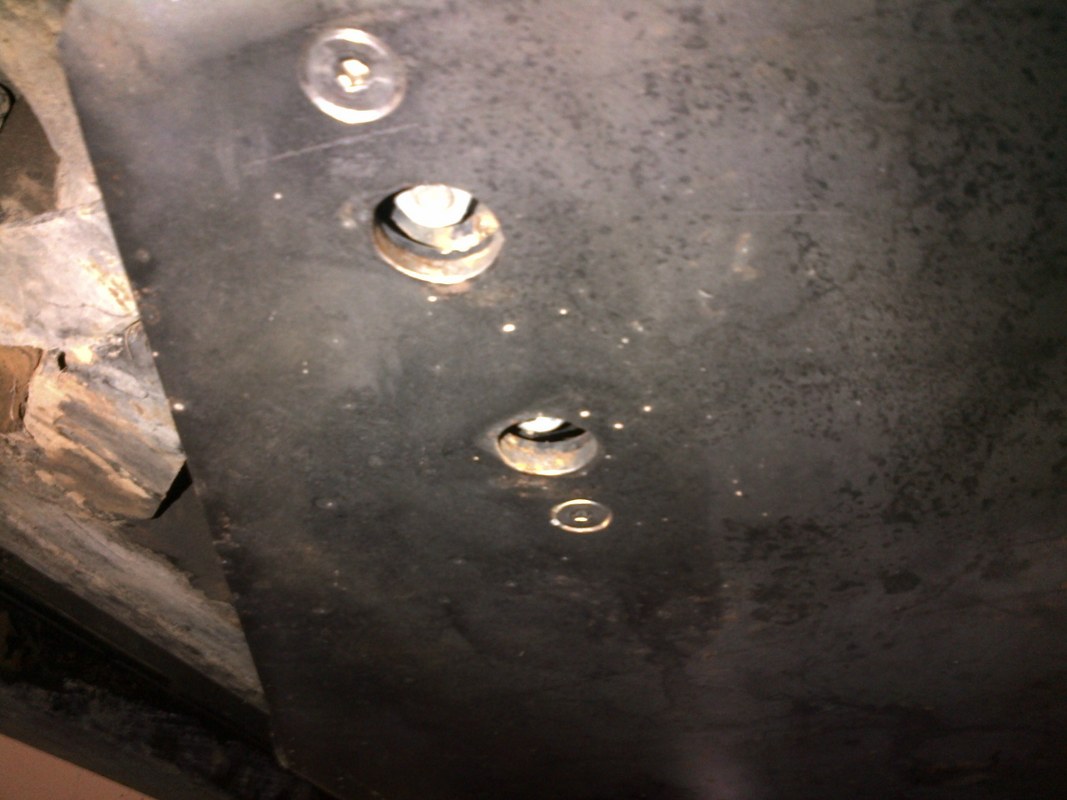
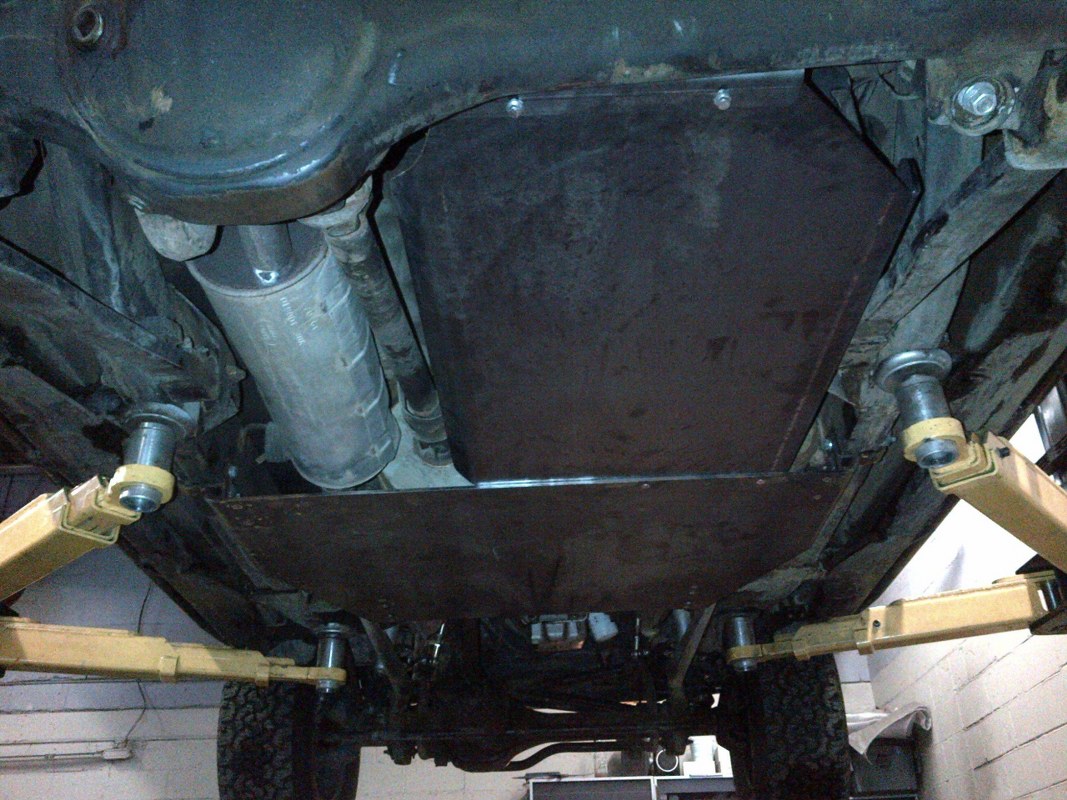
Things have come along nicely so far. The T-case skid plate is completed and mounted. The brackets all went in easily. The brackets are all bolted to the frame. The skid plate is then held in place to the brackets with stainless steel hex-screws/bolts. They are counter-sunk into the plate itself so as not to allow for getting hung up/sheared off.
Here's a picture of the bracket grasping the frame rails:
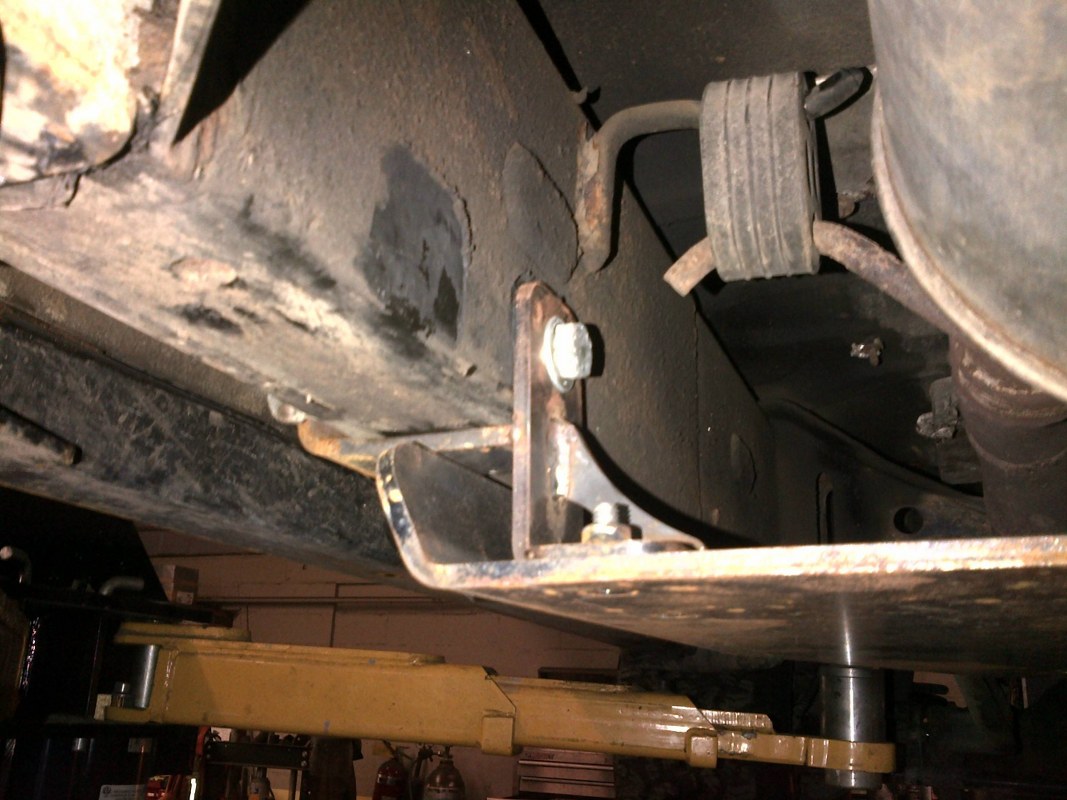
Here's a shot of the other brackets further forward. These were mounted into existing holes in the frame cross member on the vehicle.
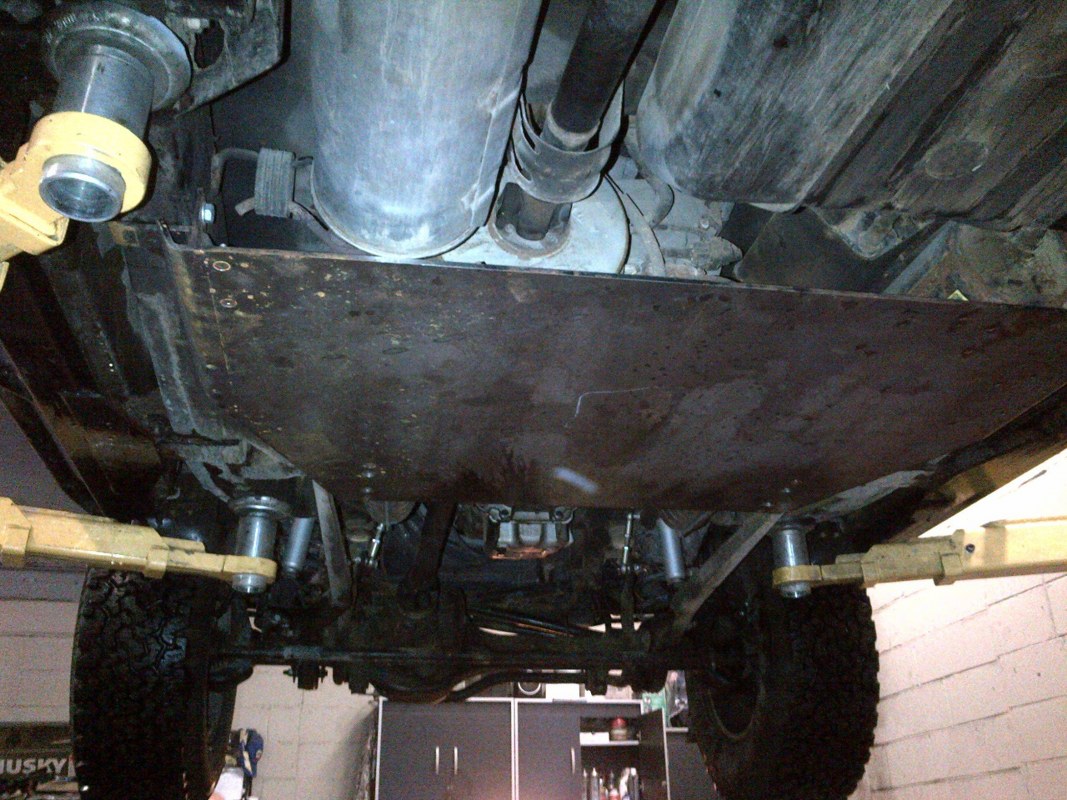
And here are a couple shots of the full skid plate itself:
Sorry for the crappy photo quality, my cellphone was all I had at my disposal.
Things have come along nicely so far. The T-case skid plate is completed and mounted. The brackets all went in easily. The brackets are all bolted to the frame. The skid plate is then held in place to the brackets with stainless steel hex-screws/bolts. They are counter-sunk into the plate itself so as not to allow for getting hung up/sheared off.
Here's a picture of the bracket grasping the frame rails:
Here's a shot of the other brackets further forward. These were mounted into existing holes in the frame cross member on the vehicle.
And here are a couple shots of the full skid plate itself:
Sorry for the crappy photo quality, my cellphone was all I had at my disposal.
Last edited by jmason; 08-30-2012 at 09:52 AM.
#5
08-13-2012, 10:38 AM
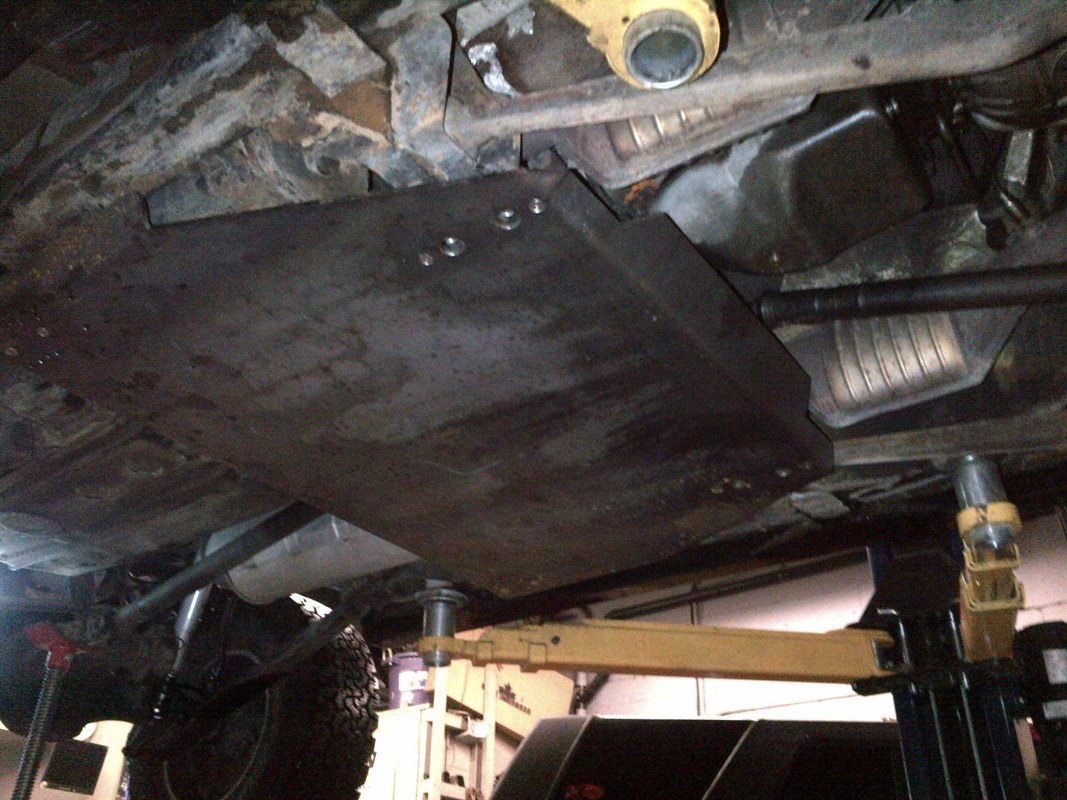
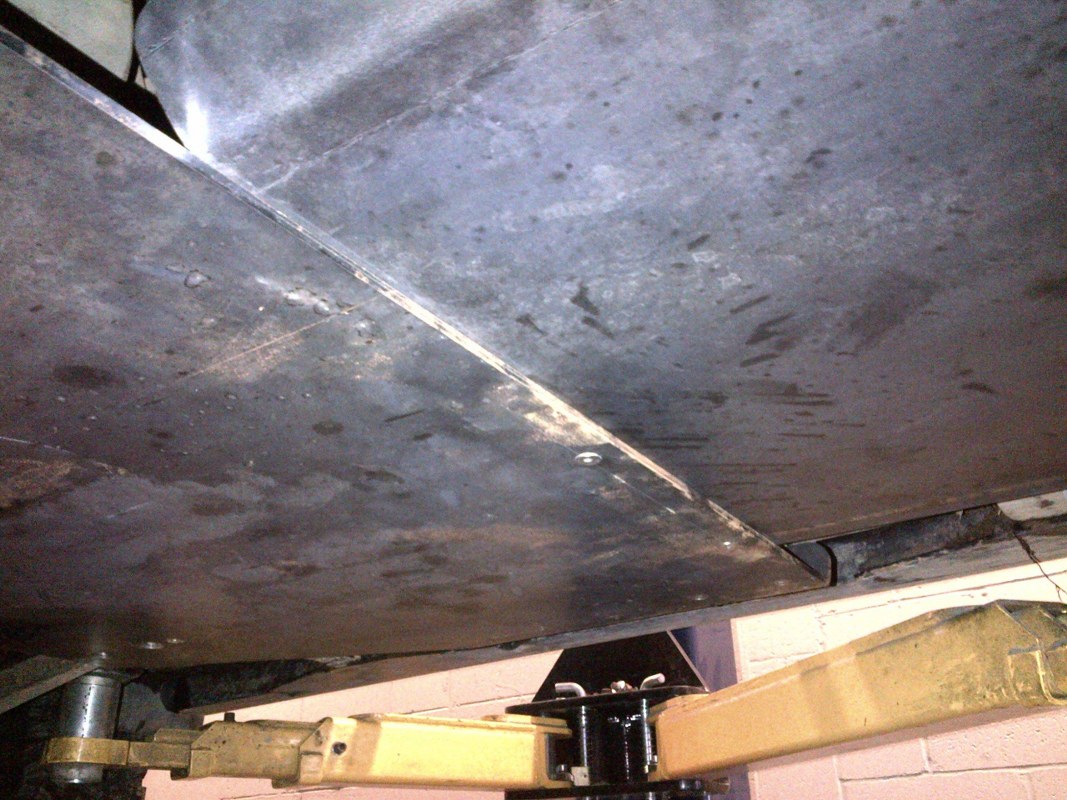
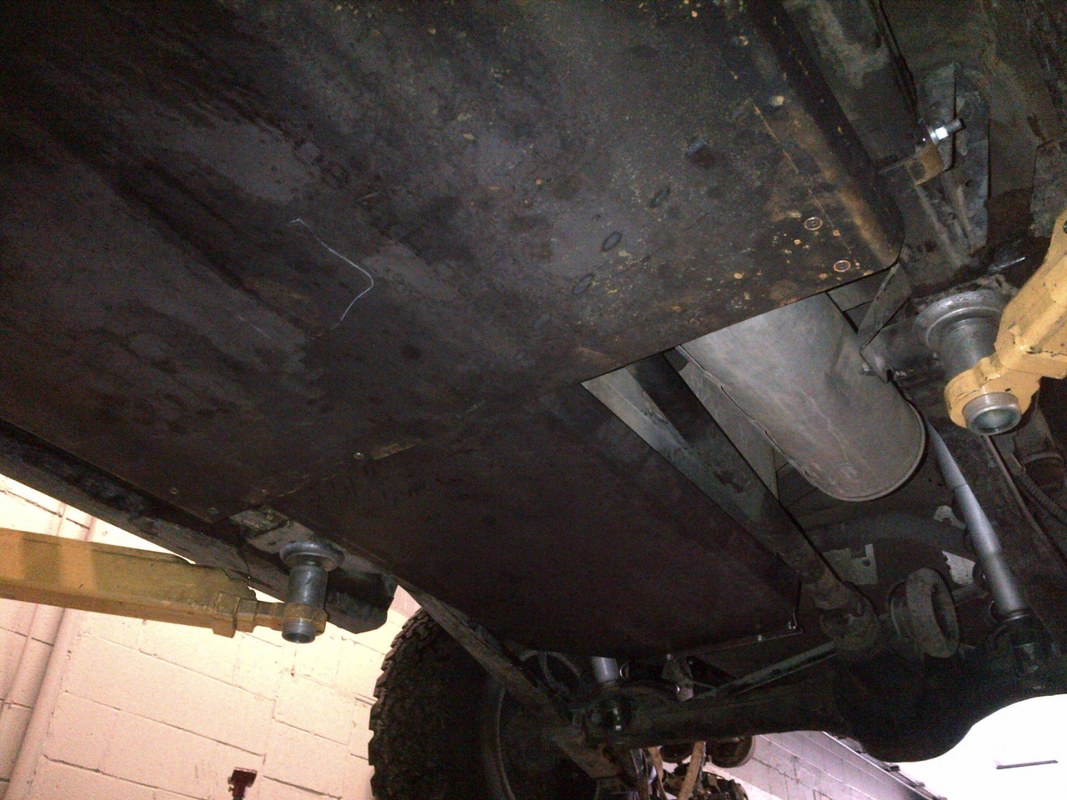
Up next was the fuel tank skid. The plan was to mount the plate with two fastening points. The first was up behind the fuel tank, using two existing holes. From there, the guard would come down and under the fuel tank, and fasten to my already installed T-case guard.
The mount behind the fuel tank went smoothly, and that piece was fastened securely. The mount to the T-case skid was fairly smooth, however due to a slight mis-measurement only two of the three positions for screws/bolts were able to be used. As such, I will be adding a small tab to the T-case skid in a little while to allow for the addition and use of the third fastening screw/bolt.
Here are some pictures:
A shot of the bracket going up and behind the fuel tank.
A shot of said bracket, looking at it from the back of the vehicle.
A shot of the bottom of the fuel-tank skid, fastened to the existing T-case skid as well.
An angle of both skids, looking towards the back of the vehicle. The quality of this photo isn't great, I apologize.
Last edited by jmason; 08-30-2012 at 09:54 AM.
#6
08-13-2012, 10:40 AM
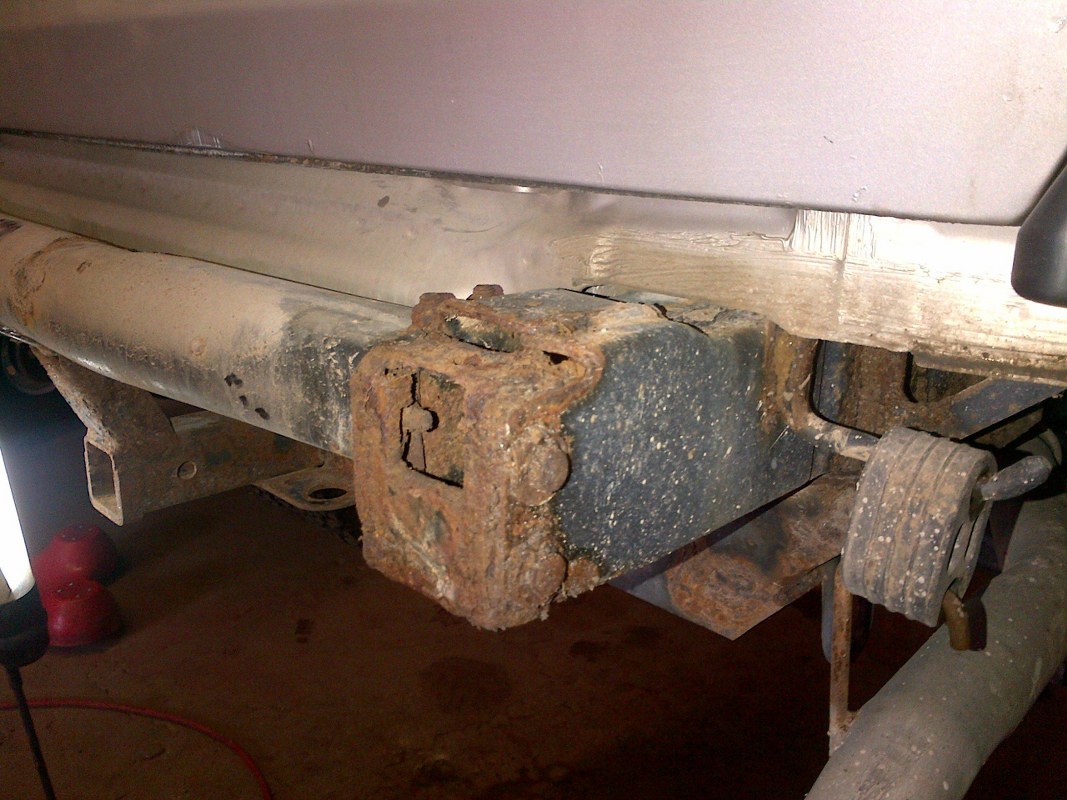
Diff guards are in the process of being made. Next it is time to start taking measurements for the bumper. I took the rear bumper off, and things are somewhat rusty, but not too bad. I will be taking the end caps off of the frame (the most corroded parts) to allow for mounting points for the new bumper. I plan on inserting mounting points into the frame rails, and bolting them in using the existing holes for the end caps. The bumper will be bolted and/or welded to the inserted mounting points.
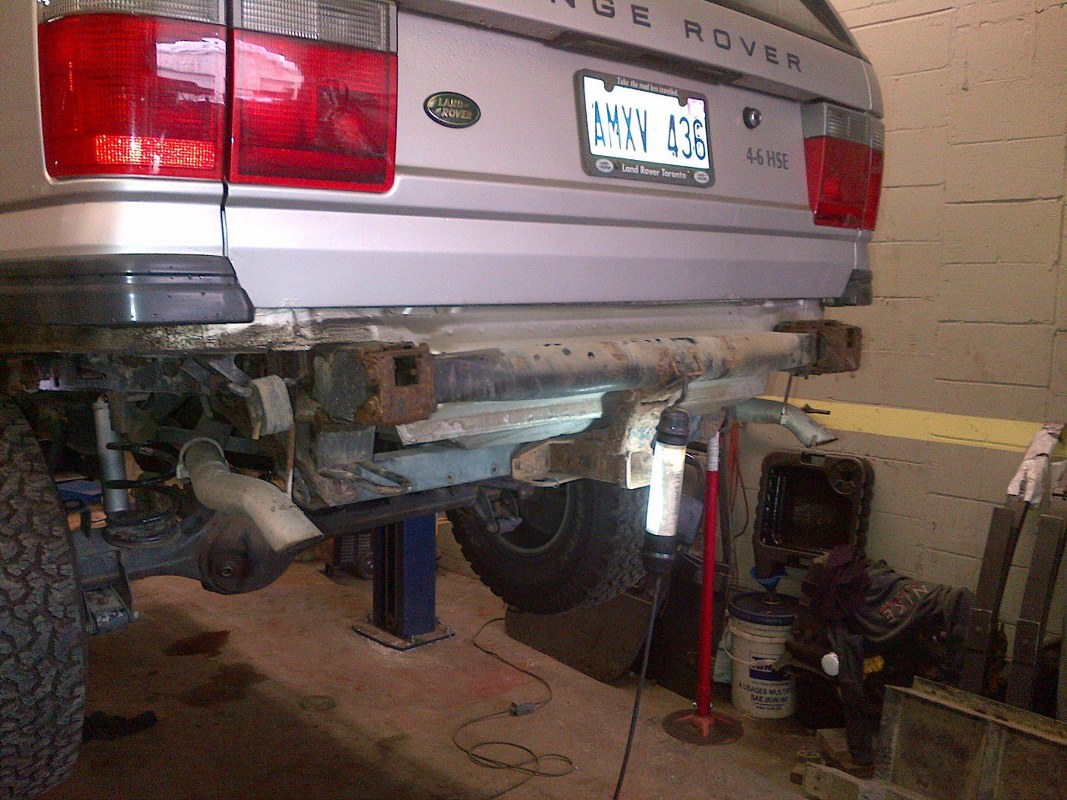
A little corroded.
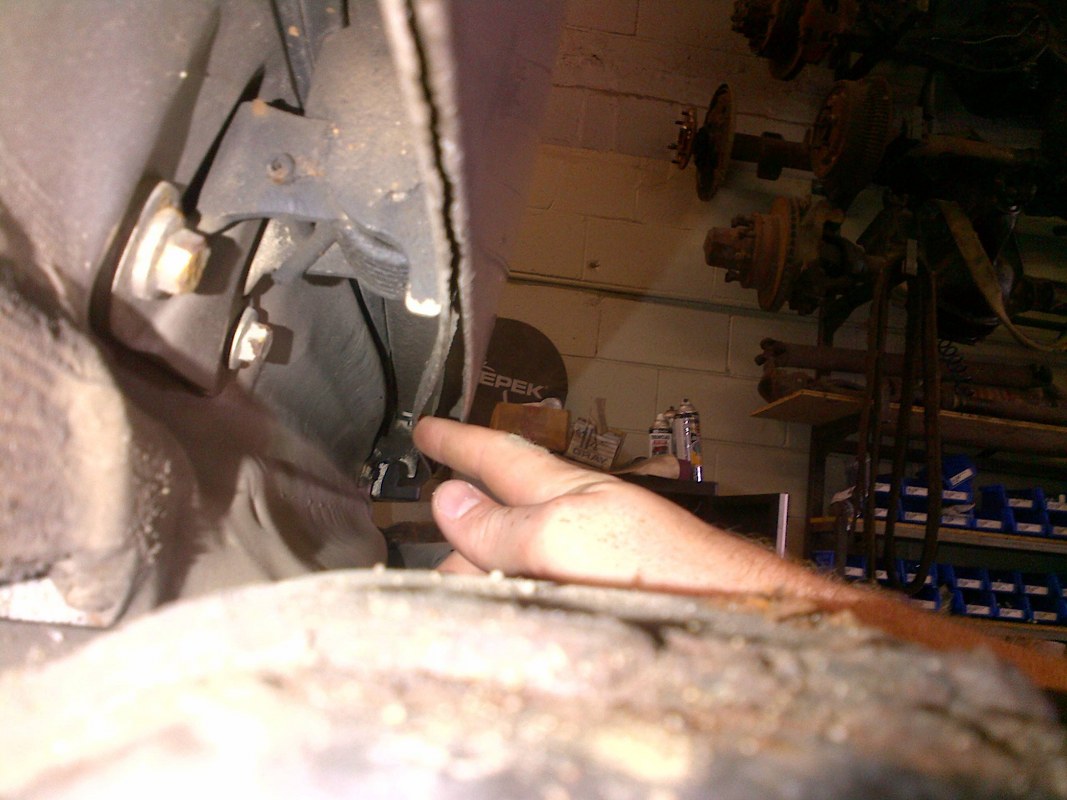
When the bumper was off, I noticed that a small piece of trim has come off of the bottom of my tailgate. It looks to be a welded seam for the bottom of the tailgate, that has corroded out of place. What is the best way of repairing this in your opinions? I'd like to seal it back up as soon as I can, so as to prevent more moisture from getting in there.
Here is a shot of me pushing the seam away from the tailgate. It all moves like one big band.
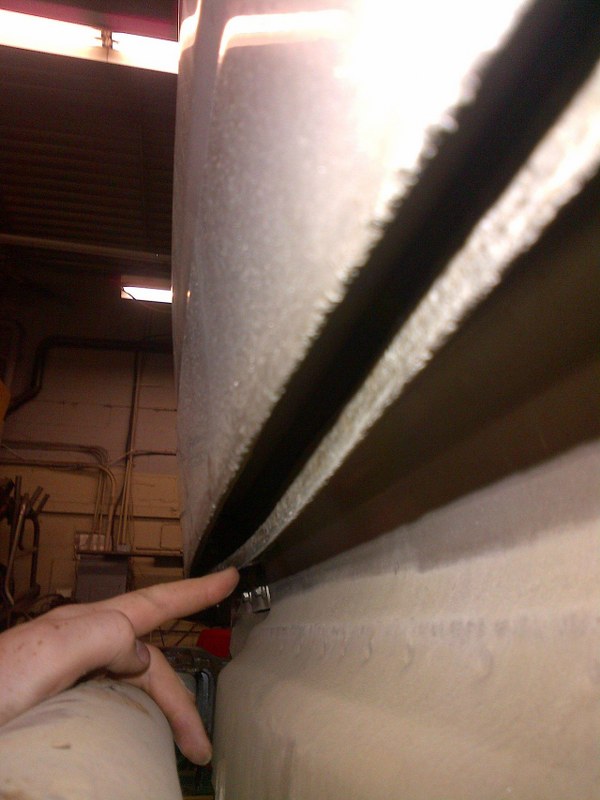
And another shot:
More to come in a bit!
A little corroded.
When the bumper was off, I noticed that a small piece of trim has come off of the bottom of my tailgate. It looks to be a welded seam for the bottom of the tailgate, that has corroded out of place. What is the best way of repairing this in your opinions? I'd like to seal it back up as soon as I can, so as to prevent more moisture from getting in there.
Here is a shot of me pushing the seam away from the tailgate. It all moves like one big band.
And another shot:
More to come in a bit!
Last edited by jmason; 08-30-2012 at 09:55 AM.
#8
08-13-2012, 04:35 PM
Recovery Vehicle

#9
08-13-2012, 09:53 PM
Anybody know how to make it so they aren't so huge?
