1998 Disco I - Electric Trailer Brake Installation
#1
 05-24-2010, 08:46 AM


Join Date: May 2010
Location: Dennard, Arkansas
Posts: 25
Likes: 0
Received 0 Likes
on
0 Posts
Good Morning:
What an informative site!!! I have found many interesting things here and many "seasoned" professionals offering priceless advice/suggestions...so here goes:
I have trailers with electric brakes that use the 7-pin RV style connectors. I recently purchased my 1998 DI and need to upfit it with the E-brake controller and converter.
What are the suggestions for a "factory-looking" installation (part numbers and/or sites with links would be very appreciative).
Thanks in advance for your help!
OzarkRover
#2
05-24-2010, 09:00 AM

Administrator
Do not use a factory look for a reason to buy a brake system. Go to a good trailer shop and see what is on the market that will work best for you and your towing requirements.
What sort of weight will you be pulling? Consider possible spring/shock replacements a tranny service, a brake flush as part of getting ready for your towing.
What sort of weight will you be pulling? Consider possible spring/shock replacements a tranny service, a brake flush as part of getting ready for your towing.
#3
05-24-2010, 09:14 AM
Join Date: May 2010
Location: Dennard, Arkansas
Posts: 25
Likes: 0
Received 0 Likes
on
0 Posts
#4
05-24-2010, 12:23 PM

Baja
Here's what I did.
This is for a '95, check the ETM in RAVE for the '98 wire colours.
If you aren't wiring trailer brakes you can use connectors with fewer poles that meet your needs, such as 4,5 or 6 pole sockets.
Vehicle side of 7Pin Trailer Socket: (second colour is trace)
Black - Ground
Red/Orange - RH Tail
Green/Purple - Stop Lights
Green/White - RH Indicator
Green/Red - LH Indicator
Red/Yellow - Rear Fog
Red/Black - LH Tail
Single Pin Socket A:
Green/Brown - Reversing light
Single Pin Socket B: 20A fuse F6 in Satellite 2 (I think)
Purple/Brown - Power
(I connected to this to supply power for the battery for the break-a-way trailer brake controller)
I got a Hoppy kit that had 7-way RV blades and 4-way flat pins (see edit below).
For connecting to the vehicle wiring I cut off the round factory connector behind the right hand panel in the rear and used uninsulated butt connectors sealed with adhesive lined heat shrink tubing to connect the wiring.
For the brake controller I ran the wiring above the headliner and mounted the brake controller to the overhead.
I drilled a hole in the bumper large enough to fit it through and installed it there. I drilled and tapped 4 8-32 holes and use stainless socket head allen screws to retain it. I put 1/4" nylon spacers between the socket and bumper because the socket is too deep to recess fully.
For the 4-way plug I used the Hoppy 48925 converter for adapting to the L/R wiring:
(edit: This converts from the European separate brake/indicator to the US common light found on most trailers)

The 4-way on this receives the 4-way from the above trailer multi socket. I cut off the round Rover factory connector and connected the wires from the LiteMate to the Rover wiring using uninsulated butt connectors and sealed them with water tight heat shrink tubing (do not use the Scotch Lock connectors).
All connections received a liberal amount of di-electric grease.
For the controller I'm using a Tekonsha P3: Brake Controllers - Tekonsha

edit:
After breaking two of the plastic Hoppy 7-blade sockets I've replaced them with good all metal Cole Hersee 7-pin sockets.
So I've gone from this
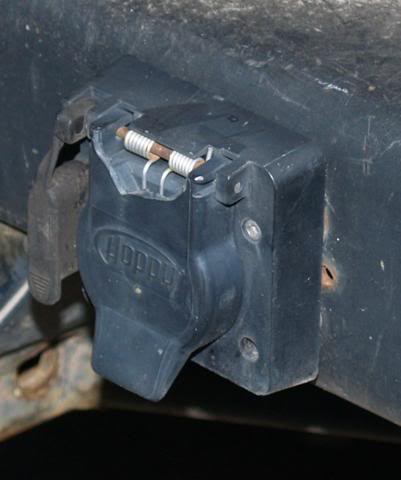
to this.

If I need it, I'll install a 4-way round socket next to the 7-way.
This is for a '95, check the ETM in RAVE for the '98 wire colours.
If you aren't wiring trailer brakes you can use connectors with fewer poles that meet your needs, such as 4,5 or 6 pole sockets.
Vehicle side of 7Pin Trailer Socket: (second colour is trace)
Black - Ground
Red/Orange - RH Tail
Green/Purple - Stop Lights
Green/White - RH Indicator
Green/Red - LH Indicator
Red/Yellow - Rear Fog
Red/Black - LH Tail
Single Pin Socket A:
Green/Brown - Reversing light
Single Pin Socket B: 20A fuse F6 in Satellite 2 (I think)
Purple/Brown - Power
(I connected to this to supply power for the battery for the break-a-way trailer brake controller)
I got a Hoppy kit that had 7-way RV blades and 4-way flat pins (see edit below).
For connecting to the vehicle wiring I cut off the round factory connector behind the right hand panel in the rear and used uninsulated butt connectors sealed with adhesive lined heat shrink tubing to connect the wiring.
For the brake controller I ran the wiring above the headliner and mounted the brake controller to the overhead.
I drilled a hole in the bumper large enough to fit it through and installed it there. I drilled and tapped 4 8-32 holes and use stainless socket head allen screws to retain it. I put 1/4" nylon spacers between the socket and bumper because the socket is too deep to recess fully.
For the 4-way plug I used the Hoppy 48925 converter for adapting to the L/R wiring:
(edit: This converts from the European separate brake/indicator to the US common light found on most trailers)
The 4-way on this receives the 4-way from the above trailer multi socket. I cut off the round Rover factory connector and connected the wires from the LiteMate to the Rover wiring using uninsulated butt connectors and sealed them with water tight heat shrink tubing (do not use the Scotch Lock connectors).
All connections received a liberal amount of di-electric grease.
For the controller I'm using a Tekonsha P3: Brake Controllers - Tekonsha
edit:
After breaking two of the plastic Hoppy 7-blade sockets I've replaced them with good all metal Cole Hersee 7-pin sockets.
So I've gone from this
to this.
If I need it, I'll install a 4-way round socket next to the 7-way.
Last edited by antichrist; 02-20-2014 at 04:24 AM.
#5
06-01-2012, 12:15 PM


Thread
Thread Starter
Forum
Replies
Last Post
gruehle
Discovery II
10
07-27-2020 09:10 AM
bcolins
Discovery II
12
08-06-2015 08:38 AM
mtr1974
Retired - Private For Sale/Trade Classifieds
1
02-28-2013 09:37 PM