When you click on links to various merchants on this site and make a purchase, this can result in this site earning a commission. Affiliate programs and affiliations include, but are not limited to, the eBay Partner Network.
I am in the process of replacing the driver's side window motor. The original motor's connector consists of two prongs to which the harness connects. This connector is easy to connect and disconnect. The replacement motor from Lucky8 has a different connector at the end of a cable. According to Lucky8, this cable connects via a different connector type in upper right corner of the door.
Why are the 2 different motor connections and how does one access the upper connector? I cannot get two hands up there and cannot push the plug into the harness connector with one hand. All the new after market motors seem to use the upper connector.
Land Rover, in its infinite wisdom, changed the way the window motors connects towards the very end of the '02 model year. If you look at the photos below, the motor would connect to the door harness by way of a male twin pin connecter going into a female receiver at the bottom of the door, completing the connection to the door wiring harness. It was simple to disconnect and reconnect the motor. It was the same from 1994 on the DI right through to the end of 2002 on the DII.
Then, to save a few pennies, Land Rover decided to drop the black connectors and run the wiring from the back of the actual motor, all the way up to the connector just inside the B pillar on the truck body. The only way to disconnect and reconnect the motor was at the motor itself as can be seen in the photos.
So, if you bought a new motor and it came without any wiring attachment that was on your old, broken motor, you need to disconnect the wiring from that old motor and plug it into the new motor. Then you should be able to reconnect the new motor to the door harness in the same way it originally was.
i have already taken both motors apart in hope of using the old two-prong connector on the new motor and thus avoiding the all but unreachable[ upper connector. however the piece with the two prongs cannot be swapped for its equivalent with the two wires because the black gear housing on the new one has no holes from which the two prongs could go through. One would have to swap out the entire black part, which I cannot do.
Can you post a picture of the new window motor you purchased from Lucky 8? As far as finding the connection, it's not in the door, it's in the b pillar. you need to pull back the rubber boot between the door and the body B pillar. You'll see the connectors stashed in the B pillar. You can pull the wiring out far enough to allow you to access the connectors but I still can't believe that's where you have to make your connection.
Like Abran said, a picture's worth a thousand words.
First of all, thank you for taking time to do this.
The support staff at Lucky8 gave me the following instructions:
the connector for new motor, doesnt connect at the motor, it connects up further in the door. the harness you have is to the old style motor.
The right connector is further up in the door. This area is not where you connect the new motor, you need to look further up in the door.
The upper connection can barely be reached from the lower openings in the door. It looks like it would work with the one on the motor. I didn't open up the B pillar, nor did Lucky8 suggest this, but I will give it a try. If that is the same connector as the one I can see, I will connect the new motor there.
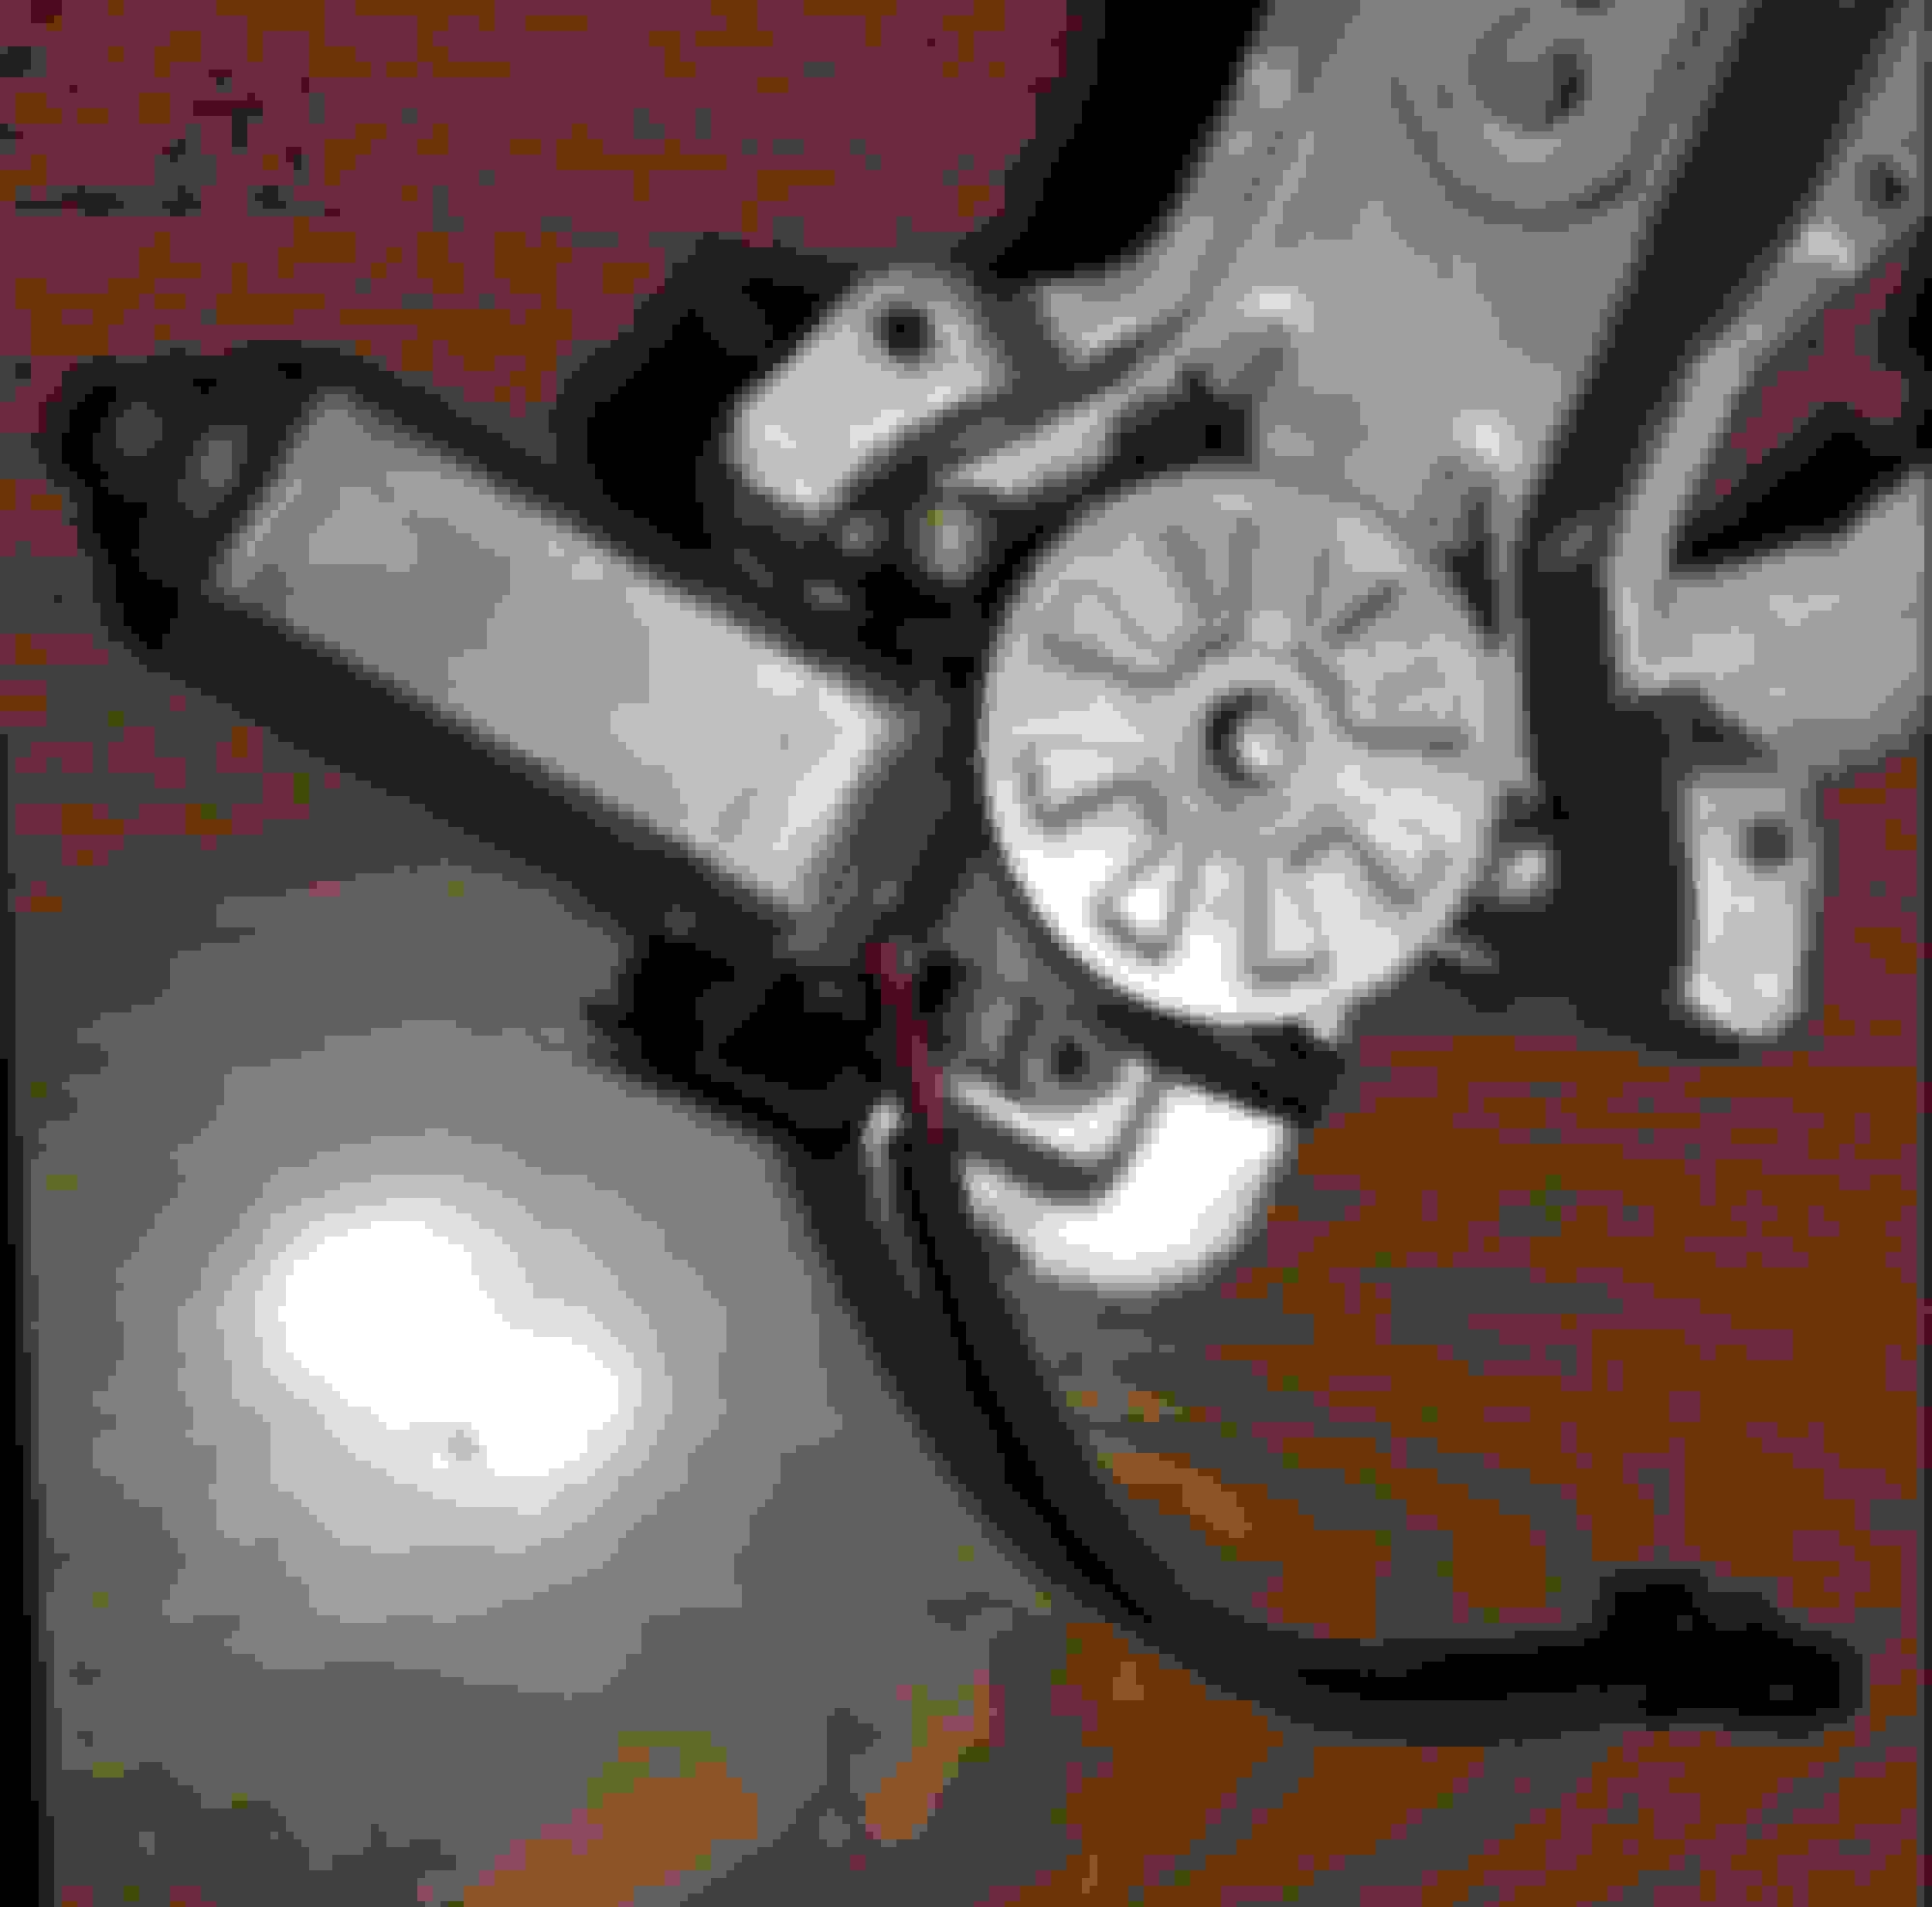
As the photos show. there are no slots in the black plastic of the new motor for the prongs of the old one to go through so I don't see how the wiring from the old one can be used in the new.
Front left Window Regulator Motor Wiring of new aftermarket motor. Connector
Ok, from your pictures, two things are evident. First, them motor you received as part of the regulator assembly is, ideally, designed to fit Land Rover Discovery models from mid 1995 through practically the end of 2002, which is to say, it's designed to fit the vast majority of Discovery models made. The other thing that is evident, that you didn't reveal, was that your Discovery is a model from late 2002 through 2004.
The motor you received, with the exception of not having the option of the removable harness at the motor, is just like the one in my pictures. It's designed with wiring that connects about six inches away from the assembly. The harness then continues up and out the door into the trucks B pillar wear there is yet another connection that continues to mate up with the harness that runs behind the front seat.
Since you cannot remove the harness at the motor the way I showed in the pictures you really only have one option. You have to remove the harness from the bad motor that came with your vehicle. You'll need to cut off the connector end of that wiring harness at the motor and also cut off the end of the wiring harness that came on the new motor. Having done that, you should have enough wiring so you'll then need to splice the wiring together between the new motor and the old harness. Otherwise, even if you located this mythical connection way up inside the door (trust me, it doesn't exist) how would the wiring from your new motor ever reach the connection?
Frankly, the new motor's design is cheap and questionable as it really will tend to compound the problem of installation for people such as yourself. In the hundreds of DII's I've parted over the last 15 or so years, thankfully, I've never run into one of these aftermarket motors and if I ever sold one to a customer I would make sure to warn anyone with one of the last DII's that installation is going to present a significant issue what with the way the harness permanently connects on the motor.
Last edited by Paul Grant; 08-25-2018 at 09:42 AM.
I must not have been clear enough in my previous messages--I have a 2000 DII which was assembled in 09/1999 so your advice was correct.
The regulator and motor were purchased separately from different vendors (I initially thought the regulator was the problem, but then determined that it was the motor). I had previously fitted the motor but left it on the regulator to take the photo because the relevant area on the part was clearly visible.
I wouldn't describe the new motor as cheap. Having disassembled both old and new, they appear identical in heft, quality of materials, etc except for the different opening for the wiring. The new regulator I would describe as cheap and I do not intend to use it.
Having tried it several times, I am aware of the difficulties involved in trying to connect the new motor to upper harness, but I am relieved to have you confirm that. The unhelpful, dismissive and patronizing "support" person at Lucky8 told me to take it to a professional because I was an incompetent who couldn't follow his "simple" instructions and that no one had ever had difficulty doing this before.
Given the nature of the problem, I will take a different approach. Which of the other window motors on a 2000 DII is the same as the front left? I will just swap them and be done with it.
I am thoroughly confused as to what was in your truck when you started on this project. Given the model year of your vehicle, you should have had the same motor in the truck as the one I pictured and you pictured. The harness should have a pair of male and female connectors (male at the end of the harness coming from the motor and female coming from the harness in the door) about 6-7 inches upstream from the motor. However, from what you're saying, there is no connection anywhere on the harness except at the old motor (which does not good because the new motor cannot connect there) and in the B pillar. That's not what you'd ordinarily find on your model year.
On DII's the left rear motor is the same as the left front motor.
The motor that was in the door when I began is the same one seen here:
original motor
and in the two shots from the Atlantic British DII Window Regulator video, the second of which shows it in the door connected to the harness.
AB How-To video AB How-to video showing connector
The left rear motor is identical, with the same 2-prong connector, but it has a 6" long cable which which plugs into the two prongs and to the harness at the other end. It is the same as the one in your photos. The new motor has the same cable as the rear motor, but it does not have the 2 prongs and cannot be unplugged from the motor, nor can its wiring be swapped out with the front motor's.
I have already tried cutting the connectors off both the front harness and new motor and splicing them together but the new motor was unresponsive. When I reinstalled the old motor in its original position with the wires spliced together again, the motor worked but when the up button was pushed, the window went down and vice versa.
There is another connector inside the front left door at the very top right of the same type as the one into which the rear motor's and the new motors's 6" cables plugs. I have no idea why it is there. Due to lack of space it was not possible for me to connect the new motor at the upper connection. The Lucky8 support agent claims that I am the only person who has not been able to accomplish this. Perhaps there is something weird or anomalous about my set-up that makes a normally easy task very difficult.
I cannot follow the part in your reply about the B pillar. How would the motor in the front door connect to the B-pillar?
My Workaround
Because what was supposed to be a simple job had become protracted and intractable problem, I opted for an expedient, pro-tem solution: I swapped out the front and rear left side motors. Now the driver's side front window operates normally and the seldom-used rear window does not. I tried to use the new motor in the rear but when it was installed, it once again was completely unresponsive. Maybe I spoke too soon when I said the motor was not cheap. Ironically, I cannot return it because I cut off the connector the try to make it work with the front wiring. I did not need the new regulator either but can't return it after having installed, uninstalled and reinstalled it several times so I spent $80 on unused parts and still have a window that won't go up.
I have another 20-yr old car that needs my attention so will return to the window another time. Thank you all for your advice.
 08-24-2018, 05:49 AM