
Tools and stuff...
#1
 04-06-2010, 03:10 PM


Join Date: Mar 2010
Location: West Hartford, CT
Posts: 41
Likes: 0
Received 0 Likes
on
0 Posts
Ok, please don't laugh, but total newbie here. I had posted earlier that I was looking for an 03' or 04' Discovery to replace my 05' Rubicon and I was successful in doing so. I'm now the proud owner of a black 2003 Land Rover Discovery SE7 w/ about 70K miles. It's in pristine condition.
I've read through the stickies, glanced over the PDF manual and have read a ton of posts here. This is an amazing place for information!
I'd like to start doing some of my own work, but have never tinkered with an auto mobile before lol. I do, however, want to start some where. I love working with my hands. I've built many computers, I know this is very different, but feel confident I can work on the Discovery too.
Where's the best place for a newbie to start? The small mom and pop dealership where I purchased the Disco did a lot already, but it probably wouldn't hurt to double check a few things.
Are there any particular tools I may need beyond the normal wrench, screwdriver, hammer etc?
As of right now she runs very smooth. I'm not noticing any odd sounds, no starting issues or cooling issues. There is condensation in the left headlight though that I'd like to take care of.
Like I said absolutely new to car work, but am determined to learn. Any advice would be greatly appreciated.
Oh and I'm out of the VIN oil pump failure range. Of course this doesn't mean it couldn't happen, but thought I'd mention it.
Thanks!
#2
04-06-2010, 03:21 PM

Administrator
Join Date: Apr 2006
Location: Denver, Colorado
Posts: 25,707
Likes: 0
Received 103 Likes
on
85 Posts
When you have any questions pop up, ask us first so we can keep you going in the right direction.
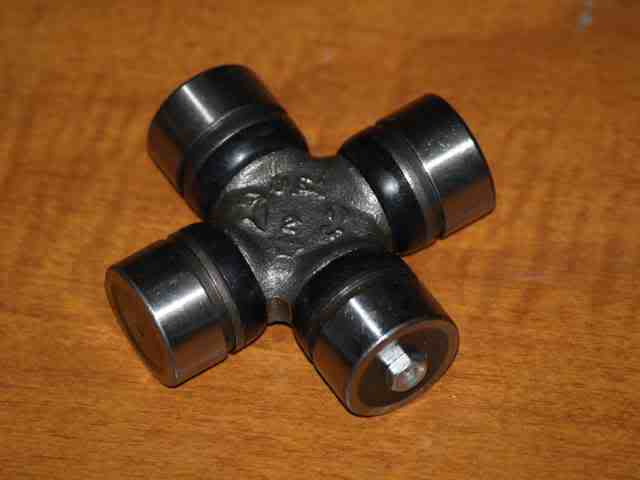
You will want to check the front drive shaft and see if it has been rebuilt or replaced yet since they fail and take the tranny with it. I you have 3 grease fittings, our OK, if only 1 you need to start on this project right away.
You will want to check the front drive shaft and see if it has been rebuilt or replaced yet since they fail and take the tranny with it. I you have 3 grease fittings, our OK, if only 1 you need to start on this project right away.
#3
04-06-2010, 03:31 PM
Join Date: Mar 2010
Location: West Hartford, CT
Posts: 41
Likes: 0
Received 0 Likes
on
0 Posts
When you have any questions pop up, ask us first so we can keep you going in the right direction.
You will want to check the front drive shaft and see if it has been rebuilt or replaced yet since they fail and take the tranny with it. I you have 3 grease fittings, our OK, if only 1 you need to start on this project right away.
You will want to check the front drive shaft and see if it has been rebuilt or replaced yet since they fail and take the tranny with it. I you have 3 grease fittings, our OK, if only 1 you need to start on this project right away.
Last edited by The Cisco Kid; 04-06-2010 at 03:37 PM.
#4
04-06-2010, 03:54 PM

Baja

#5
04-06-2010, 03:57 PM

Rock Crawling
Join Date: Jul 2008
Location: Rome, GA
Posts: 316
Likes: 0
Received 0 Likes
on
0 Posts
#6
04-06-2010, 03:59 PM

TReK

#7
04-06-2010, 03:59 PM
Join Date: Mar 2010
Location: West Hartford, CT
Posts: 41
Likes: 0
Received 0 Likes
on
0 Posts
#8
04-06-2010, 04:00 PM
Join Date: Mar 2010
Location: West Hartford, CT
Posts: 41
Likes: 0
Received 0 Likes
on
0 Posts
 And that would be awesome. I've got a bumper to bumper warranty right now and have no problem using it if needed.
I'm assuming that not the entire "drive shaft" will need to be replaced? From the pictures above and other links I've found, it looks as though just the "prop shafts" were changed? Seems like a pretty cheap fix...
Last edited by The Cisco Kid; 04-06-2010 at 04:21 PM.
#9
04-06-2010, 05:19 PM
Baja
get under and take a pic and bring it back and post it. the u joints need to be replaced with ones that can be greased. the zerk is a grease point. if you don't have zerk fittings than your drive shaft is stock and needs to be taken care of first thing. you can either have a drive line rebuild it with new u joints and a centering ball kit (around $200) or you can just buy a new drive shaft with the zerks on the u joints. ($320)
#10
04-06-2010, 05:59 PM

A good place to start is a oil change, its easy, you will get dirty and you will get a great sense of satisfaction once it is done.
Buy tools as you need them, if you try and buy them all up front you will go broke.
Look for tools at garage sales and flea markets.
As for the headlight condensation...there are threads addressing this issue if you do a search.
The headlight cover is 2 pieces, there is a seal between them, it leaks.
IMO the best fix is to drill four small holes into each headlight cover, 2 on top where the hood covers them and 2 on the very bottom.
This will allow cross ventilation and the moisture will escape through the top holes.