
Working through head gasket overhaul
#1
 08-10-2013, 01:57 PM


Join Date: Apr 2013
Location: Columbus, Ohio
Posts: 10
Likes: 0
Received 0 Likes
on
0 Posts
Greetings Everyone!
First off thank you to everyone's various posts, a lot of posts and information have helped me get this far on my head gasket job (more appropriately it's turned into an upper engine rebuild).
My first thread here: https://landroverforums.com/forum/di...nt-leak-58616/ I discussed my coolant loss problem. I've only this month been able to finally address it after an extended moving process.
I began to tear down the engine to find out the cause of the issue. As I dismantled things, it became apparent that someone has done this job on this land rover before, and did either a poor job of repairing it or a poor job maintaining it afterwords. Every gasket was damaged or disintegrating. Something was living on the valley gasket at some point:
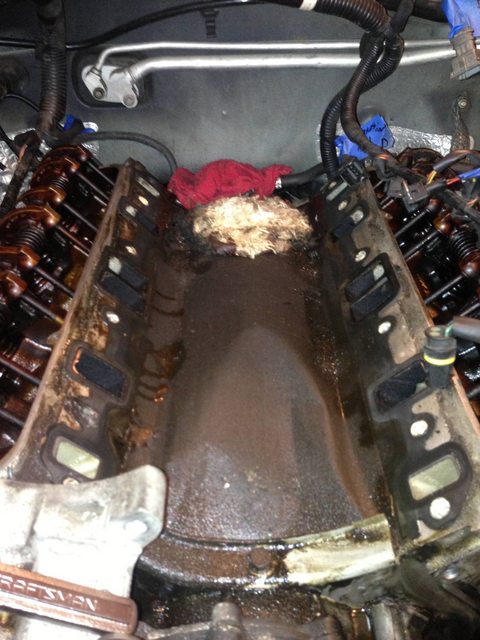
(sorry it's a bit out of focus but yes, that gasket is inverted and that's a nest of some kind of yarn).
The block was caked in about 1/4" of oil, ps fluid, and coolant and there are a lot of zip ties where there should be mounts for cables and hoses.
But all that's behind me as now I've gotten everything disassembled:
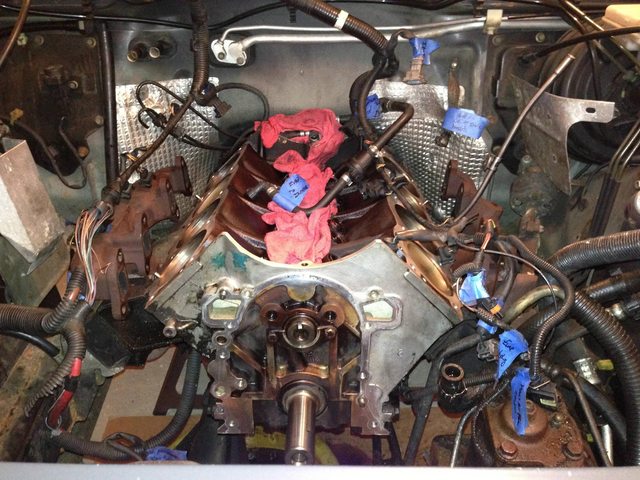
I've begun the tedious task of cleaning all the parts I've removed. My heads have been cleaned and machined and are back from the shop. As I move forward, I have a few small questions that I'm having some trouble finding answers to, but I know you'll provide me with answers.
1. What's the best way to get the oil seal out of the timing cover? I've tried a couple ways of pulling on it and can't get it to budge. As always I worry about damaging parts and don't want to have to spend big bucks because I scratched the cover or something.
2. Likewise, putting the new one back in.
3. A piece of a fuel injector was broken on one when it came out (see below). On a couple others these are cracked. Does this mean I need new injectors, or can I get these little plastic rings somewhere?
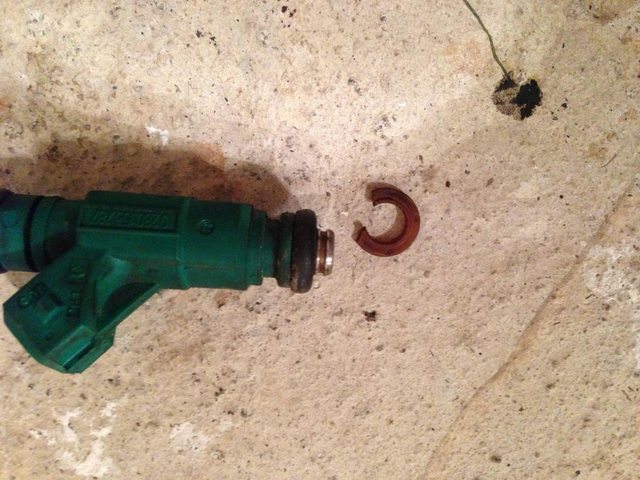
4. On the remaining injectors what's the best way to get the new o-ring on the bottom without breaking this plastic piece on the remaining injectors (several of the o-rings are corroded and falling apart).
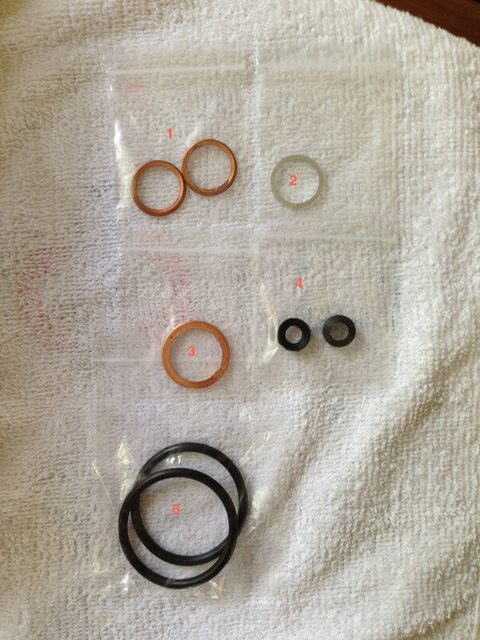
5. I bought the gasket kit from Atlantic Brittish and I'm unsure as to what these various orings go to:
6. Is there an o-ring around where the dipstick goes through the block? When removing mine, a "ring" came off which was either a bunch of dried up oil or a very degraded o-ring. It disintegrated pretty much instantly when hit with brake cleaner while cleaning up the block.
That's all for now, I'm off to do more cleaning and finding some replacement o-rings for various parts that didn't come with the kit (oil plug, oil filter elbow...)
First off thank you to everyone's various posts, a lot of posts and information have helped me get this far on my head gasket job (more appropriately it's turned into an upper engine rebuild).
My first thread here: https://landroverforums.com/forum/di...nt-leak-58616/ I discussed my coolant loss problem. I've only this month been able to finally address it after an extended moving process.
I began to tear down the engine to find out the cause of the issue. As I dismantled things, it became apparent that someone has done this job on this land rover before, and did either a poor job of repairing it or a poor job maintaining it afterwords. Every gasket was damaged or disintegrating. Something was living on the valley gasket at some point:
(sorry it's a bit out of focus but yes, that gasket is inverted and that's a nest of some kind of yarn).
The block was caked in about 1/4" of oil, ps fluid, and coolant and there are a lot of zip ties where there should be mounts for cables and hoses.
But all that's behind me as now I've gotten everything disassembled:
I've begun the tedious task of cleaning all the parts I've removed. My heads have been cleaned and machined and are back from the shop. As I move forward, I have a few small questions that I'm having some trouble finding answers to, but I know you'll provide me with answers.
1. What's the best way to get the oil seal out of the timing cover? I've tried a couple ways of pulling on it and can't get it to budge. As always I worry about damaging parts and don't want to have to spend big bucks because I scratched the cover or something.
2. Likewise, putting the new one back in.
3. A piece of a fuel injector was broken on one when it came out (see below). On a couple others these are cracked. Does this mean I need new injectors, or can I get these little plastic rings somewhere?
4. On the remaining injectors what's the best way to get the new o-ring on the bottom without breaking this plastic piece on the remaining injectors (several of the o-rings are corroded and falling apart).
5. I bought the gasket kit from Atlantic Brittish and I'm unsure as to what these various orings go to:
- 2 copper seals approx 7/8"
- 1 aluminum "washer" approx 13/16"
- 1 copper seal approx 1"
- 2 rubber seals with a valley in the middle.
- 2 rubber o-rings approx approx 1 3/4"
6. Is there an o-ring around where the dipstick goes through the block? When removing mine, a "ring" came off which was either a bunch of dried up oil or a very degraded o-ring. It disintegrated pretty much instantly when hit with brake cleaner while cleaning up the block.
That's all for now, I'm off to do more cleaning and finding some replacement o-rings for various parts that didn't come with the kit (oil plug, oil filter elbow...)
#2
08-10-2013, 02:34 PM

Super Moderator
#3
08-10-2013, 04:19 PM

Recovery Vehicle
You can purchase injector rebuild kits for these. Also you can have them sent out and cleanded and rebuilt or you can do yourself. Lots of youtube videos on how to.
Mr Injector Parts - Home
Mr Injector Parts - Home
#4
08-10-2013, 08:59 PM
Super Moderator
BTW - save that valley pan gasket and use it as a line up template when heads go back, it is said by those far wiser that you can wiggle a bit on the two index pins from the block, and get everything lined up before torquing down.
I paid dearly for missing this important step, and my new valley pan gasket is nowhere near as lined up as your old one.
I paid dearly for missing this important step, and my new valley pan gasket is nowhere near as lined up as your old one.
#5
08-10-2013, 10:41 PM
Join Date: Apr 2013
Location: Columbus, Ohio
Posts: 10
Likes: 0
Received 0 Likes
on
0 Posts
Savannah, thanks for the tip. I haven't gotten rid of anything yet, I won't until it's complete.
I was able to get the oil seal off by prying it off with some vice grips. I just bit hard on the seal and pealed it back, it finally just popped out. Going to get a short length of PCV in the appropriate diameter to pound the new one back in when it's time.
I'm looking into sending out the fuel injectors for a cleaning. Seems reasonable to get them fully cleaned rather than just put new o-rings on.
#6
08-11-2013, 12:08 AM

Yes - you need to form the new valley gasket into the same bend as the old one.
More fun is putting on valve cover gaskets.
Laugh not.
Those to me where harder than the valley gasket.
You need to put Aviation gasket maker on the valve gasket and first get the gasket glued to the valve cover.
More fun is putting on valve cover gaskets.
Laugh not.
Those to me where harder than the valley gasket.
You need to put Aviation gasket maker on the valve gasket and first get the gasket glued to the valve cover.
#7
08-11-2013, 07:31 AM
Super Moderator
#8
08-19-2013, 12:02 PM
Join Date: Apr 2013
Location: Columbus, Ohio
Posts: 10
Likes: 0
Received 0 Likes
on
0 Posts
Just wanted to drop in for an update.
I went to Lowes and purchased this to put in the front oil seal: Shop Charlotte Pipe 2-in x 1-1/2-in Dia PVC Flush Bushing Fitting at Lowes.com
The pipe end fits right on the seal and the flanged end makes a great target for my 5# hammer. A couple of swift wacks and it was in perfect.
Heads are on and tightened down (new ARP head studs). Pushrods and rockers on, valley gasket on. New timing chain and gears installed.
Going to get the inlet manifold cleaned up and installed this week. Fuel injectors were sent off to cleaning.
New oil pump gears installed (beveled edge down correct? seemed that way on the set of gears that were in there).
I'm having difficulty with removing the alignment pins. I know they're off kilter, you can visibly tell when you dry fit the timing cover that there is a slight bias. I've tried shear willpower and force but nothing is budging these things. Is there a tool that I can use to get these out? Is it possible that the last person to do this repair (it's quite evident that a similar repair was done by a PO of the truck, but not very well) put loctite or something in to keep them in there? I'm more concerned now because I've boogered them up pretty good trying to pull them with vice grips (I'm afraid to put any force against the block so that's still clean).
This week my goal is to get the engine and parts ready for the return of the fuel injectors so that I can finish buttoning it up this weekend.

#10
09-11-2013, 09:27 AM
Join Date: Apr 2013
Location: Columbus, Ohio
Posts: 10
Likes: 0
Received 0 Likes
on
0 Posts
Hey just a quick update. The truck is coming together, but slowly as I was assigned a last minute, month long contracting job that started the first week of this month.
I've got the engine mostly buttoned up. I hit the timing dowels with the heat gun for a couple of minutes and was able to wiggle them out. All the gaskets went on no issues (other than AB sent the wrong sump gasket and I had to wait for a replacement).
My new dilemma is that after I connected up the hoses on the update manifolds I found that I didn't place the fuel injector clips on the fuel rail. How important are these? I tried to finagle one in place, but it wouldn't line up right. It looks like maybe the injectors aren't all the way up in the fuel rail, but I can't get them any further in as it's assembled now, and they don't wiggle.
I know it's probably best that I break it back down and fix this, but I'm so anxious to have this truck fixed (and I would rather put the miles on it than driving my fun car as a DD to said contracting job).
Thanks again to everyone for all their help.