Cooling issues
#1
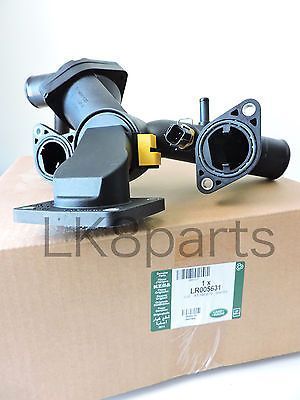
Greetings folks. I am experiencing some cooling anomalies. An inline fitting on two of the small cooling hoses atop the motor. Now, I notice a small leak on this plastic part that the upper hose attaches to. (Not sure what the part is yet, see picture) My temp gauge does not go above half and the fan kicks on. But, now I have no heat. I'm not sure what is causing that either.
So there it is in a nut shell. I'm not sure where I need to go from here.
So there it is in a nut shell. I'm not sure where I need to go from here.
#2
#4
I just did this service a month ago before a 5000 mi road trip. Try to vacuum out as much coolant as you can before tearing into it, otherwise you will spill significant amount of coolant all over the place.
Don't forget to replace the bleeder T on top of the intake manifold while you do the T-stat. There is a good chance this bleeder is very brittle and will break off as you start moving things around.
You can do this service without taking off the intake manifold, but you have to be patient and have good socket extensions to get the housing behind the throttle body off the intake manifold. Plan for a few hours and make sure you have a good hose pick to loosen all the connections on the thermostat housing

#5
specifically looks like the upper thermostat housing.
Would be better to get the entire housing new, but you can get the upper piece separately, and a new thermostat separately (which you should probably change since you're in there now) in a pinch if money is an issue.
Make sure you correctly bleed all the air out of the system when you do the job, I am guessing there is a fair amount in your system which may be backed up in the heater core area, typical when bleeding the heater won't blow warm until all the are is out. Make sure there are no bubbles in the returning coolant coming into the expansion tank.
#7
Ok, damn this thing. I replaced the thermostat housing, the thermostat and the inline bleeder atop the manifold. I read the workshop bleeding instructions for the 4.4 but something isn't right.
The truck holds temp just fine but still no heat. Am I bleeding this wrong? Am I purging air from the bleeder on the reservoir or the fitting above the manifold? I am leaving the main reservoir cap on.
The truck holds temp just fine but still no heat. Am I bleeding this wrong? Am I purging air from the bleeder on the reservoir or the fitting above the manifold? I am leaving the main reservoir cap on.
#8
Leave the main reservoir cap off and bring it up to operating temp. Let it cool down and repeat a couple more times. Each time should need a little more water to level it out.
Check out this video from AB (start at 7:30)
I didn't fuss with that bleeder valve on top when I replaced my housing and that valve.
Check out this video from AB (start at 7:30)
I didn't fuss with that bleeder valve on top when I replaced my housing and that valve.
Last edited by Boulderhead; 08-12-2016 at 01:16 PM.


