When you click on links to various merchants on this site and make a purchase, this can result in this site earning a commission. Affiliate programs and affiliations include, but are not limited to, the eBay Partner Network.
Tools
7mm socket (or flat screwdriver) for hose clamps
Hose pick
Hose clamp pliers
Bent nose pliers
Long ⅜ ratchet to release tension on belt tensioner
15mm socket with long ratchet to remove belt tensioner
T30 torx for water pump bolts
36mm Fan removal wrench (reverse or Left handed thread!)
Optional: Airlift vacuum coolant filling tool with compressed air
Parts
Water pump LR097165
2x gaskets LR049370
Water pump bolts
Serpentine belt LR064185
Oil cooler tube LR028136
Oil cooler tube o ring LR030593
WSS-M97B44-D Coolant (1-2 gallons)
Steps
1. Remove the cover with V8 stamped on it, by lifting the front edge and pulling towards you.
2. Remove air intakes (3 hose clamps - yellow arrows)
Remove the air hose quick release fastener from under the left intake.
3. Remove large top radiator hose (2 hose clamps indicated by red arrows). Then pull 2x electrical fasteners (yellow arrows) from fan shroud cover with pliers, then remove shroud.
4. Remove the fan using fan removal tool. Be careful, it is a LEFT HAND thread.
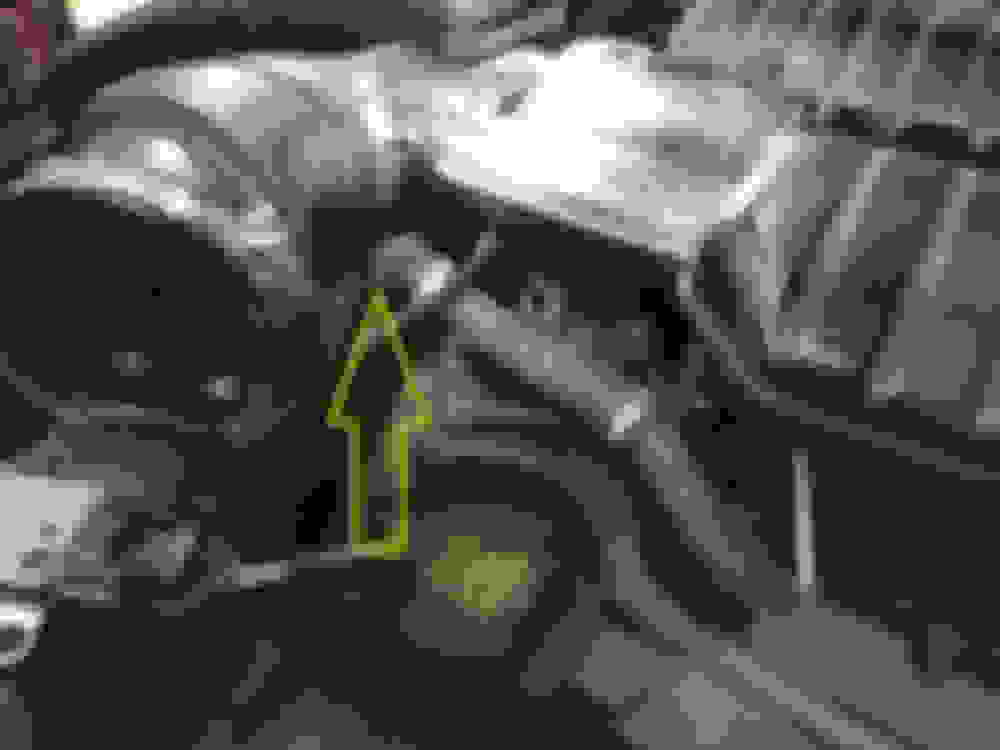
5. Disconnect small L shaped hose from water pump by pushing black plastic collar inwards while pulling hose outwards. I used bent nose pliers and a small screwdriver. (Be careful not to break this plastic hose, it may be brittle.)
6. Relieve the tension on the serpentine belt by inserting a long handle ⅜ ratchet in the square hole on the belt tensioner (red arrow) and turning it clockwise as if to tighten it. Slip the belt off the alternator pulley and then off the water pump pulley. Then remove bolt from the belt tensioner (yellow arrow) using a 15mm socket and long ratchet. Remove the belt tensioner and inspect the pulley bearing for free spinning.
7. If replacing the serpentine belt, cut it and remove it completely, otherwise leave it in position.
8. Remove the 4 T30 torx bolts from the water pump then remove the water pump from the engine
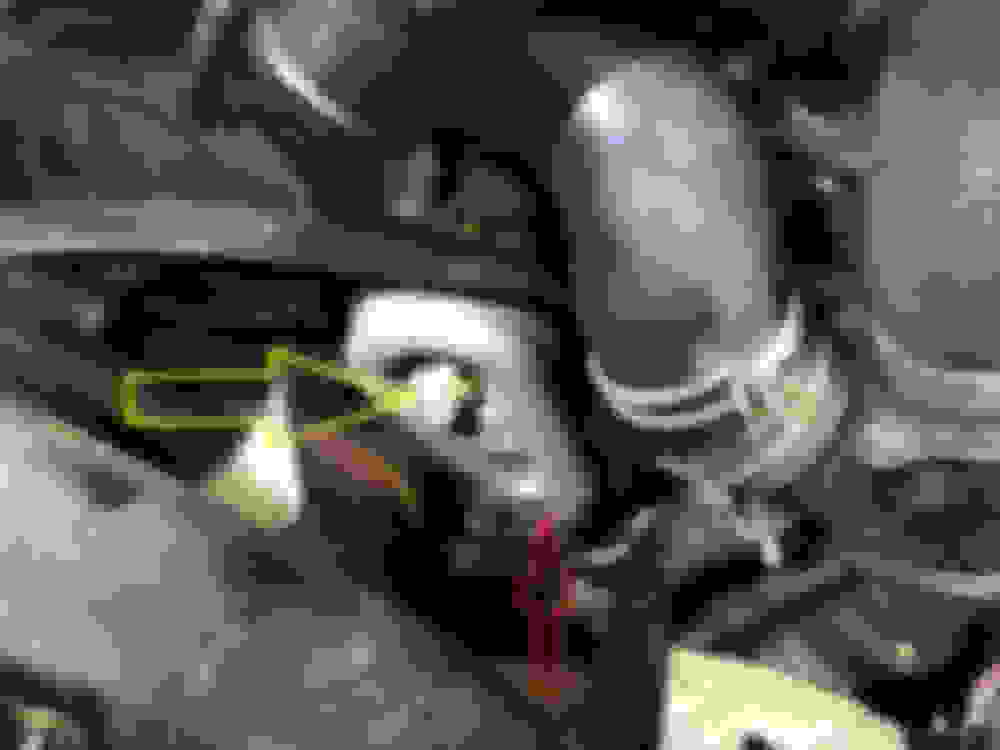
9. Remove the old water pump gaskets (yellow arrows), oil cooler tube (red arrow) and old o ring from the engine behind the water pump. Clean the area thoroughly.
10. Install new oil cooler o ring and oil cooler tube onto engine.
11. Fit new water pump gaskets and install the new pump onto the engine, making sure to correctly engage the oil cooler connection port on the back of the water pump onto the new oil cooler tube. (I ended putting the bolts through the water pump bolt holes before fitting it into location, then threading 3 or 4 turns of the bolts into the gaskets to hold them in place while trying fit the pump onto the oil cooler tube.)
12. Torque the water pump bolts to 12NM or 9 ft-lb.
13. Check all the pulleys are rotating smoothly, and replace any that are not.
14. If replacing the serpentine belt, you will need to remove the smaller viscous coupling belt and pulley (shown as part 2 in the diagram below) in order to get the new accessory belt in place.
15. Reinstall the belt tensioner.
16. Reassemble the rest of the parts in reverse order.
17. I used an Airlift vacuum fill to top up the coolant. It took about a gallon.You may also be able to fill the expansion tank, run the engine, and gradually add more coolant as the bubbles come out of the system.
18. Check for coolant leaks carefully, then regularly monitor your coolant level for the next couple of hundred miles.
Last edited by spawnywhippet; 11-15-2017 at 09:01 PM.
In the middle of doing this to my 2012 LR4. I'm replacing both belts while I'm there. My question is how do I get the fan belt/viscous coupler belt off? (And back on for that matter.) There doesn't appear to be a tensioner of any sort, nor a way to relieve tension via a slotted mount like older vehicles had pre-serpentine.
In the middle of doing this to my 2012 LR4. I'm replacing both belts while I'm there. My question is how do I get the fan belt/viscous coupler belt off? (And back on for that matter.) There doesn't appear to be a tensioner of any sort, nor a way to relieve tension via a slotted mount like older vehicles had pre-serpentine.
I�m assuming you had to take off the fan and pulley, if I�m wrong let me know.
The fan belt is stretch to fit. You can replace the serpentine belt without removing the fan and/or fan belt. You�re able to wind the serpentine through behind it.
Originally Posted by Paul Mintz
I�m assuming you had to take off the fan and pulley, if I�m wrong let me know.
Hi. My husband has replaced the water pump, oil cooler tube, o-rings, etc. But now there seems to be a leak from the oil cooler tube - the new one. When my husband took off the original oil cooler tube he noticed apoxy or glue type substance on the o-rings as if to stop a leak or keep them in place. Anyone have this issue or heard about it?
Hi. My husband has replaced the water pump, oil cooler tube, o-rings, etc. But now there seems to be a leak from the oil cooler tube - the new one. When my husband took off the original oil cooler tube he noticed apoxy or glue type substance on the o-rings as if to stop a leak or keep them in place. Anyone have this issue or heard about it?
Kim, I responded in your other thread. This is a sticky so I doubt you'll get a lot of responses. Of course I came back here because I saw that someone was able to get the serpentine belt back on without removing the fan and such. That's what I'm looking for!! No such luck for me.
Anyways, I just replaced all my crossover tubes and water pump on our 2011 RRS. I didn't notice any type of epoxy on the oil cooler tube or the o-rings. That could be a clue as to why it was leaking to begin with. But if he replaced them, then why the leak? The "indie" guy here told me that he's seen the o-ring get pinched before but it would take some miles before it started to leak. Mine is not back to together yet, waiting on a starter motor, so I have no idea if I'm going to have leaks. Fingers crossed!!
Hey there everyone, I�m new here and joined just to post this warning.
I replaced my water pump, serpentine belt and the stretch belt for the viscous cooling fan this weekend using the info in these forums.
We have a 2011 LR4 HSE with the 5.0 V8.
Everything went great, except it was very difficult to route the smaller stretch belt on using the flimsy generic lisle tool I got off of Amazon. I was forced to turn the crankshaft forward and backward a bit to work it on.
After completion - the truck has gone into reduced performance mode, thrown a P0017 code bank 1 sensor b (crankshaft position and camshaft position correlation) and real time data shows an alert/failure around the VVT.
After some research and consulting my father in law who is a lifelong mechanic, mechanical engineer and rebuilder of cars we�ve come to the conclusion that the timing chain has likely slipped on the bank 1 side.
There is a technical service bulletin (TSB LTB00474NAS3) that indicates that the timing chain tensioner and timing chain tensioner lever wear on a specific set of years/models/vins and can cause excessive slack to build up in the chains. This coupled with turning the crankshaft backward even just the one or two total turns I may have made, likely caused the chain to jump a tooth out of alignment.
This may be common knowledge, but for an amateur like myself - I stumbled right into it so I wanted to put the warning out. My apologies if I�m sharing something that�s a, �well, duh!� for some people.
We�ll be limping ours to my father-in-laws shop to redo the timing.
In the middle of doing this to my 2012 LR4. I'm replacing both belts while I'm there. My question is how do I get the fan belt/viscous coupler belt off? (And back on for that matter.) There doesn't appear to be a tensioner of any sort, nor a way to relieve tension via a slotted mount like older vehicles had pre-serpentine.
what was the solution to remove the viscous coupler belt off/on?


 11-15-2017, 08:57 PM