Subwoofers - Fixed On The Cheap (See how)
#1
 10-26-2010, 08:41 PM


Hey guys, I thought I'd share a very cost effective and quick way to repair D1 Subwoofers. I know a lot of other D1's also suffer from this issue. Mine had been bad for a while, basically your typical foam rot due to age and heat. I finally got around to fixing them. Got tired of the crappy buzzing sound. Replacing the speakers would have taken some effort due them being more or less molded (or glued) into the plastic housing, and yeah, I know I could have bought a new assembly which I saw for something like $200 with shipping, but, hey, I'm putting my money into a few other things at the moment. This fix cost about $10 and took me less than an hour and a half. They sound like new again.
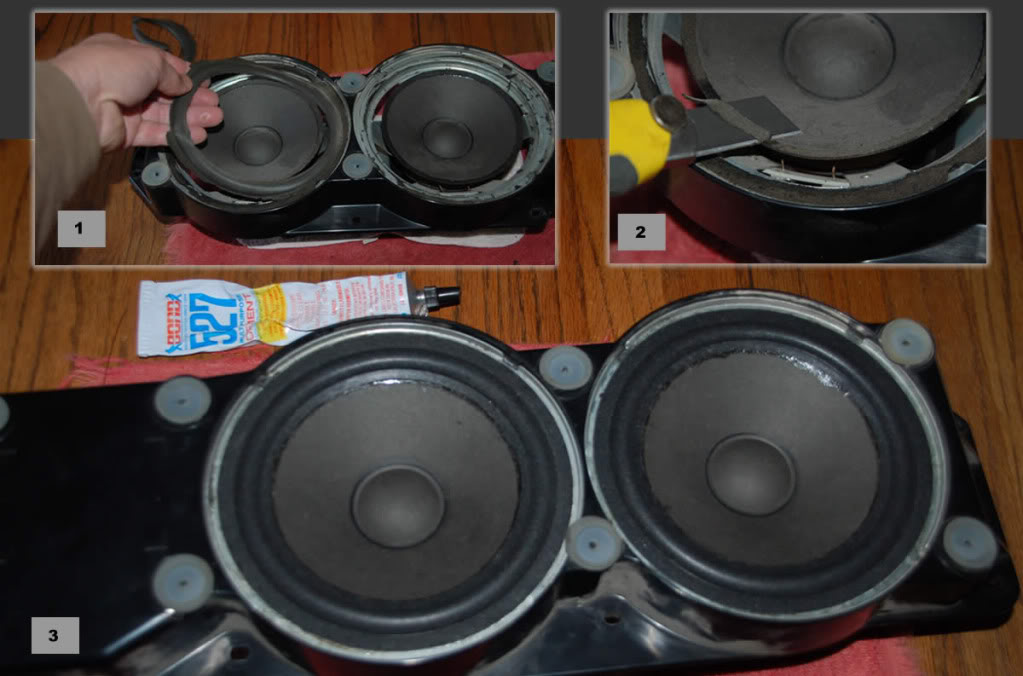
Step 1) Carefully remove the rotted foam with your fingers.
Step 2) Use a very sharp razor to very carefully separate the remaining old foam on the paper cone from the glue. Use care not to cut the paper cone. It was really easy to do as the foam separates easily.
Step 3) Glue on new foam rings. You can buy them really cheap here: http://stores.ebay.com/surroundaroun...er-repair-shop
The key factor during installation is to ensure the cone moves freely in/out and there is NO friction or binding or rubbing. Hint: The speaker cone is more or less self-centering and if you use care, it is pretty easy to do. What I did was to adhere the foam to the paper cone first, then let it dry somewhat before adhering the outer foam to the speaker basket. Press the paper cone in/out periodically as you go to ensure no binding occurs. You can always pull the foam away and re-position it. I used the glue shown (like airplane glue), but honestly, some guys use Elmers glue and that might work better. The solvents in the airplane glue expanded the foam a little but in the end it provided a firm bond. The size of speaker surround for my D1 was 6 1/2". I have some other woofers to fix so I bought enough for 3 sets of woofers (6 speakers) and it was under $20 for all of them!
Step 4) Let the glue dry.
Step 5) Reinstall and rock on! Mine sound like new!
Last edited by Mark G; 10-26-2010 at 08:55 PM.
#2
10-26-2010, 10:57 PM

Baja
Join Date: Mar 2010
Location: Pittsburgh PA suburbs.
Posts: 5,584
Likes: 0
Received 7 Likes
on
7 Posts
The trick will be if they hold together after blasting some tunes for a while. The glue reacting with the foam sounds like a potential problem brewing. Good luck with it.
You could always do some other speaker mounting in the rear corners instead of that goofy door mount, never really cared for that.
You could always do some other speaker mounting in the rear corners instead of that goofy door mount, never really cared for that.
#3
10-26-2010, 11:24 PM
Yeah, good points.
I've had them in for about a week and they're holding up just fine with my 'tests' I didn't mean to raise a scare on the glue attacking the foam. It didn't melt them or anything severe. It really wasn't a big deal. I'm not concerned about the durability, it's not rocket science, just glue in some new foam. Some foam sellers do sell what they say is the correct glue, but it's very expensive. Many just use more common household glues and from what I've read there hasn't been any problems. I agree, there are other places to put speakers back there. My goal was to illustrate an alternative 'cheap fix' that other owners may (or may not) want to persue. It's definitely not for everyone.
I've had them in for about a week and they're holding up just fine with my 'tests'
I didn't mean to raise a scare on the glue attacking the foam. It didn't melt them or anything severe. It really wasn't a big deal. I'm not concerned about the durability, it's not rocket science, just glue in some new foam. Some foam sellers do sell what they say is the correct glue, but it's very expensive. Many just use more common household glues and from what I've read there hasn't been any problems. I agree, there are other places to put speakers back there. My goal was to illustrate an alternative 'cheap fix' that other owners may (or may not) want to persue. It's definitely not for everyone.
#4
10-27-2010, 09:28 AM

Rock Crawling
#5
10-27-2010, 06:29 PM
Speakers will eventually face foam rot and sound like crap even though the rest of the speaker is in good condition. The typical fix when the foam rots out is to replace the speakers. Normally this would cost about $30 per speaker, or more depending on the quality and name brand of speakers you buy. It's generally not too hard to do. However, the speakers in our LR/s are adhered in a plastic housing and so you're looking at about $200 to replace them. It's very uncommon for folks to replace their own rotted out speaker foam surrounds first because you don't know who supplied the speakers to L/R and secondly because the mfgrs don't sell them outright (that's the beauty of the internet). Also, because nobody really 'does' it for whatever reason.
This is a cheap fix if someone is looking to save a few bucks and doesn't take a lot of time/skill or tools to do. Put the rest of the $$ in other mods or in the bank. I personally can easily afford to go out and buy new speakers, but I'm cheap and I'd rather put my money somewhere else in a case like this. I also happen to have a few other speakers to fix and I figured I could spend an hour or two here and there and get them all tuned up. It's obviously not a fix that suits everyone. As for longevity, I assure you they will last for many years, probably as long as the originals did. Land Rover owners on this board are generally hand-on folks, that's why I wanted to pass along the 'how-to'. Cheers!
This is a cheap fix if someone is looking to save a few bucks and doesn't take a lot of time/skill or tools to do. Put the rest of the $$ in other mods or in the bank. I personally can easily afford to go out and buy new speakers, but I'm cheap and I'd rather put my money somewhere else in a case like this. I also happen to have a few other speakers to fix and I figured I could spend an hour or two here and there and get them all tuned up. It's obviously not a fix that suits everyone. As for longevity, I assure you they will last for many years, probably as long as the originals did. Land Rover owners on this board are generally hand-on folks, that's why I wanted to pass along the 'how-to'. Cheers!
Last edited by Mark G; 10-27-2010 at 06:37 PM.
#7
10-27-2010, 08:34 PM
Baja
Join Date: Mar 2010
Location: Pittsburgh PA suburbs.
Posts: 5,584
Likes: 0
Received 7 Likes
on
7 Posts
I have removed the audio system from mine, the CD changer under the passengers seat had apparently shorted out from getting wet with the PO. He had a different changer put in and it was not pretty. The radio kept flashing the code light, so it all came out including the rear door unit and even the little tweeters on the front columns.
I am planning on redoing the inside of the back door to better accomodate various items.
When I do get around to redoing a sound system, I'll mount something in the rear upper corners, since I also have the headliner and most of the internal trim panels and all the carpeting out as well.
I have a little surface rust to deal with, then I will decide how I want to redo the interior. I don't need thick sponges and carpets back there absorbing water like it came from the factory with.
#8
10-28-2010, 04:07 PM

Three Wheeling
Join Date: Nov 2008
Location: Near Duluth, MN
Posts: 86
Likes: 0
Received 0 Likes
on
0 Posts
#9
10-29-2010, 10:50 PM