3" Terrafirma Lift install problem/question
#1
So I installed a Terrafirma 3" Lift on my '04 D2 that I picked up from Properspec (Amazon)...
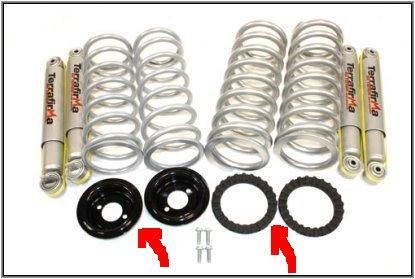
When i opened the box that was marked "front", it had these parts included that I marked in red....I have NO idea where these 2 things go!?
Can anyone enlighten me?
[IMG] [/IMG]
When i opened the box that was marked "front", it had these parts included that I marked in red....I have NO idea where these 2 things go!?
Can anyone enlighten me?
[IMG]
 [/IMG]
#2
Weeeell, I can tell you that the metal part is a spring seat. That bolts to the axle for the bottom of the spring to sit upon. However, that doesn't look compatible with the front shocks on the D2. Looks more like a rear spring seat, if I recall correctly. Perhaps that's a spring seat to convert from the optional rear air bag suspension some vehicles are equipped with.
The rubber-coated ring is a spring isolator which generally goes between the top of the spring and the chassis. Your stock springs should have them installed as well and I've heard that these can even be stacked a couple/few deep in order to level the vehicle if need-be.
Hope that helps. I'm sure someone more experienced will chime in to confirm.
Best of luck.
-Gavin
The following users liked this post:
talltodd (12-06-2015)
#3
The bit on the left is definitely the spring seat for the rears. As pointed out above. And bolts to the axle.
When I fitted my 2" lift (same parts) my old ones were in great shape and it was starting to rain, so I left them in place, and finished up quicker.
I'm trying to remember if I used the other bits on the right. But my memory is failing me. They definitely came in the kit.
Does that make sense with what you are looking at?
#4
The bit on the left is definitely the spring seat for the rears. As pointed out above. And bolts to the axle.
When I fitted my 2" lift (same parts) my old ones were in great shape and it was starting to rain, so I left them in place, and finished up quicker.
I'm trying to remember if I used the other bits on the right. But my memory is failing me. They definitely came in the kit.
Does that make sense with what you are looking at?
When I fitted my 2" lift (same parts) my old ones were in great shape and it was starting to rain, so I left them in place, and finished up quicker.
I'm trying to remember if I used the other bits on the right. But my memory is failing me. They definitely came in the kit.
Does that make sense with what you are looking at?
#5
#8
The ones on the right are without a doubt the rear isolators. They go on top of the rear springs and help keep noise to a minimum. They're not 100% necessary to install, but you might as well if you have them.
The ones on the left are the bottom plates for the front springs—not the rears, as someone said above. The holes in them are clearly for the bolts that go through the bottom of the front shocks. The rear springs are completely separate from the shocks.
Compare all these things to the stock parts when you do the swap.
#9
#10
Metal plates and hardware are included because technically it's an air-to-coil conversion, as well as a lift. The isolators go on top of the rear springs.
Those are for the rear. They just also work on a D1/d90 front axle. They are included because rear air suspension doesn't have them. Front D2 lower spring seats have a square hole, not round. The round would not work.
Last edited by ZGPhoto; 12-07-2015 at 07:26 AM.
The following users liked this post:
drowssap (12-07-2015)

