
Custom Rear Steel Bumper Completed w/ HLC Tire Carrier Video Drool On!

Thread Starter
|
Recovery Vehicle
Joined: Feb 2009
Posts: 1,151
Likes: 30
From: Denver, CO
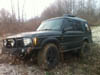
This took 60 plus hours over 3 months. But now I know I can weld and grind things. The bumper has holes drilled for the park distance controls. Perfectly square center for the trailer hitch. I welded in a Class II bumper hitch and will finally attach the 2 3/4" arm supports for a class III hitch. The bar stock for the steps was free along with the support stock for the side supports. The tread plate on the top helped support the side to side strength. I did all this with a 10" chop saw with a metal fiber blade and 2 4.5" grinders. The consumable supplies cost about $125 from harbor frieght. I put about 13lbs of weld on the bumper. I was amazed it took that much. My welding improved greatly after the first week of practice. The tire carrier slants and 5 degrees to match the angle of the rear tail gate. I am very happy how it turned out!
Discovery II Custom rear steel bump completed! - YouTube
Discovery II Custom rear steel bump completed! - YouTube
Last edited by bosshogt; Dec 13, 2011 at 06:55 PM.

Thread Starter
|
Recovery Vehicle
Joined: Feb 2009
Posts: 1,151
Likes: 30
From: Denver, CO
For now I am going to keep the rear step, since I have the ARB half rack. I am working on a quick release setup. I found 3/8" trailer hitch pins and planned on threading the ends, The other end has a small red handle. I figure if I was going to do serious off roading, I would unscrew the pins and throw the step in the back.

Thread Starter
|
Recovery Vehicle
Joined: Feb 2009
Posts: 1,151
Likes: 30
From: Denver, CO
Yes I thought about the fuel tank skid. But I cant come close based on the time involved with the Rock Armor Aluminum one. And its probably 15lbs lighter than a steel one. $150 install and done!
 Land Rover Discovery II Rock Armor Fuel Tank Skid Plate
Land Rover Discovery II Rock Armor Fuel Tank Skid Plate
Last edited by bosshogt; Dec 14, 2011 at 10:55 AM.
i love your rear bumper, the only concern is, you have to cut that metal out to get the tail lights out? i saw that rockarmor skid i think i might want steel welded all the way back to the back edge of the bumper to prevent grabbing of the bumper
Thread Starter
|
Recovery Vehicle
Joined: Feb 2009
Posts: 1,151
Likes: 30
From: Denver, CO
Deluxe Hold Down Clamp - Rockler Woodworking Tools
I used to work at Rockler here in Indy and had these in my workshop.
There are 2 of these on each light from the rear. A 10mm bolt is tapped and threaded on the bumper. The tighter I turn the bolt the more force is applied to the tail light. Also the taillight is black caulked all the way around with an additional rubber gasket on the face, so they could not crack from being pushed on. I then spray foamed the inside and any gaps around the PDC sensors of the bumper and painted it black to prevent water and road spray from filling up the boxed tube. I drilled drain holes around the bottom every foot if water gets in and needs to drain out. Thats why this thing took so long. Details!
Last edited by bosshogt; Dec 14, 2011 at 12:12 PM.
The rear lights are held in with hold down clamps. If you are familiar with wood working... There are two clamp that unscrew from the rear...Then if the tail light is damaged it can be wiggled out from the rear and replaced.
Deluxe Hold Down Clamp - Rockler Woodworking Tools
I used to work at Rockler here in Indy and had these in my workshop.
There are 2 of these on each light from the rear. A 10mm bolt is tapped and threaded on the bumper. The tighter I turn the bolt the more force is applied to the tail light. Also the taillight is black caulked all the way around with an additional rubber gasket on the face, so they could not crack from being pushed on. I then spray foamed the inside and any gaps around the PDC sensors of the bumper and painted it black to prevent water and road spray from filling up the boxed tube. I drilled drain holes around the bottom every foot if water gets in and needs to drain out. Thats why this thing took so long. Details!
now you're talking! better machinist then you are video documentarian! lol nice work! now start selling them. sure you could get $1000 without the carrier.