
Drive Shaft Transfer Case Uh Oh!
#1
 04-03-2011, 09:28 AM


So two of the nuts holding my front drive shaft to my transfer case rounded off, so me being me I cut them off with a sawzall. Now my problem is that I can't get the bolts out of the trans case to change them out. Anyone have any suggestions on how to get them out?
#2
04-03-2011, 09:33 AM

If you cut the bolt heads off, you probably have enough left to use a bolt extractor or vice grips. Heat it with a torch and remove them. If you don't have a torch, soak them with penetrating oil for a day or so and give it a try. If they don't come out easily, STOP and find a torch so you don't make things worse.
#3
04-03-2011, 11:35 AM

Baja
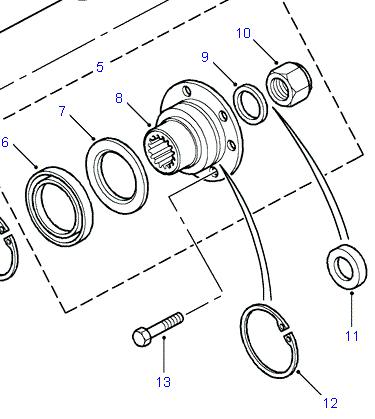
You'll need to remove the transfer case rear output flange, remove the external snap ring (#12) from the back side that retains the bolts, and remove them.
Might as well replace the output shaft oil seal while you're at it.
Be sure to fit a new nylock nut when reinstalling the flange.

Might as well replace the output shaft oil seal while you're at it.
Be sure to fit a new nylock nut when reinstalling the flange.
Last edited by antichrist; 04-03-2011 at 11:43 AM.
#4
04-03-2011, 01:13 PM
You'll need to remove the transfer case rear output flange, remove the external snap ring (#12) from the back side that retains the bolts, and remove them.
Might as well replace the output shaft oil seal while you're at it.
Be sure to fit a new nylock nut when reinstalling the flange.

Might as well replace the output shaft oil seal while you're at it.
Be sure to fit a new nylock nut when reinstalling the flange.
#5
04-03-2011, 04:51 PM
Baja
It's not too bad. Remove the countersunk screw from the brake drum to remove the drum from the output flange. Then just remove the output shaft nut, etc., as described above.
You may have to slacken the shoe adjuster to get the drum off.
You may have to slacken the shoe adjuster to get the drum off.

#7
04-06-2011, 06:43 PM
And thanks for the help! I couldn't have this without this post!
#8
04-08-2011, 10:12 AM
Ok so I've just crawled under my truck to look at taking the front output flange off of the transfer case. But what I've found is that the self locking nut is huge! Anyone have a size on that thing so I don't have to run to the store and buy two or three different sockets. And the rave manual doesn't look the same as the diagram above. Best to follow the RAVE or the diagram above? I'm hoping once I get into this it's all pretty self explanatory.
thanks guys
thanks guys
#9
04-09-2011, 12:52 PM
#10
04-09-2011, 03:41 PM
Don't worry about the seal, its pressed in there and won't ,"just fall-out".
Last edited by coors; 04-09-2011 at 03:44 PM.