
How to replace ball joints
#1
 08-10-2015 | 07:31 PM

Thread Starter
|
Camel Trophy
Joined: Nov 2012
Posts: 3,717
Likes: 246
From: Longview, Texas
I have made a concerted effort to give back to Land Rover Forums the last few weeks after years of obtaining the help and guidance I need to keep my 2000 Discovery II going as a daily driver. For better or worse, this is a continuation of those efforts. I am not a mechanic and have very little mechanical experience except what I have done on my Disco II. When it came time to replace my ball joints, I checked the forums and didn't find anything specific, so I turned to YouTube and found a pretty good video series.
Very instructive video, and I recommend it to anyone who is planning to do their own front ball joints. However, if you watch the video you will notice that he had to have a part made... I don't have access to that. So what follows is my non-mechanic recollection of my recent ball joint job.
Tools needed: sockets (metric and a set of impact sockets, plus a couple of extensions), ball joint removal tool, flat screwdriver, at least one jack (I used two) and jack stands for safety, gloves, towels, a sledge hammer, allen wrench (to remove ABS sensor safely), rubber mallet, phillips screwdriver, flat screwdriver or pry bar, and a regular hammer.
Time to complete: 3 hours on the first side, 2 hours on the second and 2 hours thereafter for any other ball joint jobs (3 hours includes learning curve)
Supplies needed: 2 upper and 2 lower ball joints (I used Moog on a recommendation, ordered from Moog), differential oil to replace any that spills.
Location: I did mine in the blazing sun. I don't recommend it.
What they do: The ball joints basically hold your tires up and down and allow you to turn.
Why to replace them: They take a lot of abuse, can allow your tires to camber out, ruin your alignment, allow the tires to wobble, and if they break, you are screwed
Note: be careful. Be safe. And I may be misremembering the bolt sizes so just have 10mm to19mm and some large sockets and you will be fine.
Here is a picture of what you are after in the removal process:
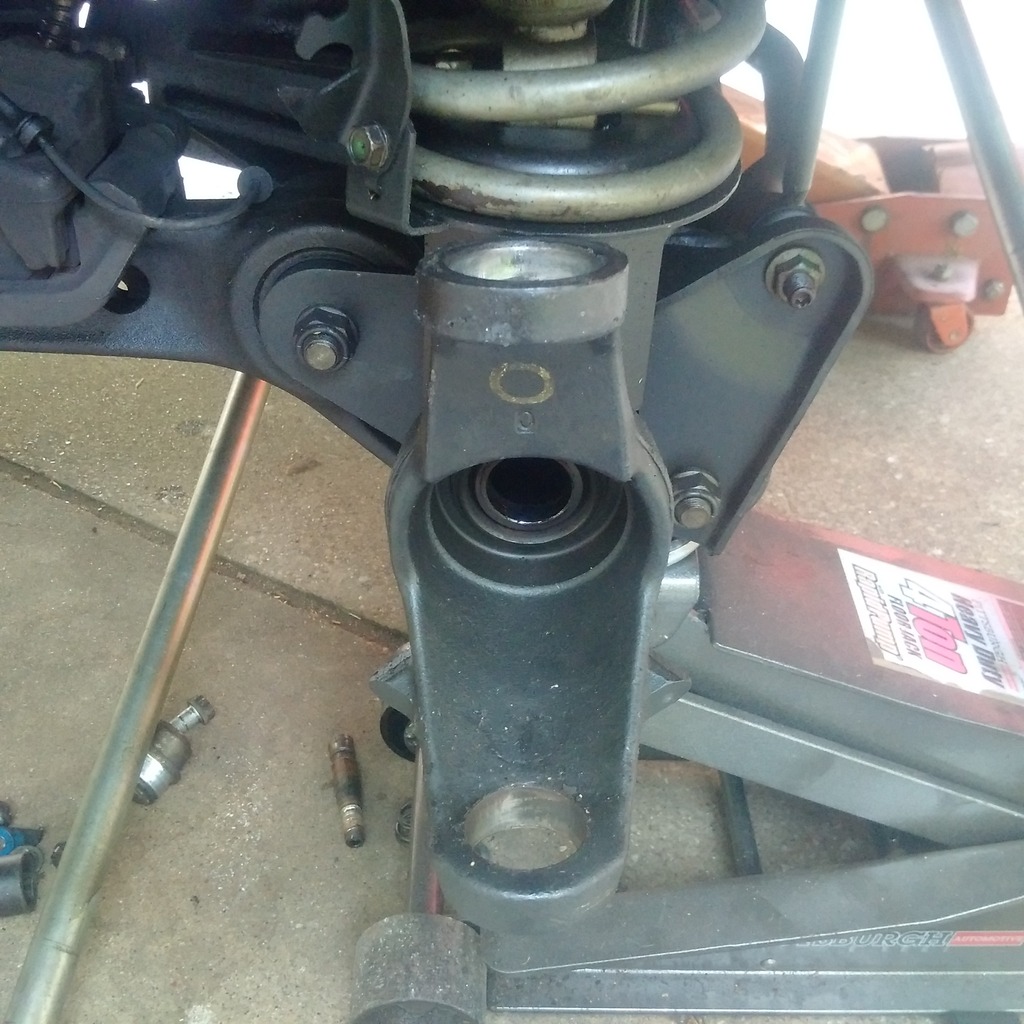
Note the brake caliper over the control arm, top left.
Just before that shot and you can see the ball joints:
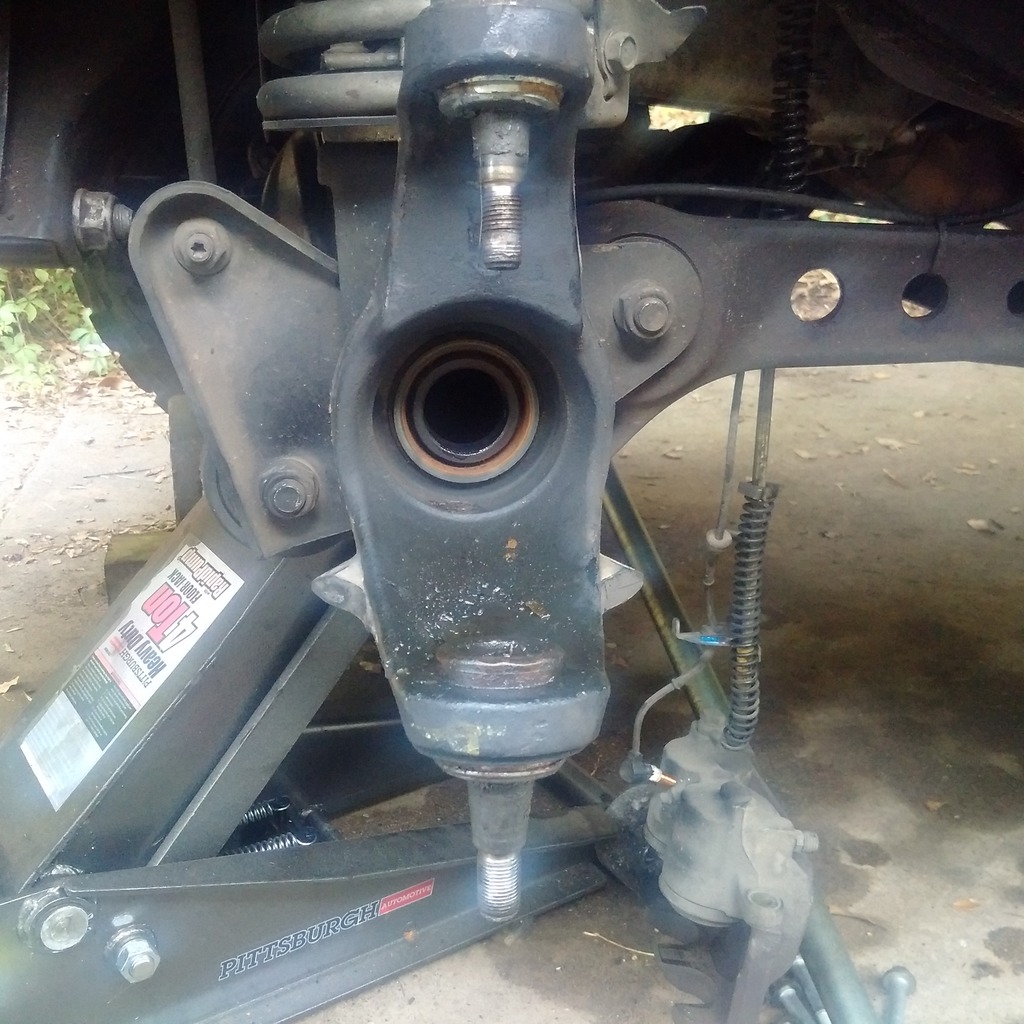
Notice the brake caliper hanging, bottom right. That's NO GOOD. Don't do that.
So here are the basic steps to getting at the ball joints:
First, the tires have to come off. Later in the process it will be helpful to have your entire front axle off the ground, so I used 2 jacks. As you can see from the pictures I just used jacks but jack stands are safer and, if you have only one jack, a necessity. Remove tires.
I had wheel spacers on mine so those came off next. If you are stock, skip that step. Now you should be looking at the smooth, beautiful brake rotors. You will see a set screw on the face of the rotor, just take that out with a screwdriver.
The brake rotors won't come off unless you remove the calipers. So, the next step is to find the two large bolts behind each caliper and remove them. If memory serves, they are 19mm. Don't let the caliper or the brake pads fall; I found a convenient place to put them was over the control arms.
Now you see the large dust cover--basically a big half moon of metal that keeps brake dust toward the outside. There are three 10mm bolts that hold it on are visible right on the front. Remove it and set it aside.
Now for the rubber mallet. As you can see from the pictures I am blessed with a relatively rust free truck, but whether you have rust or not, removing the brake rotors can be a bother. Use the mallet to tap it from behind, toward you, until it comes off. Use a mallet because you don't want to damage the surface, and when you set it down, take the same care.
Referring to the pictures above, the hole in the middle is an axle tube. At this point in the disassembly, the axle tube will have a hub with a giant nut in the middle blocking your view--the hub. There are four 15mm bolts holding that on; they are on the back, so remove them.
Before going further, look to the ABS sensor that is right on top of the hub. Use an allen wrench to loosen that. Don't pry the ABS sensor out of its socket or you will break it (as I did).
Go ahead and remove the nut from the drag link (bar that goes to the back of both tires' assemblies and keeps them straight with each other. Also, remove the steering bar if you are working on the passenger side.
Now carefully pull the hub out. It will be attached to the CV boot, so give it a close look for cracks or other damage. Keep pulling--being careful of your ABS sensor, which is sort of in the way, until you get the hub completely out. Set carefully aside.
Almost there.
What you now have is the main part that the ball joints touch. Each one has a nut on the bottom. I don't recall the size; they need to come off. Some might have a cotter pin in the bolt and you can take that out before unscrewing the nut. You would think that the joint would then fall, but it won't.
In the photo above with the ball joint bolts pointing down, you can see that the bottoms are threaded, then there is a smooth portion farther up. The smooth portion is where you are working now, except it is covered with our last part to remove. Place your sledge hammer on one side and tap with your metal hammer on the other side. Swap them back and forth, and move the assembly around. Do the top one for a little, then do the bottom one for a little. It takes awhile but you will know you have some success when you swivel the assembly for a given ball joint and the bolts stays still. When they are tight, the bolts follow your movement. When they are both loose, it basically falls off. Don't succumb to the desire to hit down with your sledge hammer. Just keep tapping (medium hard) and it will work. The sledge on the opposite side of the tapping keeps you from deforming the socket.
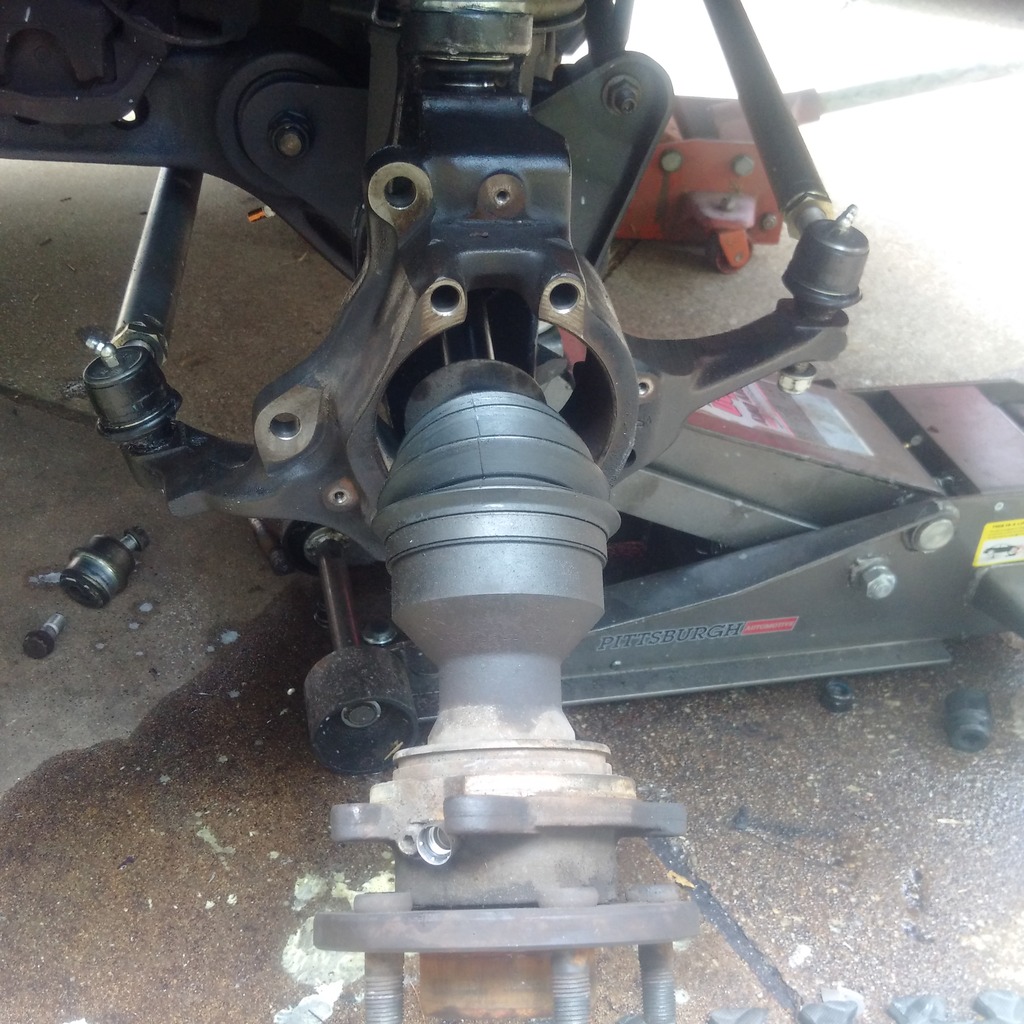
NOW you will see the bare ball joints, above in the second picture.
The ball joint tool consists of a large C Clamp and a box full of attachments. I "rented" one from an auto store--basically paid full price and returned it with the receipt--that's what they call a rental. It helps to put anti-seize on the screw of the C clamp. As you can see from the pictures, the top ball joint removes by pushing it UP, and the bottom one pushes out DOWN. Do the top one first.
The part that the guy had to make in the youtube video is a part to push out the top ball joint. I didn't have that. For space reasons that will be obvious, it is now a good time to lower the side of the axle you are working on. Basically, our ball joints angle slightly toward the spring, making it impossible to use the C clamp. In the video, he does something different but what worked for me was to lower that side of the axle so the C clamp wasn't against the spring. Since I didn't have access to a fabricator for the part, I used a tube from the ball joint kit that goes over the ball joint, then PUSHED THE BOLT UP THROUGH THE TOP OF THE BALL JOINT using a flat part in the kit. When the bolt lets go, remove the clamp and the bolt will push right up through the top of the ball joint. Now use a socket (one slightly smaller that the top of the ball joint) and push the ball joint out with the clamp. The first time I pushed the bolt out I was worried; don't be... it is easy to break it and it makes things a lot easier if you can't fabricate the part.
Now turn the C clamp upside down the put the screw through the now empty top ball joint socket, and push the bottom one out with the same socket.
Inspect and clean the ball joint sockets then apply a little lubricant of your choice to make pressing the new ones in. Just reverse the process, putting the bottom one in first, then the top one.

The blue plastic cover is packaging and comes off.
Reassemble everything and repeat on the other side.
I used blue Loctite on every threaded part.
I am sure I have left some little things out, such as the brake line brackets. But if you do this in one steady motion, you will see them on, take them off, and put them right back where you found them.
I should also mention to take care when you are putting the axles back in, both with the ABS sensor and with the ends of the driveshafts. As you nudge them in, when they make contact inside the axle tube, you will want to push them up slightly with a screwdriver or pry bar and gently move them until the spline gear goes in to place.
When you are done, don't forget to replace the diff oil you spilled if you lowered the axles.
Drive away to get your truck aligned or align it yourself with a tape measure.
Anyway, that's how I did it.
I wish I had taken more pictures, but hopefully those ones above give you some idea of what has to be done.
When you refill your differential you will be reminded of the crappy PLASTIC diff plugs. Go to Rovah Farm and order the brass ones "search for rad plug brass" and a few of the related o rings. They are 3.50 each plus 49 cents for each o ring. They fit.
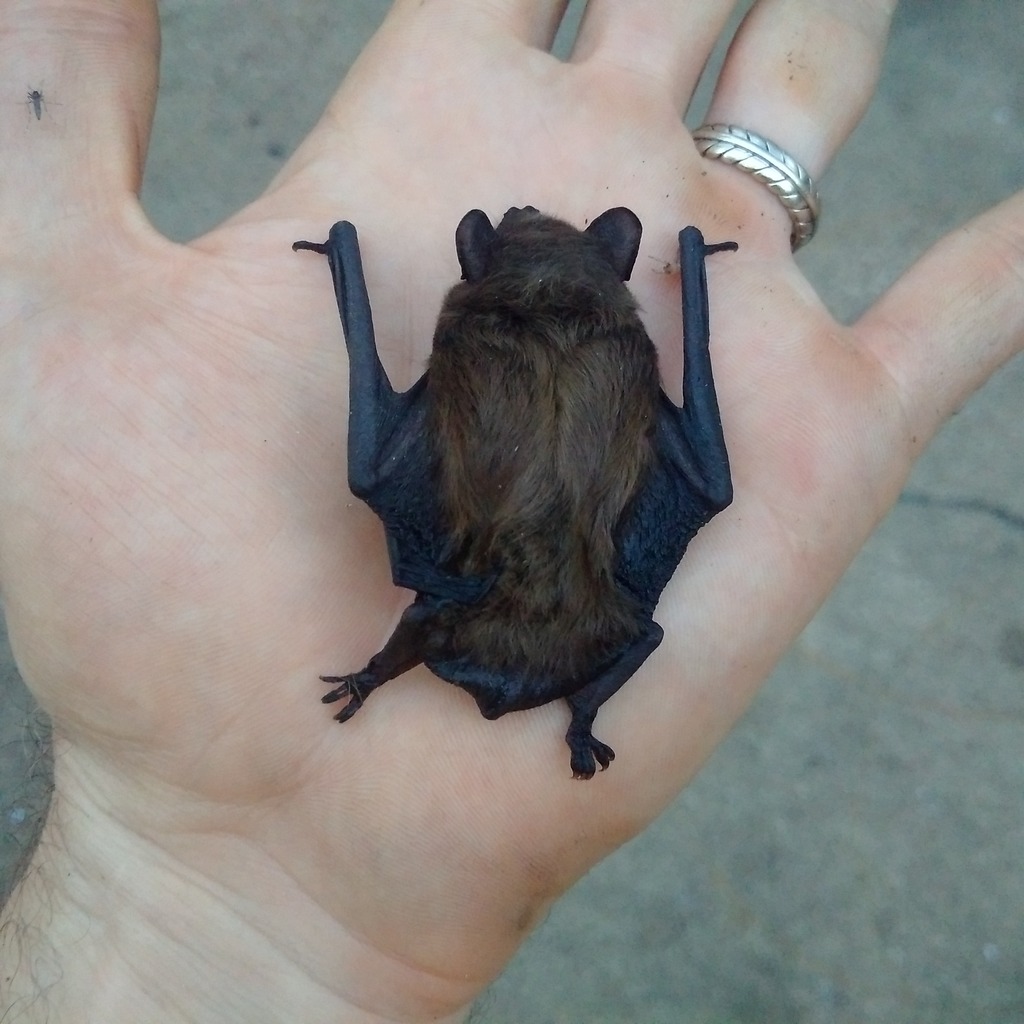
P.S. Watch our for bats. This one flew into me while I was doing this job. He survived... then the raccoons got him Sad ending. And I just noticed the mosquito sucking my blood while the bat laid still for a picture.
Tools needed: sockets (metric and a set of impact sockets, plus a couple of extensions), ball joint removal tool, flat screwdriver, at least one jack (I used two) and jack stands for safety, gloves, towels, a sledge hammer, allen wrench (to remove ABS sensor safely), rubber mallet, phillips screwdriver, flat screwdriver or pry bar, and a regular hammer.
Time to complete: 3 hours on the first side, 2 hours on the second and 2 hours thereafter for any other ball joint jobs (3 hours includes learning curve)
Supplies needed: 2 upper and 2 lower ball joints (I used Moog on a recommendation, ordered from Moog), differential oil to replace any that spills.
Location: I did mine in the blazing sun. I don't recommend it.
What they do: The ball joints basically hold your tires up and down and allow you to turn.
Why to replace them: They take a lot of abuse, can allow your tires to camber out, ruin your alignment, allow the tires to wobble, and if they break, you are screwed
Note: be careful. Be safe. And I may be misremembering the bolt sizes so just have 10mm to19mm and some large sockets and you will be fine.
Here is a picture of what you are after in the removal process:
Note the brake caliper over the control arm, top left.
Just before that shot and you can see the ball joints:
Notice the brake caliper hanging, bottom right. That's NO GOOD. Don't do that.
So here are the basic steps to getting at the ball joints:
First, the tires have to come off. Later in the process it will be helpful to have your entire front axle off the ground, so I used 2 jacks. As you can see from the pictures I just used jacks but jack stands are safer and, if you have only one jack, a necessity. Remove tires.
I had wheel spacers on mine so those came off next. If you are stock, skip that step. Now you should be looking at the smooth, beautiful brake rotors. You will see a set screw on the face of the rotor, just take that out with a screwdriver.
The brake rotors won't come off unless you remove the calipers. So, the next step is to find the two large bolts behind each caliper and remove them. If memory serves, they are 19mm. Don't let the caliper or the brake pads fall; I found a convenient place to put them was over the control arms.
Now you see the large dust cover--basically a big half moon of metal that keeps brake dust toward the outside. There are three 10mm bolts that hold it on are visible right on the front. Remove it and set it aside.
Now for the rubber mallet. As you can see from the pictures I am blessed with a relatively rust free truck, but whether you have rust or not, removing the brake rotors can be a bother. Use the mallet to tap it from behind, toward you, until it comes off. Use a mallet because you don't want to damage the surface, and when you set it down, take the same care.
Referring to the pictures above, the hole in the middle is an axle tube. At this point in the disassembly, the axle tube will have a hub with a giant nut in the middle blocking your view--the hub. There are four 15mm bolts holding that on; they are on the back, so remove them.
Before going further, look to the ABS sensor that is right on top of the hub. Use an allen wrench to loosen that. Don't pry the ABS sensor out of its socket or you will break it (as I did).
Go ahead and remove the nut from the drag link (bar that goes to the back of both tires' assemblies and keeps them straight with each other. Also, remove the steering bar if you are working on the passenger side.
Now carefully pull the hub out. It will be attached to the CV boot, so give it a close look for cracks or other damage. Keep pulling--being careful of your ABS sensor, which is sort of in the way, until you get the hub completely out. Set carefully aside.
Almost there.
What you now have is the main part that the ball joints touch. Each one has a nut on the bottom. I don't recall the size; they need to come off. Some might have a cotter pin in the bolt and you can take that out before unscrewing the nut. You would think that the joint would then fall, but it won't.
In the photo above with the ball joint bolts pointing down, you can see that the bottoms are threaded, then there is a smooth portion farther up. The smooth portion is where you are working now, except it is covered with our last part to remove. Place your sledge hammer on one side and tap with your metal hammer on the other side. Swap them back and forth, and move the assembly around. Do the top one for a little, then do the bottom one for a little. It takes awhile but you will know you have some success when you swivel the assembly for a given ball joint and the bolts stays still. When they are tight, the bolts follow your movement. When they are both loose, it basically falls off. Don't succumb to the desire to hit down with your sledge hammer. Just keep tapping (medium hard) and it will work. The sledge on the opposite side of the tapping keeps you from deforming the socket.
NOW you will see the bare ball joints, above in the second picture.
The ball joint tool consists of a large C Clamp and a box full of attachments. I "rented" one from an auto store--basically paid full price and returned it with the receipt--that's what they call a rental. It helps to put anti-seize on the screw of the C clamp. As you can see from the pictures, the top ball joint removes by pushing it UP, and the bottom one pushes out DOWN. Do the top one first.
The part that the guy had to make in the youtube video is a part to push out the top ball joint. I didn't have that. For space reasons that will be obvious, it is now a good time to lower the side of the axle you are working on. Basically, our ball joints angle slightly toward the spring, making it impossible to use the C clamp. In the video, he does something different but what worked for me was to lower that side of the axle so the C clamp wasn't against the spring. Since I didn't have access to a fabricator for the part, I used a tube from the ball joint kit that goes over the ball joint, then PUSHED THE BOLT UP THROUGH THE TOP OF THE BALL JOINT using a flat part in the kit. When the bolt lets go, remove the clamp and the bolt will push right up through the top of the ball joint. Now use a socket (one slightly smaller that the top of the ball joint) and push the ball joint out with the clamp. The first time I pushed the bolt out I was worried; don't be... it is easy to break it and it makes things a lot easier if you can't fabricate the part.
Now turn the C clamp upside down the put the screw through the now empty top ball joint socket, and push the bottom one out with the same socket.
Inspect and clean the ball joint sockets then apply a little lubricant of your choice to make pressing the new ones in. Just reverse the process, putting the bottom one in first, then the top one.
The blue plastic cover is packaging and comes off.
Reassemble everything and repeat on the other side.
I used blue Loctite on every threaded part.
I am sure I have left some little things out, such as the brake line brackets. But if you do this in one steady motion, you will see them on, take them off, and put them right back where you found them.
I should also mention to take care when you are putting the axles back in, both with the ABS sensor and with the ends of the driveshafts. As you nudge them in, when they make contact inside the axle tube, you will want to push them up slightly with a screwdriver or pry bar and gently move them until the spline gear goes in to place.
When you are done, don't forget to replace the diff oil you spilled if you lowered the axles.
Drive away to get your truck aligned or align it yourself with a tape measure.
Anyway, that's how I did it.
I wish I had taken more pictures, but hopefully those ones above give you some idea of what has to be done.
When you refill your differential you will be reminded of the crappy PLASTIC diff plugs. Go to Rovah Farm and order the brass ones "search for rad plug brass" and a few of the related o rings. They are 3.50 each plus 49 cents for each o ring. They fit.
P.S. Watch our for bats. This one flew into me while I was doing this job. He survived... then the raccoons got him
Sad ending. And I just noticed the mosquito sucking my blood while the bat laid still for a picture.
Last edited by Charlie_V; 08-11-2015 at 10:35 AM.
The following 3 users liked this post by Charlie_V:

#3
08-14-2015 | 11:18 PM
Thread Starter
|
Camel Trophy
Joined: Nov 2012
Posts: 3,717
Likes: 246
From: Longview, Texas


Thread
Thread Starter
Forum
Replies
Last Post
me 2
Discovery II
9
06-13-2013 03:26 PM