Driveshaft center support replacement
#1
Yes....it can be done.
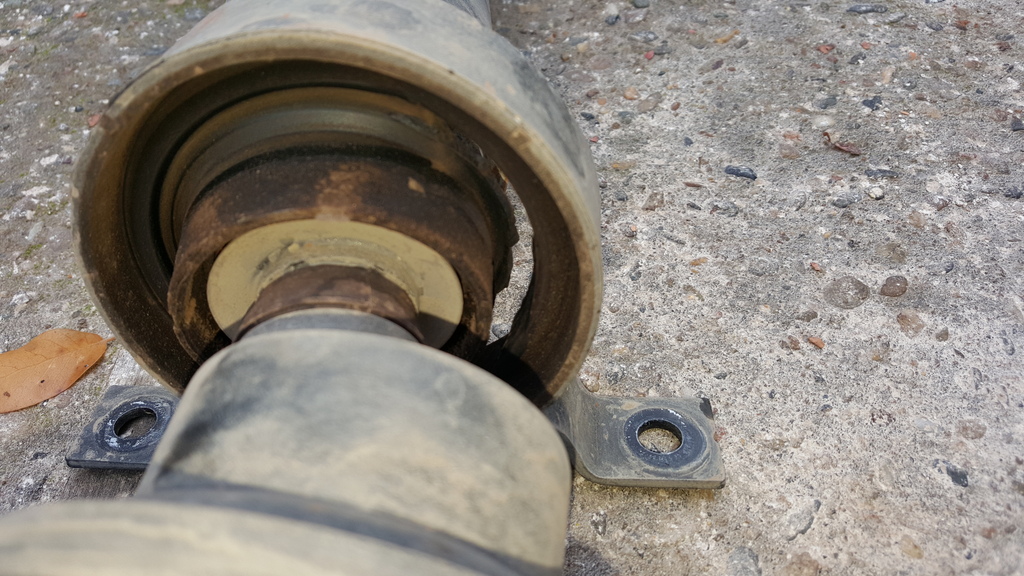
A common failure on higher-mileage LR3s (and likely LR4/RRS) is for the center support bearing on the driveshaft to fail. The bearing itself isnít the culprit, but the rubber support for it will fail allowing the driveshaft to flop around, potentially even rubbing against the fuel tank leading to all sorts of problems.
Failed support
Per Land Rover the driveshaft is non-serviceable and they will only sell you a complete new unit. Cost? Nielo in Sacramento quoted me over $700 for the driveshaft alone. You can get aftermarket stuff for half that, but the track record is pretty poor and I would never recommend an aftermarket driveshaft on any sort of trail rig. They may be fine for street driven trucks but are not up to heavy use.
But for a few hours of your time and less than $100 you can replace the center carrier on your own if youíre willing to put in a little effort. Companies like RoverWare and Atlantic British have them available.
The first step is to remove the driveshaft from the truck. Youíll find this is a bit challenging since LR decided to use spine-head bolts instead of hex, but in a pinch you can get the rear bolts with an 11mm and the fronts with a 10mm standard wrench. Mind you Iím not recommending this, only saying it can be done. The rears are quite tight and are installed with thread locker so youíll need to put some muscle into them. The fronts arenít quite so tough.
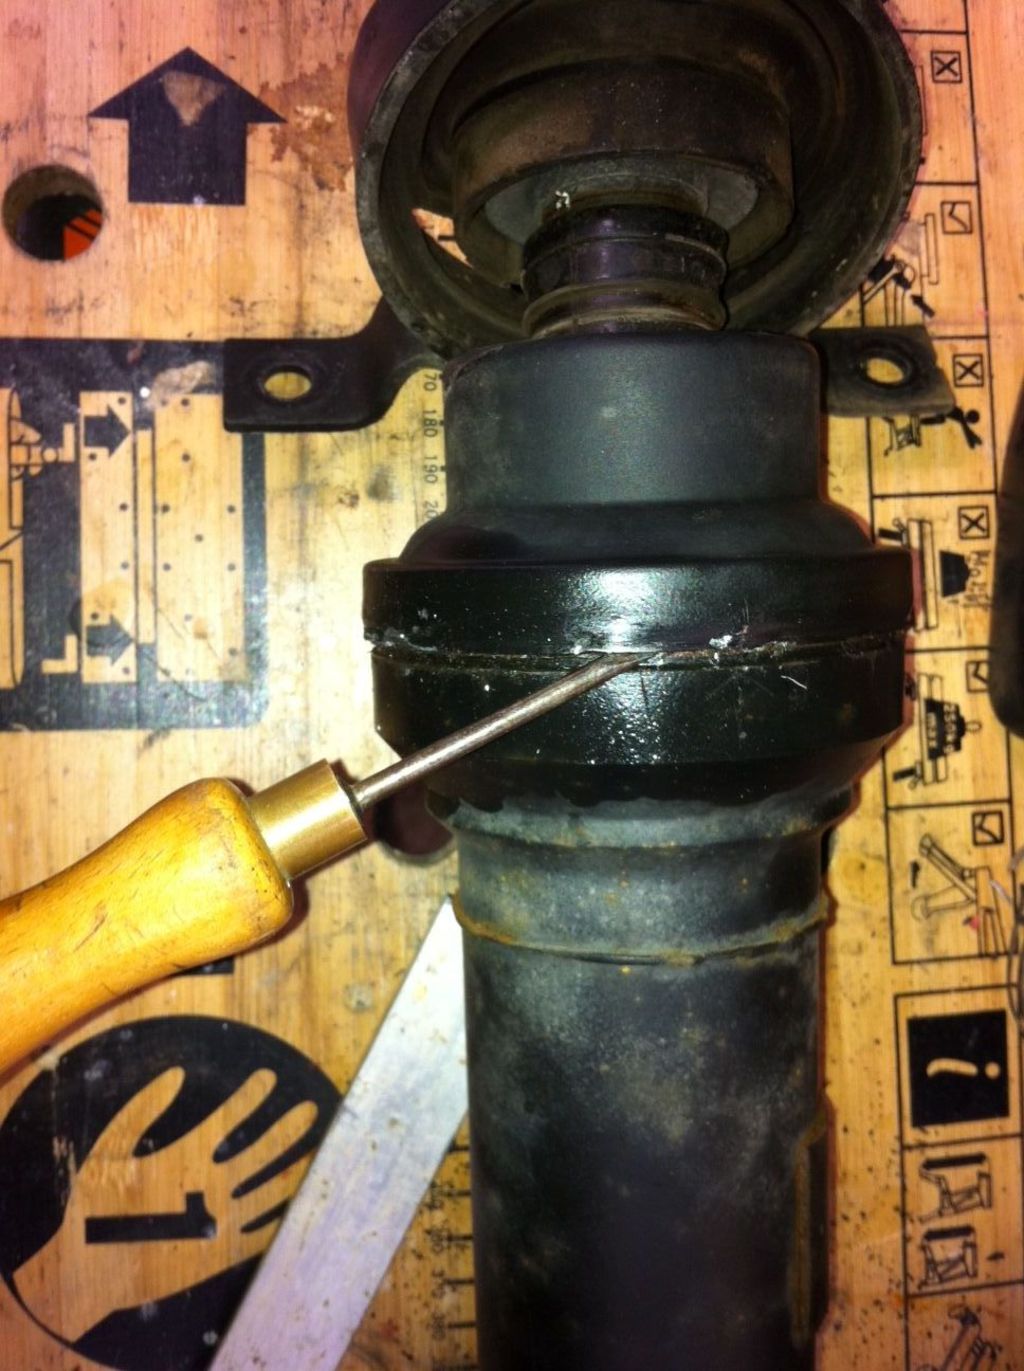
Once the driveshaft is on the bench start by marking the orientation of the two halves. Youíll want to be able to put them back together in the same alignment you took them apart to keep it in balance. Now youíre ready to break it down. The first step is to pry the metal cover apart over the center CV joint.
(photo from disco3.co.uk)
Youíll likely damage this somewhat in the process but try not to do any more damage than you have to. Keep in mind there is an O-ring behind this as well, so keep the prying as gentle as you can but one way or the other youíll have to open it up. It seems best to work your way around slowly with a small screwdriver.
Once itís apart pull the cover back and youíll find a greasy mess that looks like this:

(photo from disco3.co.uk)
A common failure on higher-mileage LR3s (and likely LR4/RRS) is for the center support bearing on the driveshaft to fail. The bearing itself isnít the culprit, but the rubber support for it will fail allowing the driveshaft to flop around, potentially even rubbing against the fuel tank leading to all sorts of problems.
Failed support

Per Land Rover the driveshaft is non-serviceable and they will only sell you a complete new unit. Cost? Nielo in Sacramento quoted me over $700 for the driveshaft alone. You can get aftermarket stuff for half that, but the track record is pretty poor and I would never recommend an aftermarket driveshaft on any sort of trail rig. They may be fine for street driven trucks but are not up to heavy use.
But for a few hours of your time and less than $100 you can replace the center carrier on your own if youíre willing to put in a little effort. Companies like RoverWare and Atlantic British have them available.
The first step is to remove the driveshaft from the truck. Youíll find this is a bit challenging since LR decided to use spine-head bolts instead of hex, but in a pinch you can get the rear bolts with an 11mm and the fronts with a 10mm standard wrench. Mind you Iím not recommending this, only saying it can be done. The rears are quite tight and are installed with thread locker so youíll need to put some muscle into them. The fronts arenít quite so tough.
Once the driveshaft is on the bench start by marking the orientation of the two halves. Youíll want to be able to put them back together in the same alignment you took them apart to keep it in balance. Now youíre ready to break it down. The first step is to pry the metal cover apart over the center CV joint.

(photo from disco3.co.uk)
Youíll likely damage this somewhat in the process but try not to do any more damage than you have to. Keep in mind there is an O-ring behind this as well, so keep the prying as gentle as you can but one way or the other youíll have to open it up. It seems best to work your way around slowly with a small screwdriver.
Once itís apart pull the cover back and youíll find a greasy mess that looks like this:

(photo from disco3.co.uk)
The following users liked this post:
TOM R (05-26-2016)
#2
Clean it up as best you can, which won’t be good enough but will have to do. Have about 30 rolls of paper towels on hand for this.
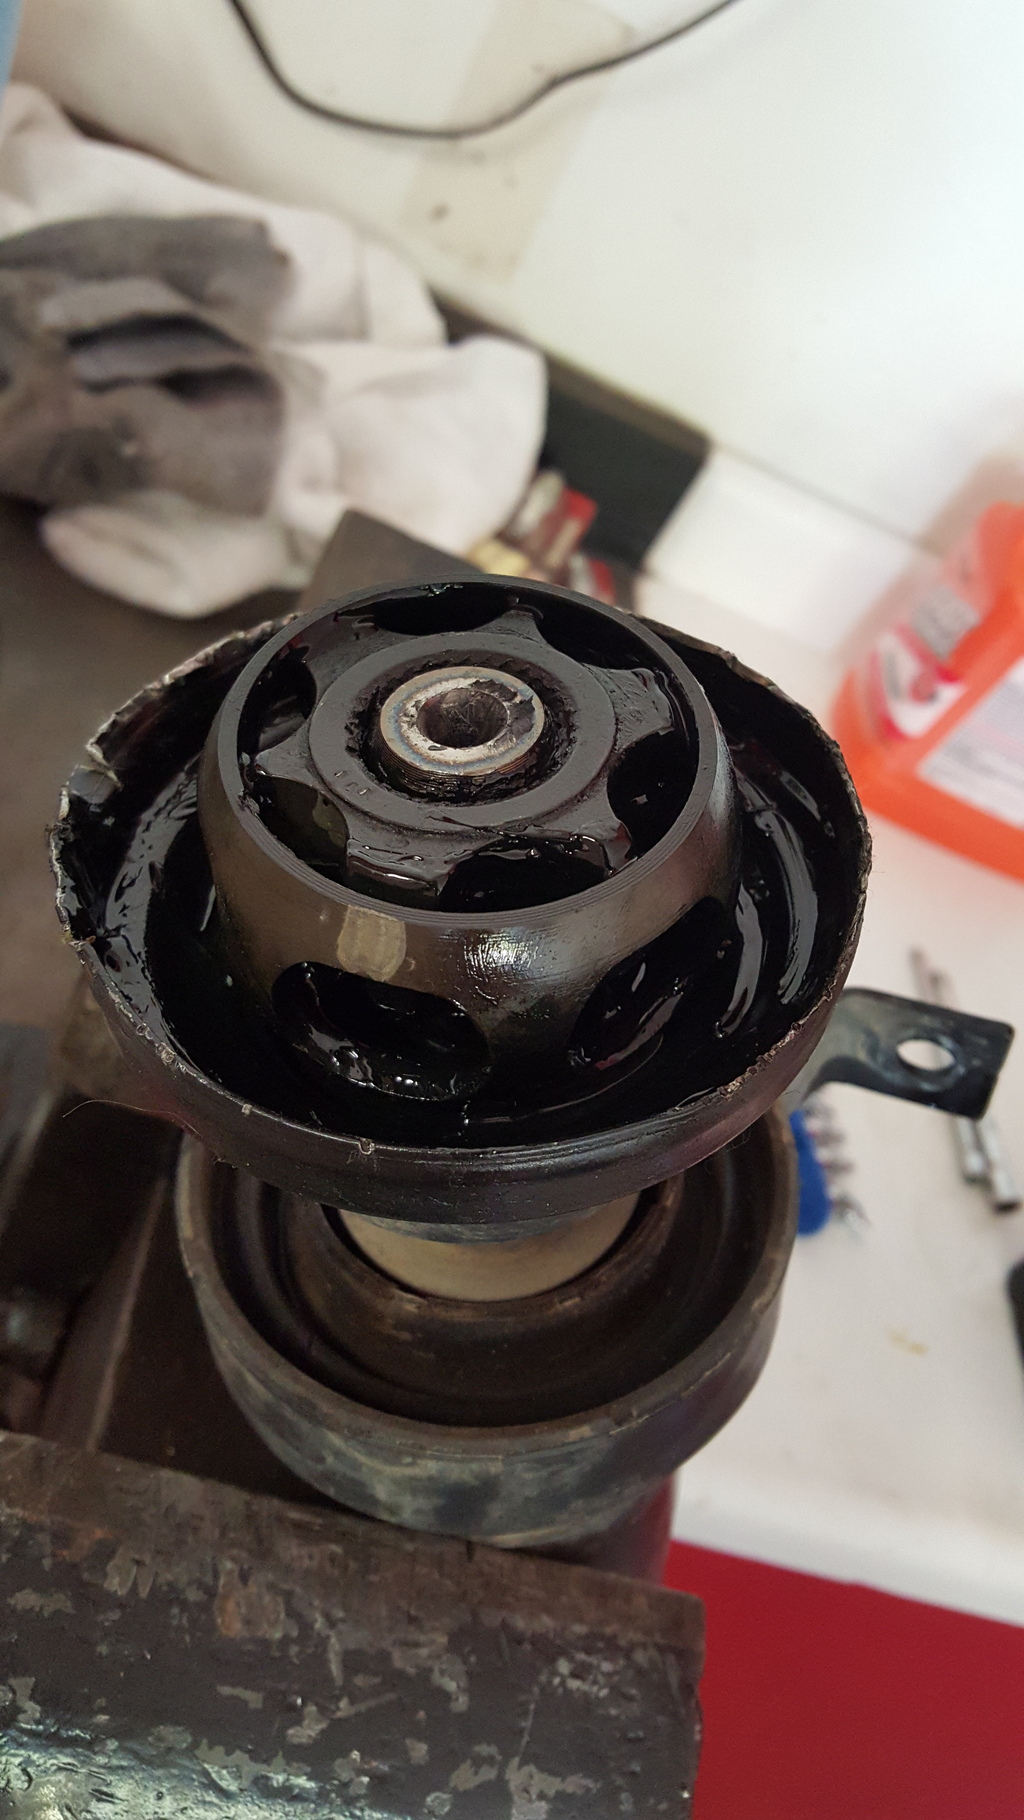
With the grease as cleaned up as you can manage now you can work the two halves up and down to separate the joint. This takes a little effort, but if you bend the joint too far you can basically hyper-extend it so the ***** pop out (do not loose these!) and you can separate the two driveshaft halves. You’ll then have something like this:
A closer view:
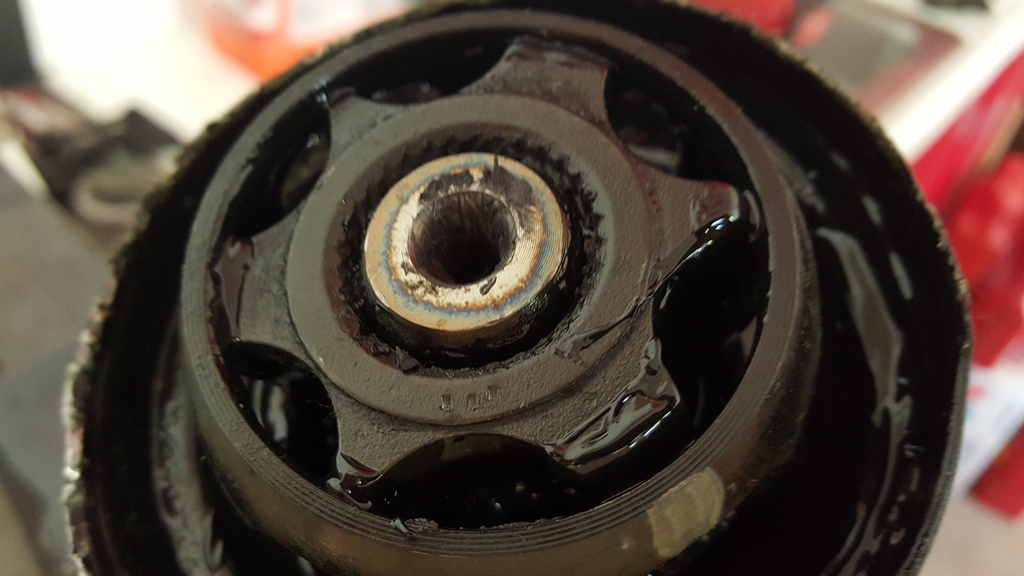
This will be a good time to do some more cleaning and to mark the relationship of the CV spider to the spines on the shaft.
To get the spider off the shaft you’ll have to release a retaining ring on the back side of the shaft. I was able to spread it apart with a couple of small flat blade screwdrivers to get it out of its groove on the shaft. I used a small 3-jaw puller to apply a light pressure while prying the clip’s ‘legs’ apart. Once they were out of the groove the puller slid the spider up the spline just enough to keep the clip from falling back into the groove. You may also find it helpful to use tape to keep the boot pulled back so you have more room to work, or have an extra helper on hand to hold it back for you.
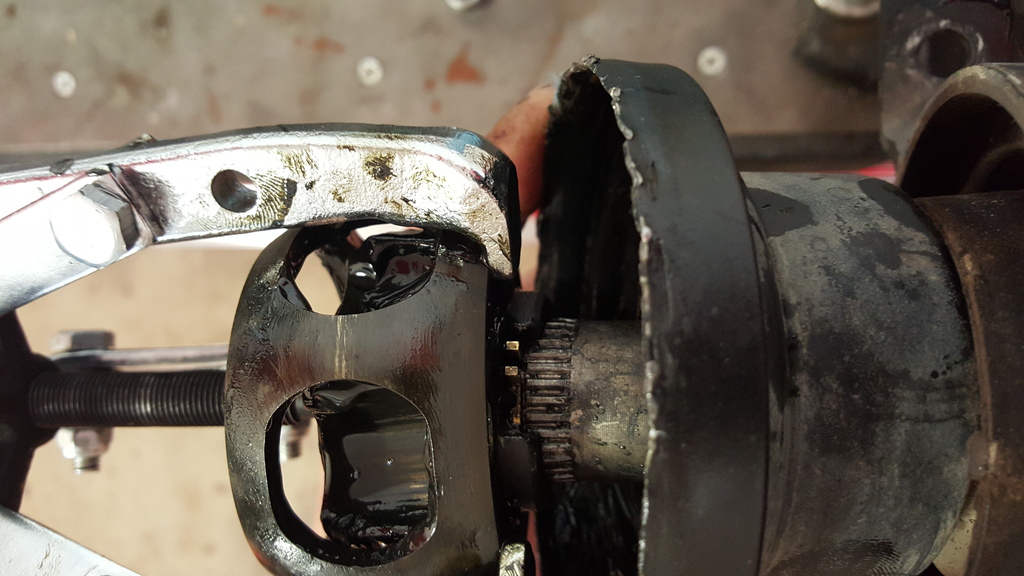
In this pic you can see what the retaining ring looks like once it’s apart.

(photo from disco3.co.uk)
Now you’ll want to pop the clamp off the neck of the boot (a simple flat blade screwdriver can pry this loose) and slide the boot off. You’ll now finally be able to get to the torn support which was the whole point of this exercise to begin with.
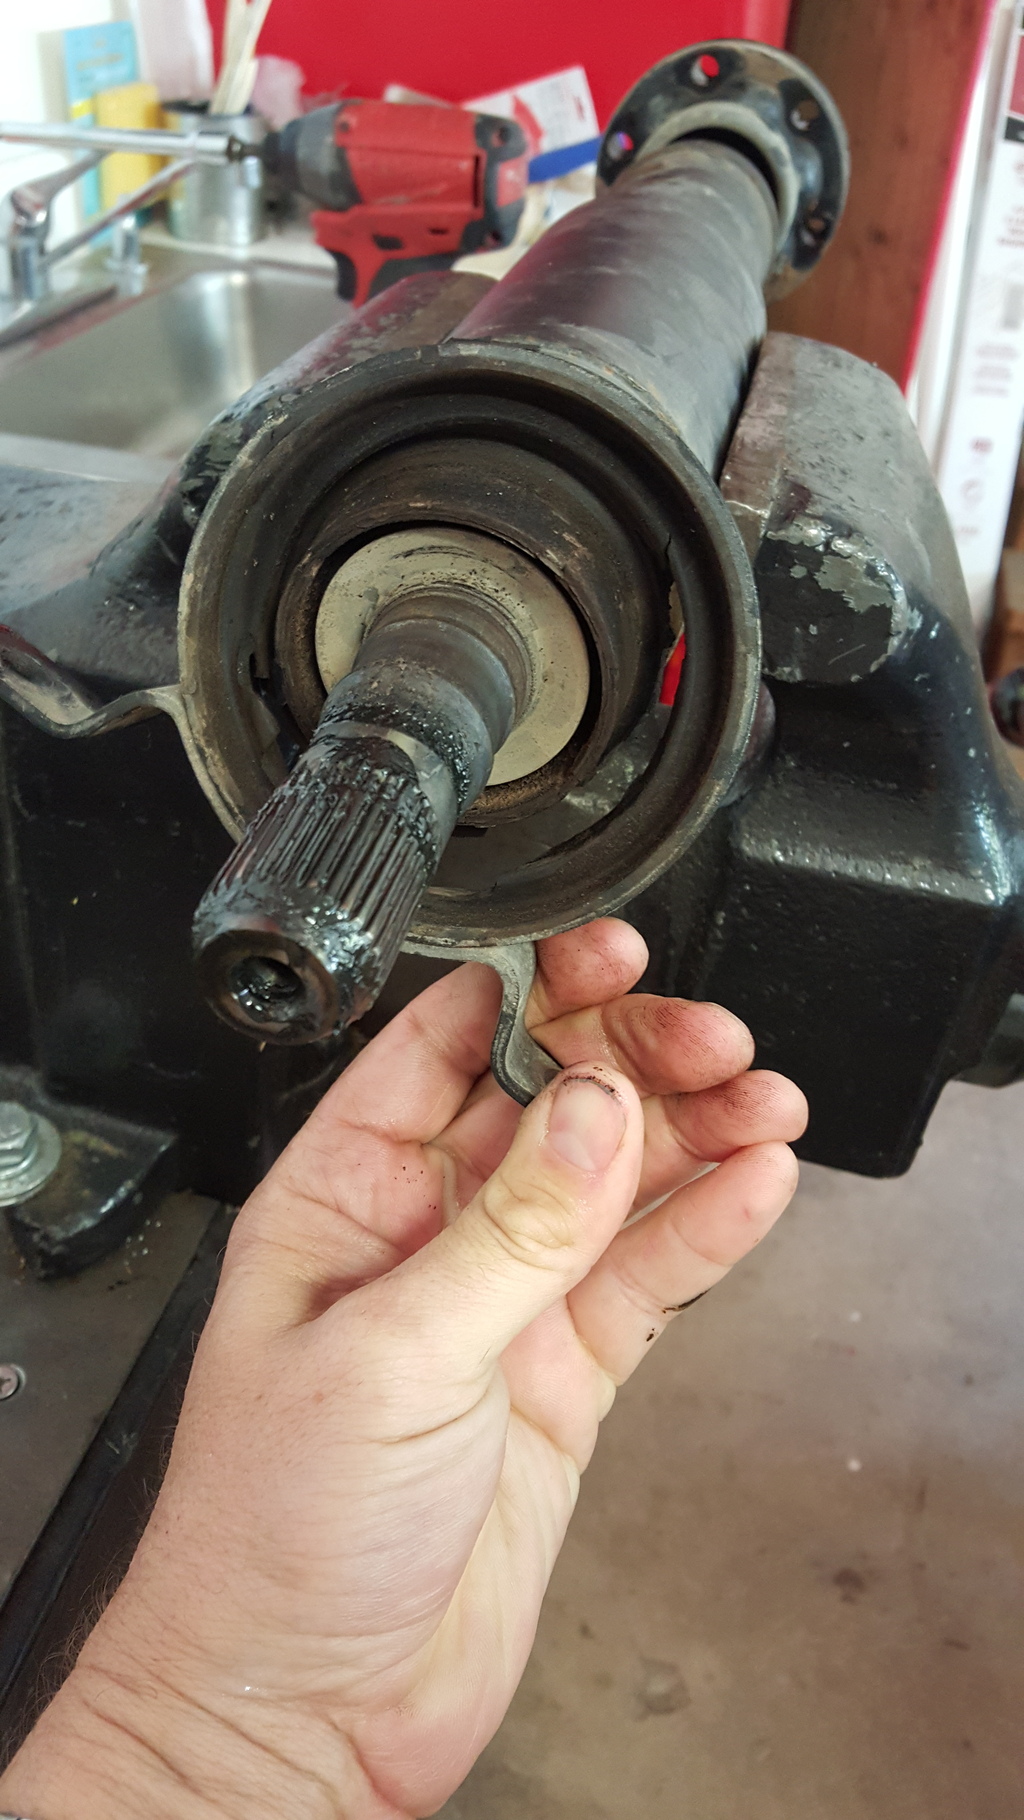
With the grease as cleaned up as you can manage now you can work the two halves up and down to separate the joint. This takes a little effort, but if you bend the joint too far you can basically hyper-extend it so the ***** pop out (do not loose these!) and you can separate the two driveshaft halves. You’ll then have something like this:

A closer view:

This will be a good time to do some more cleaning and to mark the relationship of the CV spider to the spines on the shaft.
To get the spider off the shaft you’ll have to release a retaining ring on the back side of the shaft. I was able to spread it apart with a couple of small flat blade screwdrivers to get it out of its groove on the shaft. I used a small 3-jaw puller to apply a light pressure while prying the clip’s ‘legs’ apart. Once they were out of the groove the puller slid the spider up the spline just enough to keep the clip from falling back into the groove. You may also find it helpful to use tape to keep the boot pulled back so you have more room to work, or have an extra helper on hand to hold it back for you.

In this pic you can see what the retaining ring looks like once it’s apart.

(photo from disco3.co.uk)
Now you’ll want to pop the clamp off the neck of the boot (a simple flat blade screwdriver can pry this loose) and slide the boot off. You’ll now finally be able to get to the torn support which was the whole point of this exercise to begin with.

#3
Since the supporting rubber is already torn, you can go ahead and simply use a razor knife to cut it away and remove the support so you can get to the bearing. Before attacking the bearing there is a one-way conical retaining washer pushed on. You can pry this off with screwdrivers or whatever works for you – the new bearing will come with a new replacement for this retainer so don’t worry about damaging it as you won’t be re-using it.
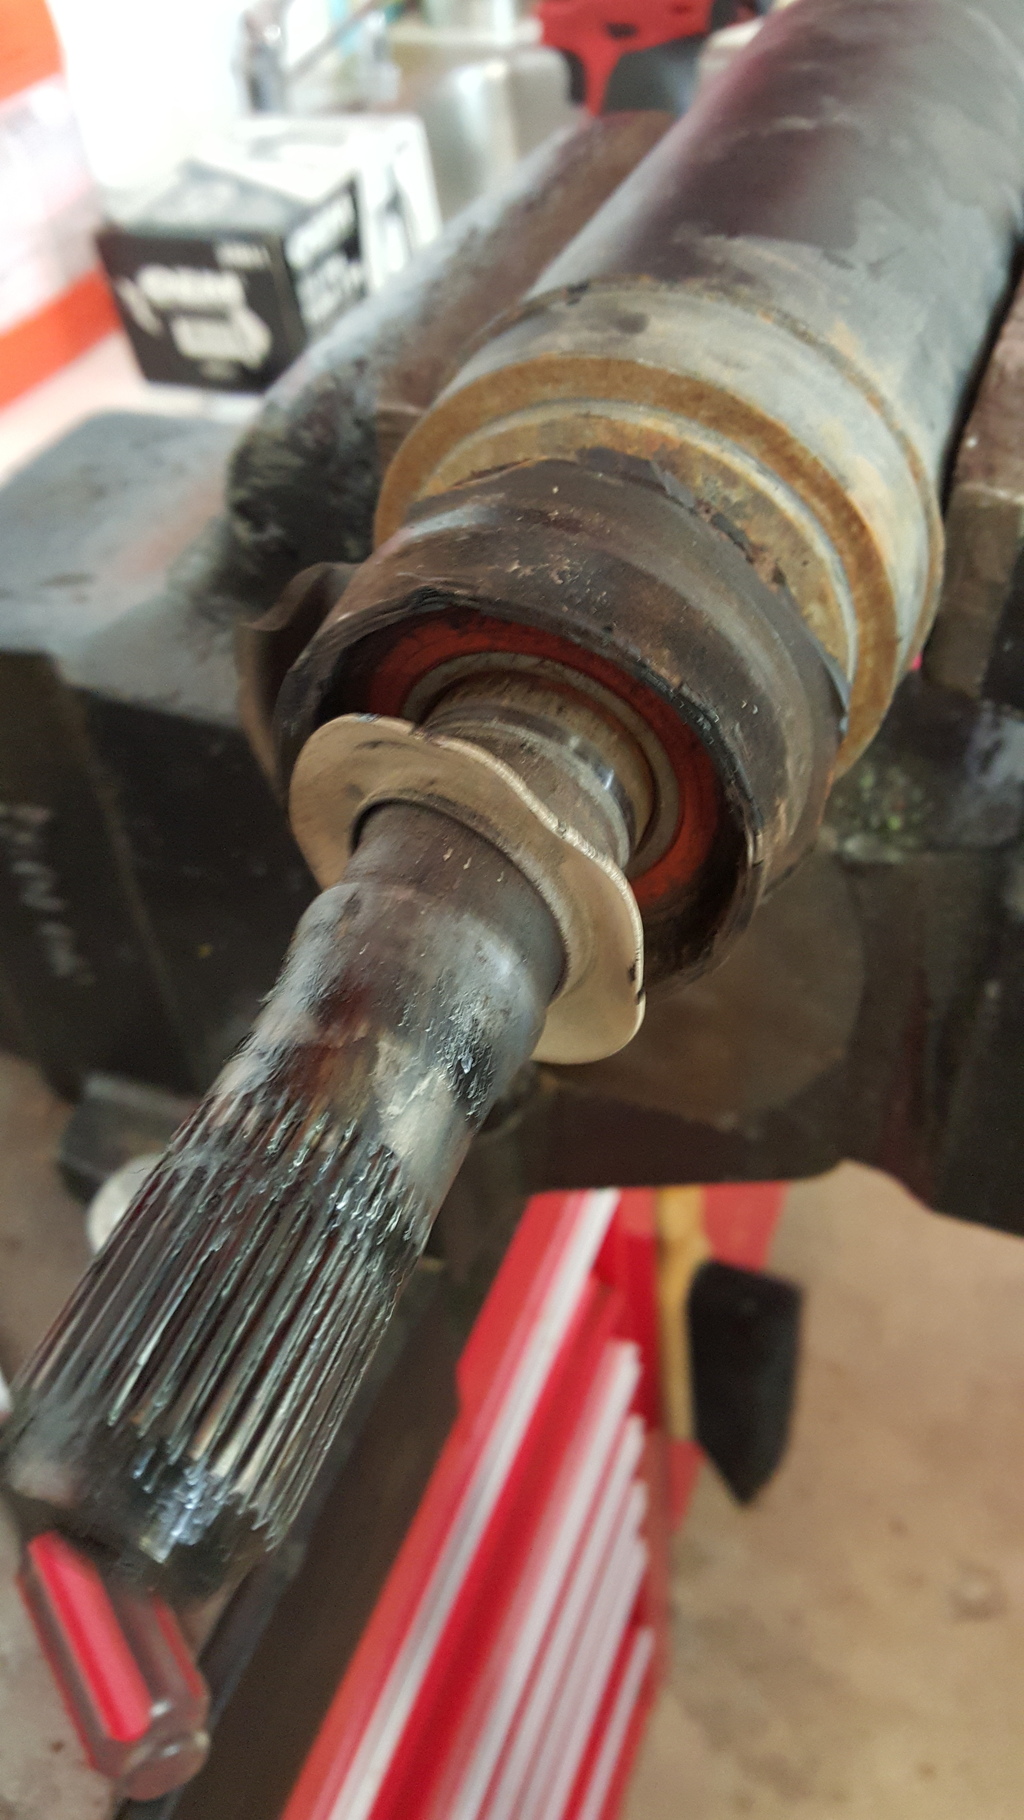
Now you can remove the remaining bearing however you like. It’s difficult to grasp with a puller since there’s not a lot of room behind it so I simply used a cut-off wheel to slice through it 99% of the way then a chisel to break the remaining metal of the inner race. With that done it’s easy to pry it off the shaft. If you go this way do be careful not to damage the shaft.
Now clean up the shaft and polish out any nicks you may have caused during the disassembly with some emery cloth and slide the new support bearing on followed by the new conical retaining washer. I used a 3/8” extension and hammer to gently tap it home, though a brass drift with a large foot would be a better choice. It shouldn’t be excessively hard to seat the bearing, so just be patient and slowly work it home. Once these parts are on, you can slide the boot half back in place and set this part of the driveshaft aside for the moment.
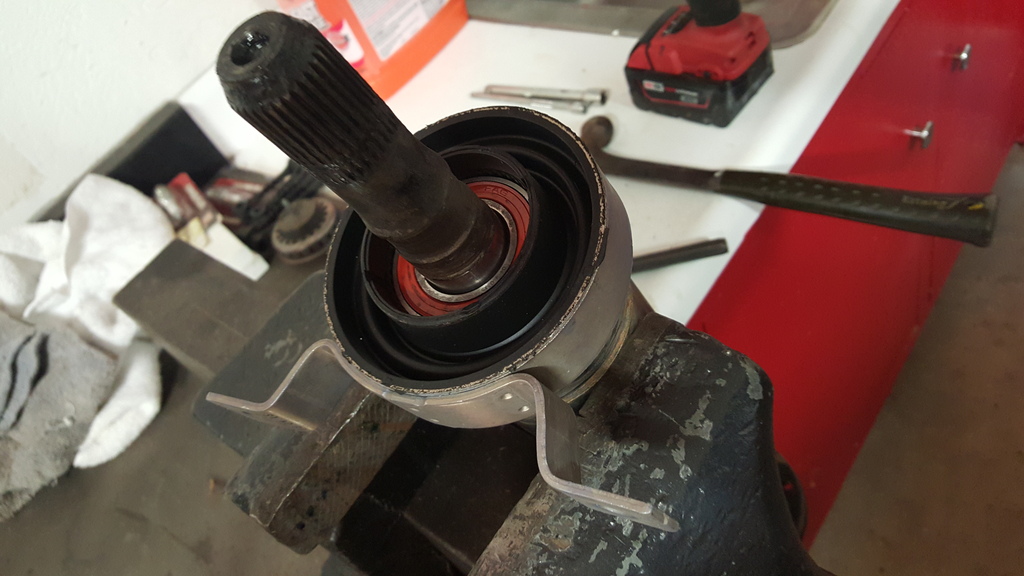
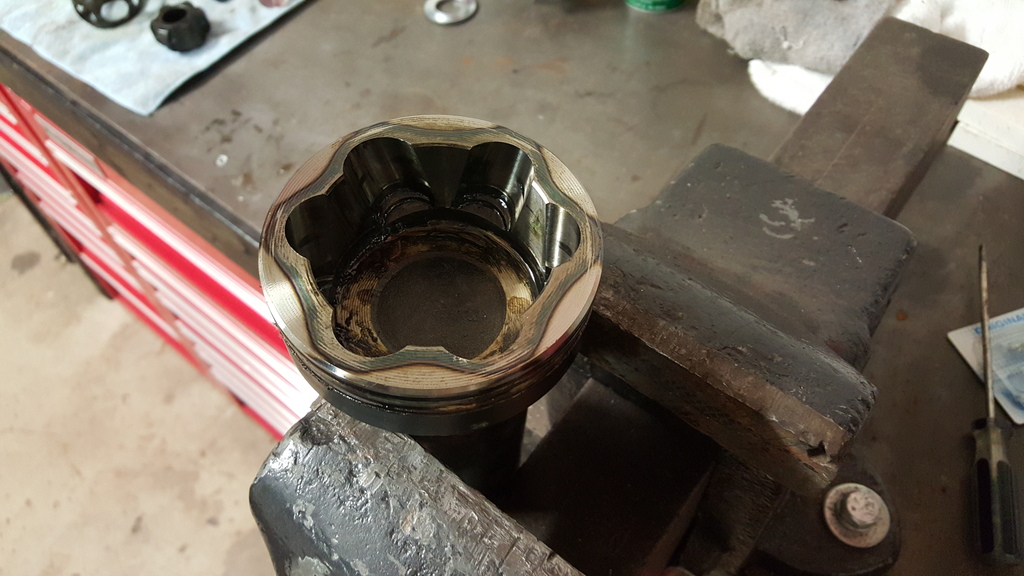
Now it’s time to reassemble the CV joint. This is best done working on the other half of the driveshaft which forms the outer part of the joint as seen here. Note how there are alternating wide and narrow lands around the perimeter.
Now look closely at the spider and you’ll see it too has alternating wide and narrow lugs.
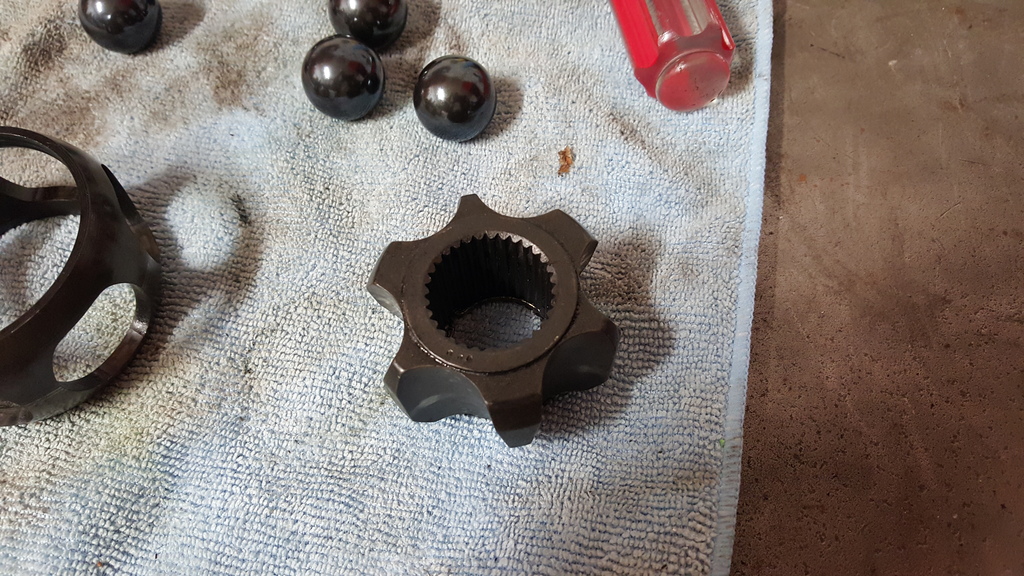
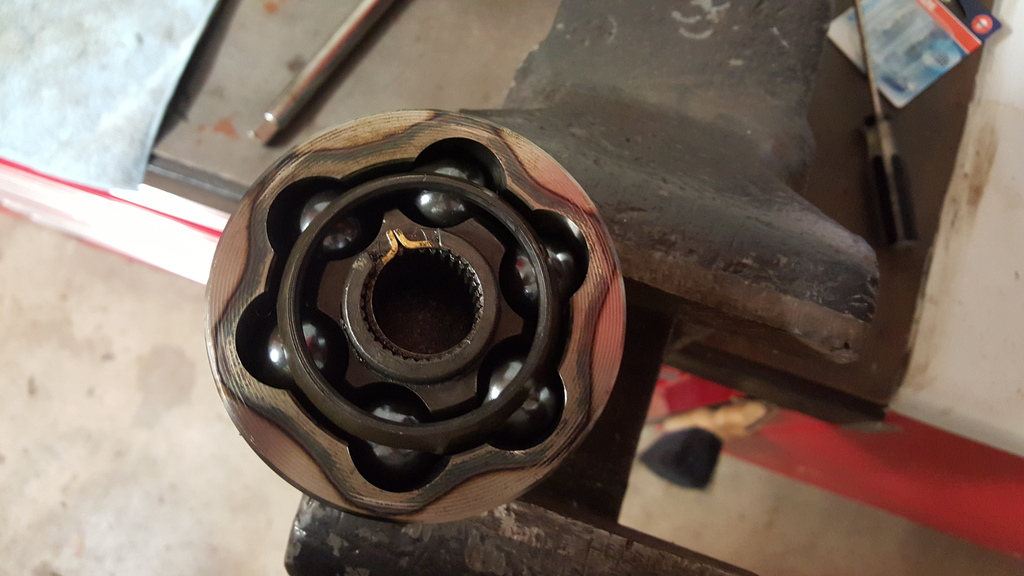
The key to re-assembly is to be sure these wide/narrow parts are opposite each other. A wide spot on the outer part aligns with a narrow spot on the spider. You should also be able to align the various marks you made in the beginning and have the wide/narrow alignment come together, but in all honesty I accidentally destroyed my marks while cleaning and simply re-assembled it based on standard CV joint practice. It’s a little finicky to get all the *****, the spider, and the cage all back in place since you don’t have quite the range of movement you would on a traditional CV joint but with some fiddling you’ll get it. Again, a second set of hands doesn’t hurt here. I found it easiest with the driveshaft standing vertical so gravity wasn’t working against me so much. Be sure the spider goes in with the retaining clip facing out so it can seat home in its grove on the splined shaft when you mate the two halves of the driveshaft. It will look like this once assembled.

Now you can remove the remaining bearing however you like. It’s difficult to grasp with a puller since there’s not a lot of room behind it so I simply used a cut-off wheel to slice through it 99% of the way then a chisel to break the remaining metal of the inner race. With that done it’s easy to pry it off the shaft. If you go this way do be careful not to damage the shaft.
Now clean up the shaft and polish out any nicks you may have caused during the disassembly with some emery cloth and slide the new support bearing on followed by the new conical retaining washer. I used a 3/8” extension and hammer to gently tap it home, though a brass drift with a large foot would be a better choice. It shouldn’t be excessively hard to seat the bearing, so just be patient and slowly work it home. Once these parts are on, you can slide the boot half back in place and set this part of the driveshaft aside for the moment.

Now it’s time to reassemble the CV joint. This is best done working on the other half of the driveshaft which forms the outer part of the joint as seen here. Note how there are alternating wide and narrow lands around the perimeter.

Now look closely at the spider and you’ll see it too has alternating wide and narrow lugs.

The key to re-assembly is to be sure these wide/narrow parts are opposite each other. A wide spot on the outer part aligns with a narrow spot on the spider. You should also be able to align the various marks you made in the beginning and have the wide/narrow alignment come together, but in all honesty I accidentally destroyed my marks while cleaning and simply re-assembled it based on standard CV joint practice. It’s a little finicky to get all the *****, the spider, and the cage all back in place since you don’t have quite the range of movement you would on a traditional CV joint but with some fiddling you’ll get it. Again, a second set of hands doesn’t hurt here. I found it easiest with the driveshaft standing vertical so gravity wasn’t working against me so much. Be sure the spider goes in with the retaining clip facing out so it can seat home in its grove on the splined shaft when you mate the two halves of the driveshaft. It will look like this once assembled.

Last edited by Zelatore; 02-22-2016 at 11:25 PM.
#4
Go ahead and load up this side of the joint with fresh CV grease.
Now you will slide the two halves of the driveshaft together until the retaining ring snaps into place on the splines. Do check carefully to get the alignment right between the two halves using the marks you made previously so you can retain the proper balance. I actually got mine 1 spline off but didnít notice any vibrations.
With the CV joint reassembled you can now fill the rest of the joint with grease and push the metal cover back in place and tap it down. You can also re-install the clamp that holds the neck of the boot to the shaft.
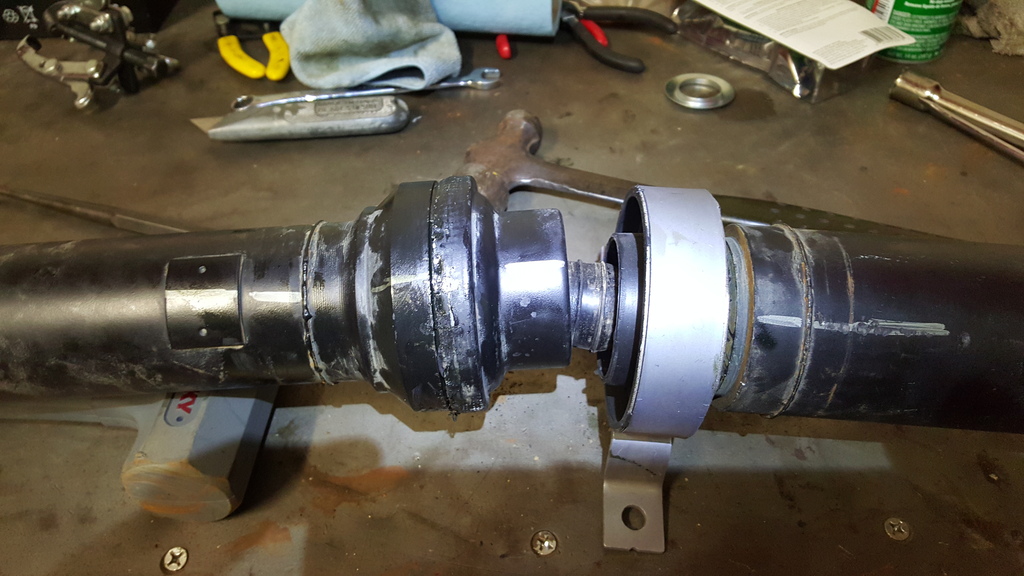
Hopefully you didnít damage it too badly when prying it apart back at the beginning of the project, but most likely the seal will be questionable so after cleaning up any residual grease some silicon around the metal joint would be a good idea. I happened to have some 3M 5200 on hand (sort of like silicon on steroids) so since I had buggered up the metal cover pretty well during disassembly I put a nice bead of it around the joint.
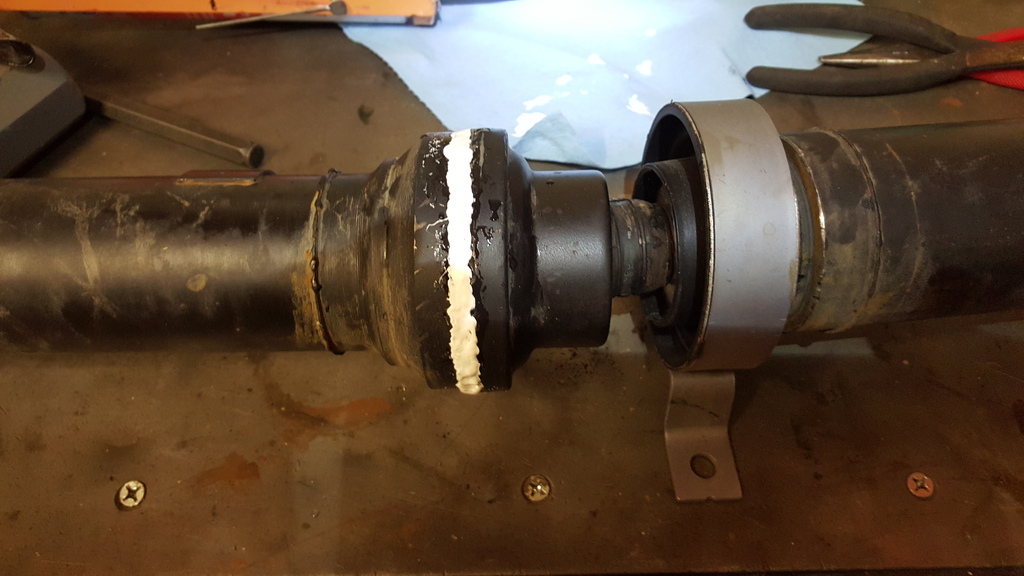
Assuming you did everything right, you should find the two halves of the driveshaft flex freely on the center joint. Congratulations, youíve just replace the center support bearing on an LR3 driveshaft and saved yourself about $600 vs buying one from your local dealer. Re-install the driveshaft in the vehicle and enjoy a celebratory beverage with your savings.
Now you will slide the two halves of the driveshaft together until the retaining ring snaps into place on the splines. Do check carefully to get the alignment right between the two halves using the marks you made previously so you can retain the proper balance. I actually got mine 1 spline off but didnít notice any vibrations.
With the CV joint reassembled you can now fill the rest of the joint with grease and push the metal cover back in place and tap it down. You can also re-install the clamp that holds the neck of the boot to the shaft.

Hopefully you didnít damage it too badly when prying it apart back at the beginning of the project, but most likely the seal will be questionable so after cleaning up any residual grease some silicon around the metal joint would be a good idea. I happened to have some 3M 5200 on hand (sort of like silicon on steroids) so since I had buggered up the metal cover pretty well during disassembly I put a nice bead of it around the joint.

Assuming you did everything right, you should find the two halves of the driveshaft flex freely on the center joint. Congratulations, youíve just replace the center support bearing on an LR3 driveshaft and saved yourself about $600 vs buying one from your local dealer. Re-install the driveshaft in the vehicle and enjoy a celebratory beverage with your savings.
The following users liked this post:
cmb6s (02-23-2016)
#6
Honestly I didn't feel much of anything when mine was going, I just checked it as part of routine inspection. There are stock heat shields that cover it so you can't see it, plus on my rig the skid plates cover part of the driveshaft as well. But if you grab the shaft and shake it you shouldn't have excess movement in the middle. I understand if they tear out completely the driveshaft can move around enough to rub against the gas tank. I believe one guy claimed he actually rubbed a hole in the tank but that seems far-fetched as I'm sure you would hear/feel it long before you got to that point.
At least one guy had the actual bearing go out instead of just tearing the support, so in that case you'd hear the typical groan of a bad bearing. But most just tear the supporting rubber.
FWIW that driveshaft has about 125K on it and both the rear U-joint and the front CV were in good shape still. The actual bearing in the center was also OK. It was just the carrier that died. Seems a shame to toss a mostly good driveshaft just because the rubber support failed, but that's what LR would have you do.
The following users liked this post:
drowssap (02-23-2016)
#7
#10
It just comes when I am not gassing my LR2, other wise if it's just going without gas or on neutral it makes a loud noise which I acnt figure out, so I took it to a auto shop and they said it's the drive shaft and also they are denying to open it up and see as they are saying that I just need to replace as you cannot open land rover driveshaft, so I dont know what to do as the noise is really loud


