When you click on links to various merchants on this site and make a purchase, this can result in this site earning a commission. Affiliate programs and affiliations include, but are not limited to, the eBay Partner Network.
As this was my third Rover to have a roof rack, the third Front runner rack and ladder to be installed on said Rovers, I thought I knew what I was doing. Only change from the last two was the addition of the wind dam and the additional slats to fill in the gaps, it should have been easy.
Well I often tell my wife that I am smarter than the average bear, and today I personified the original author by a few missteps on my way to getting that what he would describe as a perfect pic-a-nic bas-ket on my Rover.
I assembled the rack upside down on my work table. I placed ALL of the slats in the rails, tied them together and voila it was done. Seemed easy enough.
Me-1
Average bear-0
While it was on its back, I thought that was a good time to install the slide mounts for the table. Twice actually because it seems I do not know my right from my left.
Me-1
Average bear-1
I thought I knew best and was going to wait until I had the rack on the car to slide the bolts in the channels for mounting. Once the rack was on the feet, all was going well until I needed to put a bolt in a slats that had the table slides. I was not going to take the rack back down to fix my mistake, so I raised the rack with a couple of 2x4’s to get enough room to reach the nuts and bolts for the slide brackets. I had to remove all 8 bolts, remove the slide and insert the two mounting bolts and slide them to the end of the slat, reinstall the slides and adjust to fit the table tight in the slides, and then align the rack and tighten up the eight nuts securing the rack to the feet. All with only a few inches between the roof and the rack, after squeezing past the mounting feet.
Me-1
Average bear-2
I squared up the rack and tightened the front and rear bolts to keep it in place while I tightened the other six bolts.the two middle bolts were inaccessible now that the rack had all of the slats in place.(seems that last time I reached through the slats to tighten the nuts.
Me-1
Average bear-3
I removed the front slat that had the brackets and managed to tighten the other four bolts. I replaced the slat and bracket before I moved on to the wind dam
Me-2
Average bear-3
I could not figure out how to get the two inside nuts tight on the wind dam, Then I remembered the sunroof! I got all of them tight with no other issues.
Me-3
Average bear-4
Despite my best efforts to sabotage my ladder installation, it went as planned with one slight variation. I had to remove the inside liftgate trim to un-hook the Garmin back-up camera I had in place, Other than that no issues.
Me-4
Average bear-4
So in summary:
If doing this again as a fresh install, I would build the rack and not install the two slats that need the brackets. I would put the bolts in the slats with the table slides (with the slides on the correct side), while the rack is upside-down on the table, and then mount the rack per the instructions. I would then install the two that need the bracket kit.
I think that if I had looked at the boxes a few more days, maybe let them collect a little more dust, I would have thought about the install and maybe addressed each issue differently and would have scored higher and might have actually been smarter than the average bear.
When I did my front runner install I nearly had a disaster as my roof glass is not on square so when tightening the feet down they tightened to the glass on one side I noticed just in time before I tightened them too much an shattered the roof. I had to put a bunch of washers between the threads and the feet to clear the glass.
Just added a Alu-Cab 270 degree Shadow awning as I get ready for a short trip next month. There were a few snags (as I was folding it back up I noticed a squeak in the mounting I unfoldedit it, refolded it and still a squeek. As it turns out, I had put the bolts in the holes I drilled in the rack, but never put on, much less tightened the nuts.) but I think it is a resounding ..win!
Me=2
Average Bear=1
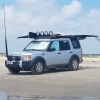
Here are a few pictures because as we all no, no pic's.....it didn't happen
Rear View
Front view
I can you were going to ask, yes it does interfere, but not enough to keep me form opening it to get into the fridge for an adult beverage
Side view. I think it will be enough room for 2 lawn chairs and a small table for the previously mentioned beverages.


 03-06-2019, 04:06 PM