Driver side long brake line replacement
#1
 09-28-2015, 03:30 PM


Hey all,
After replacing the seized caliper and short metal lines, apparently my 97 Disco developed a rather large leak (brake fluid pouring out) from the driver side right under the footwell area under the truck.
I picked up a 25' coil of brake line, a bunch of metric bubble flare fittings and new clamps.
Has anyone replaced this brake line?
If so, how bad is it?
I'm going to rent out a bubble flaring tool and hopefully knock it out this weekend.
Any tips/tricks or photos are greatly appreciated.
Thanks!!
#2
09-29-2015, 07:38 AM

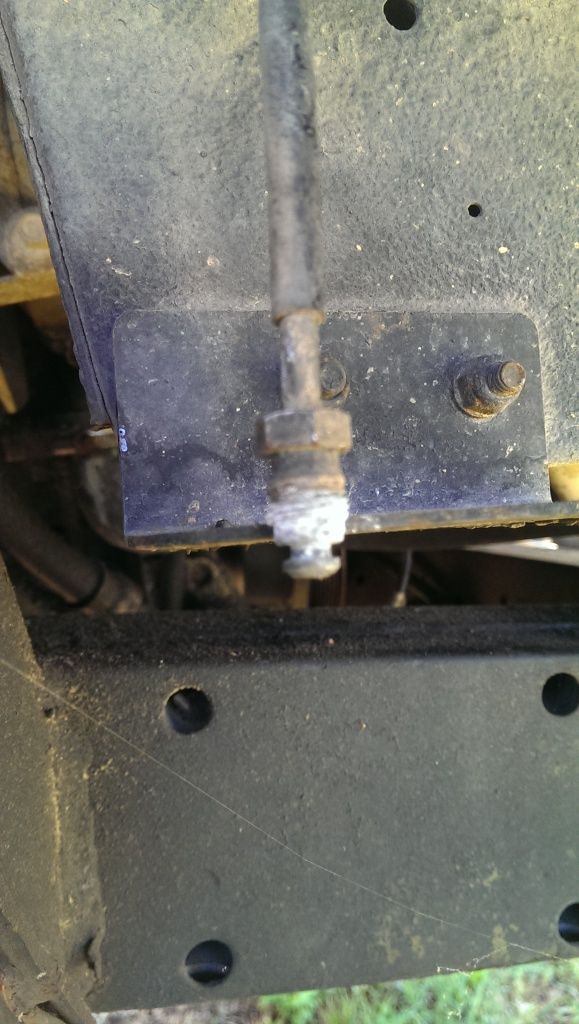
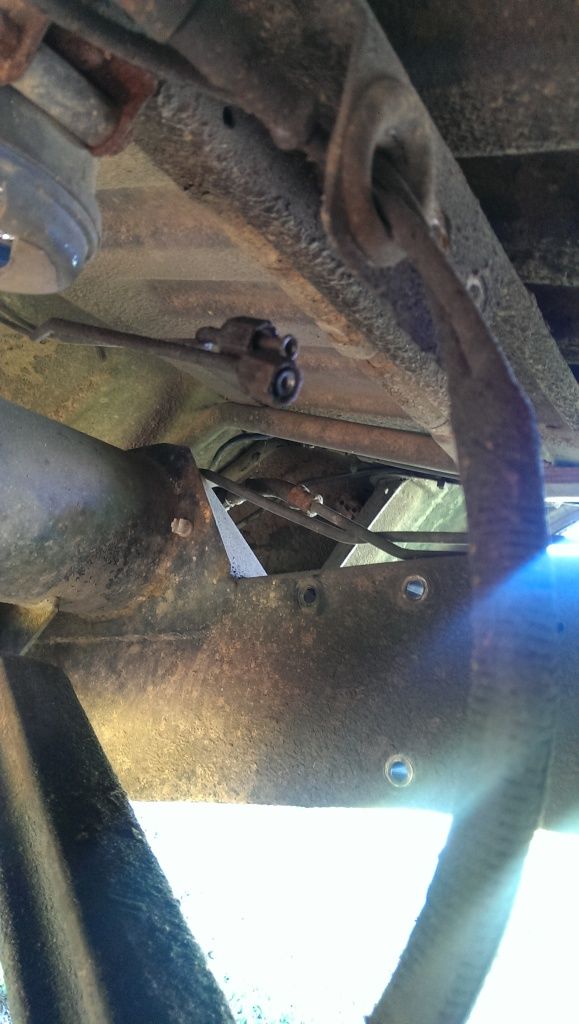
it's as easy as doing it on any other vehicle, its just a brake line. there is a junction right above the bottom of the A pillar behind the driver's front tire. PB the fitting at the axle, it will not let you out easy. I replaced mine, but thats your call.
you can always shoot me a message, since I did mine, and I live close by. on second thought, I'll do it for you, just trade bumpers for work
you can always shoot me a message, since I did mine, and I live close by. on second thought, I'll do it for you, just trade bumpers for work
The following users liked this post:
97GreenMeanie (09-29-2015)
#3
09-29-2015, 08:08 AM
#4
09-29-2015, 11:16 PM

If you are handy, a very good option to using compression fittings is to braze or solder (with high-content silver solder) long repair lines together to form a single contiguous line. The 'long' brake line usually rusts along the side frame rails so a guy can cut it where it is still good (usually up by the driver's foot area) and solder in the new line from there. Solder in a section with a double-flared end where it goes to the rear connector block. I usually don't get as good of a double-flare from the hand flaring tools as the store bought flared brake lines and a lot of time the homemade flares end up leaking. For a coupler, to connect two lines together, use a small section of brake line that is the next size larger in diameter which usually fits perfectly over the size you are using. Be sure the sections to be brazed are exceptionally clean (not a single trace of brake fluid) and no rust or paint. Use an oxy-acetylene or Mapp gas torch, flux and so on. Spray paint the completed joint with a self-etching paint for good corrosion resistance. GM and Ford did it this way for years back in the 60's. Done right, it's a strong connection and will hold tight. That's how they connect and repair refrigerant lines. I've never had one that re-leaked.
Lines that rust at the back axle are best to just replace with a single line. If need be, make a loop to use up excess length.
That being said, if compression fittings are done right, the ones I've seen or used, seem to hold well too.
Lines that rust at the back axle are best to just replace with a single line. If need be, make a loop to use up excess length.
That being said, if compression fittings are done right, the ones I've seen or used, seem to hold well too.
Last edited by Mark G; 09-29-2015 at 11:20 PM.
#5
09-30-2015, 07:50 AM
If you are handy, a very good option to using compression fittings is to braze or solder (with high-content silver solder) long repair lines together to form a single contiguous line. The 'long' brake line usually rusts along the side frame rails so a guy can cut it where it is still good (usually up by the driver's foot area) and solder in the new line from there. Solder in a section with a double-flared end where it goes to the rear connector block. I usually don't get as good of a double-flare from the hand flaring tools as the store bought flared brake lines and a lot of time the homemade flares end up leaking. For a coupler, to connect two lines together, use a small section of brake line that is the next size larger in diameter which usually fits perfectly over the size you are using. Be sure the sections to be brazed are exceptionally clean (not a single trace of brake fluid) and no rust or paint. Use an oxy-acetylene or Mapp gas torch, flux and so on. Spray paint the completed joint with a self-etching paint for good corrosion resistance. GM and Ford did it this way for years back in the 60's. Done right, it's a strong connection and will hold tight. That's how they connect and repair refrigerant lines. I've never had one that re-leaked.
Lines that rust at the back axle are best to just replace with a single line. If need be, make a loop to use up excess length.
That being said, if compression fittings are done right, the ones I've seen or used, seem to hold well too.
Lines that rust at the back axle are best to just replace with a single line. If need be, make a loop to use up excess length.
That being said, if compression fittings are done right, the ones I've seen or used, seem to hold well too.
I doubt there will be anything left after I remove all the rust. LOL
I think I'll just bend up a new line, flare it and hope for the best.
Thanks for the options. I didn't even think of that.

#7
10-01-2015, 10:33 AM

I think peeps need to relax on this one, it's only brake line. Here's the only tips I can give - I replaced ALL the lines, everything.
1. Spend the extra money and buy a roll of copper-nickel tubing. You'll never have to worry about rotten lines again. You may be better than me, hopefully, but I needed 50'.
2. Don't get crazy making the bubble flares. In fact, if you are one of those dudes who needs perfection in all things cut your losses now and buy the lines or have someone else do it. There are a few places that you need to feed a length of tubing through a hole like a shoelace, and once you do this the tubing is all humpty-waggle and doesn't look nice anymore. Everything was also so rusty under there I ended up zip-tying them to the frame rail. Really really ugly. But two years later it still looks like it did the day I put it in there.
3. Get both a large radius and small radius tubing bender. They are super cheap and you will need both.
4. Speaking of flares, I finally discovered that if you drench the tube and flare tool with brake fluid before you make the flare, you get much much better results. I bought the $20 special flare tool, worked great.
5. Even after I changed all the lines, I had to flush and flush and flush before I got clear fluid again. 3 quarts I ran through it, but very important.
Good luck!
The following users liked this post:
97GreenMeanie (10-01-2015)
#8
10-01-2015, 05:14 PM
Thanks for the advice.
I bought new universal frame rail 3/16" line clamps assuming I might abandon the rusted piece in place and just run new in the event that it refuses to cooperate.
I plan on flaring it myself since I have 6 new ends and 25 feet of line to screw up. Hahaha
Interesting trick with drenching the tool and line with brake fluid.
#9
10-05-2015, 06:31 AM
An update.
I was able to bubble flare the line using a double flare tool and replaced the line.
Unfortunately, prior owner replaced all lines except for the part that failed and when they replaced them they used compression fittings.. Argh..
So looks like I'll be replacing all their hack job work with all New bubble flared lines.
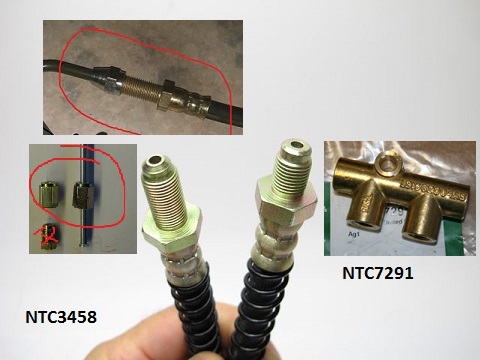
Does anyone know the correct size and configuration of the two large fittings directly above the rear different? It looked like a female end possible of an m10x1.
Any info is appreciated.
I was able to bubble flare the line using a double flare tool and replaced the line.
Unfortunately, prior owner replaced all lines except for the part that failed and when they replaced them they used compression fittings.. Argh..
So looks like I'll be replacing all their hack job work with all New bubble flared lines.
Does anyone know the correct size and configuration of the two large fittings directly above the rear different? It looked like a female end possible of an m10x1.
Any info is appreciated.
#10
10-06-2015, 09:53 AM
Sounds like you're having a rough time. Just unbolt that front bumper and send it my way, scrap the rest of the truck.
But really, you should have searched, or asked me when you sent me that Facebook message. Every flare on the D1 is bubble, except for the rear line, which is inverted.
From my thread:
https://landroverforums.com/forum/di...fferent-67056/
But really, you should have searched, or asked me when you sent me that Facebook message. Every flare on the D1 is bubble, except for the rear line, which is inverted.
"I just can't figure out how every picture of the replacement rubber hose I see is male bubble on the frame side" That part of the hose is correct. The only thing you are missing is a HARD LINE with a Double Inverted Flare and a M10x1.0 FEMALE Tube Nut.
Like this> NUT BRAKE PIPE FEMALE 10mm, RND954, FM10 - Rovers North - Classic Land Rover Parts
Like this> NUT BRAKE PIPE FEMALE 10mm, RND954, FM10 - Rovers North - Classic Land Rover Parts
From my thread:
https://landroverforums.com/forum/di...fferent-67056/