When you click on links to various merchants on this site and make a purchase, this can result in this site earning a commission. Affiliate programs and affiliations include, but are not limited to, the eBay Partner Network.
How is the Knoxville LR dealer ? They are one of my fall back dealers, nearest me.
I am still awaiting a winch kit to be made available to order from my N.C. dealer --- no luck so far, no dates, no info., so am thinking of calling around.
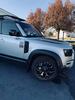
Hi looks really good with the Amazon steps!!! Are you running the 19" gloss black wheels with the factory off-road tires???
Yeah, on the window sticker it says 20" standard. Then to the options to the right says 19". No idea why.
I was very surprised by the Amazon quality. Turns out it was good. And $400 cheaper than Land Rover brand.
Knoxville has treated me very well. First time customer too. We saw the Defender around 1p, drove off at 4p in a new vehicle. Been by a few times for random questions and parts. Treated well. Free vehicle when they were putting on our stuff.
i just placed my order for the amazon sides. i have been waiting for your post showing a ok. the oem ones if i could get in a timely manner would still have to be sent off and painted black. saves me time and money with these amazon ones
even at 600 for the installed it seems pretty pricey to install these. not sure exactly what goes into the install but from the pics it just looks like bolts and nuts.
how were the instructions? Do you think any mechanic or shop can put these in
Originally Posted by USMC_Denver
Got them installed. When we dropped it off to get the side bars installed, they called us an hour later and said that some fender guards just came in. So they installed those as well. I cancelled my OTHER order for them I had placed from a company in the UK. Now they have a notice on their site saying due to the 'rona that they cant ship till after Jan. It was $971 from them though, so cheaper from dealership. Dealership had no issues putting them on, saying they were identical to the Land Rover version of them. Which I was a it worried about since they were from Amazon and came from China. All clips and other parts were there. I have attached a few pics, and of the receipt. Someone said their dealership charged 1k, maybe with a receipt showing a $600 install they can get it price matched. If needed I can send a whole pic.
They had originally told me a much cheaper price on the tire cover, now they're saying $500. And its backordered. There are some on Amazon and Ebay that are from China... but not sure the color would be a 100% match, or quality the same. No reviews on them yet. And $469-$600. I may pull the trigger and see though. I can return to Amazon if necessary. Hope this helps anyone trying to get parts and their dealership has them on backorder like mine did. I was really hesitant about getting the side bars from Amazon and a knock off, glad I did now.
i just placed my order for the amazon sides. i have been waiting for your post showing a ok. the oem ones if i could get in a timely manner would still have to be sent off and painted black. saves me time and money with these amazon ones
even at 600 for the installed it seems pretty pricey to install these. not sure exactly what goes into the install but from the pics it just looks like bolts and nuts.
how were the instructions? Do you think any mechanic or shop can put these in
I think any mechanic shop could. I should have, just really didn't have the time before our weekend getaway and wanted them on first. Instructions were printed on paper, and pretty clear.
I keep on meaning to leave an Amazon review to help out others but forget. I'll try to do later.
I know to install the factory ones requires removal of some trim pieces, skid plates, and cutting some notches in the skid plates. Are these different? If they don't go on the same way, it may be something the average mechanically inclined person can do? I would really like to have some that don't require a lot of removal and trimming.
I know to install the factory ones requires removal of some trim pieces, skid plates, and cutting some notches in the skid plates. Are these different? If they don't go on the same way, it may be something the average mechanically inclined person can do? I would really like to have some that don't require a lot of removal and trimming.
Hi - to anyone wanting to fit a set of these aftermarket side steps, I have just done it, and can advise:
The items that I bought from China appear identical to the LR items except they do not have the "DEFENDER" embossed in the rubber step tread. They look good, and are of good quality. Pretty much impossible to distinguish from the genuine article. I got the silver coloured steps, but I recall that they had the gloss black option also.
They arrived with all of the nuts and bolts needed to fit them, but without any fitting instructions. The link to the fitting instructions in the post above is correct and you need to refer to this carefully.
IMPORTANT: What was not supplied from China were the 30 x LR112137 plastic clips that replace the ones that snap off when you remove the plastic trims. (these LR112137 clips are sacrificial - ie: you WILL snap off the heads as you pull off the panels. Fortunately after many years of working on cars I had some near identical clips at hand, so could replace, but I doubt anyone else will be that fortunate so, my advice, unless you have bought a genuine LR side step set, is to buy the clips before you start. I will attach a photo of the clips you need for reference.
The job is do-able by an amateur, albeit a bit more involved than I expected. Here is a run down of the effort:
Firstly, refer to the LR instructions in the link provided in earlier post.
Under the car:
Use a trim removing tool to prise out the 9 or 10 mushroom headed fixings holding up the edges of both the plastic sill (rocker) cover and the undershield panel. (trim tool is essential - as they are in recesses and hard to take out without one) The heads of these fixings are about 25mm dia, and only the visible outer plastic head needs to be prised down, as this is also the pin that spreads the wedge section at the back - once you get the first one out check it out and you should be able to get the rest apart more easily. Next with a 10mm socket remove all of the securing bolts holding up the protective undershield panel. These fixings will include 5 bolts on the deflector in front of the rear wheel arch. Also 2 x 8mm bolts holding on a second smaller deflector plate near the centre of the car. Note that you do not need to take down the entire transmission protector plate as the LR instruction indicates - just the few fixings at the rear of that panel, where the undershield panel joins it.
I recommend you do one side of the car at a time, and leave the other intact as reference. There is no advantage to dismantle both sides together anyway.
I set the air suspension to high, and used a pair of HD ramps under the rear wheels, with a pair of axle stands under the front jacking points for security - and access was fine.
Now for the plastic trims (hardest bits).
Pull out the bottom of the plastic panel at the bottom rear of the guard / fender / wing and the whole assembly should pop loose, and then be able to be split into an outer panel and an inner panel (they just clip together). On the inner section there are two large white plugs at the bottom, and two LR112137 clips at the top, which will almost certainly have snapped when removing this panel. Don't panic.
Open rear door, and pull up the bottom of the plastic cover where it meets the sill, again you will break the clip that is about 6 inches up on this panel, and it will have to be replaced.
Next the full plastic sill / rocker cover has to be taken off. Open front and rear doors and carefully begin unclipping the trim panel by pulling up and out at the bottom edge from one of the ends. You will hear clips snapping and see the heads of the clips falling out as each one breaks off, and leaves the rest of the clip in the fixing holes. The breaking of these clips is expected by LR as in their parts list they have 30 new fixings to replace all of these on both sides. (the clips are available through LR dealers or I have found some on line also.)
Once all clips are undone / snapped, wriggle the sill cover panel down and off (watching out for the 3 locating pegs that you need to avoid damaging as you take this cover off.)
Underneath the sill edge below the car you have two long bolts to remove - one where the front bracket is to be fixed, the other where the rear bracket fixes. These are replaced with the longer items supplied in the kit, so can be set aside when removed.
Positions for the step brackets are quite obvious once you have got all the trim panels apart. Just make sure you get the Left Front / Left Rear and Right Front / Right Rear brackets worked out as they are subtly different, but they are marked.
Install the brackets to the car, fixing to the holes in the body which are pre-tapped ready for this purpose. Insert the two large M10 bolts up from underneath, vertically, and two shorter M8 bolts from the outside of the sill, horizontally in each bracket (using washers on the two M8's) I personally also loctited the bolts.
Next, test fit the step to both brackets to ensure the final fixings will line up, but assuming they do, leave the final fitting of the step until all trim panels are back together as it is easiest.
You DO have to cut the bottom (hidden) edges of the plastic sill cover as per the diagrams in the LR instructions, but if you look carefully inside the sill cover, LR will have also kindly lined out where the sections are to be removed. I used a 19mm wood spade drill bit to create the rounded corners, and then a hacksaw blade to cut the straight lines. Easy and neat.
Next you have to cut matching recesses (to go around the brackets) out of the edge of the undershield panel. No guidance lines from LR for this unfortunately. To do this match up the fixing holes in the sill cover and underside panels, and mark / measure carefully and cut the composite underside panel with a hacksaw blade, or a sharp Stanley knife (being very careful to keep fingers out of the way). This took me a couple of attempts to get exact but was also fairly easy. Using the opposite side brackets as a guide also helped. Once done you should have a pair of panels that when back in place, wrap neatly around both of the fitted brackets and don't expose any gaps.
By this stage the hard work is done.
Reinstall the undershield panel using the bolts (but leave the two deflectors at the wheel arch for the moment), then use the trim tool to remove the remains of the broken off clips from the car's (metal) sill panel and at the small panel at the base of the front guard / fender / wing. Install new LR112137 clips to all of the slots in the sill cover, plus the two for the lower guard cover, and one for the rear wheelarch cover. Clip inner and outer lower guard covers back together, and carefully begin refitting these plastic panels back into place. For me they all clippped back straight in, and lined up fine.
Then underneath the sill you need to re-insert the plastic mushroom headed clips through the sill cover and underbody panels - carefully tapping back in the pin that spreads opens the wedge to fix these solidly.
Reinstall the deflectors to the undershield with the 5 x M10 headed bolts, and 2 x M8 headed bolts.(One bolt goes into the sill edge)
Finally, bolt the step on to the brackets using 6 x M6 bolts and washers.
......and repeat for the other side before you stand back and admire.
With the correct tools, clips and confidence, I reckon you need to allow 3 hours to do this. Read and understand the instructions before you start though.
I am sorry but I did not take photo's when doing this, but if anyone really want's to see some, I may be able to take one or two and add them. Let me know if needed.
It is probably a little more straightforward in practice than I have made it sound - but if you are not the sort of person who is prepared for pulling apart panels, and breaking and replacing of the trim clips, and the accurate measuring and cutting of the panels, I'd get your local dealer or help from someone who has done it already. As you can tell it is not just a simple bolt on or bolt off job.
Good luck
Oldmowgli
LR112137 clips that will all snap as you remove the plastic trim panels. The 12mm round head at the top is designed to snap off under light pressure so the whole clip is sacrificial (ie: LR make money out of renewing them).
LR parts diagram. Looks simple - but it's the disassembly and re-assembly that is the hard bit.
thanks for the detailed write up. i have read the LR instructions and yes this is not as easy of an install. but if you handy this should be achievable
those mushroom tabs are essential. Depending on what amazon set you but you might get different parts. mine is schedule tk come in late Jan but i will most likely order the clips anyways.
i need some for my mud flap install which you need to pull off the smallest panel.
i installed my fender flare protection yesterday. not as detailed as the running boards but these mushroom clips are everywhere
Originally Posted by Oldmowgli
Hi - to anyone wanting to fit a set of these aftermarket side steps, I have just done it, and can advise:
The items that I bought from China appear identical to the LR items except they do not have the "DEFENDER" embossed in the rubber step tread. They look good, and are of good quality. Pretty much impossible to distinguish from the genuine article. I got the silver coloured steps, but I recall that they had the gloss black option also.
They arrived with all of the nuts and bolts needed to fit them, but without any fitting instructions. The link to the fitting instructions in the post above is correct and you need to refer to this carefully.
IMPORTANT: What was not supplied from China were the 30 x LR112137 plastic clips that replace the ones that snap off when you remove the plastic trims. (these LR112137 clips are sacrificial - ie: you WILL snap off the heads as you pull off the panels. Fortunately after many years of working on cars I had some near identical clips at hand, so could replace, but I doubt anyone else will be that fortunate so, my advice, unless you have bought a genuine LR side step set, is to buy the clips before you start. I will attach a photo of the clips you need for reference.
The job is do-able by an amateur, albeit a bit more involved than I expected. Here is a run down of the effort:
Firstly, refer to the LR instructions in the link provided in earlier post.
Under the car:
Use a trim removing tool to prise out the 9 or 10 mushroom headed fixings holding up the edges of both the plastic sill (rocker) cover and the undershield panel. (trim tool is essential - as they are in recesses and hard to take out without one) The heads of these fixings are about 25mm dia, and only the visible outer plastic head needs to be prised down, as this is also the pin that spreads the wedge section at the back - once you get the first one out check it out and you should be able to get the rest apart more easily. Next with a 10mm socket remove all of the securing bolts holding up the protective undershield panel. These fixings will include 5 bolts on the deflector in front of the rear wheel arch. Also 2 x 8mm bolts holding on a second smaller deflector plate near the centre of the car. Note that you do not need to take down the entire transmission protector plate as the LR instruction indicates - just the few fixings at the rear of that panel, where the undershield panel joins it.
I recommend you do one side of the car at a time, and leave the other intact as reference. There is no advantage to dismantle both sides together anyway.
I set the air suspension to high, and used a pair of HD ramps under the rear wheels, with a pair of axle stands under the front jacking points for security - and access was fine.
Now for the plastic trims (hardest bits).
Pull out the bottom of the plastic panel at the bottom rear of the guard / fender / wing and the whole assembly should pop loose, and then be able to be split into an outer panel and an inner panel (they just clip together). On the inner section there are two large white plugs at the bottom, and two LR112137 clips at the top, which will almost certainly have snapped when removing this panel. Don't panic.
Open rear door, and pull up the bottom of the plastic cover where it meets the sill, again you will break the clip that is about 6 inches up on this panel, and it will have to be replaced.
Next the full plastic sill / rocker cover has to be taken off. Open front and rear doors and carefully begin unclipping the trim panel by pulling up and out at the bottom edge from one of the ends. You will hear clips snapping and see the heads of the clips falling out as each one breaks off, and leaves the rest of the clip in the fixing holes. The breaking of these clips is expected by LR as in their parts list they have 30 new fixings to replace all of these on both sides. (the clips are available through LR dealers or I have found some on line also.)
Once all clips are undone / snapped, wriggle the sill cover panel down and off (watching out for the 3 locating pegs that you need to avoid damaging as you take this cover off.)
Underneath the sill edge below the car you have two long bolts to remove - one where the front bracket is to be fixed, the other where the rear bracket fixes. These are replaced with the longer items supplied in the kit, so can be set aside when removed.
Positions for the step brackets are quite obvious once you have got all the trim panels apart. Just make sure you get the Left Front / Left Rear and Right Front / Right Rear brackets worked out as they are subtly different, but they are marked.
Install the brackets to the car, fixing to the holes in the body which are pre-tapped ready for this purpose. Insert the two large M10 bolts up from underneath, vertically, and two shorter M8 bolts from the outside of the sill, horizontally in each bracket (using washers on the two M8's) I personally also loctited the bolts.
Next, test fit the step to both brackets to ensure the final fixings will line up, but assuming they do, leave the final fitting of the step until all trim panels are back together as it is easiest.
You DO have to cut the bottom (hidden) edges of the plastic sill cover as per the diagrams in the LR instructions, but if you look carefully inside the sill cover, LR will have also kindly lined out where the sections are to be removed. I used a 19mm wood spade drill bit to create the rounded corners, and then a hacksaw blade to cut the straight lines. Easy and neat.
Next you have to cut matching recesses (to go around the brackets) out of the edge of the undershield panel. No guidance lines from LR for this unfortunately. To do this match up the fixing holes in the sill cover and underside panels, and mark / measure carefully and cut the composite underside panel with a hacksaw blade, or a sharp Stanley knife (being very careful to keep fingers out of the way). This took me a couple of attempts to get exact but was also fairly easy. Using the opposite side brackets as a guide also helped. Once done you should have a pair of panels that when back in place, wrap neatly around both of the fitted brackets and don't expose any gaps.
By this stage the hard work is done.
Reinstall the undershield panel using the bolts (but leave the two deflectors at the wheel arch for the moment), then use the trim tool to remove the remains of the broken off clips from the car's (metal) sill panel and at the small panel at the base of the front guard / fender / wing. Install new LR112137 clips to all of the slots in the sill cover, plus the two for the lower guard cover, and one for the rear wheelarch cover. Clip inner and outer lower guard covers back together, and carefully begin refitting these plastic panels back into place. For me they all clippped back straight in, and lined up fine.
Then underneath the sill you need to re-insert the plastic mushroom headed clips through the sill cover and underbody panels - carefully tapping back in the pin that spreads opens the wedge to fix these solidly.
Reinstall the deflectors to the undershield with the 5 x M10 headed bolts, and 2 x M8 headed bolts.(One bolt goes into the sill edge)
Finally, bolt the step on to the brackets using 6 x M6 bolts and washers.
......and repeat for the other side before you stand back and admire.
With the correct tools, clips and confidence, I reckon you need to allow 3 hours to do this. Read and understand the instructions before you start though.
I am sorry but I did not take photo's when doing this, but if anyone really want's to see some, I may be able to take one or two and add them. Let me know if needed.
It is probably a little more straightforward in practice than I have made it sound - but if you are not the sort of person who is prepared for pulling apart panels, and breaking and replacing of the trim clips, and the accurate measuring and cutting of the panels, I'd get your local dealer or help from someone who has done it already. As you can tell it is not just a simple bolt on or bolt off job.
Good luck
Oldmowgli
LR112137 clips that will all snap as you remove the plastic trim panels. The 12mm round head at the top is designed to snap off under light pressure so the whole clip is sacrificial (ie: LR make money out of renewing them).
LR parts diagram. Looks simple - but it's the disassembly and re-assembly that is the hard bit.
The instructions are pretty similar to the official ones from LR. Taking off the trim pieces, and the undercarriage part may be the hardest. Oldmowgli, my dealership called me and said that they couldn't find the clips that were supposed to be in my box, and that to use theirs was $30. But then we picked it up and they said that they found them. I didn't look in my box, but maybe there are still in yours somewhere kinda hidden?
I'm sure this guy is known here, but I stumbled across him. He has many useful guides for the new Defender, and other vehicles. Not just installation but for the infotainment system and other useful things. He has one specifically for the fender guards.

 01-07-2021, 04:11 PM