Distributor Q's
#11
 09-14-2010, 09:25 PM


Join Date: Jul 2010
Location: Big Island, HI
Posts: 159
Likes: 0
Received 0 Likes
on
0 Posts
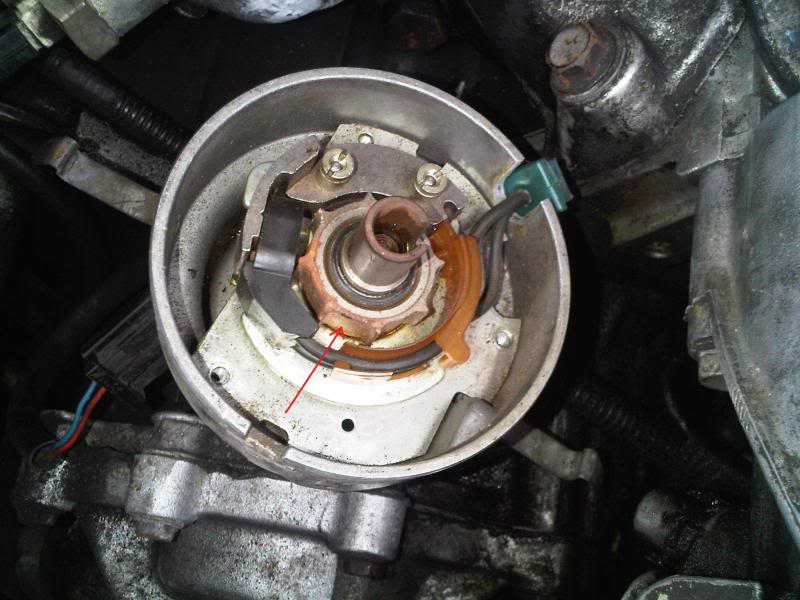
Cosmic or anyone that knows, how do you get this piece off? I don't want to damage anything but I figured once that cir-clip was off it would just slide out. Thanks!
________
Suzuki GSX 650 F
________
Suzuki GSX 650 F
Last edited by Henrici; 01-30-2011 at 12:16 PM.

#13
09-15-2010, 08:14 AM

X2.... no need to remove the center shaft, spindle, cams or anything to swap out that bad vac. advance? In theory, you don't even need to remove the cap / rotor to make the swap. Did curiousity kill the cat here?
HOWEVER, now that you are in like Flint... the circlip is the only thing holding it together. No bearings, just a two washers under that "C" clip. Maybe corossion and grit is making it tight on the shaft. OR are you talking about the entire dist. assembly? I assume you are just talking about the center spindle...exploded diag. is in Rave in section - PDF...LJ...WMLJ97E.pdf Section 86 - Electrical.. .page 4.
ALSO, and maybe it is just me, but it appears that your Dist. is rotated clockwise about 90deg. from where it normally would be situated (as far as I have ever seen). Or could it be the angle of the picture.
All of the following is from Rave...Engine overhaul page 24...
1.
Ensure timing pointer is aligned with 3� mark
on crankshaft pulley and No.1 piston is on the
compression stroke.
compression stroke.
2.
Engine numbers without suffix B: Position oil
pump drive shaft tongue at the ten to four
position.
position.
3.
Lubricate a new ’O’ ring with engine oil and fit
to distributor.
4.
Turn distributor drive until rotor arm is
approximately 30
� anti-clockwise from No.1
spark plug segment in distributor cap.
5.
Insert distributor into timing cover, engage
drive gear and push distributor down until
’O’
ring enters bore; position distributor clamp on
stud.
ENGINE
OVERHAUL
stud.
ENGINE
OVERHAUL
25
6.
Engine numbers without suffix B: Locate
slotted adapter to oil pump drive shaft tongue.
7.
Check that centre line of rotor arm is aligned
with No.1 spark plug segment in distributor cap
and reference marks on distributor body and
clamp are aligned; reposition distributor if
necessary.
and reference marks on distributor body and
clamp are aligned; reposition distributor if
necessary.
8.
Remove rotor arm.
9.
Rotate distributor to position pick-up opposite
nearest reluctor tooth.
10.
Fit distributor clamp nut ensuring that
counterbored portion is towards clamp; tighten
nut to 20 Nm (15 lbf.ft).
nut to 20 Nm (15 lbf.ft).
11.
Fit rotor arm.
CAUTION: This distributor setting is to
enable engine to be started. When engine
is refitted, ignition timing must be set
using electronic equipment.
OIL COOLER ADAPTER - ENGINE NUMBERS
WITHOUT SUFFIX B
Oil cooler adapter - remove
1.
enable engine to be started. When engine
is refitted, ignition timing must be set
using electronic equipment.
OIL COOLER ADAPTER - ENGINE NUMBERS
WITHOUT SUFFIX B
Oil cooler adapter - remove
1.
Remove oil filter element.
2.
Mark position of adapter in relation to oil pump
cover.
3.
Remove centre screw and withdraw adapter.
4.
Remove and discard sealing ring.
Last edited by Cosmic88; 09-15-2010 at 08:36 AM. Reason: new info
#15
09-15-2010, 05:11 PM
Join Date: Jul 2010
Location: Big Island, HI
Posts: 159
Likes: 0
Received 0 Likes
on
0 Posts
Pretty much, I read in your thread about if you pulled on the advance too hard you could mess up the springs and cams below. Everything looked fine so I tried to leave the advance sticking out a little like I had found it before. Got it to stumble a little but it never fired up. Still that seems to be on the right track.
________
Lexus Cup specifications
________
Lexus Cup specifications
Last edited by Henrici; 01-30-2011 at 12:17 PM.
#16
09-15-2010, 05:17 PM
Join Date: Jul 2010
Location: Big Island, HI
Posts: 159
Likes: 0
Received 0 Likes
on
0 Posts
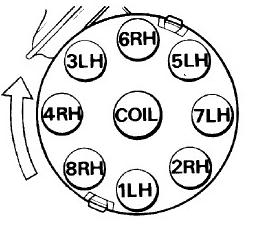
My #1 lead is where the #4 is on this chart. But it seems to match up to where the rotor is pointing and the piston is near the top.
I'm going to look around and see what it will cost to have the engine timed correctly.
________
easy vape vaporizer
Last edited by Henrici; 01-30-2011 at 12:17 PM.

Thread
Thread Starter
Forum
Replies
Last Post
sealsupra6
General Range Rover Discussion - Archived
0
02-07-2009 12:07 AM