
Finished Head Gasket Job - After thoughts
#1
 03-16-2011 | 12:59 PM

Thread Starter
|
Rock Crawling
Joined: Aug 2009
Posts: 395
Likes: 28
From: C'Ville, VA
Machined Heads ($440), Tools I didn’t have ($100), Fluids…yes beer counts($70), Gaskets & Bolts ($180)….. Performing successful open heart surgery on my 94 Discovery… priceless
Total length of project: ~3 Weeks (this was working on it two or three times a week for 1-2 hours) So approximately 12-15 hours
Thank you to everyone that contributed to this project! The resources online are unbelievable and I encourage anyone attempting this job to read as much as possible before they perform it.
So before I get into the problems I ran into let me first go through the most useful tools and equipment I used on this project:
Specific sockets needed –
Things replaced -
Head gaskets obviously, valley pan gasket, valve cover gaskets, water pump gasket, distributor cap and rotor, wires, fluids, valve seats, exhaust manifold gaskets exhaust manifold to down pipe gaskets, spark plugs, thermostat and gasket for it
A general summary of the steps I took
1) Take apart top of engine up to Air box and Plenum (Hex bolts)
2) Drain coolant
3) Take apart front of engine, Remove fan, front of water pump (didn’t remove the whole thing and left the distributor in there also, Power steering fluid pump, alternator, tensioner, Ac/Heat pump. The Ac/heat pump is on the same bracket as the alternator so I only removed the alternator and left the bracket in the engine bay so I didn’t have to deal with unscrewing the AC hoses.
4) Take Exhaust manifolds off
5) Take intake manifold, rocker arms, push rods and heads off. When you remove the rocker arms off place them on the side of the car that they are from, also keep the front of the arms towards the front and the rear towards the rear. Also keep the push rods up and down the same way they were in the car.
6) CLEAN EVERYTHING, machine heads, valve jobs, all mating surfaces, pour a quart or two of cheap oil into the engine just on top of the cam shaft to pull any nasty stuff down! Call your local land rover dealer to find out where they send their heads to get them machined.
6.5) If you have a D1 it is likely that your heads have the old style of exhaust valves. There is a small undercut in the newer ones that prevents sticking. It is your choice if you want to spend the additional $130 here to replace all 8 exhaust valves. Online is the cheapest, dont buy from the dealership because it's like $80/valve.
7) I changed the rotor and the distributor cap at this point also. Not everyone will have a distributor. The easiest way to remove an old rotor is to remove the cap take a flat head screw driver place it at 90* above the old rotor (so it doesnt slip off and damage what's below the rotor) hit the top of the screwdriver with a hammer and the rotor should chisel right off.
8) Torque down heads Make sure to put some tape over the exhaust and intake ports now so that you don't mess up the whole job by letting something go through those ports. Make sure to coat the head bolts with oil before putting them into the threads. Finger tighten to make sure you don't go over the torque specs with a ratchet. Long bolts go in the middle three.
9) Push rods and rocker arms. Make sure they are seated in the lifters and the rocker arms above! Torque down the rocker arms.
10)Valley pan (mine fit better one way than it did another way so apparently there is a front and a back, make sure you try it in both ways before you put the end clamps on. Dont forget to fill the small divet on both sides of the end seals with RTV before you put them in.
11)Intake manifold, end clamps. Both have torque values. I would also replace the thermostat and gasket at this point.
12)Valve covers with new gaskets and RTV. Exhaust manifold with new gaskets. Plenum with just RTV.
13)Front of engine, air box/MAF, fan, oil change, coolant, plugs and wires, battery
14) Check for no tools in engine bay and secure anything small around that might fall into engine bay.
15) Pray.
16) CRANK THAT ****!
17) Cry out of happiness well or it doesnt start so sadness. Make sure to check you have fuel (purge valve on the rail), spark.
18) Check coolant levels, bleed system
19) Change oil in a day or two after driving to get any of the remaining crud out.
Problems that were faced and defeated:
Brittle wires and plugs – In a 94 everything you touch will fall apart, you will not be able to find a new wire harness easily so be nice to your current one or you will end up with ripped wires and a sad face
Gross engine – power wash the bottom of your car before you do this job it will make things much cleaner and you won’t be crying when dirt goes in your mouth and eyes.
Firing order Sequence/diagram – Make sure to take note of your original sequence before you remove your wires. The one I saw online as well as in the Rave were both incorrect for my model. I found one on page 67 of the RAVE for the 3.9 and it made everything turn out beautifully.
Exhaust manifold not lining up – When placing the exhaust manifold back on I suggest removing the manifold from the rest of the exhaust for two reasons. You can replace the gasket in the connection there and you can handle the exhaust manifold much easier after that. Oh and you can check for cracks in your exhaust manifold which is a common problem in our cars. One hole in the manifold didn’t line up exactly once I began screwing in the bolts. Make sure you screw everything in finger tight before you start using a socket wrench, if you feel resistance use a socket but only if are sure the bolt will not strip the threads.
Useful tips:
The bottle jack was very handy for getting the exhaust back in place, push it in between the exhaust and the body of the car and maneuver it which ever way you need to
Torque method for the heads is 15nm then 90 degrees then another 90 degrees as per rave and head gasket directions. To clarify you do all the bolts to 15nm then all bolts 90* then another 90* following the sequence each time.
Write down torques for everything before you begin to keep your laptop clean and so you don't have to interrupt your progress.
Intake manifold and head gaskets are the only components that have a sequence to them during this job. Everything else needs to be tightened evenly.
Have a competent helper there, not only is it reassuring knowing that someone is there to help you lift the heavy bits its also daunting to do this alone so a friend really helps.
Place everything in the back of your truck and try to be as organized as possible. An organized work area will lead to a well done job! Keep your radiator fan vertical also, I’ve heard so many things about the fan messing up if laid down…
Another very well done write up: http://www.discoweb.org/forums/showt...ferrerid=18051
A compilation of problems and solutions that other people have written about on other threads and forums. Thanks to Tugula from DiscoWeb for this file! Also attached to this post LINK
Summary:
All in all the job was a lot of fun! Spreading out over a few weeks time made it much easier to do and much less stressful. You could get it done in two days if you really set yourself on it. Looking back at the entire job I regret nothing and saving a $1000 really feels good. Especially now that I know I can fix anything on this discovery. Thinking about the job now and how loose everything was (especially the head bolts) while taking it apart I don’t believe that the head gasket was the direct cause of my coolant leak. It seems that having a loose bolts doesn’t do wonders for an engine. Everything works beautifully now and the engine runs smoother and quieter than ever. So no cracked headbolts, no stripped threads, no broken fingers, and no major surprises. How can a head gasket job go soo smoothly?!?! Well there was one hiccup. Right before we started the car up we removed the radiator expansion cap and placed it right on the top of the radiator. When the car started up the cap rolled into the engine bay, hit one of the fan blades, shot across the garage, the fan blade broke off and lodged itself in the serpentine belt, which lead to a very loud squeaking noise. It took us a minute to piece together what happened but everything and everyone is okay, just have to replace those two items now.
Good luck to everyone that is doing this job !
!
Relevant pictures that I used are below...
Serpentine belt path

Firing order for 3.9 and 4.0
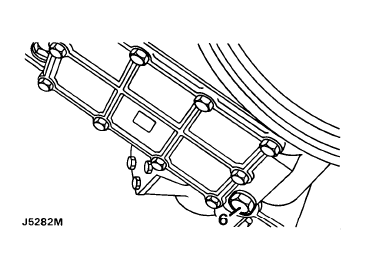
A break down of the parts you will enconter
The two heads you will get machined hopefully

The intake manifold

Intake manifold with valley pan gasket still attached

New distributor cap and wires, rotor is underneath

Total length of project: ~3 Weeks (this was working on it two or three times a week for 1-2 hours) So approximately 12-15 hours
Thank you to everyone that contributed to this project! The resources online are unbelievable and I encourage anyone attempting this job to read as much as possible before they perform it.
So before I get into the problems I ran into let me first go through the most useful tools and equipment I used on this project:
- In search of the experience DVD – this DVD includes a pretty thorough explanation of the entire procedure and covers all of the common questions asked during the job as well as much much more. I strongly recommend this DVD to anyone that has to do this job and is not a practicing mechanic. LINK
- Breaker Bar aka the tire changing pipe in the set that comes with each Disco
- Bottle Jack – I love this jack more than anything, was useful for the exhaust removal and refitting.
- Pry Bars – bought a set of 3 different sizes, extremely useful to get those hoses off
- Camera – I was nervous about unplugging every wire and pulling a lot of the hoses off but it was reassuring knowing that most of the connections were documented and were there for reference. I marked nothing while taking things off though, everything goes back together pretty simply if you just use some common sense.
- Swivel adapters – instead of buying a huge set of swivel set sockets I just bought the adapters that turn any socket into a swivel.
- Torque Wrench – friend lent me his, crucial.
- Magnetic pick up tool - figure it out haha
- Gold sharpie – for marking head bolts for the 90* rotations
- Right Stuff – the best RTV out there
- Rail of Sockets – both SAE and Metric, obviously a � inch drive ratchet wrench for them
- RAVE – gotta love it
- Fan clutch tool – just for taking the fan off
- Brake parts cleaner – different from carb cleaner and stronger, probably went through 10 cans or so, my car was filthy.
- Ziplock bags – place all your bolts in them and label them specific to the parts they go to, made assembly so easy and felt great throwing them away
Specific sockets needed –
- 12 point 5/16th – the valve/rocker covers require this
- long 13/16th – spark plug removal and placement
- 5/6 – Invest in an impact socket for this because this will be used for the head bolts
- Socket extensions – so incredibly valuable
Things replaced -
Head gaskets obviously, valley pan gasket, valve cover gaskets, water pump gasket, distributor cap and rotor, wires, fluids, valve seats, exhaust manifold gaskets exhaust manifold to down pipe gaskets, spark plugs, thermostat and gasket for it
A general summary of the steps I took
1) Take apart top of engine up to Air box and Plenum (Hex bolts)
2) Drain coolant
3) Take apart front of engine, Remove fan, front of water pump (didn’t remove the whole thing and left the distributor in there also, Power steering fluid pump, alternator, tensioner, Ac/Heat pump. The Ac/heat pump is on the same bracket as the alternator so I only removed the alternator and left the bracket in the engine bay so I didn’t have to deal with unscrewing the AC hoses.
4) Take Exhaust manifolds off
5) Take intake manifold, rocker arms, push rods and heads off. When you remove the rocker arms off place them on the side of the car that they are from, also keep the front of the arms towards the front and the rear towards the rear. Also keep the push rods up and down the same way they were in the car.
6) CLEAN EVERYTHING, machine heads, valve jobs, all mating surfaces, pour a quart or two of cheap oil into the engine just on top of the cam shaft to pull any nasty stuff down! Call your local land rover dealer to find out where they send their heads to get them machined.
6.5) If you have a D1 it is likely that your heads have the old style of exhaust valves. There is a small undercut in the newer ones that prevents sticking. It is your choice if you want to spend the additional $130 here to replace all 8 exhaust valves. Online is the cheapest, dont buy from the dealership because it's like $80/valve.
7) I changed the rotor and the distributor cap at this point also. Not everyone will have a distributor. The easiest way to remove an old rotor is to remove the cap take a flat head screw driver place it at 90* above the old rotor (so it doesnt slip off and damage what's below the rotor) hit the top of the screwdriver with a hammer and the rotor should chisel right off.
8) Torque down heads Make sure to put some tape over the exhaust and intake ports now so that you don't mess up the whole job by letting something go through those ports. Make sure to coat the head bolts with oil before putting them into the threads. Finger tighten to make sure you don't go over the torque specs with a ratchet. Long bolts go in the middle three.
9) Push rods and rocker arms. Make sure they are seated in the lifters and the rocker arms above! Torque down the rocker arms.
10)Valley pan (mine fit better one way than it did another way so apparently there is a front and a back, make sure you try it in both ways before you put the end clamps on. Dont forget to fill the small divet on both sides of the end seals with RTV before you put them in.
11)Intake manifold, end clamps. Both have torque values. I would also replace the thermostat and gasket at this point.
12)Valve covers with new gaskets and RTV. Exhaust manifold with new gaskets. Plenum with just RTV.
13)Front of engine, air box/MAF, fan, oil change, coolant, plugs and wires, battery
14) Check for no tools in engine bay and secure anything small around that might fall into engine bay.
15) Pray.
16) CRANK THAT ****!
17) Cry out of happiness well or it doesnt start so sadness. Make sure to check you have fuel (purge valve on the rail), spark.
18) Check coolant levels, bleed system
19) Change oil in a day or two after driving to get any of the remaining crud out.
Problems that were faced and defeated:
Brittle wires and plugs – In a 94 everything you touch will fall apart, you will not be able to find a new wire harness easily so be nice to your current one or you will end up with ripped wires and a sad face
Gross engine – power wash the bottom of your car before you do this job it will make things much cleaner and you won’t be crying when dirt goes in your mouth and eyes.
Firing order Sequence/diagram – Make sure to take note of your original sequence before you remove your wires. The one I saw online as well as in the Rave were both incorrect for my model. I found one on page 67 of the RAVE for the 3.9 and it made everything turn out beautifully.
Exhaust manifold not lining up – When placing the exhaust manifold back on I suggest removing the manifold from the rest of the exhaust for two reasons. You can replace the gasket in the connection there and you can handle the exhaust manifold much easier after that. Oh and you can check for cracks in your exhaust manifold which is a common problem in our cars. One hole in the manifold didn’t line up exactly once I began screwing in the bolts. Make sure you screw everything in finger tight before you start using a socket wrench, if you feel resistance use a socket but only if are sure the bolt will not strip the threads.
Useful tips:
The bottle jack was very handy for getting the exhaust back in place, push it in between the exhaust and the body of the car and maneuver it which ever way you need to
Torque method for the heads is 15nm then 90 degrees then another 90 degrees as per rave and head gasket directions. To clarify you do all the bolts to 15nm then all bolts 90* then another 90* following the sequence each time.
Write down torques for everything before you begin to keep your laptop clean and so you don't have to interrupt your progress.
Intake manifold and head gaskets are the only components that have a sequence to them during this job. Everything else needs to be tightened evenly.
Have a competent helper there, not only is it reassuring knowing that someone is there to help you lift the heavy bits its also daunting to do this alone so a friend really helps.
Place everything in the back of your truck and try to be as organized as possible. An organized work area will lead to a well done job! Keep your radiator fan vertical also, I’ve heard so many things about the fan messing up if laid down…
Another very well done write up: http://www.discoweb.org/forums/showt...ferrerid=18051
A compilation of problems and solutions that other people have written about on other threads and forums. Thanks to Tugula from DiscoWeb for this file! Also attached to this post LINK
Summary:
All in all the job was a lot of fun! Spreading out over a few weeks time made it much easier to do and much less stressful. You could get it done in two days if you really set yourself on it. Looking back at the entire job I regret nothing and saving a $1000 really feels good. Especially now that I know I can fix anything on this discovery. Thinking about the job now and how loose everything was (especially the head bolts) while taking it apart I don’t believe that the head gasket was the direct cause of my coolant leak. It seems that having a loose bolts doesn’t do wonders for an engine. Everything works beautifully now and the engine runs smoother and quieter than ever. So no cracked headbolts, no stripped threads, no broken fingers, and no major surprises. How can a head gasket job go soo smoothly?!?! Well there was one hiccup. Right before we started the car up we removed the radiator expansion cap and placed it right on the top of the radiator. When the car started up the cap rolled into the engine bay, hit one of the fan blades, shot across the garage, the fan blade broke off and lodged itself in the serpentine belt, which lead to a very loud squeaking noise. It took us a minute to piece together what happened but everything and everyone is okay, just have to replace those two items now.
Good luck to everyone that is doing this job
! Relevant pictures that I used are below...
Serpentine belt path
Firing order for 3.9 and 4.0
A break down of the parts you will enconter
The two heads you will get machined hopefully
The intake manifold
Intake manifold with valley pan gasket still attached
New distributor cap and wires, rotor is underneath
Last edited by losinov; 03-20-2011 at 11:56 PM.

#3
03-16-2011 | 02:03 PM

Recovery Vehicle
Joined: Aug 2009
Posts: 851
Likes: 0
From: Golden, CO
#4
03-16-2011 | 02:38 PM
Thread Starter
|
Rock Crawling
Joined: Aug 2009
Posts: 395
Likes: 28
From: C'Ville, VA


#7
03-19-2011 | 06:14 PM
Thread Starter
|
Rock Crawling
Joined: Aug 2009
Posts: 395
Likes: 28
From: C'Ville, VA
You can contact Will Tillery at willtillery@roverguy.com for all the gaskets you might need plus the head bolts. This will be about $180. You will also need a water pump gasket. You might want to do spark plugs, wires, caps and rotor, I'm not sure if you even have a distributor though. He will also need all the torque specs and the sequences found in the RAVE. In terms of hours... this job is supposed to take 11-13 hours per the rave manual. I have heard quotes of $1500-2500 for a shop to do this.
#8
03-19-2011 | 06:47 PM

Baja
Joined: Sep 2007
Posts: 5,232
Likes: 51
From: Georgia, USA
I'm sure a lot of people will find your writeup useful.
A couple of things I noticed.
One typo: "5/6 – Invest in an impact socket for this because this will be used for the head bolts"
Also, I'd remove the photo of the push rods and rockers. The push rods should be kept in order when removed so they can be refit to their original locations.
A couple of things I noticed.
One typo: "5/6 – Invest in an impact socket for this because this will be used for the head bolts"
Also, I'd remove the photo of the push rods and rockers. The push rods should be kept in order when removed so they can be refit to their original locations.
#9
03-20-2011 | 07:23 PM
Thread Starter
|
Rock Crawling
Joined: Aug 2009
Posts: 395
Likes: 28
From: C'Ville, VA
I'm sure a lot of people will find your writeup useful.
A couple of things I noticed.
One typo: "5/6 – Invest in an impact socket for this because this will be used for the head bolts"
Also, I'd remove the photo of the push rods and rockers. The push rods should be kept in order when removed so they can be refit to their original locations.
A couple of things I noticed.
One typo: "5/6 – Invest in an impact socket for this because this will be used for the head bolts"
Also, I'd remove the photo of the push rods and rockers. The push rods should be kept in order when removed so they can be refit to their original locations.
As far as the photo goes, i'll just leave it up so people can reference what the arms and push rods look like. I didn't realize that it mattered to put them back into their original slots. I believe the most important things to keep the same are the orientation of the arms front to front and rear to rear as well as the push rods, up and down the same way. They should be interchangeable though when talking about which lifter they are seated on. But if you are worried you can certainly keep them in the exact order as before. Wouldn't hurt at all
#10
03-20-2011 | 07:47 PM
Baja
Joined: Sep 2007
Posts: 5,232
Likes: 51
From: Georgia, USA
Every manufacturer I've ever seen says keep them with the associated lifters when not replacing with new.
I suggested deleting the photo as it's misleading to someone not familiar with the process as it appears mixing them up is appropriate.
If you want I can post a photo of a set I have in a storage block to maintain correct order, so people can see what they look like.
I suggested deleting the photo as it's misleading to someone not familiar with the process as it appears mixing them up is appropriate.
If you want I can post a photo of a set I have in a storage block to maintain correct order, so people can see what they look like.