Front brake pads servicing


Thread Starter
|
Banned
Joined: Feb 2011
Posts: 373
Likes: 1
From: Enfield NH
Front pads just gave out last night so here's my next project: replacing all front brake pads. I've don't pad replacing on my former 97 mercury grand marquis, but never on a SUV. Any word of thoughts or proper procedures or special tools needed to do the job?


Mudding
Joined: May 2011
Posts: 173
Likes: 1
Well, I think the Rover axle is a little bit of a pain because you have to disassemble the hub to remove the rotor, but it's not that hard.
You should have a 53mm or 2 1/16" socket tool to remove the hub nut. Land Rover parts dealers sell tubular steel tools for less than a proper cast socket. I don't know if the regular socket would fit or not.
You also need the joint washer, the hub inner oil seal, a new lock washer, the pad retaining hardware, the pads, and depending on the condition of your rotors, you will either be able to turn them or have to replace them.
While you're doing the job, you may consider replacing the bearings. The only additional thing you would need are the bearings themselves.
When I remove the calipers, I like to clean the caliper bolt threads with a die and the hole threads with a tap and use brake parts cleaner. I'm guessing the caliper bolts are 10mm x 1.25 JIC, but it's a totally wild guess. With clean threads, the thread locker will work well. I use threadlocker. If you work the brakes often it's better to use anti-seize or make a little of your own with graphite and petroleum jelly (everyone has vaseline and pencil lead, even in the bush, so why ever have a frozen caliper bolt?). It's also worthwhile to take the time to bleed the brake lines while you're there.
I should qualify my advice with the fact I haven't actually done the job yet. I'm just contemplating it like yourself. Best wishes...
Recovery Vehicle
Joined: Feb 2010
Posts: 1,062
Likes: 23
From: West Chester PA
If you just mean pads search the forum. Al disco just asked this same question. It's super easy. Takes 15 min per side if that. Pads slip into the calipers. The calipers don't have to come off
Mudding
Joined: May 2011
Posts: 173
Likes: 1
I would change pads and leave the rotors on a race car with 300 laps. You have a street car with 196,000 miles, completely worn out pads, and no idea the condition of the rotors. I would plan on removing them and replacing them with new. If you find that they've been replaced previously, you may be able to turn them but it could depend on their condition and type. Not all rotors can be turned.

Mudding
Joined: Apr 2009
Posts: 102
Likes: 1
If you have access to a caliper, measure your rotor, should be within spec. If not, you need to replace the rotors as well as the pads. You didn't mention whether or not your old pads were down to the metal, if so, then you pretty much need to either turn your rotors or replace with new. I'm assuming that you will be using this as a Daily Driver, I would highly recommend changing pads/rotors at the same time, just so YOU know all is good with your brakes. Plan on doing a brake fluid flush with a new bottle of DOT 4 to finish off the job right. It might also be a good time to consider checking/replacing your rear brakes as well.

Administrator
Joined: Apr 2006
Posts: 25,707
Likes: 108
From: Denver, Colorado
If you haven't serviced the bearings in the last 30,000 miles you will need to do all 4 wheels, either repack or replace them along with your pads, then do a full 2 quart, DOT 4 brake flush to finish it off.

Baja
Joined: Mar 2010
Posts: 5,584
Likes: 7
From: Pittsburgh PA suburbs.
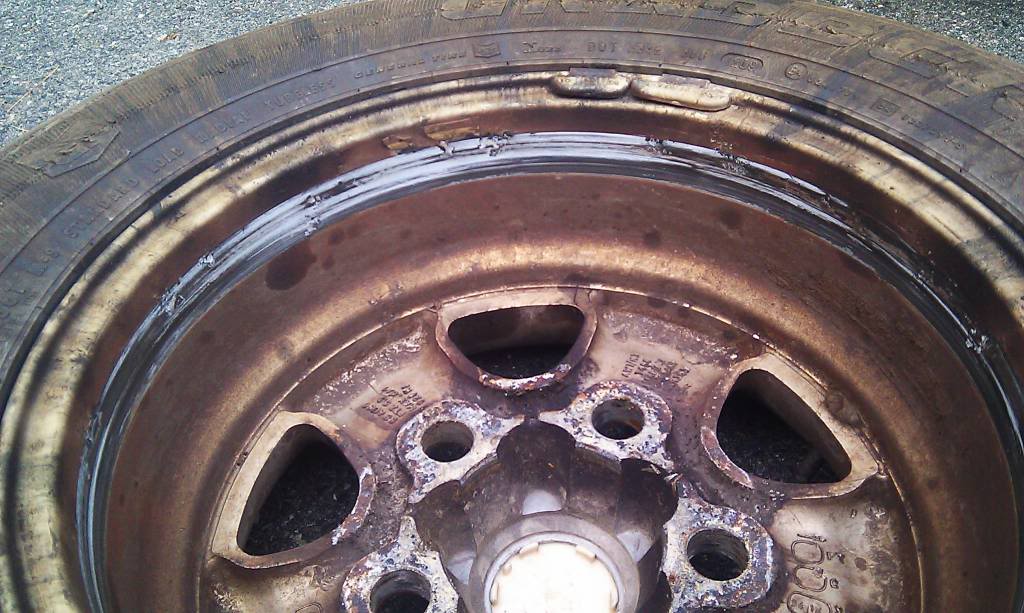
The original Discovery rotors are a finned variety in the center for heat dissipation and as such they do not reccommend turning these rotors. They were not intended to be turned.
Shadow Merchant:
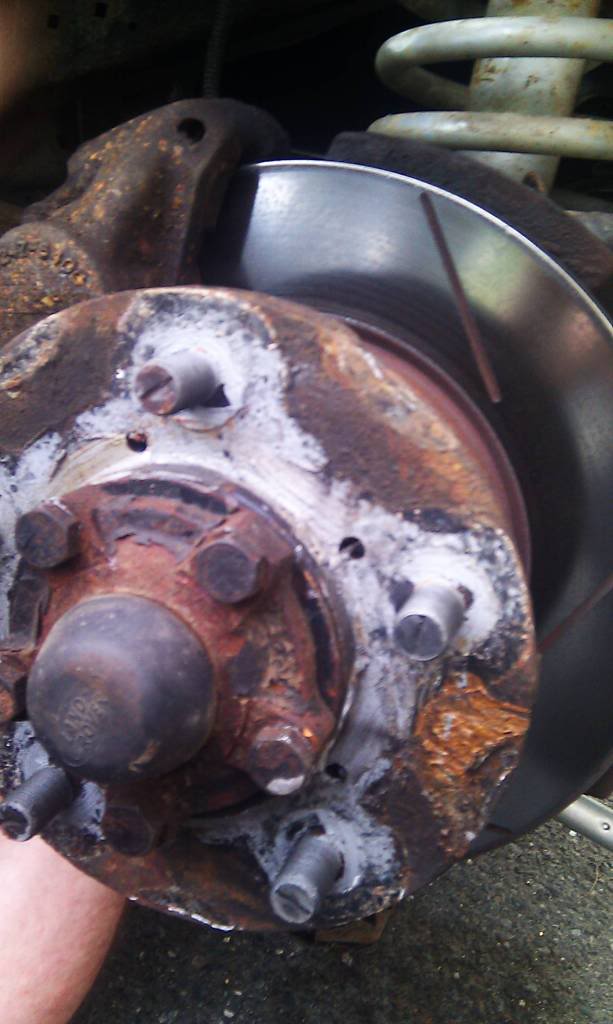
Seeing as how your 98 has almost 200k on it and you said the front brakes failed last night, I doubt you can get by with just pads. I would strongly advise that you be prepared to replace the rotors and pads and wheel bearing as well. You will need the hub nut socket to make the job easier. You will also need the bearings, grease seals, the gasket (paper hub gasket,it's cheap) I like to get new lock washers as well even though you may get by with reusing them, bearing grease to pack the nw bearings. You will need a drift or good punch to remove the old bearing races. If the bearings in there are good, you can clean them and repack them and leave the old race in place, if you put in mew bearings, you should also rewmove the old races and install new ones since the old ones are worn to fit the old bearings. If you do not replace the bedarings, make sure to keep them in the same wheel they are in and not do both at once and inadvertently swap them.
I also got all new mounting bolts for my rotors, new caps for the hubs, new caliper mounting bolts as well because my old ones were in terrible shape. I had to replace the calipers as well as the pads and rotors on the rear of mine and new pads and rotors on the front. My front calipers were still good.
You should also buy the new "fitting kit" it has new springs, pins, clips, (all the little goodies). My old springs were really rusty. The fitting kit is cheap and makes it a lot simpler reassembling with all new hardware.
It is DOT 4 fluid. You should get a Turkey Baster and suck out the old black fluid from the brake fluid reservoir. Brake fluid is clear when clean, black means NASTY. So be prepared to drain the fluid. You will need to bleed it even if you do not totally drain and change it to get the air out for the brakes to work properly.
First time thru on an old high milage Discovery can be a tough job depending on the conditions you encounter. I have read about people having to actually beat the old rotors off to get them separated from the vehicle even after removing the hub nuts. I did not have to, but they can seize in place if they have been on there a long time. So do not underestimate the effort. It can be nasty, just work your way thru it.
Better to start with everything on hand than to be stranded with the thing almost apart but needing something that you did not order. A lot of the small stuff may not be available locally.
Look at AB, Rovers North, and RovahFarm and see who has the best deal currently and buy all the little stuff as well. I used the Rovers North pad and rotor kits for both front and rear. They are roughly 100 bucks per axle for the rotors well as the pads.
I do not recall the part number , but there is a double lip seal used on the Defender that is said to be much better than the standard single lip seal if you plan to do any off-roading. If you do a search on hubs you will see it listed.
Take your time and do a thorough job. After all brakes are not the area where you want to be cheap, but you do not need to buy cross-drilled slotted rotors or fancy colored caliper either.
Shadow Merchant:
Seeing as how your 98 has almost 200k on it and you said the front brakes failed last night, I doubt you can get by with just pads. I would strongly advise that you be prepared to replace the rotors and pads and wheel bearing as well. You will need the hub nut socket to make the job easier. You will also need the bearings, grease seals, the gasket (paper hub gasket,it's cheap) I like to get new lock washers as well even though you may get by with reusing them, bearing grease to pack the nw bearings. You will need a drift or good punch to remove the old bearing races. If the bearings in there are good, you can clean them and repack them and leave the old race in place, if you put in mew bearings, you should also rewmove the old races and install new ones since the old ones are worn to fit the old bearings. If you do not replace the bedarings, make sure to keep them in the same wheel they are in and not do both at once and inadvertently swap them.
I also got all new mounting bolts for my rotors, new caps for the hubs, new caliper mounting bolts as well because my old ones were in terrible shape. I had to replace the calipers as well as the pads and rotors on the rear of mine and new pads and rotors on the front. My front calipers were still good.
You should also buy the new "fitting kit" it has new springs, pins, clips, (all the little goodies). My old springs were really rusty. The fitting kit is cheap and makes it a lot simpler reassembling with all new hardware.
It is DOT 4 fluid. You should get a Turkey Baster and suck out the old black fluid from the brake fluid reservoir. Brake fluid is clear when clean, black means NASTY. So be prepared to drain the fluid. You will need to bleed it even if you do not totally drain and change it to get the air out for the brakes to work properly.
First time thru on an old high milage Discovery can be a tough job depending on the conditions you encounter. I have read about people having to actually beat the old rotors off to get them separated from the vehicle even after removing the hub nuts. I did not have to, but they can seize in place if they have been on there a long time. So do not underestimate the effort. It can be nasty, just work your way thru it.
Better to start with everything on hand than to be stranded with the thing almost apart but needing something that you did not order. A lot of the small stuff may not be available locally.
Look at AB, Rovers North, and RovahFarm and see who has the best deal currently and buy all the little stuff as well. I used the Rovers North pad and rotor kits for both front and rear. They are roughly 100 bucks per axle for the rotors well as the pads.
I do not recall the part number , but there is a double lip seal used on the Defender that is said to be much better than the standard single lip seal if you plan to do any off-roading. If you do a search on hubs you will see it listed.
Take your time and do a thorough job. After all brakes are not the area where you want to be cheap, but you do not need to buy cross-drilled slotted rotors or fancy colored caliper either.
Last edited by Danny Lee 97 Disco; Jun 2, 2011 at 05:06 PM.
Thread Starter
|
Banned
Joined: Feb 2011
Posts: 373
Likes: 1
From: Enfield NH
First off as always my budget is tight. As for my rotors, they are aftermarket slotted rotors. I got the passenger side wheel off and learned that the pads have plenty of life left, the rotors will do for now... It's the lower caliper mounting bolt that was the issue. In fact the bolt managed to slip out completly leaving the lower end of the caliper un mounted. As a result every time I stepped on the brakes the lower end of the caliper would POP up and grime against the the inside of the rim. For now i removed the upper mounting bolt and inserted it in the lower hole so to secure the caliper. This way when I step on the brakes while in drive gear the caliper will not POP out and grind the rim. Just have to be careful when braking while in reverse. This tempo fix must hold until I buy the bolts.
PS. Guess all you need to do to replace the pads is remove the 2 caliper bolts, remove the caliper and replace the pads.
PS. Guess all you need to do to replace the pads is remove the 2 caliper bolts, remove the caliper and replace the pads.