
Light switch??


Thread Starter
|
Overlanding
Joined: Jan 2011
Posts: 16
Likes: 0
the headlight switch is not even close to the intricacy of the seat switch, the seat switch will take most people a good hour just to put back together (even being careful) the light switch can usually be removed, cleaned, and reinstalled in about half that time. I agree that sometimes it can be cleaned up but not always (and sometimes it doesn't last long) one downside to cleaning it is you will clean off all the dielectric grease which is pretty necessary to its operation, so you may want to get some to replace it. Be sure to check the wires in the plugs as sometimes they can be the problem.
I don't know how much you are spending on a new/used switch but if you are interested I can give you a pretty cheap fix (under $20)
I don't know how much you are spending on a new/used switch but if you are interested I can give you a pretty cheap fix (under $20)
Whats the fix for under $20 Rover chris??

Recovery Vehicle
Joined: Dec 2008
Posts: 1,175
Likes: 9
From: Chandler,AZ
I strongly suggest you test these wires your self, but you will need a 30-40 Amp 12-24 volt SPDT relay, the most common is Bosch but it doesn't need to be, they roughly cost a couple bucks each but some stores can charge quite a bit for them. you will also need a meter or test light, a few wires, and some connectors (t taps, male spades for the t taps and female spades for the relay terminals)
The relay will have 5 terminals on the bottom and they will be labeled 85,86,30,87, and 87a. You will connect them as follows 85 will go to ground (any bare metal under the dash should be fine) 86 is your trigger wire and is going to connect to the wire that gets power when the headlights come on (I would test the blue wire going into the switch, if that does not work test the blue/red or the blue/white). 30 is going to connect to a power source, I would use the brown/purple wire at the switch as this is the wire that is intended for this use. 87 is going to connect to your parking light/dash light circuit which is the small red wire. 87a will not be used.
basically so you understand what is going on here the relay is a switch that operates using a "trigger" instead of your finger and basically we will be applying power to the wire that loses power (dash/tail lights) through our relay and we will be using the headlights to open and close the relay(flip the switch). Once the relay is installed this will be done automatically and you will never have to worry about it again.(not sure if this will make sense to you or not).
here is a diagram of the harness going to the headlight switch so you can see where the wires you need are and there colors.
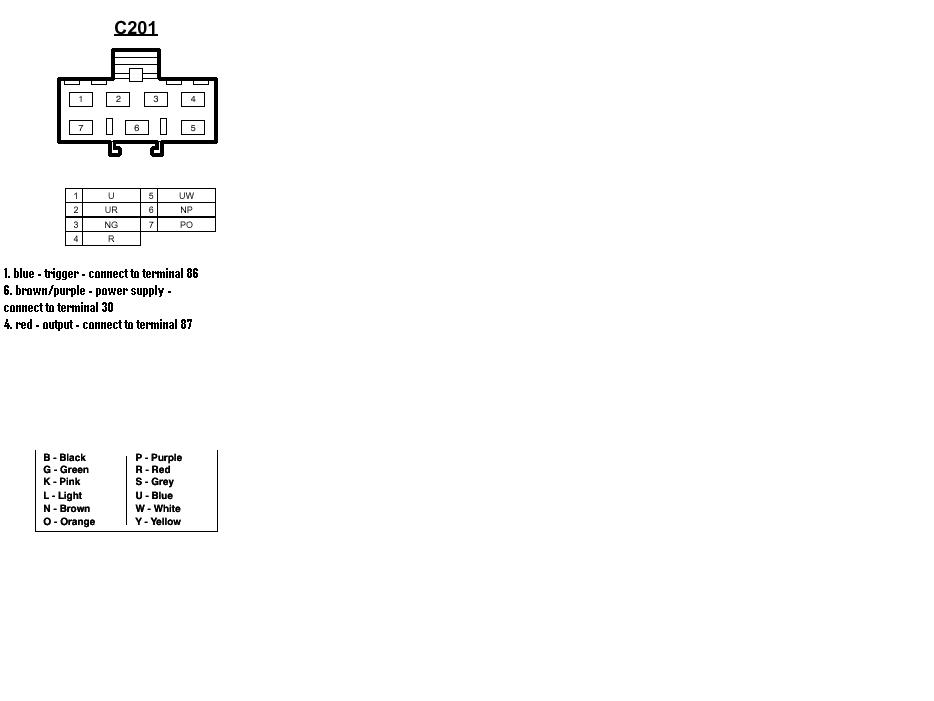
Recovery Vehicle
Joined: Dec 2008
Posts: 1,175
Likes: 9
From: Chandler,AZ
just thought I would add this as I wrote it up for another post, it may help anyone who is messing with the switch. Use it with the plug diagram above
1. Blue - this wire is the output to your fog lights when the head lights are turned on
2. blue/red - this wire is the output to your low beams
3. brown/green - this wire is the input power wire for your side lamps/gauge lights
4. red - this wire is the output to your side lamps/gauge lights
5. blue/white - this wire is the output to your high beams
6. brown/purple - this wire is the input power for the fog lights, low beams, and high beams.
7. purple/orange - I am not sure on this one, it lists horns but I think it may only be for base model trucks, needless to say you shouldn't need to mess with it if it is there.
Recovery Vehicle
Joined: Dec 2008
Posts: 1,175
Likes: 9
From: Chandler,AZ
bottom of the clamshell (plastic shroud around steering column) there are a few recessed screws, remove those then CAREFULLY pry the 2 halves of the clamshell apart, this will give access to the switches and the ignition module, the headlight switch is held on by I think 2 screws and it sits in a locking dock thing that it has to be snapped out of, I don't remember exactly how it came out but if you are careful and examine it you should be able to figure it out. I do remember a few of the screws were a PITA to get out, may need a right angle screwdriver for the tight spots.
in order to do my method though you don't need to remove the switch, just get access to the plug and unplug it, then you are just attaching wires.
in order to do my method though you don't need to remove the switch, just get access to the plug and unplug it, then you are just attaching wires.

Baja
Joined: Mar 2010
Posts: 5,584
Likes: 7
From: Pittsburgh PA suburbs.
What is the secret to getting the switch housing apart? I took the four screws out, the rear cover came off from around the contacts, but I could not get the switch housing apart to get to the contacts. I sprayed it heavily with WD40, but I still get the same problem. I did read good continuity thru the contacts, but not really sure what the pins werre so not 100 percent sure if it is the switch.
Also, the connector housing was discolored from overheating at the red wire at the top. Don't the spade connectors release from the housing somehow? I thought there was a little lock tab to depressbut had no sucess getting the spades out of the housing either to clean them.
I looked at the taillights, they look clean, I did notice a trailer plug and two purple wires with spade lugs on them, I touched them together and got an arc. I guess these were power leads for a trailer hookup? Maybe they had been hitting the chassis and drawing some heat thru the switch. I taped them off to prevent any furthe shorting. Was wondering about disconnecting them somewhere.
I found the schematic in the Power Distribution portion of the electrical t/s manual. I had printed and cataloged most of it when I first got my Discovery. Need to study the rest of the circuit.
If I go with the added in relay, like Rover Chris recommends, is that just tapped in to the existing wires?

Thread
Thread Starter
Forum
Replies
Last Post
abran
Retired - Private For Sale/Trade Classifieds
0
Aug 5, 2014 06:13 PM
AZRover
Retired - Private 'Wanted' Classifieds
1
Jul 2, 2012 06:43 PM
angasreid
Discovery II
5
Nov 16, 2006 11:40 AM