4.6/hp24 into 4.0/hp22
#81
 07-02-2015, 11:24 AM


Yeah, I had never heard of a crucifix seal but I have ordered them now since I am taking the crank out for polishing.
ANCHOR BOLTS?! "Through Bolt Gal M16x125 20qty | Better Hardware - Trade Quality Supplies At Lower Prices." Awesome find. I think the stainless would be best...
Well, of course, finding them in the US is close to impossible. Here are Zinc version (17 bucks for 5): http://www.ebay.com/itm/ForgeFix-Thr...item1c553214c3. I don't know what zinc would do to the heads... have to check that. Ugh.
Last edited by Charlie_V; 07-02-2015 at 11:57 AM.
#82
07-02-2015, 11:46 AM
#83
07-02-2015, 11:58 AM

Super Moderator
#84
07-02-2015, 12:25 PM
The 4.6 hose setup is a little different than my 4.0. This is what I was going to order: , , and , along with a .
Now I am getting: ,
, ,
, and the . I guess I still need the upper hose... well, maybe I need to study this some more. EDIT; School is for fools so I just ordered it all. Whatever.
Looks like this will work fine on the 4.6.
Also, for completenesss, I got a new and
.
Last edited by Charlie_V; 07-02-2015 at 01:16 PM.
#85
07-02-2015, 12:47 PM
Germane to the original idea of this thread I also swapped the instrument pod from the 03--MISTAKE. Though it was a perfect fit and looks much more snazzy than the old (2000) one, the odometer flashes now, and when I swapped my old one back in, it flashes, too. I'm not concerned about resale but it looks like I'm an odometer crook now and I've added 20k to the clock because it shows the 03's mileage. Apparently, both the pod and computers track mileage and if there is a disagreement they basically call you a crook. I drove a bit and miles still accrue, but it continues to flash.
The 03/4.6 has better heat shielding throughout than a 00/4.0, but it all swaps perfectly (existing holes and bolts); it is aluminum rather than foil over hard foam. The shielding behind the engine (which my 4.0 lacks completely) would make it basically impossible to do anything with the coils, fuel line, or the upper transmission bolts without pulling the engine mounts and lowering it, but I will probably use it anyway.
The 03/4.6 has better heat shielding throughout than a 00/4.0, but it all swaps perfectly (existing holes and bolts); it is aluminum rather than foil over hard foam. The shielding behind the engine (which my 4.0 lacks completely) would make it basically impossible to do anything with the coils, fuel line, or the upper transmission bolts without pulling the engine mounts and lowering it, but I will probably use it anyway.
Last edited by Charlie_V; 07-04-2015 at 08:36 AM.
#86
07-02-2015, 01:12 PM
So for anyone wanting to know what this all costs...
Total cost so far is 900 for the 03 Rover, plus about 300 in parts and HG kit from AB, cruciform seals (4 bucks for 2), 270 for the things listed immediately above, and the priceless emnity from my wife for trashing up the driveway. I've also bought some canned cleaners and rags. I bought a transmission jack and aluminum 4 ton jack, too, but I am not counting the cost against this project because I will use them for others. So I am at about 1500 so far.
What I have gotten so far is the 4.6 engine, hp24 transmission, all seals/gaskets (door and windows), all 4 door locks and window motors, and the dash pod (MISTAKE!!!!), plus some little plastic doo dads that are hard to find like the caps for the windshield washer arms, wind deflectors fore and aft (I don't need them now, but they are expensive when I do).
My buddy has the transfer case and front driveshaft, and the y-pipe. He is also taking the door panels and other interior bits (including three rows of seats, good carpet, dash, and console) to spruce his up.
So far a win win.
What I have left to do on the engine is the heads, crank, and reassembly. Cost for redoing the critical engine bits will be about 200. I also need the plugs for the SAI (maybe 30 dollars at most). I;m enthralled by high performance cams, but I have so much on my plate I will save that for later.
Monday is my drop dead date forgetting the 03 OUT of the driveway and is the date I will be dropping off the engine components, so I will be pulling some more things off of it before then, hopefully including the axles and everything attached (hubs, wheels, steering and drag link), the ABS modulator, etc. Whatever is still on it by Monday will be going to the boneyard. I still need a good plan to put this thing on a trailer without axles.... and all of my plans so far sound shakey---put on wood block, back trailer under it, drag across pristine concrete with winch, lift hull with engine crane.... not looking good. Then, after a rest, I will start carefully removing the 4.0 engine, transmission, and transfer case to make room for the new stuff.
VERY BIG QUESTION: DOES ANYONE KNOW FOR A FACT WHETHER I HAVE TO CHANGE MY TRANSMISSION CONTROLLERS (since I am going to hp24 from hp22)??????
Last edited by Charlie_V; 07-02-2015 at 10:45 PM.
#87
07-02-2015, 10:55 PM
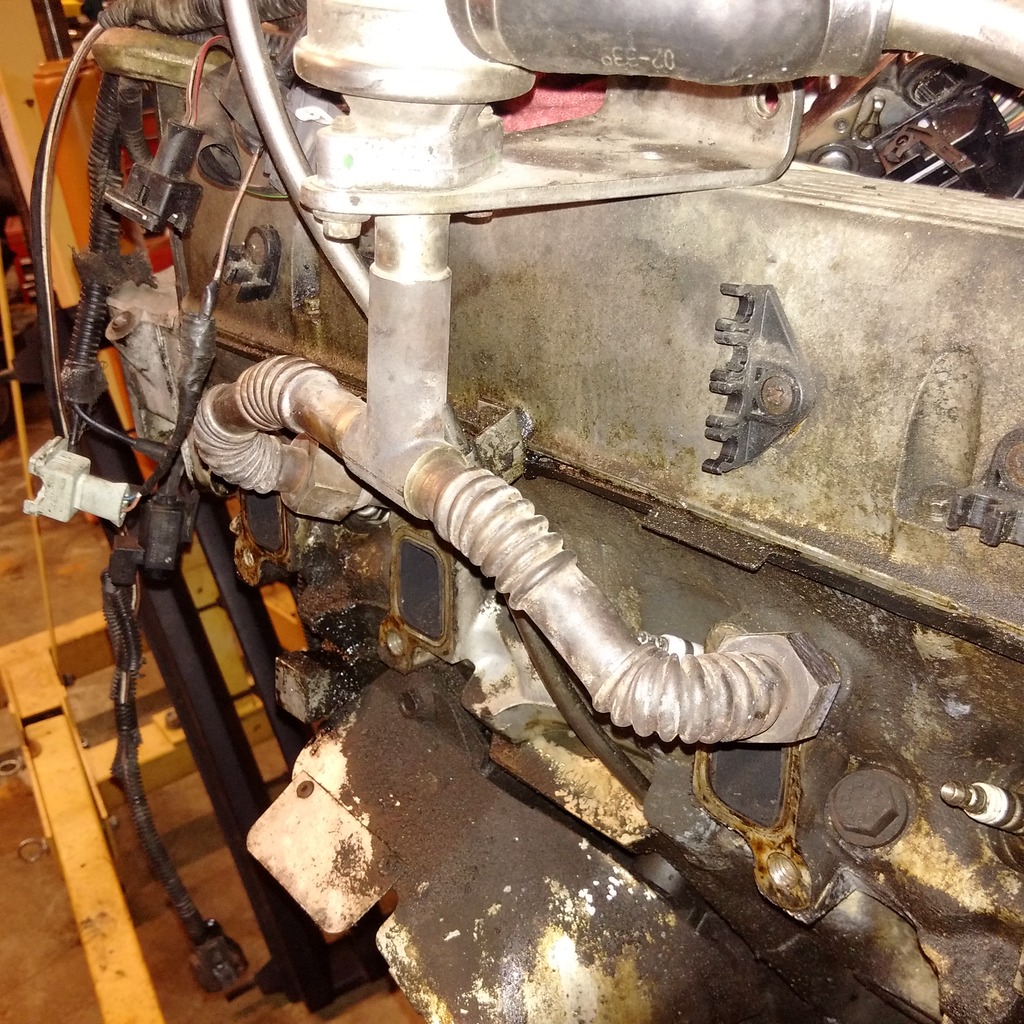
I have struck out on finding an off the shelf bolt for the four SAI holes in the heads. The only options seem to be the concrete anchor mentioned on the previous page or chance an oil drain plug. Both are non US items. The first requires me to fab some and the second might not work.
So I'm forging ahead.
Here is a picture of the SAI assembly on the heads. The corrugated pipes.
I cut them. The metal is super soft and thin.
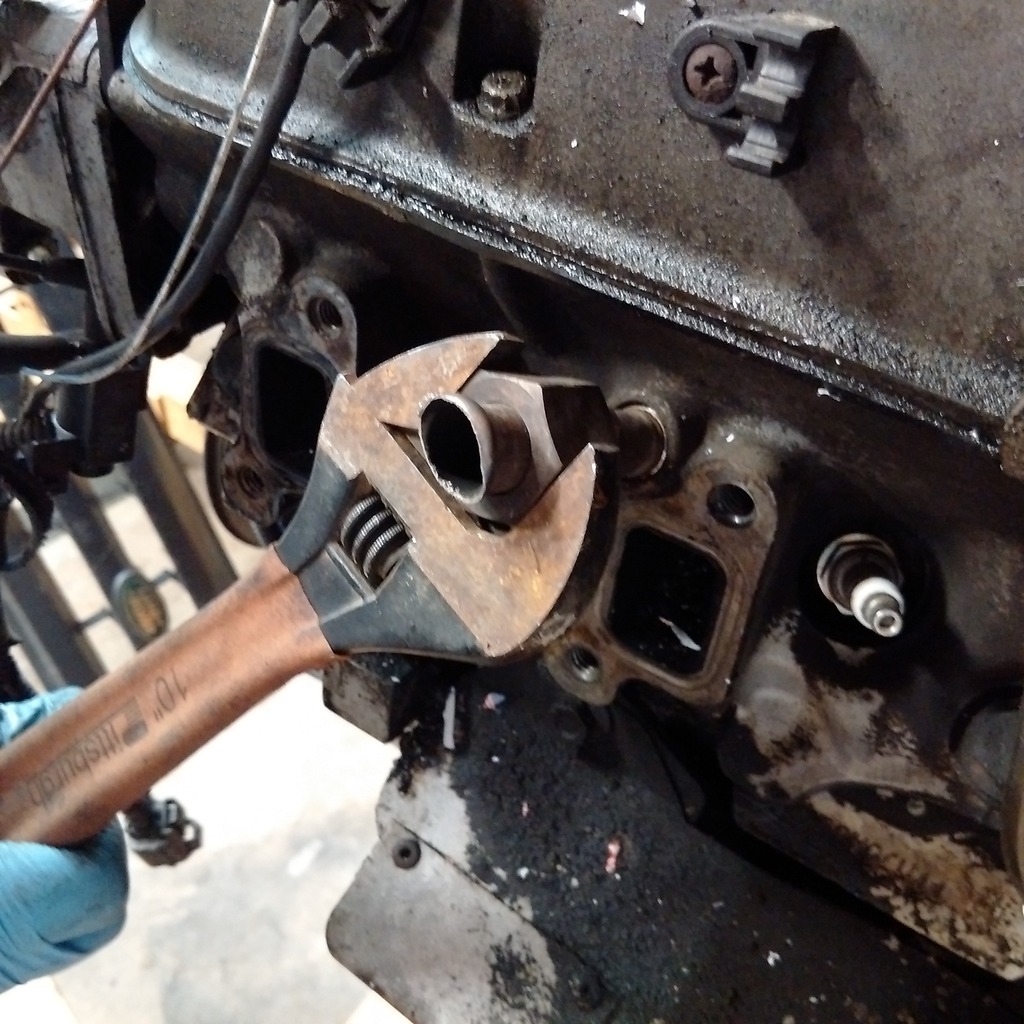
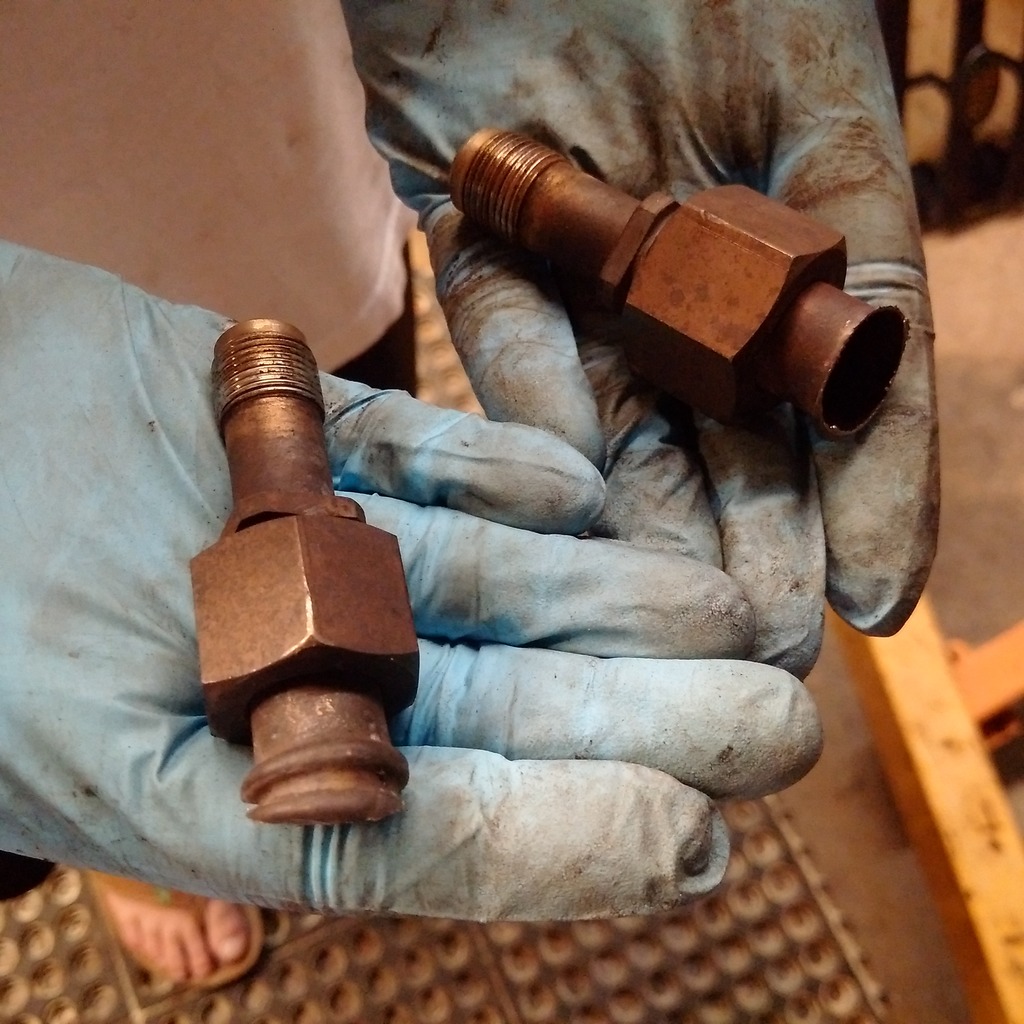
They came out very easy. I didn't try to separate the compression nut because I want the whole thing, so there is no way to take them off without cutting (can't spin the whole assembly). This is what they look like.
I would not cut them unless I was taking the whole engine apart because it puts metal shaving in the head.
I don't know whether you can see in the pictures but the end of the bolt portion is tapered and sits against a surface in the heads for a tight seal. So a replacement bolt would have to be very precise to provide the same seal. I'm taking these to a fab shop tomorrow to either get them filled or duplicated as bolts. They are so soft I wonder if they aren't brass. In any case if I strike out at the fab shop I'll just swap the heads for my old 4.0 ones. I just hate to not use these heads.
So I'm forging ahead.
Here is a picture of the SAI assembly on the heads. The corrugated pipes.
I cut them. The metal is super soft and thin.
They came out very easy. I didn't try to separate the compression nut because I want the whole thing, so there is no way to take them off without cutting (can't spin the whole assembly). This is what they look like.
I would not cut them unless I was taking the whole engine apart because it puts metal shaving in the head.
I don't know whether you can see in the pictures but the end of the bolt portion is tapered and sits against a surface in the heads for a tight seal. So a replacement bolt would have to be very precise to provide the same seal. I'm taking these to a fab shop tomorrow to either get them filled or duplicated as bolts. They are so soft I wonder if they aren't brass. In any case if I strike out at the fab shop I'll just swap the heads for my old 4.0 ones. I just hate to not use these heads.
Last edited by Charlie_V; 07-02-2015 at 11:15 PM.
#88
07-03-2015, 08:19 AM
Doing a little research this morning to figure out what else I need off of the 03 and i'm a little wound up about the transmission. The cooler lines for a hp24 have m18 nipples. For most, but not all, hp22s the nipples are m16. So I may need the lines and cooler off the 03 for my 00.
Looks like I should go ahead and put the hp24 on the 00 Disco since I'll have to drain the transmission to figure out which nipples I have. I hadn't planned on doing that now but I don't know how else to figure it out and I don't want to have to buy a transmission cooler and lines when I have free ones currently in the driveway. Hopefully, the flex plates are the same and it will be a simple swap, but it never seems to be the case.
Also, hopefully, I won't have to swap the controllers. Anyone know?
The following users liked this post:
dusty1 (07-03-2015)
#89
07-03-2015, 08:45 AM
Super Moderator
I have struck out on finding an off the shelf bolt for the four SAI holes in the heads. The only options seem to be the concrete anchor mentioned on the previous page or chance an oil drain plug. Both are non US items. The first requires me to fab some and the second might not work.
So I'm forging ahead.
Here is a picture of the SAI assembly on the heads. The corrugated pipes.

I cut them. The metal is super soft and thin.

They came out very easy. I didn't try to separate the compression nut because I want the whole thing, so there is no way to take them off without cutting (can't spin the whole assembly). This is what they look like.

I would not cut them unless I was taking the whole engine apart because it puts metal shaving in the head.
I don't know whether you can see in the pictures but the end of the bolt portion is tapered and sits against a surface in the heads for a tight seal. So a replacement bolt would have to be very precise to provide the same seal. I'm taking these to a fab shop tomorrow to either get them filled or duplicated as bolts. They are so soft I wonder if they aren't brass. In any case if I strike out at the fab shop I'll just swap the heads for my old 4.0 ones. I just hate to not use these heads.
So I'm forging ahead.
Here is a picture of the SAI assembly on the heads. The corrugated pipes.
I cut them. The metal is super soft and thin.
They came out very easy. I didn't try to separate the compression nut because I want the whole thing, so there is no way to take them off without cutting (can't spin the whole assembly). This is what they look like.
I would not cut them unless I was taking the whole engine apart because it puts metal shaving in the head.
I don't know whether you can see in the pictures but the end of the bolt portion is tapered and sits against a surface in the heads for a tight seal. So a replacement bolt would have to be very precise to provide the same seal. I'm taking these to a fab shop tomorrow to either get them filled or duplicated as bolts. They are so soft I wonder if they aren't brass. In any case if I strike out at the fab shop I'll just swap the heads for my old 4.0 ones. I just hate to not use these heads.
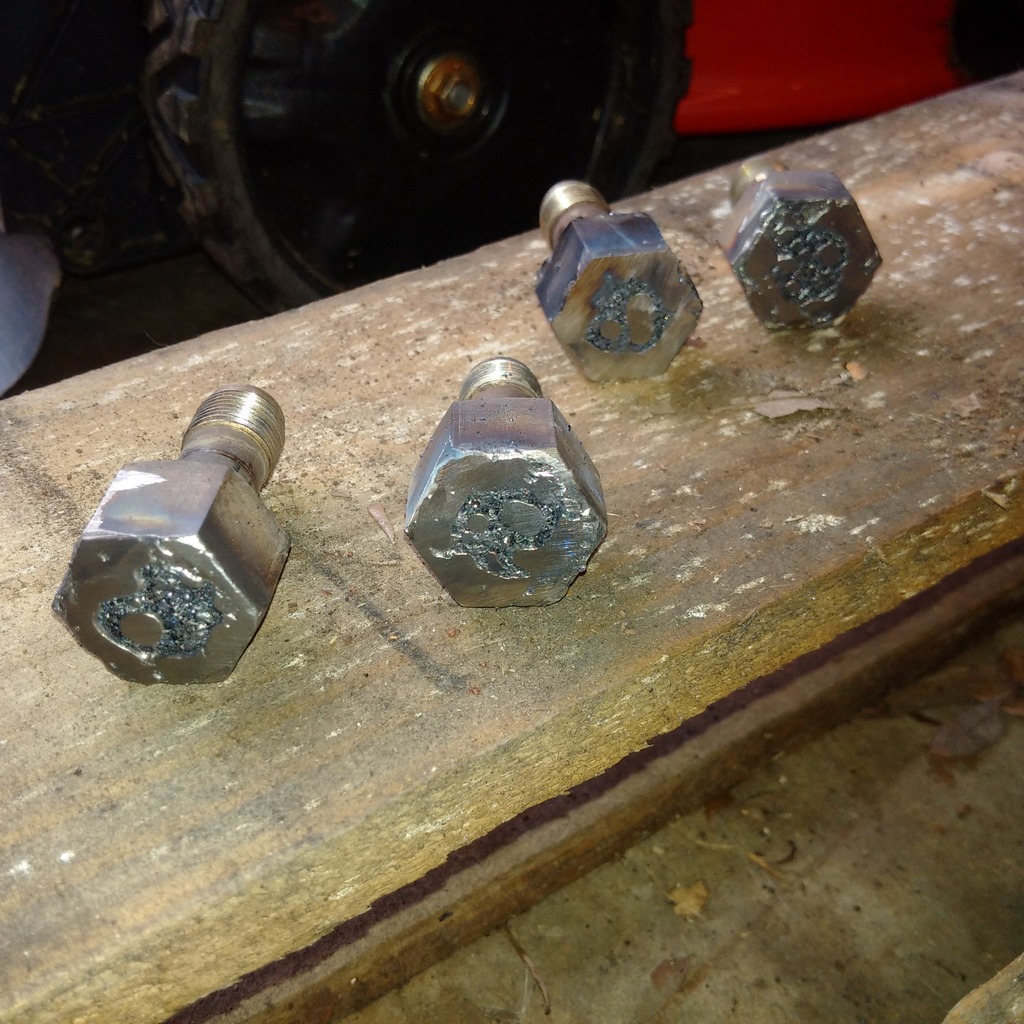
just a thought but you could just....plug and weld those stubs closed and use them.
btw I like your style....work gloves and flip flops
#90
07-03-2015, 10:33 AM
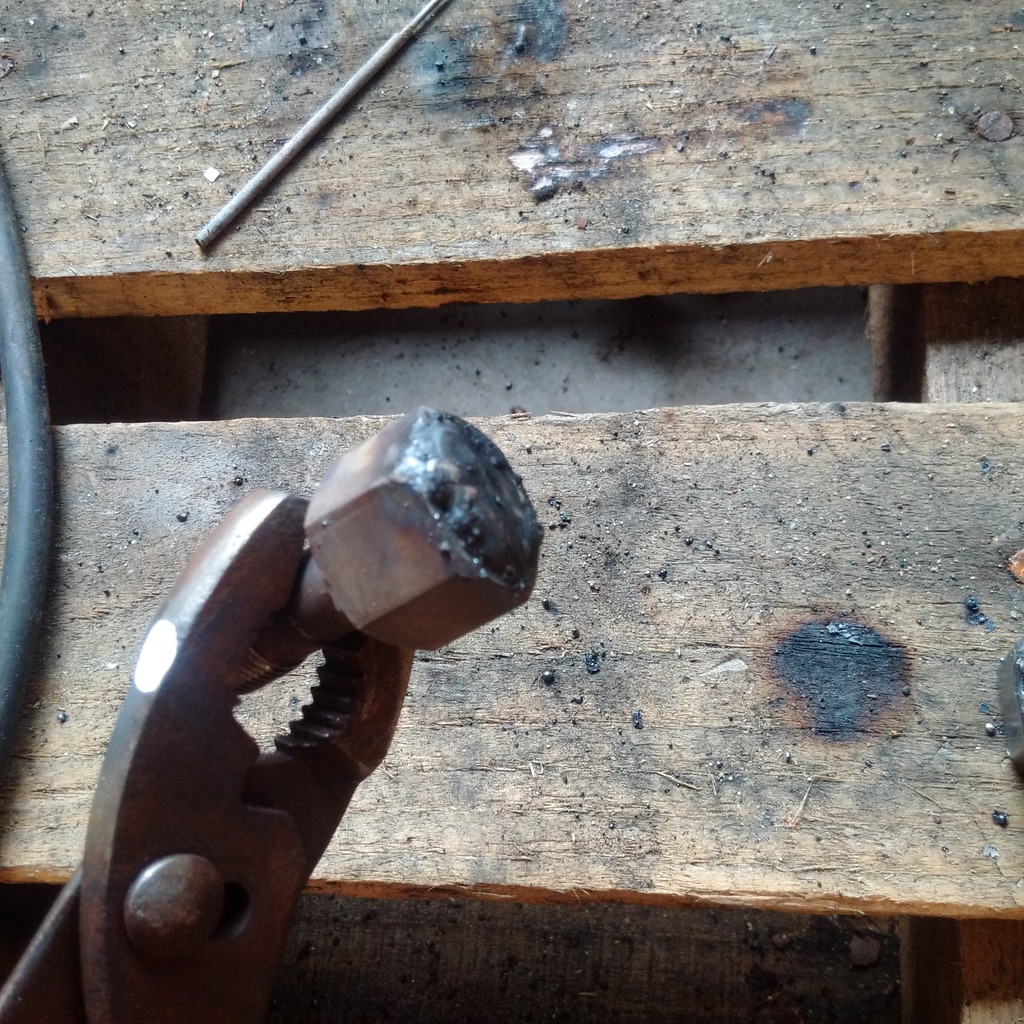
Cheapo HF inverter welder to the rescue. I also shot down the middle of the bolt from the small end just to be sure. Left the big compression nuts on because that makes them easier to put on and take off. So, now I can remove the SAI heads, get them planed and pressure tested, and plug my non SAI wiring harness and ECM into it.
So now the SAI harness is a spare.
Last edited by Charlie_V; 07-03-2015 at 11:22 AM.