
Air to Coil Conversion with pics!

Thread Starter
|
Rock Crawling
Joined: Jan 2011
Posts: 446
Likes: 3
From: Honolulu, Hawaii
Hey guys, just stopping by to drop off some pictures and a bit of a write up on changing out my 2003 Disco2 shocks and springs on all four corners, including air bags on the rear axle.
Anyways here goes nothing! The reason we started this is because the drivers side bag started giving way and chewing at the tire, and sometimes while the car was sitting it would come all the way down onto the tires.
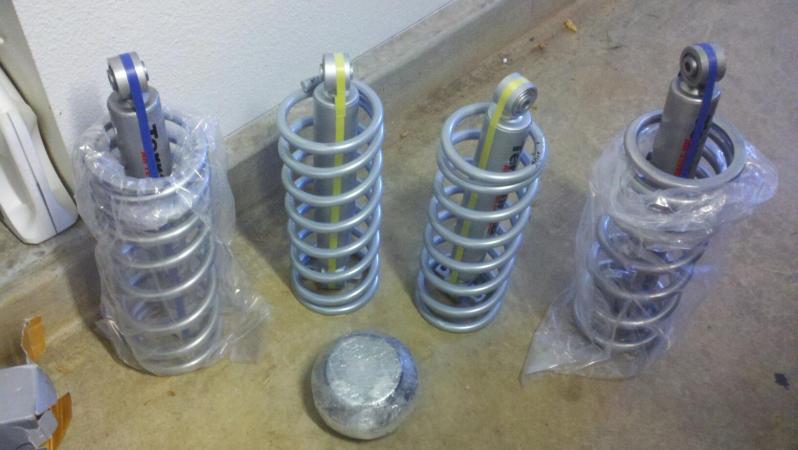
Here is the TF medium duty shocks and all terrain springs, and the Atlantic British air to coil conversion kit:
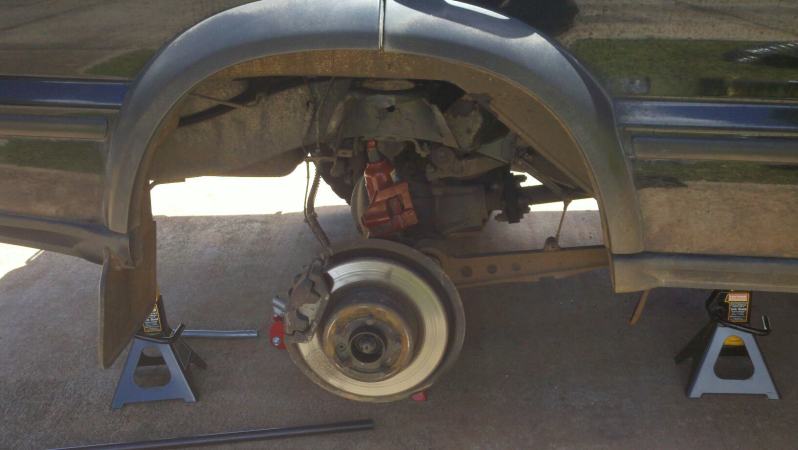
We started with the back because that was the side giving us trouble:
We got everything out pretty smoothly. We ended up having to cut the air lines to get the air out of the bag, we tried to get the nut loose from the airbag itself first, but it wasn't budging.
Everything came out smoothly and the same was true until we tried bolting down the seating for the rear spring. We were confused why the bolts weren't catching at all, and as it turns out, the factory never tapped the nuts they welded onto the seating surface! So it was off to the O'Rielly's again to get a tap.
As you can see, it was easy once we tapped it out, it sat down perfectly. The air to coil kit is an extremely simple, and aside from an easy tap (that if we would have had the correct tools on hand, would have only added 10 minutes onto the build). So now it was time to put in the spring! That was a little exciting, it required strapping them done (we really wish we had spring compressors at that moment, but we did the best with what we had)
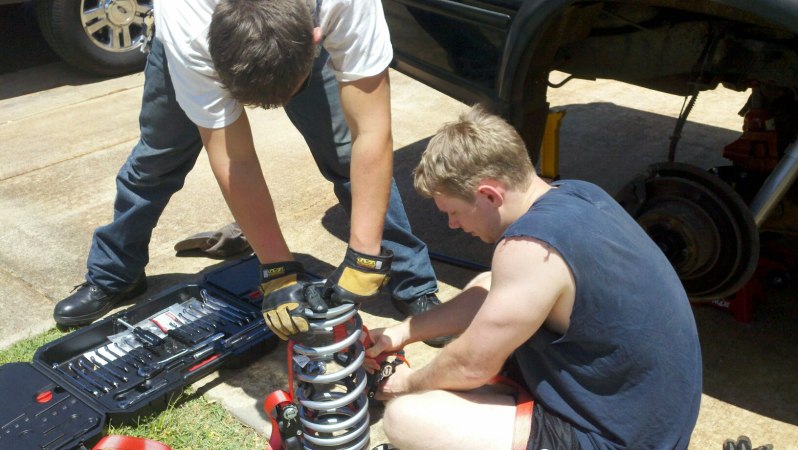
We ended up having to compress it down to about 3/4ths its normal height, and I will say for those planning on doing this in the future, just pony up and get regular spring compressors, or go to a lift!

We finally compressed it to a height that would allow it to easily fit under the clearance, and that is right when one of straps gave way a little resulting in the spring going in a little ****-eyed, but after putting a little weight on it, it went into the seat easily.
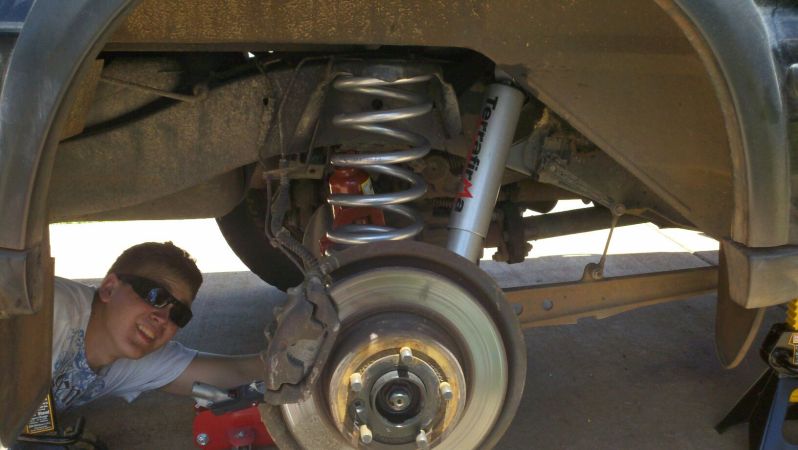
And here you can see the finished product! It took all about 2 hours including a trip to O'Rielly's including a few stops to enjoy a beer! It took all of about 45 on the other side since we had a better idea of what we would run into, and ways to make it quicker!
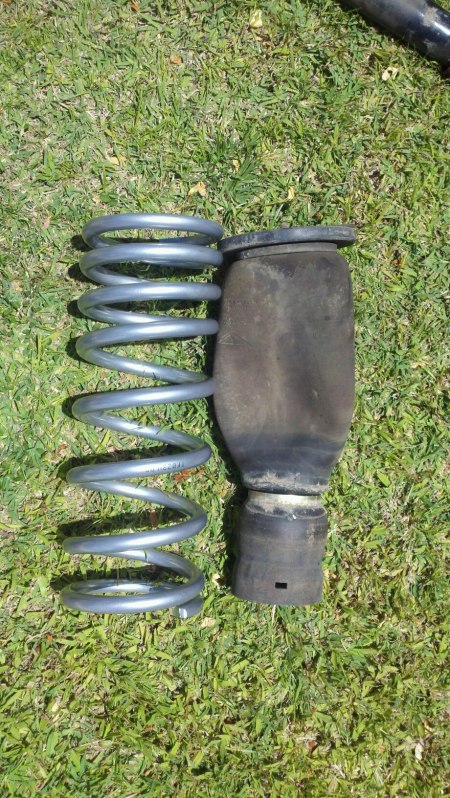
After looking over the old air bags we saw that where the bag would roll up or roll down when would engage the "off road mode" was dry rotted and probably would have leaked about the amount that we saw (Fully extended to on tires in about 24 to 36 hours).
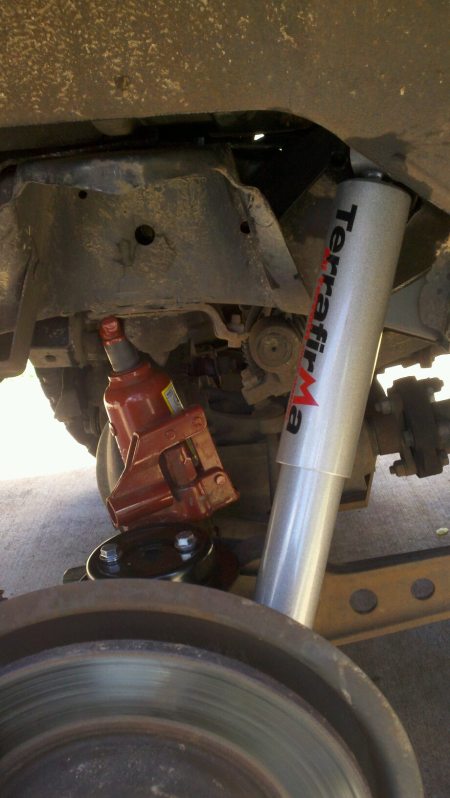
Check out how beefy that TF spring is! I definitely feel more confident when I drive it around now compared to those saggy air bags!
Then we ended up doing the front end, and that is when my phone/camera died, so I really don't have any pics from the front end other than this one my friend took:

The front end ended up being a lot more tricky than the back side because you are putting a lot more spring into it compared to stock. Also, make sure your interferences are removed before you start wrenching. Taking the shocks out was an ordeal. You first need to remove the cone that holds the shock in from under the hood first which isn't to bad aside from all the random wiring that you have to make sure you done pull on (my friend did not fully grasp this concept and just kind of ripped the passangers side out which resulted in a coolant line being pulled out from the overflow tank...). Also when putting the new shock on, make sure that the seating surface on the axle itself is lined up or else it will be a hassle to line up without taking a bit of tension off the spring.
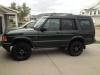
Anyways, here is how it used to sit:
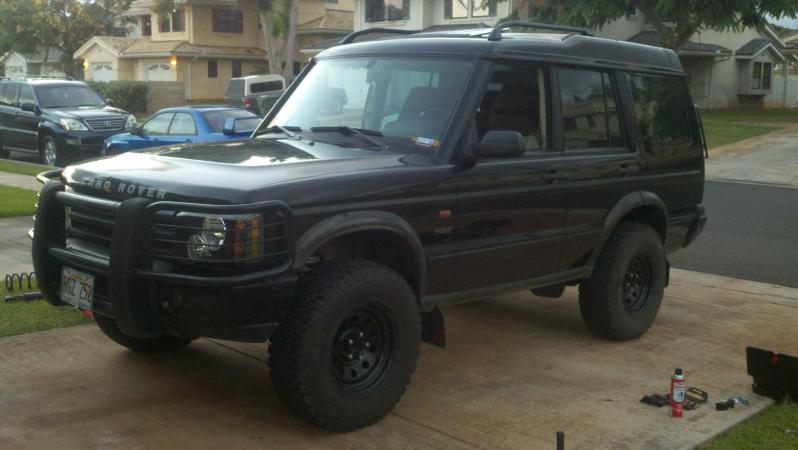
And here is how it sits now!
I haven't gone offroading yet, however for day to day driving, I would definitely say I feel a lot more confident going down the road, knowing that I dont have nigh on 10 year old air bags holding me up! There is a little bit of sway when turning, especially at higher speeds, but I'm in Hawaii and the speed limit is 55, so it shouldn't be an issue. There is also a bit of bounciness in the rear, but it completely went away the moment I put anything in the back, or had someone sit in the back seat.
Anyways, I hope you enjoyed my write up. It was not meant to be a super technical write up, if you need that, there are plenty of videos of just that on youtube, which I used and I would recommend. I will give an update on how it feels offroad after I go wheeling this afternoon!
Anyways here goes nothing! The reason we started this is because the drivers side bag started giving way and chewing at the tire, and sometimes while the car was sitting it would come all the way down onto the tires.
Here is the TF medium duty shocks and all terrain springs, and the Atlantic British air to coil conversion kit:
We started with the back because that was the side giving us trouble:
We got everything out pretty smoothly. We ended up having to cut the air lines to get the air out of the bag, we tried to get the nut loose from the airbag itself first, but it wasn't budging.
Everything came out smoothly and the same was true until we tried bolting down the seating for the rear spring. We were confused why the bolts weren't catching at all, and as it turns out, the factory never tapped the nuts they welded onto the seating surface! So it was off to the O'Rielly's again to get a tap.
As you can see, it was easy once we tapped it out, it sat down perfectly. The air to coil kit is an extremely simple, and aside from an easy tap (that if we would have had the correct tools on hand, would have only added 10 minutes onto the build). So now it was time to put in the spring! That was a little exciting, it required strapping them done (we really wish we had spring compressors at that moment, but we did the best with what we had)
We ended up having to compress it down to about 3/4ths its normal height, and I will say for those planning on doing this in the future, just pony up and get regular spring compressors, or go to a lift!
We finally compressed it to a height that would allow it to easily fit under the clearance, and that is right when one of straps gave way a little resulting in the spring going in a little ****-eyed, but after putting a little weight on it, it went into the seat easily.
And here you can see the finished product! It took all about 2 hours including a trip to O'Rielly's including a few stops to enjoy a beer! It took all of about 45 on the other side since we had a better idea of what we would run into, and ways to make it quicker!
After looking over the old air bags we saw that where the bag would roll up or roll down when would engage the "off road mode" was dry rotted and probably would have leaked about the amount that we saw (Fully extended to on tires in about 24 to 36 hours).
Check out how beefy that TF spring is! I definitely feel more confident when I drive it around now compared to those saggy air bags!
Then we ended up doing the front end, and that is when my phone/camera died, so I really don't have any pics from the front end other than this one my friend took:
The front end ended up being a lot more tricky than the back side because you are putting a lot more spring into it compared to stock. Also, make sure your interferences are removed before you start wrenching. Taking the shocks out was an ordeal. You first need to remove the cone that holds the shock in from under the hood first which isn't to bad aside from all the random wiring that you have to make sure you done pull on (my friend did not fully grasp this concept and just kind of ripped the passangers side out which resulted in a coolant line being pulled out from the overflow tank...). Also when putting the new shock on, make sure that the seating surface on the axle itself is lined up or else it will be a hassle to line up without taking a bit of tension off the spring.
Anyways, here is how it used to sit:
And here is how it sits now!
I haven't gone offroading yet, however for day to day driving, I would definitely say I feel a lot more confident going down the road, knowing that I dont have nigh on 10 year old air bags holding me up! There is a little bit of sway when turning, especially at higher speeds, but I'm in Hawaii and the speed limit is 55, so it shouldn't be an issue. There is also a bit of bounciness in the rear, but it completely went away the moment I put anything in the back, or had someone sit in the back seat.
Anyways, I hope you enjoyed my write up. It was not meant to be a super technical write up, if you need that, there are plenty of videos of just that on youtube, which I used and I would recommend. I will give an update on how it feels offroad after I go wheeling this afternoon!
Thread Starter
|
Rock Crawling
Joined: Jan 2011
Posts: 446
Likes: 3
From: Honolulu, Hawaii
I juts reread the part talking about the front axle, and it might be a little confusing. To clarify, when you are lining everything up, make sure the bolts easily go through the shock mounts, through the spring seat, into the axle. If you dont line that up the first time before putting tension on the seat from the front shock, it can be hugely difficult to line up!
Mudding
Joined: Mar 2012
Posts: 110
Likes: 1
I'm definitely stoked to get my TF springs/shocks next week. I had heard that some of the nuts on the rear hadn't been factory tapped and some were. I guess I'll have to wait and see. Which tap did you end up getting at O'Reily?

Super Moderator
Joined: Nov 2009
Posts: 5,847
Likes: 106
From: Arkansas
I reused the old springs from when I installed the 3" lift on my 2003. I can tell you it's a lot easier putting old stock spring in than it is installing the heavier springs.

Mudding
Joined: Mar 2012
Posts: 110
Likes: 1
There are some out there that came tapped from the factory. I'm sure they're the exception and not the rule, but I helped pull the bags out of a '00 a few weeks ago and the new spring seats bolted right down. Now I know not to expect to be so lucky and I'll have a tap on hand.
Pro Wrench
Joined: Jan 2011
Posts: 1,869
Likes: 44
From: Philly
I did my Terrafirma MD install of the weekend. The TF kit replaced OME 776's in the front and 781's in the rear. The previous owner installed the OME's, but kept the factory LR shocks. Truck originally had SLS. The date marked on the OME springs read 10/06. Not sure if this means they were installed in '06 or not.
However, they ride was pretty harsh and I wanted more lift. I did't gain much in the rear. Maybe, .5" The front lifted at least 1.5" over the OME 776's. Which I was super stoked about since I had some major rake going due to the ARB bull/winch bar.
Wish I had a good before pic.
And here's after. The ground is not level. I'll have to find some level ground (Ha. Story of my life) and re-post.


The Old OME Springs


And The New Stuff.


However, they ride was pretty harsh and I wanted more lift. I did't gain much in the rear. Maybe, .5" The front lifted at least 1.5" over the OME 776's. Which I was super stoked about since I had some major rake going due to the ARB bull/winch bar.
Wish I had a good before pic.
And here's after. The ground is not level. I'll have to find some level ground (Ha. Story of my life) and re-post.
The Old OME Springs
And The New Stuff.
Last edited by coors; Aug 13, 2012 at 08:32 AM.