
corroded connectors:(


Thread Starter
|
4wd High
Joined: Nov 2013
Posts: 9
Likes: 0
iv go a 99 disco 2 NAS and the connectors under the passenger footwell are corroded and wires are starting to fall out of their connectors.
i had a ton of sympoms conected to the bcu (dead obd port, no dome lights, no horn, no rear window wiper, key fob not working)
traced the wires in the rave manual and found that all the broken stuff has a wire or two in that big bundle under the passenger foot well.
searching brought me to this
https://landroverforums.com/forum/di...-repair-57435/
but the links to where he got the parts are broken.
anyone know where i can get connectors C0285-8ish?
any other advice concerning this repair would be helpful too, i seams i'm going to have to take out the blower to get at the connectors better
thanks abe from alaska

Three Wheeling
Joined: Dec 2013
Posts: 76
Likes: 22
From: Kent, UK
iv go a 99 disco 2 NAS and the connectors under the passenger footwell are corroded and wires are starting to fall out of their connectors.
i had a ton of sympoms conected to the bcu (dead obd port, no dome lights, no horn, no rear window wiper, key fob not working)
traced the wires in the rave manual and found that all the broken stuff has a wire or two in that big bundle under the passenger foot well.
searching brought me to this
https://landroverforums.com/forum/di...-repair-57435/
but the links to where he got the parts are broken.
anyone know where i can get connectors C0285-8ish?
any other advice concerning this repair would be helpful too, i seams i'm going to have to take out the blower to get at the connectors better
thanks abe from alaska
i had a ton of sympoms conected to the bcu (dead obd port, no dome lights, no horn, no rear window wiper, key fob not working)
traced the wires in the rave manual and found that all the broken stuff has a wire or two in that big bundle under the passenger foot well.
searching brought me to this
https://landroverforums.com/forum/di...-repair-57435/
but the links to where he got the parts are broken.
anyone know where i can get connectors C0285-8ish?
any other advice concerning this repair would be helpful too, i seams i'm going to have to take out the blower to get at the connectors better
thanks abe from alaska
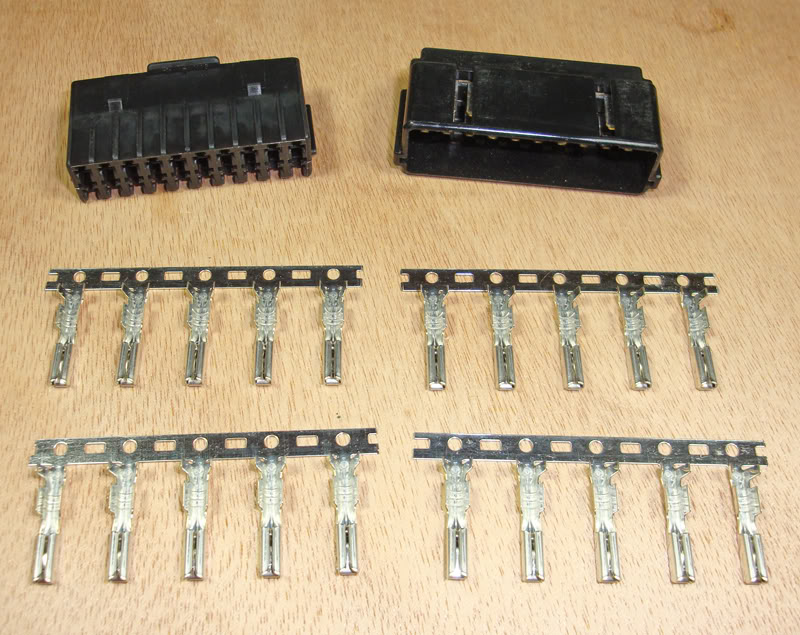
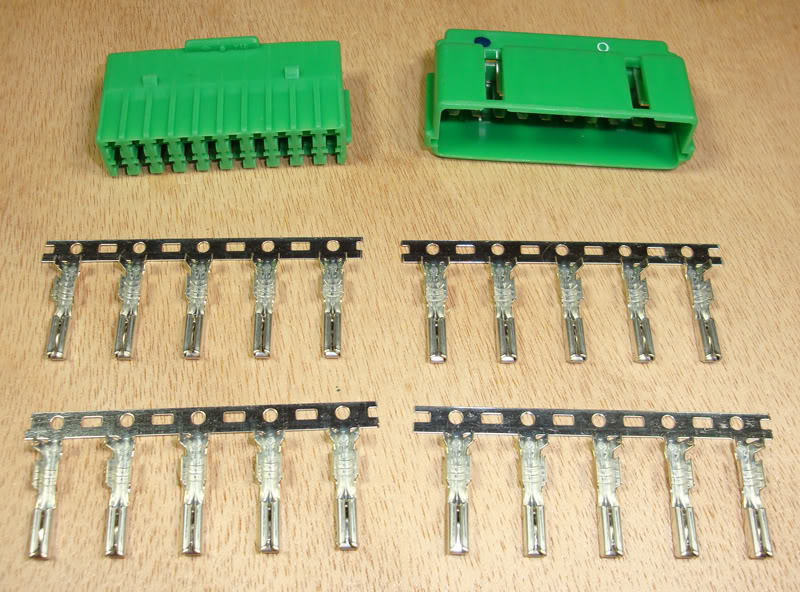
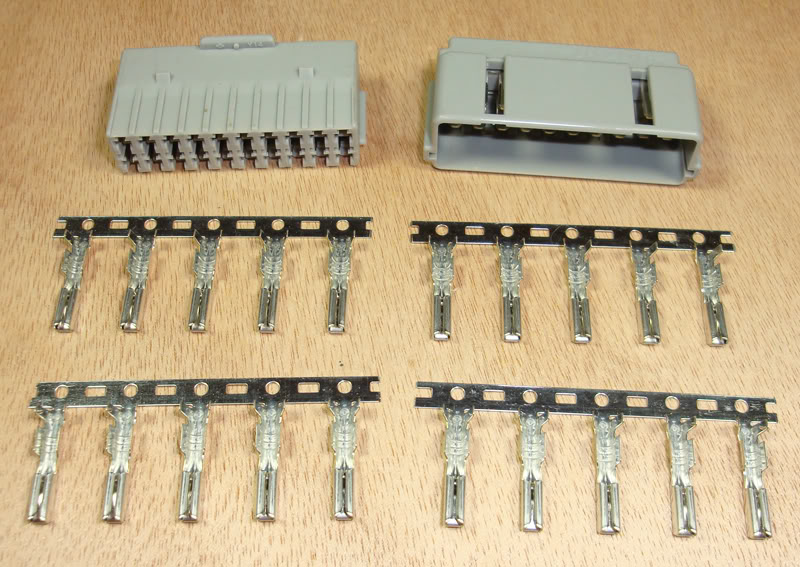
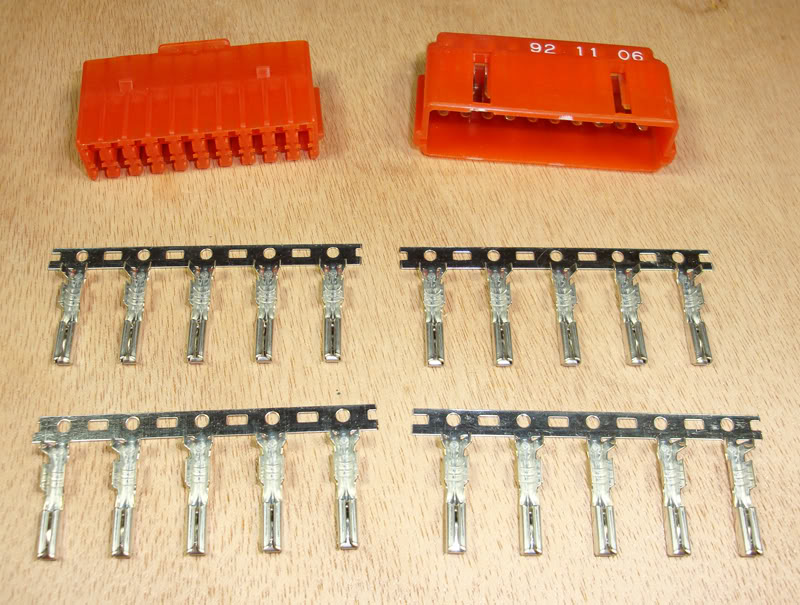
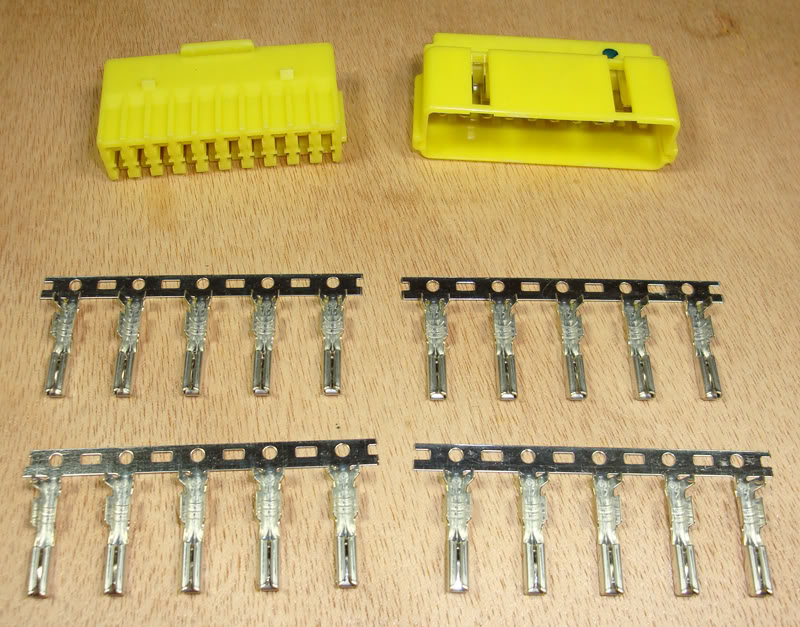
I can supply replacement Sumitomo 20-way header connectors and terminals.
BLACK
Sub-divided into five circuits -

BLUE

Sub-divided into four circuits -
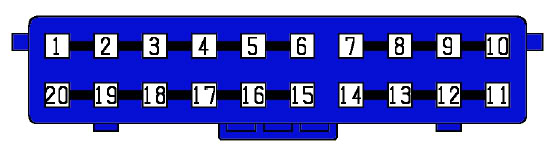
GREEN
Sub-divided into four circuits -
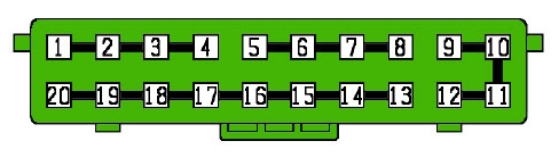
GREY
Sub-divided into three circuits -
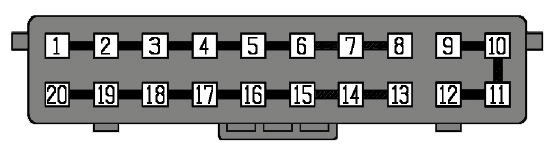
ORANGE
Sub-divided into six circuits -
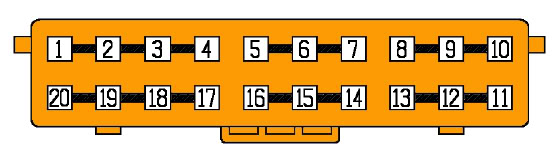
YELLOW
Sub-divided into five circuits -
Supplied (as pictured above) with a 20-Way Splice Connector, Splice Cap and 20 x Sumitomo 090 Terminals.
They are �9.95 each + Postage
I'm happy to post anywhere in the world -
P&P for the UK is �1.10
P&P for Europe is �3.45
P&P for the Rest of the World is �4.25
I can also supply spare Sumitomo 090 terminals.
These are �0.28 each + Postage (as above)
.
Last edited by PaulMc; Oct 8, 2014 at 05:52 AM. Reason: To reflect Royal Mail's 2014 price increases

Pro Wrench
Joined: Dec 2012
Posts: 1,364
Likes: 31
From: Placerville, CA USA
And here's how to get the Blower out. It's actually quite easy.
https://landroverforums.com/forum/di...t=Blower+Motor
Might as well service it while out.
https://landroverforums.com/forum/di...t=Blower+Motor
Might as well service it while out.
Thread Starter
|
4wd High
Joined: Nov 2013
Posts: 9
Likes: 0
im working on dismantling the harness the rest of the way today. (thanks for the link supersport)
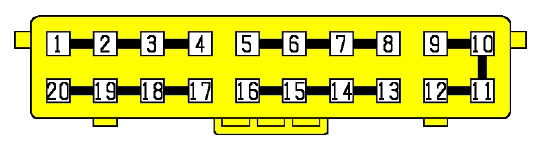
looking at your diagrams paul im assuming the black lines indicate a splice. ex: pins 9-11 are connected together on the yellow connector? (on a side note, if i only need one connecter i might make my own out of some 24 pin d-subs)
thanks paul il pm if i decide to get the lot:
i love this forum, everyone is the best
Three Wheeling
Joined: Dec 2013
Posts: 76
Likes: 22
From: Kent, UK
That's correct
As you can see from the diagrams, each colour of splice connector has its own configuration of terminals that are linked together.
On some of the headers on your D2, you'll find that Land Rover have used 'jumper' loops between sub-circuits, to increase the number on terminals that are common to a particular circuit.
.
Thread Starter
|
4wd High
Joined: Nov 2013
Posts: 9
Likes: 0
OK got access to all the connectors and they are corroded so bad that wires are falling off.
note: to anyone doing this job, you dont have to take the blower out, their are two nuts on the engine side of the firewall and two more on the bracket it self and the bracket holding the bundle of wires falls out.
note: to anyone doing this job, you dont have to take the blower out, their are two nuts on the engine side of the firewall and two more on the bracket it self and the bracket holding the bundle of wires falls out.

Recovery Vehicle
Joined: Dec 2012
Posts: 942
Likes: 29
From: St. James, NY
I got my replacement connectors form Paul Grant. Paul parts out Rovers. He sent me connectors with pig tails that were in great shape. No corrosion at all. I ended up splicing on connector in and replaced two splice caps (shown in PaulMc photos on the right side) on the connectors.


2nd Gear
Joined: Aug 2013
Posts: 2
Likes: 0
The leak is probably coming through the fresh air vent under the cowl; leaking through the blower motor, it is not a whole lot. Those wires are wrapped in a plastic covering and that holds the water in the connectors. if you look at your cowl it is prolly not sealing tightly against the passenger side of the windshield glass.
Thread Starter
|
4wd High
Joined: Nov 2013
Posts: 9
Likes: 0
im soldering the wires, using some good liqued flux and 60/40 rosin core solder. its working pretty well.
i tried using acid in the form of;
viniger and salt mix- took forever and didnt do much
sulfuric acid- had some laying around for jeaurly stuff to desolve slag, it was a bit better than the viniger/salt mix but still poor relults.
to anyone trying to solder corroded stuff;
-use rosin core 60/40 eletronics solder
-if the corrsion is really bad (mine was) then use liqued or rosin flux. put the flux on the wire and then heat it for a little while with the soldering iron, i should bubble a little. then put a little more flux on and then try to solder the wire agian.
- a hot soldering iron- i use a 40 watt one for small exetronics and a butane one i just got for when i need to be portable, like working on a car, the butane iron is really hot and gets the job done great.
iv soldered two connectors so far (C0286 and 289) and my dome lights and automatic door locks have started working, (havent tested the data port yet)