Fender Flares back to new looking
#1
 04-13-2012, 10:19 PM

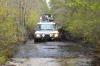
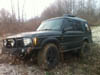
I know there are other posts and people painting their sun beat fender flares. Mine were very faded and pitted.
Taped off and gave them a good sanding,
retaped and papered off the truck. (IMPORTANT TO BAG OF THE WHEELS, OR PUT AN OLD BLANKET OVER THEM)
The product I tried was Duplicolor Bed Armour (see PIC) not knowing if it would be the way to go or not, but I figured if it were good enough for a truck bed, it would be great on a fender flare.
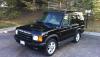
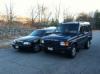
Anyhow, it has been about a week now and it looks great. Product says it stays flexible after curing up and it sure feels nice and rock solid.
Anyhow here is what it looks like. I would recommend it.
Some things to note if you try it.
1 Have a brush ready. It will come out kind of "globby" and need to be lightly brushed with a foamy or brush. You will need to brush it it to avoid runs and to make it look smooth.
2 For the underside of the flares and in the break on the rear ones...use a brush...spray it on a peice of cardboard then dip the brush and apply it normally. I did four light coats and still have more in the can.
Have a rag available to wipe the spray nozzle every so often as it will want to clog up on you every so often.
The last few coats I was concerned about it looking perfect but when it dried, it dried nice...very consistent looking finish.
Good luck, I think it looks great and can't wait to get some wax on her to make those flares pop!!!
Taped off and gave them a good sanding,
retaped and papered off the truck. (IMPORTANT TO BAG OF THE WHEELS, OR PUT AN OLD BLANKET OVER THEM)
The product I tried was Duplicolor Bed Armour (see PIC) not knowing if it would be the way to go or not, but I figured if it were good enough for a truck bed, it would be great on a fender flare.
Anyhow, it has been about a week now and it looks great. Product says it stays flexible after curing up and it sure feels nice and rock solid.
Anyhow here is what it looks like. I would recommend it.
Some things to note if you try it.
1 Have a brush ready. It will come out kind of "globby" and need to be lightly brushed with a foamy or brush. You will need to brush it it to avoid runs and to make it look smooth.
2 For the underside of the flares and in the break on the rear ones...use a brush...spray it on a peice of cardboard then dip the brush and apply it normally. I did four light coats and still have more in the can.
Have a rag available to wipe the spray nozzle every so often as it will want to clog up on you every so often.
The last few coats I was concerned about it looking perfect but when it dried, it dried nice...very consistent looking finish.
Good luck, I think it looks great and can't wait to get some wax on her to make those flares pop!!!


#4
04-14-2012, 05:35 PM

#5
04-14-2012, 07:01 PM
#6
04-14-2012, 07:21 PM

Three Wheeling

#8
04-14-2012, 11:29 PM
I may get another can and do the rocker panels...can really see the difference...that was about how my fenders looked before the job was done.
I am in Canada right now and found this bed liner at Canadian Tire.
I would recommend any bed liner product you can find, like Bosshog said, there are some other nail hard and still flexible products.
I am in Canada right now and found this bed liner at Canadian Tire.
I would recommend any bed liner product you can find, like Bosshog said, there are some other nail hard and still flexible products.
#9
04-18-2012, 03:05 AM

I've been using the Duplicolor TR250 for a couple of years, but I don't bother sanding, brushing, or doing multiple coats. I just tape off and hit it. The stuff goes on great and has a nice textured finish. I also use it on my steel bumpers and rock sliders. Makes for a quick, easy, and even cover up for scratches from the trail. Because of the textured finish, even just hitting spots blends right in with the rest of the bumper without having to do the whole thing each time.