
Homemade D2 Dual Battery Box


Thread Starter
|
Recovery Vehicle
Joined: Sep 2009
Posts: 1,135
Likes: 14
From: Roanoke Valley, VA
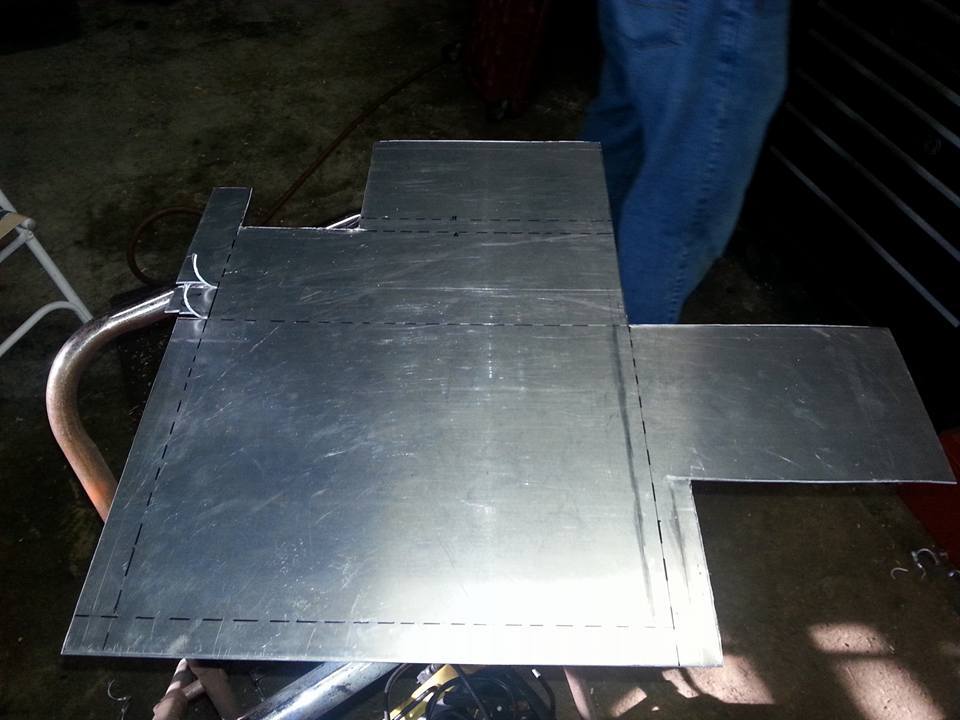
I have seen the Columbia Overland version and liked it, but not the price at $189 now plus S/H from the northwestern US.  I finally got to measuring and drawing and making a pizza box version, based on the original battery box, my group 34 battery, and visual estimates of their model. I cut and test fitted my pizza box model and made a few adjustments. I then moved the drawing to a 2'x2' .090 sheet of aluminum. I tried finding the aluminum sheet on the Internet, but had better success just calling up a local sheet metal shop and confirming they had what I wanted. I went by and they cut it for me while i was there. After getting the aluminum sheet I did a lot of measuring, measuring again, cutting, grinding edges and corners for smoothness, bending, making brackets, making brackets again , and some minor adjustments and some hours of my time with plenty of help from my talented cousin with the cutting and bending, and the dual battery box is done. This was a nice 1/2 weekend little project. Very doable by one person, nice to have another pair of hands, and additional skills, and a second set of eyes to keep me on track cutting and measuring.
The air sheers were really nice that my cousin had, but you can do it without them with hand sheers or cutting wheel. The bending had its challenges using some wide vise grips that seem to be perfect for this, but only bending about 2-3 inches at a time that way, and slowly working from one end to the other and back and forth bending only slightly going each way until done. In the spots with the bends close together they were not as easy to get to I had to use some scrap 2x6 wood pieces to basically make a large wooden block to clamp the box to and used a large dead-blow hammer to work up and down the bending edges over the wooden block edges to get the bend. For the brackets I just bent them in the table vise with the large hammer mostly, and the ViseGrips with the large ends as well. There may be some better ways, or easier methods with more complex bending tools, but with a little imagination, we were able to get all the bends worked out. No aluminum welding or JB Weld type stuff, just bending it into shape, smoothing out those edges and drilling a few holes, and the one large hole with a hole saw to mount the bottom bracket.
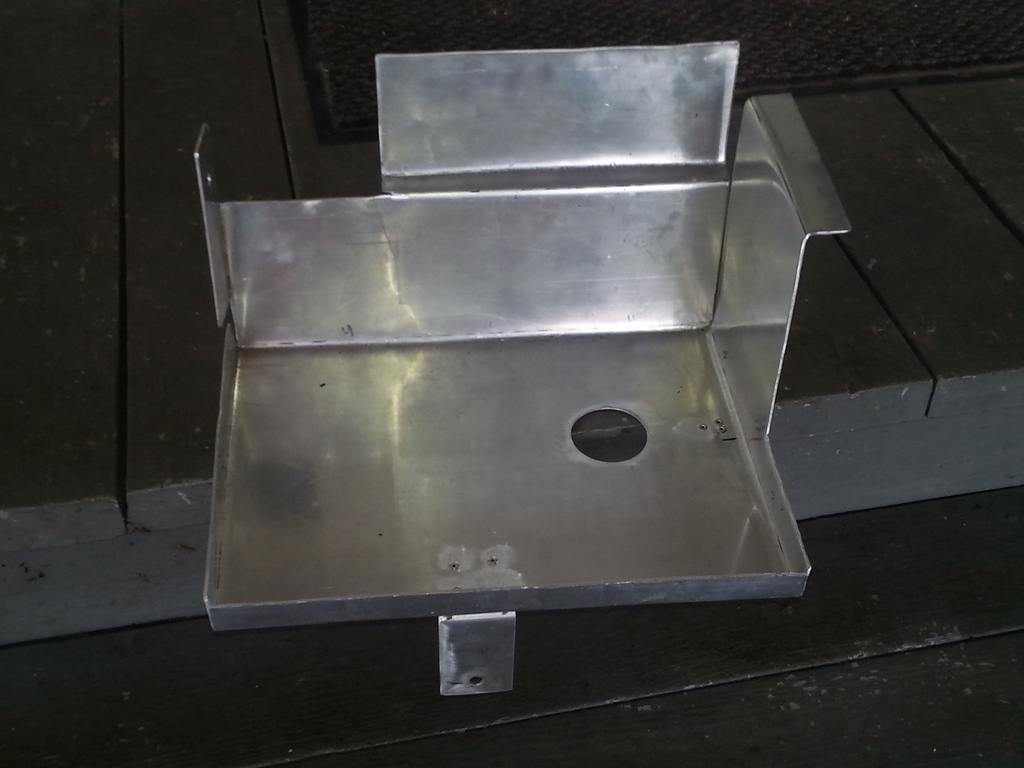
For anybody that may be interested in the dimensions, I will be glad to share. The front bracket is pretty straight forward, but the one on the bottom through the hole required a few adjustments because I could not get under the box to get exact measurements and angle. It angles from the mount hole up to the outside right edge of the box as you are standing facing the truck where you can see the pop rivets in the picture. I did not cut two large holes in the bottom of the battery tray like the Columbia Overland tray, as I used a little thinner aluminum sheet, so I could bend it with the tools I had. I used one hole only to get to to the bolt on the one mount point. The bracket on the front is a little harder to get to with no big hole to work through, so long arm around the back of the box and up under to get a wrench on that front bracket to mount using the factory bolt and mount point up front is required. I went ahead and cut the factory battery cable clamp ends and soldiered ring eyelets on the cable ends and used military style cable clamps. I am still working on my winch install, and dual battery setup, but this is my first step to getting there. I will be getting the winch installed this week with the single battery for now.
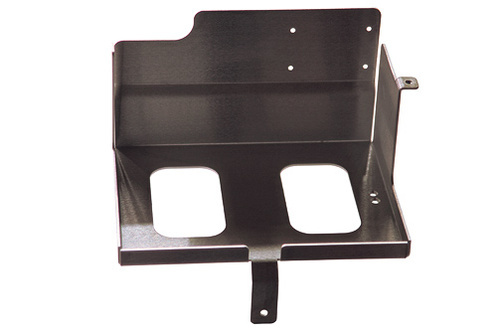
Columbia Overland picture below using .125" (1/8") aluminum sheet for comparison. Yea, I know their model is much prettier, but hey, it is a battery box! BTW, the .090" is plenty stout to hold the batteries, so no worries there. I will need to get my battery hold down worked out. But it will run left to right and use the top lip on the engine side, and I will see what works best on the fender side. I am not sure how Columbia Overland mounts on the fender side, as I can only see the flat top mounting bracket in the pictures I have seen, but working out something will not be hard. There are plenty of off the shelf battery hold downs I can work from. You can see the Columbia Overland hold down made of thicker aluminum below.

I finally got to measuring and drawing and making a pizza box version, based on the original battery box, my group 34 battery, and visual estimates of their model. I cut and test fitted my pizza box model and made a few adjustments. I then moved the drawing to a 2'x2' .090 sheet of aluminum. I tried finding the aluminum sheet on the Internet, but had better success just calling up a local sheet metal shop and confirming they had what I wanted. I went by and they cut it for me while i was there. After getting the aluminum sheet I did a lot of measuring, measuring again, cutting, grinding edges and corners for smoothness, bending, making brackets, making brackets again , and some minor adjustments and some hours of my time with plenty of help from my talented cousin with the cutting and bending, and the dual battery box is done. This was a nice 1/2 weekend little project. Very doable by one person, nice to have another pair of hands, and additional skills, and a second set of eyes to keep me on track cutting and measuring. The air sheers were really nice that my cousin had, but you can do it without them with hand sheers or cutting wheel. The bending had its challenges using some wide vise grips that seem to be perfect for this, but only bending about 2-3 inches at a time that way, and slowly working from one end to the other and back and forth bending only slightly going each way until done. In the spots with the bends close together they were not as easy to get to I had to use some scrap 2x6 wood pieces to basically make a large wooden block to clamp the box to and used a large dead-blow hammer to work up and down the bending edges over the wooden block edges to get the bend. For the brackets I just bent them in the table vise with the large hammer mostly, and the ViseGrips with the large ends as well. There may be some better ways, or easier methods with more complex bending tools, but with a little imagination, we were able to get all the bends worked out. No aluminum welding or JB Weld type stuff, just bending it into shape, smoothing out those edges and drilling a few holes, and the one large hole with a hole saw to mount the bottom bracket.
For anybody that may be interested in the dimensions, I will be glad to share. The front bracket is pretty straight forward, but the one on the bottom through the hole required a few adjustments because I could not get under the box to get exact measurements and angle. It angles from the mount hole up to the outside right edge of the box as you are standing facing the truck where you can see the pop rivets in the picture. I did not cut two large holes in the bottom of the battery tray like the Columbia Overland tray, as I used a little thinner aluminum sheet, so I could bend it with the tools I had. I used one hole only to get to to the bolt on the one mount point. The bracket on the front is a little harder to get to with no big hole to work through, so long arm around the back of the box and up under to get a wrench on that front bracket to mount using the factory bolt and mount point up front is required. I went ahead and cut the factory battery cable clamp ends and soldiered ring eyelets on the cable ends and used military style cable clamps. I am still working on my winch install, and dual battery setup, but this is my first step to getting there. I will be getting the winch installed this week with the single battery for now.
Columbia Overland picture below using .125" (1/8") aluminum sheet for comparison. Yea, I know their model is much prettier, but hey, it is a battery box! BTW, the .090" is plenty stout to hold the batteries, so no worries there. I will need to get my battery hold down worked out. But it will run left to right and use the top lip on the engine side, and I will see what works best on the fender side. I am not sure how Columbia Overland mounts on the fender side, as I can only see the flat top mounting bracket in the pictures I have seen, but working out something will not be hard. There are plenty of off the shelf battery hold downs I can work from. You can see the Columbia Overland hold down made of thicker aluminum below.
Last edited by Rover_Hokie; Aug 12, 2015 at 07:10 PM.


Thread Starter
|
Recovery Vehicle
Joined: Sep 2009
Posts: 1,135
Likes: 14
From: Roanoke Valley, VA
It was a pair of Vise Grip brand ViseGrips with a 2-3 inch wide plate across the end where the normal plier type ends were. I believe it is intended or referred to as a "sheet metal tool".
My cousin had another set of Matco brand with a big "C" clamp on the end, that was nice for holding points with other C-clamps as well, to keep everything in place while bending. Worked out pretty well for what I needed. I am sure there are much better ways to bend if you are going to do much more than this that would be worth the money.
Bending just a small portion at a time going down the bending seam with the sheet metal tool worked well, then to smooth out where the tool was clamped on where it was not as smooth, just put it on the wood blocks and work it with the dead-blow hammer hammering until pretty even bend.
Last edited by Rover_Hokie; May 24, 2015 at 04:22 PM.

Three Wheeling
Joined: Apr 2015
Posts: 89
Likes: 10
From: Krugersdorp, South Africa
Hokie:
I love it! Can you just post the dimensions for all of us? I need to make one!!! Two questions; I have a Td5, not sure what you have, but where exactly under the hood did you mount this? Second, what did you use to secure the battery? I drive ROUGH trails, this battery would bounce around pretty badly. Did you make a hold down bracket too?
Thanks for sharing!
Thread Starter
|
Recovery Vehicle
Joined: Sep 2009
Posts: 1,135
Likes: 14
From: Roanoke Valley, VA
Hokie:
I love it! Can you just post the dimensions for all of us? I need to make one!!! Two questions; I have a Td5, not sure what you have, but where exactly under the hood did you mount this? Second, what did you use to secure the battery? I drive ROUGH trails, this battery would bounce around pretty badly. Did you make a hold down bracket too?
Thanks for sharing!
I love it! Can you just post the dimensions for all of us? I need to make one!!! Two questions; I have a Td5, not sure what you have, but where exactly under the hood did you mount this? Second, what did you use to secure the battery? I drive ROUGH trails, this battery would bounce around pretty badly. Did you make a hold down bracket too?
Thanks for sharing!
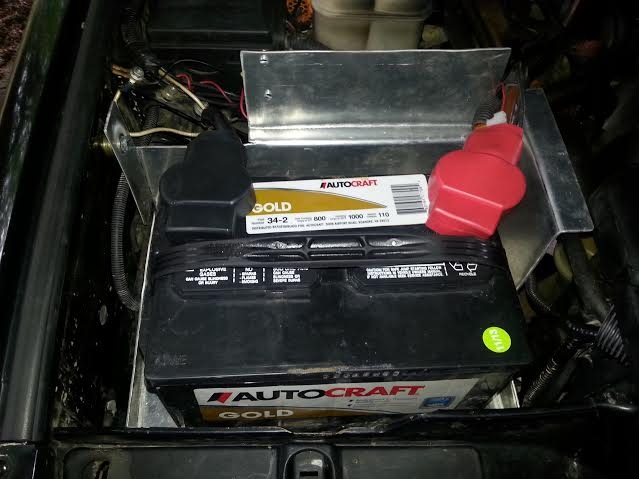
2) In regard to the battery hold down, I am planning on a simple L-bracket bolted to the inside of the fender side for the mount point on that side. I am not sure what they used, but based on the hold down piece going across, it has to be something similar. I will use the folded edge on the top of the box on the engine side like the Columbia Overland part. I just left the entire lip there rather than cutting it a leaving on the mounting tab. I will then a cut-out a thicker piece of aluminum flat bar stock from Lowe's or something similar to fab the actual cross over hold down piece, much like the Columbia Overland part. The height of the inside wall of the box on mine is the height I chose. The Columbia Overland mount says it is the correct height for the Optima batteries which are AGM and have no caps for the water/acid openings like my battery, so I planned my lip to match the top of my caps. I just have my single battery there for right now. I have also seen a picture of an aftermarket hold down that some have used, and I will try to find the picture of that to share, that may work well too. I plan on getting that all worked out in the next couple days.
Last edited by Rover_Hokie; Mar 3, 2024 at 11:08 AM.
