
How to install a factory brush guard?
#1
 11-25-2009 | 05:21 PM

Thread Starter
|
Rock Crawling
Joined: Apr 2009
Posts: 364
Likes: 1
From: Hudsonville MI
Supposedly this bad boy bolts right on? I also have to cut a hole for the passenger side. Can anyone post a photo up close of where the brush bar actually bolts to the frame--I would love to see it up close so I can figure it out. I don't have any Extension pieces that I feel i might need.
#3
11-25-2009 | 06:27 PM

Mudding
Joined: Apr 2007
Posts: 248
Likes: 0
From: Madison, Wisconsin
Here's what it all looks like with the bumper removed. The brackets are black, the crush cans are aluminum colored. I labeled to try and make it easy.

You'll pull the bolts that hold the crush cans in place to the ends of the frame. This will mean your bumper will no longer be completely attached, so make sure it is well supported. Do one side at a time so you only need to support that side. The brackets slide up from underneath, then the original bolts go right back in.
You'll pull the bolts that hold the crush cans in place to the ends of the frame. This will mean your bumper will no longer be completely attached, so make sure it is well supported. Do one side at a time so you only need to support that side. The brackets slide up from underneath, then the original bolts go right back in.
#4
11-25-2009 | 07:20 PM

#5
11-26-2009 | 09:23 AM
Thread Starter
|
Rock Crawling
Joined: Apr 2009
Posts: 364
Likes: 1
From: Hudsonville MI
Thanks Phil. I will give you a call when I am doing it. It will be a while. I heated up the bend and straightened it out. Also I am scraping all the vinyl coating off and will be rattle canning the whole thing with rustoleum. That vinyl does not come off easy where it hasn't rusted inside. I think the vinyl is bad stuff because it ends up trapping the moisture inside against the metal and making the rust worse. So I will be wire brushing and sanding all of that off to get her clean for paint. It is a long process.
Does anyone have any nifty tricks to get that vinyl off? I am basically chipping and cutting it off with a chisel and lots of elbow grease.
Does anyone have any nifty tricks to get that vinyl off? I am basically chipping and cutting it off with a chisel and lots of elbow grease.
#6
12-03-2009 | 05:35 PM
Mudding
Joined: Apr 2007
Posts: 248
Likes: 0
From: Madison, Wisconsin
The hole that was cut in passenger side of my bumper wasn't perfect, but it did accommodate the brush bar. To make it exactly like the driver's side hole, you'll need to do some measuring and stuff. But to make it just work, go with this...
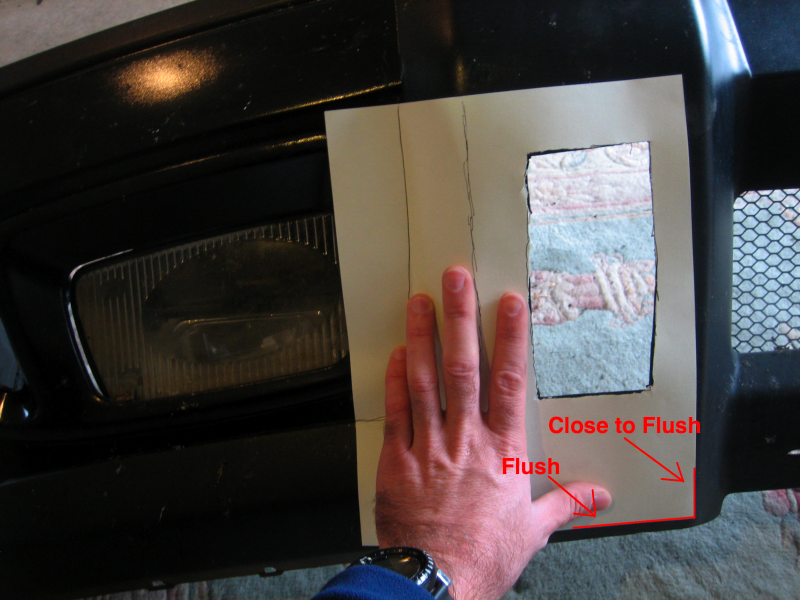
Here's what mine looks like... left hole is a little shorter and gets narrower at the bottom. Side note: those are the brush bar mounting brackets at the bottom of this pic.

There really aren't any right angles on the bumper, so when you align the template, try to align the bottom edge of the paper with the bottom of the bumper. Flush it on the little ridge, just above where the molding begins to curve away. It isn't a perfect line either, so focus on just getting the right side of the bottom lined up... parallel and flush with the ridge. Lower right corner of paper in the corner of the ridges.
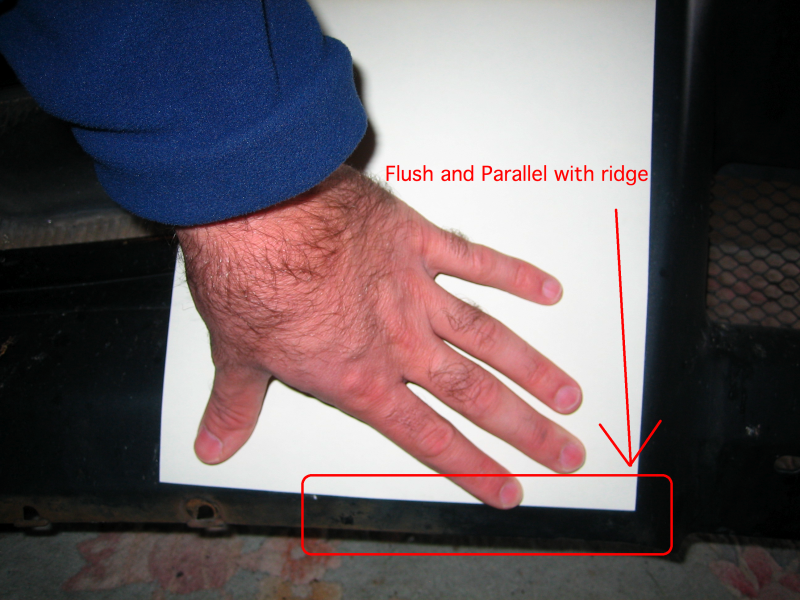
Here it is with the hole cut in it. Bottom right corner is flush at bottom, and as close as it can be at the right. Again, concentrate on getting as much of the bottom aligned as possible, and just butt the corner against the right.
You'll notice the hole itself isn't perfectly square, so you may want to trim a little extra at the bottom right. If I remember, I think my brush bar rubbed there a smidge.
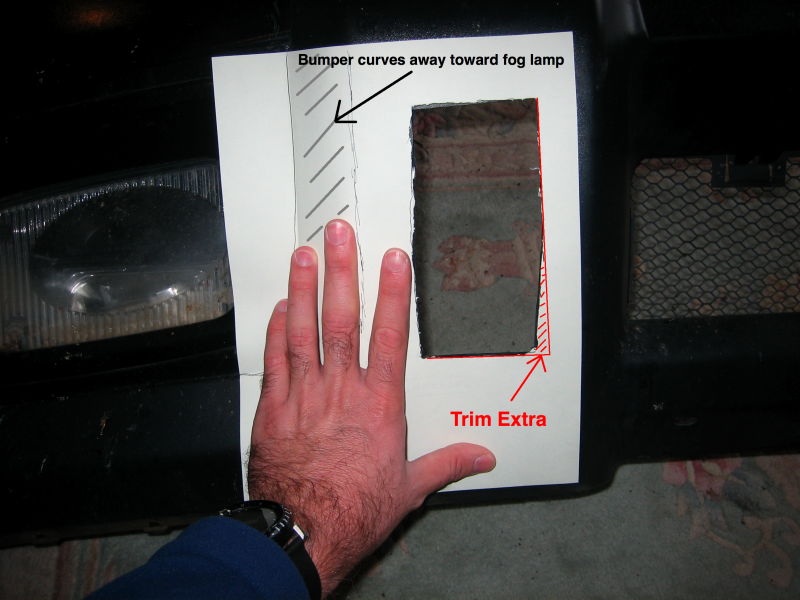
This ought to get you a good hole right where you need it to allow access of the brush bar attachment points to the mounting brackets.
Please take pics of your installation process and share!
Cheers!
Here's what mine looks like... left hole is a little shorter and gets narrower at the bottom. Side note: those are the brush bar mounting brackets at the bottom of this pic.
There really aren't any right angles on the bumper, so when you align the template, try to align the bottom edge of the paper with the bottom of the bumper. Flush it on the little ridge, just above where the molding begins to curve away. It isn't a perfect line either, so focus on just getting the right side of the bottom lined up... parallel and flush with the ridge. Lower right corner of paper in the corner of the ridges.
Here it is with the hole cut in it. Bottom right corner is flush at bottom, and as close as it can be at the right. Again, concentrate on getting as much of the bottom aligned as possible, and just butt the corner against the right.
You'll notice the hole itself isn't perfectly square, so you may want to trim a little extra at the bottom right. If I remember, I think my brush bar rubbed there a smidge.
This ought to get you a good hole right where you need it to allow access of the brush bar attachment points to the mounting brackets.
Please take pics of your installation process and share!
Cheers!
Last edited by JavaRacer; 12-03-2009 at 06:04 PM. Reason: added bracket side note and template alignment image
#7
12-03-2009 | 08:35 PM
Thread Starter
|
Rock Crawling
Joined: Apr 2009
Posts: 364
Likes: 1
From: Hudsonville MI
Thanks Java,
I will use the template when I get it. My school just bought a Fein power saw. http://www.fein.de/fein-multimaster/...ucts/news.html
So I will be able to make a nice clean cut with little effort!
I will post photos when I get to it.
Right now I am still in the process of scraping the old plastic coating off--a slow process.
#8
12-05-2009 | 03:44 PM
Thread Starter
|
Rock Crawling
Joined: Apr 2009
Posts: 364
Likes: 1
From: Hudsonville MI
Spike--30 minutes? This took all day. I had to remove the bumper in order to access the bolts that mount over the crush cans and the frame--there is no way not to.
The template ended up being unnecessary. If you look at the backside of the bumper, Land Rover was kind enough to mold into the bumper where the cut out goes. It is still VERY tight to work. I taped the nut onto the wrench to hold it in place on the inside mounts of the bar because there was so little room. I wouldn't be able to use a a socket to I could only get in a combo-box wrench.
Last edited by bikingteacher; 12-06-2009 at 09:07 AM.

