When you click on links to various merchants on this site and make a purchase, this can result in this site earning a commission. Affiliate programs and affiliations include, but are not limited to, the eBay Partner Network.
Also - for those that don't want to read the whole thread or even my whole first post, here are the answers to the two most asked question:
Which thermostat temperature should I run? In cool weather the 03-04 trucks will throw a code if you use less than a 180 degree thermostat, the 99-02's will do it if you use less than a 170 degree thermostat. In warmer weather they generally heat up so quick they will not throw the code even with the cooler thermostats. The Disco cooling system is only capable of holding a 100 degree temperature difference to ambient at highway speeds on relatively level ground. Climbing mountains or towing uphill increases that temperature difference depending load/grade. This means during summer in the south or west you are going to see 195-200 degrees on the ultragauge even with a 180 degree thermostat installed, even with no thermostat installed. The radiator just isn't big enough to keep it colder.
My D2 engine starts to get hotter than the thermostat setting when I am idling for long periods, is that normal?
The factory D2 water pump does not pump enough water too keep the engine cool in hot weather with the AC on. If the engine is revved to approximately 1000-1200 rpm the temperature will come down to normal temperatures (remember, 100 degrees over ambient) or once normal driving resumes.
Now on to the post
Let me start by saying that regardless of whether you use the kit I provide or roll your own using the Meziere or Jegs inline thermostat, I think this is the single best modification you can make to a D2. The factory D2 thermostat regardless of which temperature thermostat you choose has a number of issues that include:
Poor quality manufacturing resulting in frequent malfunctions
Plastic material degrade over time and are known to crack and leak - this is more a problem with the OEM thermostats than the replacement black nylon housings, but they are not immune to the degradation over time, just happens slower.
Poor design results in high temperatures across the board.
Properly functioning OEM style 180 degree thermostats maintain temperature between 185-195
Even if the thermostat opens correctly, the bypass valve may not seal completely allowing some coolant to bypass the radiator completely and increasing your operating temperature.
Engine cannot be operated with Thermostat easily removed to troubleshoot other components like the radiator flow.
Thermostat cannot be removed roadside/trailside without dumping most of the coolant.
Thermostat temperature options are limited.
With the thermostat down low, bleeding air out of the system is much more difficult
The inline thermostat mod addresses most of these shortcomings:
Higher quality thermostat manufacturing means less frequent malfunctions. My kit uses Motorad which are made in Israel, NOT China.
No plastic materials to degrade over time
Lower opening temperatures than factory thermostats
No bypass loop to malfunction and raise operating temperatures.
Engine can easily be operated without ANY thermostat installed, allowing for easy troubleshooting of radiator, fan, or water pump components.
Thermostat element can be removed trailside by removing two bolts with almost Zero coolant loss.
Virtually unlimited thermostat temperature selection, from 140 to 195 easily selectable. (more about this later).
Thermostat located at the top of the cooling system essentially automatically bleeds the air out, no vent port needed.
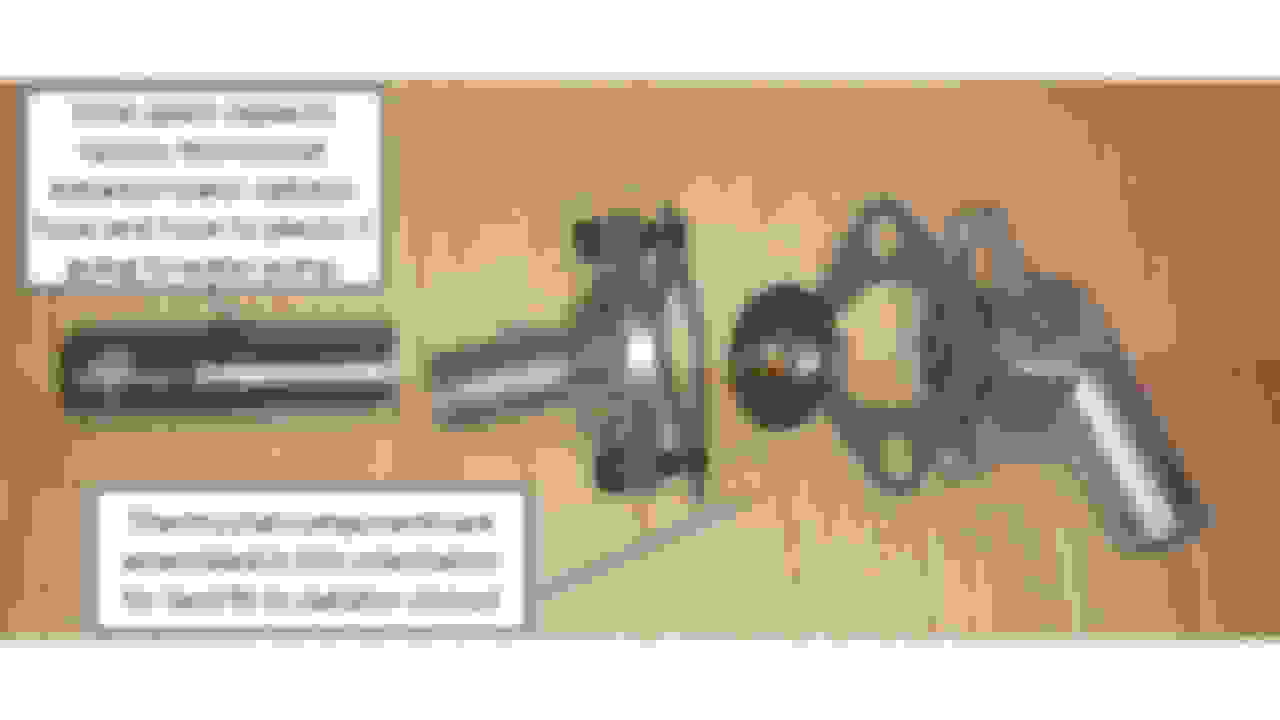
After looking at numerous threads using the Meziere inline thermostat or the Jegs, I decided to design one using the housings I selected for a number of reasons:
More standard tools needed to change thermostat - the Meziere uses 2.5" wrench flats (who has that in their toolbox) and the Jegs uses allen bolts - five of them (what a pain!). The housings I use have two bolts and nuts. I originally threaded the housings but some beta testers had some issues so now I am going to serrated nuts on the backside
Size and shape - the Meziere and Jegs are somewhat bulky, most of the installs I saw posted on here required a pretty big cutout in the radiator shroud. Although it is well worth it over the factory system, I preferred a housing that tucked neatly against the shroud without modification.
Metal hose splice in the lower hoses instead of a custom hose - cheaper and easier to source OEM hoses than find a rare, custom BMW hose that fits.
After running these in most of the 16 trucks that I have owned for some period of time, I have learned the following about using this mod:
The thermostat must have a bleed hole. Because the thermostat does not have a bypass loop like the OEM Disco and is moved away from the intake manifold like most OEM American V8's it will not open as quickly as desired from a cold start without the bleed hole. The coolant in the engine will heat up, but the coolant in the hose going to the thermostat takes much longer to reach the opening temperature. The difference can be as much as 60 degrees on a cold start, resulting in some heartpounding moments at that coolant temp approaches 240 before opening. A small bleed hole lets a small amount of coolant flow past the thermostat while the engine is warming up, keeping it close to the same temperature of the engine. The thermostats I use come with a punched precision bleed hole, but if you roll your own make sure and drill a small bleed hole about 1/8".
With the bleed hole in the thermostat and the thermostat positioned at the top of the cooling system the air naturally bleeds out in to the tank. In all the trucks I have used it in all that is needed is to fill the tank normally after installation and buzz the engine to 2500 rpm for about 45 seconds after the engine is warm - cooling system fully bled!
In cool weather the 03-04 trucks will throw a code if you use less than a 180 degree thermostat, the 99-02's will do it if you use less than a 170 degree thermostat. In warmer weather they generally heat up so quick they will not throw the code even with the cooler thermostats.
The Disco engine will normally run about 140 degrees in cool weather without ANY thermostat installed
The Disco cooling system is only capable of holding a 100 degree temperature difference to ambient at highway speeds on relatively level ground. Climbing mountains or towing uphill increases that temperature difference depending load/grade. This means during summer in the south or west you are going to see 195-200 degrees on the ultragauge even with a 180 degree thermostat installed, even with no thermostat installed. The radiator just isn't big enough to keep it colder.
The 180 thermostat will hold temps between 177-185 in weather less than 85 degrees F. The motorad thermostats I use are very consistent and the bleed hole in the thermostat helps even out the temperature swings from open to close cycles.
Ok, so on to the pictures and instructions
Once you have the new hardware installed, refill the system with coolant through the bottle till the bottle is full.
Start the engine with the overflow tank cap off.
Let the engine come up to temperature until the thermostat opens. The gauge should read in the middle of the range and the new thermostat housing will be warm/hot to the touch.
Rev the engine to 2500 rpm with the truck in park for 45 seconds. This will push all of the air in the system to the coolant bottle.
Put the cap on the coolant bottle. I recommend running it one turn off of full tight to prevent building pressure and blowing hoses or radiator end tanks (frequent issue on 15+ year old hoses). BTW, I use one of those jumbo underbed storage boxes to catch all the coolant during draining.
So I know some of you are going to ask about a bleed port. You could of course install a separate component in the upper hose to bleed it, but I also have a version of the kit with the sensor port in the housing oriented up so you can use it for a bleed port or a sensor port if you want to install a mechanical temperature gauge. The port up version does not fit the radiator shroud as closely as the port down version does, and with this system you don't really need a bleed port, but if you really want it they are available.
Also, you can use a re-usable silicone gasket if you want to, they cost a little more but make it easier to remove and replace the thermostat element without any of the black goop. Of course if you want you can run it without the thermostat element at all, enabling you to troubleshoot a system for a bad radiator or other issue. Only one silicone gasket required, can go on either side of the thermostat element.
Ok, so to streamline ordering and make it easier for forum members to get these without having to PM me every time and send an invoice on PayPal every time I have set up a web site to allow ordering. The web site is www.inlinethermostats.com . You will see that in addition to the D2 kits, there are lots of other configurations available for other rigs. Once I realized the flaws in the Meziere and Jegs design I thought lots of other applications could benefit from this design as well. I keep a good quantity of these in stock now although supply chain is still a bit challenging. I am going to contact shops in Europe and down under and let them know on larger quantities ( to save shipping cost) my lead time from the manufacturer is 90 days.
One other question I have been asked is will this work with my P38 or D1. Well on the D1 the thermostat is mounted in the intake manifold like on a small block chevy and it is not so problematic, but I do have a kit for it and it would allow you a wider selection of temperatures and to be able move it out to a more accessible area. On the P38 you could easily convert the Jarvis heart thermostat of the P38 to the inline mod type by retrofitting the D2 lower hose spider and the D2 heater hose pipe that mounts to the alternator bracket and using the D2 inline kit, although the top radiator hose fitment would be slightly different. If someone has a P38 and would like to try it I can provide a kit for beta testing.
That's it guys, let me know if you have questions and I will try to answer them. You might also want to hit up some of the members that have installed the kit for their experiences, a short list of active members who installed just this year…
Arains44
Best4x4
Richard Gallant
Whowa004
And others…
Thanks,
Tim aka Extinct
Last edited by Extinct; 08-12-2021 at 08:19 PM.
Reason: Added sensor photos
Congrats on officially putting this into action. Strongly considering jumping on board. I have a few questions. Is it a 3/8" NPT on the sensor port for the D2 kit too? Curious why the fit isn't as snug with the sensor up. Is mounting a sensor with a port down impractical (shroud interference or wire to fan proximity) or impossible (fan would hit sensor)?
Congrats on officially putting this into action. Strongly considering jumping on board. I have a few questions. Is it a 3/8" NPT on the sensor port for the D2 kit too? Curious why the fit isn't as snug with the sensor up. Is mounting a sensor with a port down impractical (shroud interference or wire to fan proximity) or impossible (fan would hit sensor)?
Thanks.
Yes, 3/8" NPT sensor port. The fit with the sensor up is related to the angle of the housing, the hoses, and the shroud. It is a completely different housing than the sensor down housing. It certainly is not objectionable but not as snug as the sensor port down. You might be able to mount a sensor in the sensor down position but you would need to put a hole in the fan shroud and the fan might hit the sensor unless it was very short.
Last edited by Extinct; 03-11-2021 at 07:21 AM.
Reason: Ch
Any chance I could get hardware list for the bolt and nut size? I recently redid one of mine and the threads started to blow out when torqueing the second time. It is holding but would like to have some insurance handy if I need to crack it open again.
That said I run this kit in both my discos and strongly recommend them. Very simple and my temps rarely go over 185 even on long up-hills and the temps are very consistent so no wild fluctuations.
I used just normal SS Button Head 3/8 16 thread bolts with SS lock nuts on mine. 1 1/4 or 1 1/2 length if I'm not mistaken. Gives it a very finished look IMHO.
I also used a HP Gasket by Edelbrock P/N 7260
Oh very nice Best! I just didn't know size and hadn't bothered to go measure, honestly had forgotten that one of them stripped or partially stripped as I haven't had any issues. I should have some hardware that will fit just fine, might need to pick up some serrated nuts as I like that idea. Curious to see how the gasket holds up. It certainly has a cleaner look than all the rtv gooped around on mine haha
It's a HP gasket meant for racing applications and it had a smaller diameter center hole allowing you to just slap in the thermostat as straight as possible, and once tightened up it completely surrounded the thermostat. Not a drop out of it, and it should last a very long time. Cruised down I-10 yet again today into LA for work (Mercedes Sprinter is INOP yet again and I think a piece of flying debris destroyed a 2300.00 DEF tank due to it being mounted directly behind a giant plastic bumper with ZERO protection...), and I was cruising at 75-80MPH and the highest I saw was 195F.
The only reason I went with that gasket was I had to tear my inline setup apart, and the paper gaskets I got to replace the originals were not nearly as thick or high of quality so when I put it back together it leaked like the Titanic. When I went back to get more I found out I had bought the only 2 they had in stock. I then cruised down the HP Isle as I always remembered seeing a thermostat gasket hanging there and sure enough = meant for our application. It was pretty bad as the auto parts store employee had NO CLUE that gasket was even out there.... I walked up with it and he was like where did that come from with a very puzzled look on his face!
Best4x4 - Where did you get the clear tube that you're using as a "window" in the middle of the upper hose? That's a great idea to view your coolant. I'd love to source something similar if you have any recommendations. Also, did you have to do any tricks other than the hose clamps to keep it from leaking? Great idea..
 03-10-2021, 09:31 PM