
Pioneer AVH4000NEX install


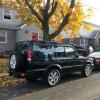
My endeavor in this project was to bring my 03 Disco 2 stereo out of the dark ages and into digital age. I already had the Pioneer head unit in my Silverado, and since my Disco was going to be my main ride, it was a matter of moving from one vehicle to the other (or so I thought)
I started with the wiring, so I purchased the Metra 70-1786 harness and the PAC SWI-RC steering wheel control module, then i wired in the micro bypass switch to fool the head unit to think the emergency brake was on for full time viewing. After the wiring was complete, I took the finished harness out to the vehicle and hooked it up and programmed the PAC SWI-RC as per the instructions(it retains the programming,even if you remove power, until you reset).
My next dilemma, figuring out which plug of the three mini-iso plugs went to the amplified head phone jacks behind the rear seats. Since the head unit has dual-view, there is a mini-jack for a 3.5 to rca plug. I found a metra 70-1787 kit that has the mini-iso male plug that plugs into the oem plug and removed two of the rca plugs(of the four it came with), then re-pinned the remaining two to match the left and right channels. The oem wiring splits the wires and sends to each headphone jacks.
Next was the amp and sub. I removed the cd changer from below the passenger seat and there went my mono bloc amp. I wired the positive cable from the fuse box(engine) thru the firewall, under the door sill to the passenger seat. I used one of the cd changer mounting studs and nut to provide the ground(earth). I ran the rca plugs and amp turn on signal wire under the console to the amp. I ran the speaker wires from the amp under the rear door sill and trim to the cargo area and hooked up sub.
At this point, I happened to read about, replacing the two 6.5 speakers in the oem rear door sub box, and decided to look at the speakers, both were pretty much shot, foam had holes in it and were crumbling. So I replaced with some alpine SPS 600 speakers that my son had lying around in the garage(perfect fit) After seeing the rear door subs, I decided to check out the remaining 4 6.5 speakers in the doors, and all were ok, I will replace with better ones at a later date.
Now for the head rest monitors, I already had two in my Chevrolet truck, and so I removed and installed in the Disco. It was a tight fit but they came out great, colors matched and all.( I had run the video rca plug along with the sub rcas to passenger seat and used the sub pos and neg posts to get power to the monitors. Each monitor has a power button, so i checked and both came on.
I searched the forum and found my Disco had the diversity antennas, and someone posted the place to get the y-adapter to make use of both the antennas(large end antenna is AM/FM, and small end antenna is FM only)
I installed the siriusxm module behind the dash and now have to find a place for the antenna. I also installed the navi add-on and digital tvtuner behind the dash and ran the gps antenna up thru the dash vent and mounted on the center of the dash. Thanks to abran(forum member) I ordered the two plugs from Paul in UK to plug into the fuse box(interior) to power the tvtuner and the navi add-on module. The navi add-on uses constant power and the tuner uses switched power. With the plugs i will not have to splice into any existing wires, and they both will be fuse protected.
So today, I removed the Pioneer from my Silverado, and put back my oem stereo in it, and plugged into my Disco.
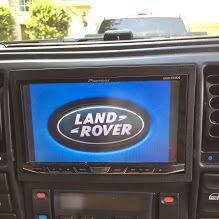
I turned the key on and the Pioneer came to life, I had to insert my security code and go thru the setup procedure but all went according to plan. I hit sdcard input and started a movie, to check the monitors and working great.
Then to test the sound, Lenny Kravitz, American Woman, Not what I expected, at which point, I remembered, when i removed the deck all settings went back to default(subwoofer turned off, rear speakers turned off, EQ set at flat, and so on) Started the song over and boom, Lenny was entertaining the whole neighborhood. The steering wheel controls worked perfect.
The music lasted for about 2 minutes, then started sounding really crappy. I turned the key to start, and click,click,click. My disco had been sitting for the last couple of weeks while doing all this and the battery was about dead. I hooked up the charger and in a few minutes everything was cranking. I now have over 200 ripped DVD movies on a sdcard, 25000 songs on Solid State Drive, Pandora, siriusxm, HD Radio, Bluetooth phone, or streaming, Navigation thru AppRadio or Navi add-on(Pioneer AVIC-U260), Digital TV at my fingertips.
I also use DashCommand which along with the obd2 wifi reader, turns my head unit into a real time diagnostic tool, and with Escort Live, it communicates with my Radar detector thru my phone.
When my connectors get here from UK, I can button up this thing start a new project.
I have to thank the contributing members on this forum, for all the helpful posts that has made my trip into Land Rover ownership, a great experience.
I started with the wiring, so I purchased the Metra 70-1786 harness and the PAC SWI-RC steering wheel control module, then i wired in the micro bypass switch to fool the head unit to think the emergency brake was on for full time viewing. After the wiring was complete, I took the finished harness out to the vehicle and hooked it up and programmed the PAC SWI-RC as per the instructions(it retains the programming,even if you remove power, until you reset).
My next dilemma, figuring out which plug of the three mini-iso plugs went to the amplified head phone jacks behind the rear seats. Since the head unit has dual-view, there is a mini-jack for a 3.5 to rca plug. I found a metra 70-1787 kit that has the mini-iso male plug that plugs into the oem plug and removed two of the rca plugs(of the four it came with), then re-pinned the remaining two to match the left and right channels. The oem wiring splits the wires and sends to each headphone jacks.
Next was the amp and sub. I removed the cd changer from below the passenger seat and there went my mono bloc amp. I wired the positive cable from the fuse box(engine) thru the firewall, under the door sill to the passenger seat. I used one of the cd changer mounting studs and nut to provide the ground(earth). I ran the rca plugs and amp turn on signal wire under the console to the amp. I ran the speaker wires from the amp under the rear door sill and trim to the cargo area and hooked up sub.
At this point, I happened to read about, replacing the two 6.5 speakers in the oem rear door sub box, and decided to look at the speakers, both were pretty much shot, foam had holes in it and were crumbling. So I replaced with some alpine SPS 600 speakers that my son had lying around in the garage(perfect fit) After seeing the rear door subs, I decided to check out the remaining 4 6.5 speakers in the doors, and all were ok, I will replace with better ones at a later date.
Now for the head rest monitors, I already had two in my Chevrolet truck, and so I removed and installed in the Disco. It was a tight fit but they came out great, colors matched and all.( I had run the video rca plug along with the sub rcas to passenger seat and used the sub pos and neg posts to get power to the monitors. Each monitor has a power button, so i checked and both came on.
I searched the forum and found my Disco had the diversity antennas, and someone posted the place to get the y-adapter to make use of both the antennas(large end antenna is AM/FM, and small end antenna is FM only)
I installed the siriusxm module behind the dash and now have to find a place for the antenna. I also installed the navi add-on and digital tvtuner behind the dash and ran the gps antenna up thru the dash vent and mounted on the center of the dash. Thanks to abran(forum member) I ordered the two plugs from Paul in UK to plug into the fuse box(interior) to power the tvtuner and the navi add-on module. The navi add-on uses constant power and the tuner uses switched power. With the plugs i will not have to splice into any existing wires, and they both will be fuse protected.
So today, I removed the Pioneer from my Silverado, and put back my oem stereo in it, and plugged into my Disco.
I turned the key on and the Pioneer came to life, I had to insert my security code and go thru the setup procedure but all went according to plan. I hit sdcard input and started a movie, to check the monitors and working great.
Then to test the sound, Lenny Kravitz, American Woman, Not what I expected, at which point, I remembered, when i removed the deck all settings went back to default(subwoofer turned off, rear speakers turned off, EQ set at flat, and so on) Started the song over and boom, Lenny was entertaining the whole neighborhood. The steering wheel controls worked perfect.
The music lasted for about 2 minutes, then started sounding really crappy. I turned the key to start, and click,click,click. My disco had been sitting for the last couple of weeks while doing all this and the battery was about dead. I hooked up the charger and in a few minutes everything was cranking. I now have over 200 ripped DVD movies on a sdcard, 25000 songs on Solid State Drive, Pandora, siriusxm, HD Radio, Bluetooth phone, or streaming, Navigation thru AppRadio or Navi add-on(Pioneer AVIC-U260), Digital TV at my fingertips.
I also use DashCommand which along with the obd2 wifi reader, turns my head unit into a real time diagnostic tool, and with Escort Live, it communicates with my Radar detector thru my phone.
When my connectors get here from UK, I can button up this thing start a new project.
I have to thank the contributing members on this forum, for all the helpful posts that has made my trip into Land Rover ownership, a great experience.

Finally got around to install my rear view camera. The camera came with a hole saw bit, so I drilled a hole in the bumper, right above the hitch. And tapped into the reverse lamp to power up the camera. I removed the tailight, and ran the rca cable into the cab area behind the jump seat moulding, down under the sill, to the front dash and up to head unit. Since the head unit has to have reverse signal to change to camera view, I tapped into the unused navi harness that was capped right to left of the interior fuse box. I read this is where one of the Oem navi modules plugs in. There was the green and brown wire I knew I had to find. I tapped into the wire and hooked up to reverse signal wire on the head unit, and tried it out. Everything worked so I soldered wire, buttoned up and good to go. I decided not to hook up siriusxm receiver for now, I never listen anyway, and deactivated my account.
Sorry for not posting picture yet. I made a youtube video and posted it, but forgot some of the features. I am writing a narrative so as to not forget anything and not hear myself go uh, forget what i am saying etc. Also, I have to clean up my interior, and then will post pics,
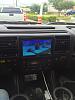
This picture is before the navi add-on, and rear view camera, the iPhone (white cord in pic) has been rerouted to come out from below the console, where my phone holder will go. This also does not show the gps antenna on the dash.

This picture is before the navi add-on, and rear view camera, the iPhone (white cord in pic) has been rerouted to come out from below the console, where my phone holder will go. This also does not show the gps antenna on the dash.
Last edited by Joemamma1954; May 5, 2015 at 09:04 PM.
LOL, Not a slacker, Just not enough hours in the day, when you are 60 years old and between job, home duties, a 3 year old and 4 year old that I take to school and daycare before work, pick up after work, then feed them, entertain them, until the wife comes home at 7:30. My time on the Disco is only when i can get a few minutes, here and there.

I found a fascia on eBay for 40.00 and cut it, found Pioneer made a 2din install kit(metal cage), screwed and glued it on. I still have original fascia, head unit, and cd changer boxed up, if I ever need to reinstall. I did not cut any of the harness, just found ways to plug into it.