
Roof Rack Build Attempt


Rock Crawling
Joined: Mar 2009
Posts: 294
Likes: 21
That is looking great.
If you lived in Denver I would buy the material and let you build me one...LOL
I am curious...
Once you get there - Details of wiring up the lights on the rack... you have detailed your work so nicely to now Would like to see how you route the wires and to what switch.?
If you lived in Denver I would buy the material and let you build me one...LOL
I am curious...
Once you get there - Details of wiring up the lights on the rack... you have detailed your work so nicely to now Would like to see how you route the wires and to what switch.?
Thread Starter
|
Mudding
Joined: May 2012
Posts: 193
Likes: 15
From: Oklahoma
That is looking great.
If you lived in Denver I would buy the material and let you build me one...LOL
I am curious...
Once you get there - Details of wiring up the lights on the rack... you have detailed your work so nicely to now Would like to see how you route the wires and to what switch.?
If you lived in Denver I would buy the material and let you build me one...LOL
I am curious...
Once you get there - Details of wiring up the lights on the rack... you have detailed your work so nicely to now Would like to see how you route the wires and to what switch.?
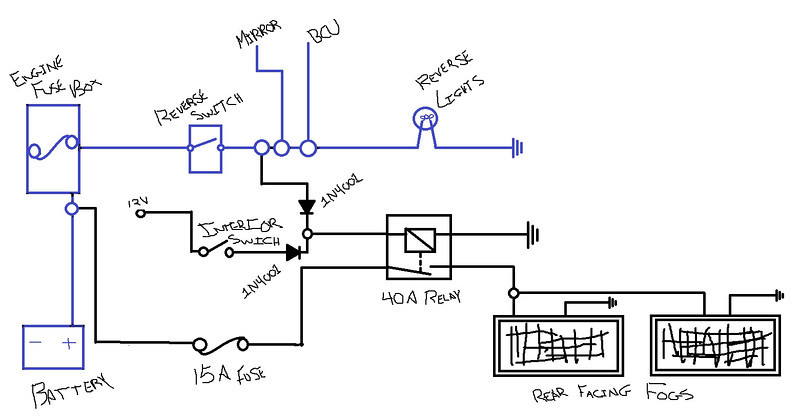
The Hella 700's came with a wiring kit so that will be pretty easy, just running wires. The back lights I want to come on with the reverse lights, as well as, have a manual over ride. Here's the wiring diagram I came up with for those. The Diodes (1N4001) are in there to prevent back feeding the BCU and mirror with a 12v signal and having them think I have the vehicle in reverse when I manually override.
This was just the initial draft of what I was going to wire. In all honesty I probably would only need that one between the stock wiring (blue) since the switch would "block" the 12v from the reverse lights coming on. I also didn't go with a 40A relay, because two 55w lights don't pull near that. Additionally, I may let 12v go to the rear mirror and isolate just the BCU. This way when the lights are manually the mirror will auto undim.
Last edited by BrandonS; Jan 12, 2013 at 10:23 AM.

Mudding
Joined: Jul 2010
Posts: 129
Likes: 0
From: In the Disco!
Hey Brandon,
Nicely done on the build. I like the wind deflector.
I would personally refrain from drilling any holes into the rack for wire runs, it's not worth having any excess moisture sitting inside of the rack for longer than it needs to be.
My Disco also has the four lights on front and one rear work light. The guy I bought it from installed it's own fuse box inside the battery compartment.


Those lights look to be from Harbor Freight, or at least the same type that are sold there. Due to the way you have them mounted, be sure to unscrew the black plastic surrounds that holds the glass lamp in place, and flip it over to prevent water from being able to drain into the housing.
Just FYI because-

Just FYI because-
Thread Starter
|
Mudding
Joined: May 2012
Posts: 193
Likes: 15
From: Oklahoma
Thanks for looking out. I did read that. In relation when i flip ittthe housing's drain hoes to the bottom, but how does water get out of the whole housing? Did you drill a separate drain hole?
Thread Starter
|
Mudding
Joined: May 2012
Posts: 193
Likes: 15
From: Oklahoma
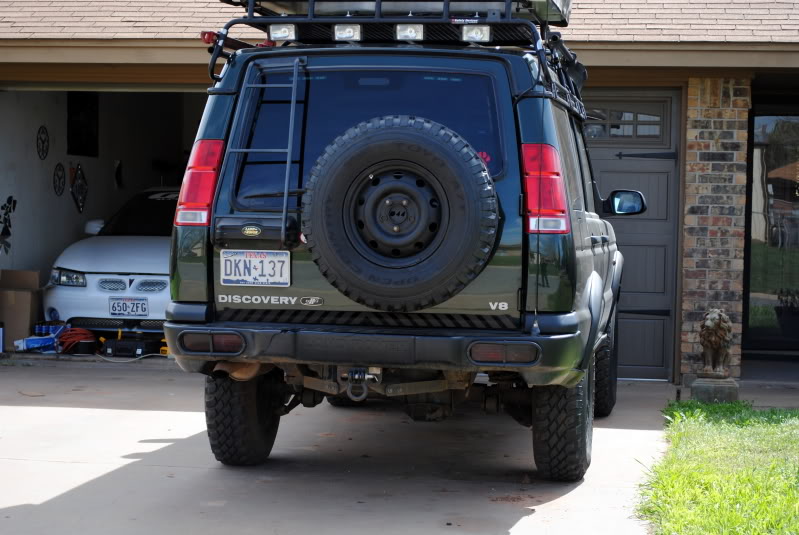
I know thread that won't die..... Finally got it on. Took it out at night and definitely will need to make glare shields for under the lights. The windshield gets lots of glare.
Sorry for the crappy cellphone pic.

Sorry for the crappy cellphone pic.
Last edited by BrandonS; Jan 13, 2013 at 09:00 PM.

