Super Simple Ultra Gauge Install
#1
 05-09-2013, 01:53 PM


I've had my Ultra Gauge installed almost as soon as I bought my DII because of all the posts about it on this forum. I LOVE and Highly Recommend it to everyone.
It's been sitting happily here until today, because I've always wanted to integrate it a little better for aesthetics.
Today, I decided to open the UG and see if I could extend Remote Buttons so that I could mount the gauge flush in either my Dash or Overhead Console here. I was going to cut a hole in that blank cover and route the wires left and down.
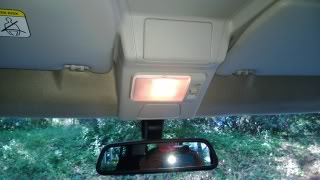
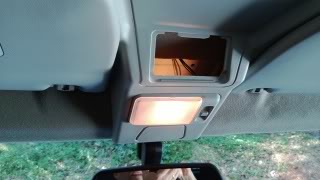
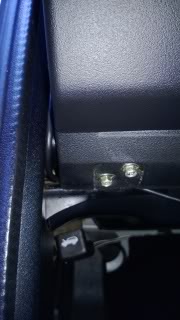
I was going to add these buttons to the blank panel and soldering them into the Gauge Directly. It looked easy enough to do, and 5 butons for under $2 on eBay made it very cheap too.

I then found the cord was going to be too short to reach the OBDII socket, and since I didn't want to cut/extend the cable, I started over.
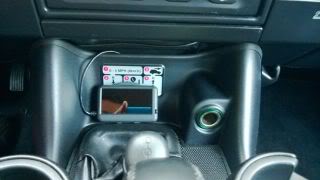
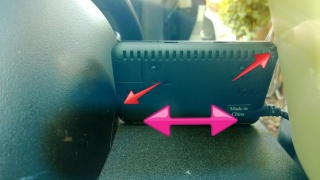
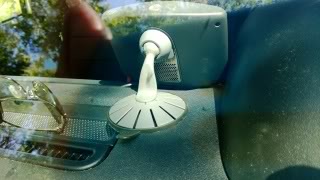
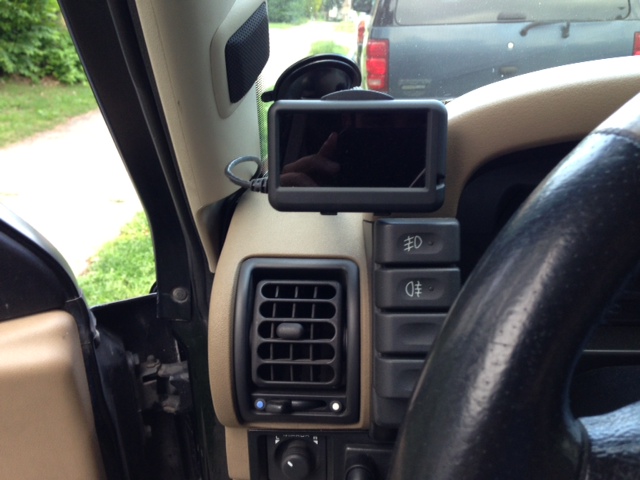
I went SIMPLE and mounted it here.
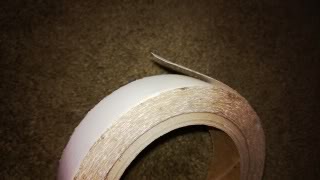
I used some Double Sided Tape that I had around from when I owned my sign shop. It's MUCH thinner than most tapes, SUPER sticky, and clear, so it barely shows after installation.
I cleaned the Gauge and Dash with Rubbing Alcohol and let it dry. I then placed very small strips at these spots, using a full strip across the bottom, then pressed it into place.
I routed the wire as follows:
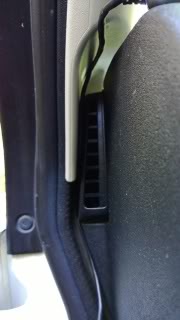
Where it hits that gasket below the grill, I pushed it on the LEFT side of that gasket so it went behind.
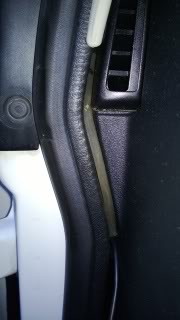
Then, I pulled it down and around that dash mounting post because the plug on the Gauge was too large to go behind it. After it's in, you cannot notice the wire anymore.
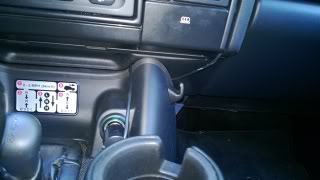
Then, pull the plastic plug on the kick panel underneath so you can route the wire inside the kick panel. Tuck in the wire, and zip tie it in place so it does not fall out on your foot in the future.

Plug in the Gauge, put the Kick Panel back on and you are done.
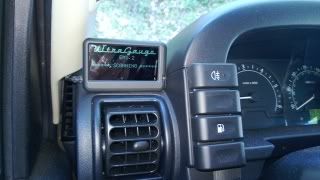
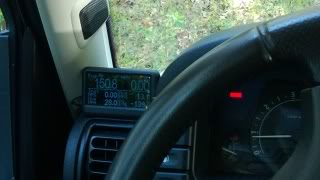
Here's how it looks installed.
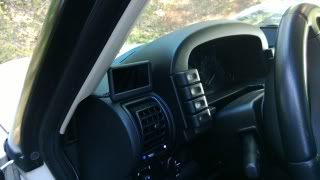
And this is the view from the driver's seat. Unobstructed.
With that under my belt, I decided to do the same with my TomTom GPS, moving it from the Windshield to the Dash, and a little closer for my short arms to reach.
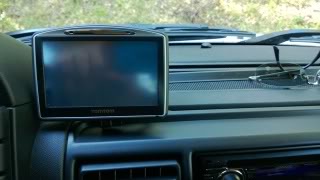
I cleaned the GPS Mount and Dash as before with Rubbing Alcohol, then placed the same Double Sided Tape on the Mount and trimmed it for a clean look.
Now, tuck the wire in so it disappears. I used a Blunt Key to press it into the groove, and it ended up pressing behind this dash trim.

Press it in all the way down, then cross over the dash and tuck behind the console trim. It's barely noticeable here after it's in place.

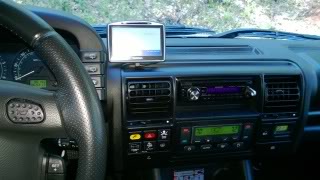
And here is how it all looks together. For me, this is clean enough, and only took about 30 minutes total to complete.
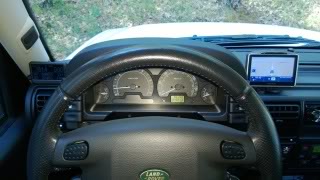
Both are very visible without moving my head while driving.
This also puts them into EASY reach, and allows easy access to the UltraGauge's buttons. WAY easier than when it was laying down by the shifter.
It's been sitting happily here until today, because I've always wanted to integrate it a little better for aesthetics.
Today, I decided to open the UG and see if I could extend Remote Buttons so that I could mount the gauge flush in either my Dash or Overhead Console here. I was going to cut a hole in that blank cover and route the wires left and down.
I was going to add these buttons to the blank panel and soldering them into the Gauge Directly. It looked easy enough to do, and 5 butons for under $2 on eBay made it very cheap too.
I then found the cord was going to be too short to reach the OBDII socket, and since I didn't want to cut/extend the cable, I started over.
I went SIMPLE and mounted it here.
I used some Double Sided Tape that I had around from when I owned my sign shop. It's MUCH thinner than most tapes, SUPER sticky, and clear, so it barely shows after installation.
I cleaned the Gauge and Dash with Rubbing Alcohol and let it dry. I then placed very small strips at these spots, using a full strip across the bottom, then pressed it into place.
I routed the wire as follows:
Where it hits that gasket below the grill, I pushed it on the LEFT side of that gasket so it went behind.
Then, I pulled it down and around that dash mounting post because the plug on the Gauge was too large to go behind it. After it's in, you cannot notice the wire anymore.
Then, pull the plastic plug on the kick panel underneath so you can route the wire inside the kick panel. Tuck in the wire, and zip tie it in place so it does not fall out on your foot in the future.
Plug in the Gauge, put the Kick Panel back on and you are done.
Here's how it looks installed.
And this is the view from the driver's seat. Unobstructed.
With that under my belt, I decided to do the same with my TomTom GPS, moving it from the Windshield to the Dash, and a little closer for my short arms to reach.
I cleaned the GPS Mount and Dash as before with Rubbing Alcohol, then placed the same Double Sided Tape on the Mount and trimmed it for a clean look.
Now, tuck the wire in so it disappears. I used a Blunt Key to press it into the groove, and it ended up pressing behind this dash trim.
Press it in all the way down, then cross over the dash and tuck behind the console trim. It's barely noticeable here after it's in place.
And here is how it all looks together. For me, this is clean enough, and only took about 30 minutes total to complete.
Both are very visible without moving my head while driving.
This also puts them into EASY reach, and allows easy access to the UltraGauge's buttons. WAY easier than when it was laying down by the shifter.
Last edited by SuperSport; 05-10-2013 at 10:59 AM.


#4
05-09-2013, 02:11 PM

#5
05-09-2013, 05:59 PM

Not to burst your bubble, but my UG came w/ the flexible windscreen mount and I placed mine exactly well, not exactly but relatively close to where you have yours adhered w/ double sided tape. I love the location, it fits right in there. Stealth 
Last edited by coors; 05-09-2013 at 06:06 PM.
 Great minds think alike, and all that...


#9
05-20-2013, 06:34 PM

Recovery Vehicle
You could purchase and OBD2 extension cable.
Cool ELM327 OBD2 1.5 Meters Long 16 pin OBDII Male to Female Extension Cable on eBay!
Cool ELM327 OBD2 1.5 Meters Long 16 pin OBDII Male to Female Extension Cable on eBay!
#10
05-20-2013, 06:37 PM
You could purchase and OBD2 extension cable.
Cool ELM327 OBD2 1.5 Meters Long 16 pin OBDII Male to Female Extension Cable on eBay!
Cool ELM327 OBD2 1.5 Meters Long 16 pin OBDII Male to Female Extension Cable on eBay!