
Want to replace that ugle brake boot?


Well it is very simple if you want to sew.
You will need some fabric that you will like and will function in the vehicle without getting snagged or anything. So materials like leather are to thick. denim like materials work best but what ever suits you is fine. (don't use anything thin or else you will have problems later). You will also need some epoxy or crazy glue (I prefer epoxy), thread and needle, some pins, and some paper clips.
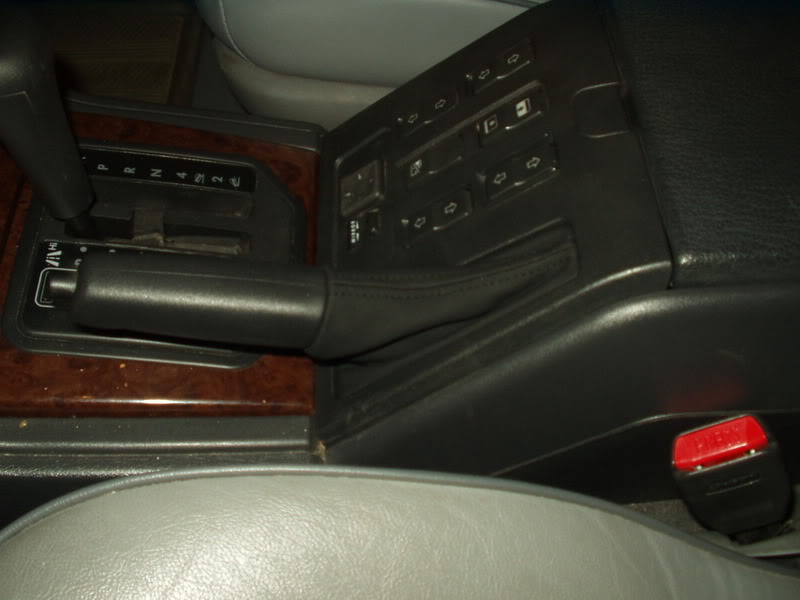
First off remove the ugly brake boot. There is a rubber ring holding it to the handle itself, be careful not to break it, mine had some play to it but I don't know where to find a new ring if you do break it. Maybe a hair tie?

Once off you will have this thing

There is only one part that actually is stitched together and it goes from the handle to the base and you can take it apart with a knife or thread puller. You will also have to pull the glue they used apart, don't worry if you tear anything, you just need the basic shape of it. Once apart it will look like this.

Now, using your new material and some pins to hold down the old material, make a new piece of fabric to use for the boot.

After tacking it down, cut it out. You should have something very similar to this.

Feel free to clean the edges if you want but most of them will be hidden so I wouldn't worry about it too much. Now remember how the basic shape of the boot was put together and go ahead and stitch the front seam together first.

After that line up the little wire frame and go ahead and mix some epoxy

Now you will be gluing all the edges together to hold the fabric around the wire frame. Be careful not to use to much, as it will soak the material and be chunky, but not such a little amount that makes terrible surface contact. (maybe try practicing on some scrap material to see how it reacts?)

Now after gluing things together, use paper clips to hold things together while it is setting.

Now you can clean everything up and go ahead and reinstall.
This is what I got -


Now I hope that everyone can follow my crude instructions but personally, I was so tired of that piece of junk flaking everywhere that I was willing to try anything. This is pretty easy is you have ever done some arts and crafts. Overall I probably spent about $15 and about 2 hours worth of my time getting materials do doing the work plus 30 minutes to dry the epoxy. Overall I'm happy with it and I hope it works for anyone else who tries it.
First off remove the ugly brake boot. There is a rubber ring holding it to the handle itself, be careful not to break it, mine had some play to it but I don't know where to find a new ring if you do break it. Maybe a hair tie?
Once off you will have this thing
There is only one part that actually is stitched together and it goes from the handle to the base and you can take it apart with a knife or thread puller. You will also have to pull the glue they used apart, don't worry if you tear anything, you just need the basic shape of it. Once apart it will look like this.
Now, using your new material and some pins to hold down the old material, make a new piece of fabric to use for the boot.
After tacking it down, cut it out. You should have something very similar to this.
Feel free to clean the edges if you want but most of them will be hidden so I wouldn't worry about it too much. Now remember how the basic shape of the boot was put together and go ahead and stitch the front seam together first.
After that line up the little wire frame and go ahead and mix some epoxy
Now you will be gluing all the edges together to hold the fabric around the wire frame. Be careful not to use to much, as it will soak the material and be chunky, but not such a little amount that makes terrible surface contact. (maybe try practicing on some scrap material to see how it reacts?)
Now after gluing things together, use paper clips to hold things together while it is setting.
Now you can clean everything up and go ahead and reinstall.
This is what I got -
Now I hope that everyone can follow my crude instructions but personally, I was so tired of that piece of junk flaking everywhere that I was willing to try anything. This is pretty easy is you have ever done some arts and crafts. Overall I probably spent about $15 and about 2 hours worth of my time getting materials do doing the work plus 30 minutes to dry the epoxy. Overall I'm happy with it and I hope it works for anyone else who tries it.


Ah, I guess I didn't see it. All I could find was the original replacement that costs like $80 or something. I thought that was crazy and just decided to make my own.

Recovery Vehicle
Joined: Jun 2009
Posts: 1,099
Likes: 8

Rock Crawling
Joined: Oct 2011
Posts: 480
Likes: 11
Nice work!!
Micro suede is nice to work with.
Micro suede is nice to work with.


Camel Trophy
Joined: Aug 2014
Posts: 4,743
Likes: 984
From: Southwestern Virginia
The images are hosted externally so the original poster would have to re-upload and re-link the images. As for someone else doing a write up, well, that's up to anyone else willing. Should be simple though, I'd say you could follow along without pictures.
Recovery Vehicle
Joined: Sep 2014
Posts: 1,182
Likes: 105
From: Putnam county. NY.
https://landroverforums.com/forum/discovery-ii-18/swap-ratty-old-handbrake-gator-nice-leather-one-69341/
Pics still work
