
Wiper Switch Fix


Thread Starter
|
Rock Crawling
Joined: Mar 2009
Posts: 294
Likes: 21
I had a wiper switch that only worked when the weather as warm. I heard the switch needed to be dismantled and cleaned of all the old grease that turns to "glue" over time. This is what i did and it worked beautifully, the switch operates like new. Here are some before and after pics. The grease was actually tacky and you can see why the switch would not work
Before cleaning...
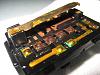
After...

Find the Continued Thread for my description of what i did
Before cleaning...

After...

Find the Continued Thread for my description of what i did
Thread Starter
|
Rock Crawling
Joined: Mar 2009
Posts: 294
Likes: 21
Feel free to add your own comments, this is what worked for me. Total time was about an hour to do the repair.
1. Remove the steering wheel column shroud to access the switch and turn the steering wheel to postition where screws are accessible. Some people want you to disconnect the battery when working around the steering wheel... I did not.
Attachment 7918
2. Remove the screws, then I used a flathead screwdriver to apply some pressure to the plastic holding the switch in place, while pulling the switch arm with a decent amount of force away from the steering column. It will slide right off. Carefull not to crack anything.
Attachment 7919
3. One the switch was out, I dismantled it. I found it easier to remove the switch arm from the base...(may not be required) by holding the switch unit and forcing the switch arm up and out...it will release. DON'T mess with the end that was removed as it is spring loaded and the force of the spring is what holds the plate in place. It will shoot like a rocket if you arent careful. Take note of the position of the white "slides" at this point.
The one is stationary, the other will need to be placed to fit back with the arm...(play with the switch arm a bit and you'll see what I mean.
Attachment 7920
4. Then you will be able to see the 4 little retaining clips that hold the bottom on, lightly lifted them and remove bottom
Attachment 7921
5. Remove the white slides. Notice the contacts on springs will need to be cleaned of the old grease as well.
Attachment 7922
6. I gently cleaned the contacts with some degreaser, lubed them up with some vasoline and reassmble the unit. It all clipped back together very easily.
It has almost taken me longer to write this up than it took to do the actual work and no more issues with the switch. I am in Canada and it was cold today... still the wiper works!
This may now be your issue, but it was mine. If your wiper switch doesn't function when the weather gets chilly then i would try it.

Super Moderator
Joined: Jan 2011
Posts: 16,322
Likes: 88
From: Savannah Georgia
Very good write up. Two pix come through (before and after), but other attachments don't, not sure why.
Do you think there is an opening where a plastic straw from a can of contact cleaner could be pressed in, and soak it, rather than full dismantle?
Do you think there is an opening where a plastic straw from a can of contact cleaner could be pressed in, and soak it, rather than full dismantle?


Thread Starter
|
Rock Crawling
Joined: Mar 2009
Posts: 294
Likes: 21
Buzz...
Once the wiper arm comes off the unit you could spray some cleaner and manually shift the slide to lossen the old lube...but it is too easy not to just break it down the entire way. You will see what I mean once you get into it.
Once the wiper arm comes off the unit you could spray some cleaner and manually shift the slide to lossen the old lube...but it is too easy not to just break it down the entire way. You will see what I mean once you get into it.

Thread Starter
|
Rock Crawling
Joined: Mar 2009
Posts: 294
Likes: 21
I just got easier for you....
You can skip the 3rd step and avoid the possiblity of the spring loaded arm coming apart. Just lightly pry the 4 small clips at the base of the unit- remove and all will be exposed and reassembly will make sense. Just note the positions of the white slides.

You can skip the 3rd step and avoid the possiblity of the spring loaded arm coming apart. Just lightly pry the 4 small clips at the base of the unit- remove and all will be exposed and reassembly will make sense. Just note the positions of the white slides.

Rock Crawling
Joined: Aug 2006
Posts: 291
Likes: 15
From: Central Florida
Another switch wiper switch cleaned... thanks for the post! Mine was goobered up too. I noticed that it was slow on the first setting in the cold morning. The only problem that I had was one of the posts bent when connecting the female to the male. I noticed that my delayed wiper switch was not working. I pulled it apart and saw the bent tab. Pulling the whole switch out required patience and gentle pulling... but it eventually came out with a little prying from a thin regular screw driver near the screw locations/ tabs.
Thanks-
Thanks-

