

Drawer System
#1
 09-09-2015 | 11:59 AM

Thread Starter
|
Recovery Vehicle
Joined: Oct 2014
Posts: 1,222
Likes: 130
EDIT: Project is finished, below are build updates. Edited for cost changes.
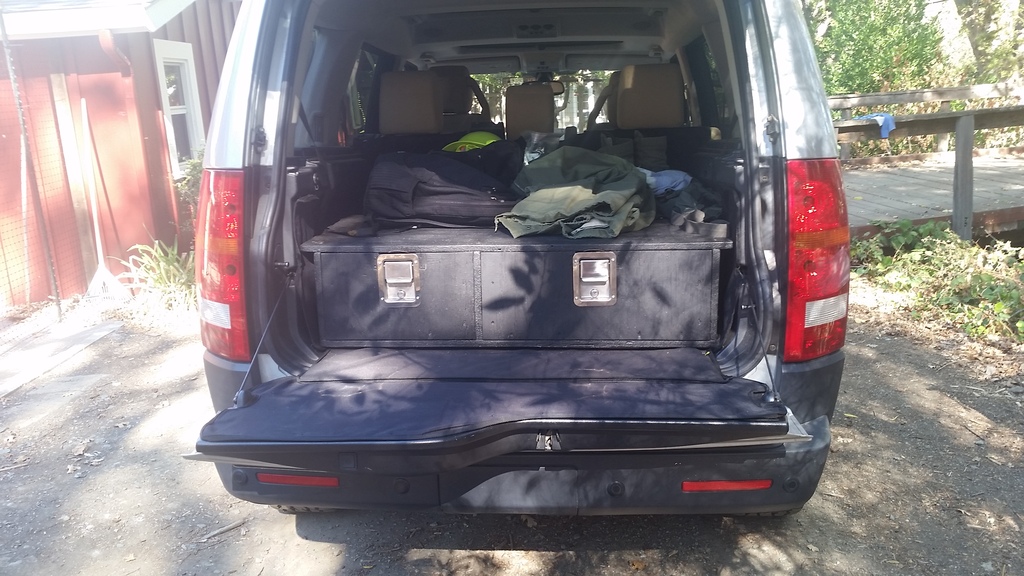
I've been thinking about adding drawers for a while now, and after re-reading the Overland Journal build thread on that Disco4, I definitely had the itch bad. Like many, I didn't have a few thousand to ask AT overland for that sweet, sweet drawer system they made for Scott.
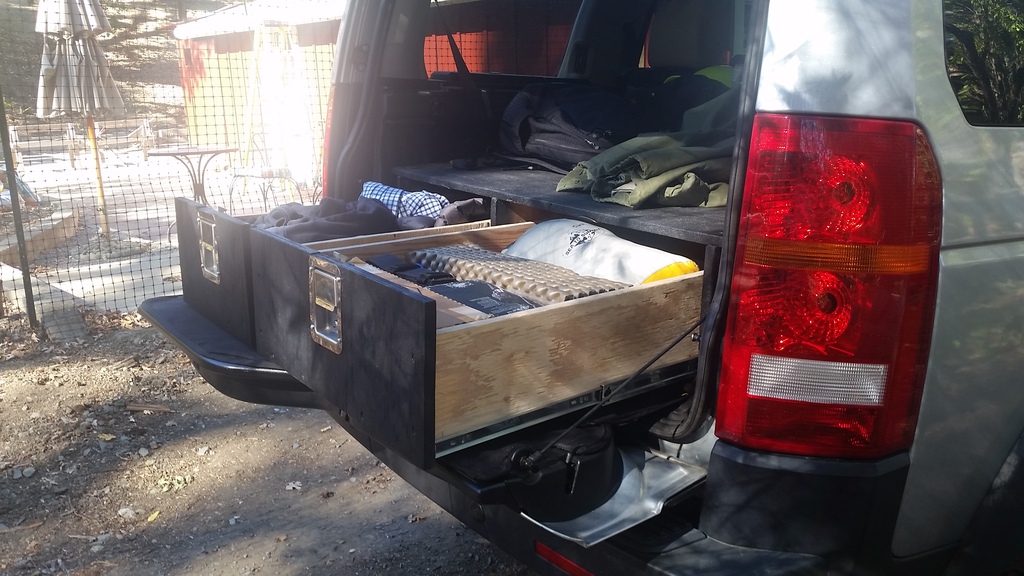
Started on a mockup a few days back, and I should have a rough set completed this weekend. I will post up more specific measurements as we near completion, but we went really quickly with this, and got SUPER lucky with most of the fitting. We plan on doing a second section to cover the middle row as well to make the thing a sleeping platform.
The basic info I can offer at this point is:
EDIT: Cost ended up being around $300. I was wasteful and changed my mind on what drawer pulls I wanted, what features I wanted, and didn't understand exactly how we were going to put everything together at first; and ended up mounting the truck toolbox latches you see, so this meant we needed way more brackets, bolts, and a set of strike plates. If I did everything again I could probably keep the cost under $200.
39" long
41" wide
up to 48" at widest point of the top panel that contours the shape of the rear cabinets at back.
11" deep, it sits almost level with the lower part of the liftgate, so that I can add a slider for a fridge if needed later.
Without the drawers, the frame is STRONG. We were clambering all over the thing taking measurements in the back and it was very solid. That might be a consideration for some to choose thicker plywood.
One drawer is much wider than the other to allow for future access through the floor to the spare tire winch. Some may like the asymmetry like I do (I can put my big tools and things in the one, and smaller kit in the other).
Two sheets of 3/4" plywood (if I did it again I would go with 1/2", the larger thickness is kind of overkill, and heavier). These were $40-50 each, and we still have approximately 75% of the second sheet left for drawers.
Two 22" sliding drawer rails (with ball bearing slides) maybe $20 each
Assorted things like screws, woodglue, brackets, bolts, drawer pulls etc.
I regret not documenting the build as much, but we have a ways to go. Final fit and finish will be a few coats of paint, and rubber or carpet up top with duplicate tie-down points.

I've been thinking about adding drawers for a while now, and after re-reading the Overland Journal build thread on that Disco4, I definitely had the itch bad. Like many, I didn't have a few thousand to ask AT overland for that sweet, sweet drawer system they made for Scott.
Started on a mockup a few days back, and I should have a rough set completed this weekend. I will post up more specific measurements as we near completion, but we went really quickly with this, and got SUPER lucky with most of the fitting. We plan on doing a second section to cover the middle row as well to make the thing a sleeping platform.
The basic info I can offer at this point is:
EDIT: Cost ended up being around $300. I was wasteful and changed my mind on what drawer pulls I wanted, what features I wanted, and didn't understand exactly how we were going to put everything together at first; and ended up mounting the truck toolbox latches you see, so this meant we needed way more brackets, bolts, and a set of strike plates. If I did everything again I could probably keep the cost under $200.
39" long
41" wide
up to 48" at widest point of the top panel that contours the shape of the rear cabinets at back.
11" deep, it sits almost level with the lower part of the liftgate, so that I can add a slider for a fridge if needed later.
Without the drawers, the frame is STRONG. We were clambering all over the thing taking measurements in the back and it was very solid. That might be a consideration for some to choose thicker plywood.
One drawer is much wider than the other to allow for future access through the floor to the spare tire winch. Some may like the asymmetry like I do (I can put my big tools and things in the one, and smaller kit in the other).
Two sheets of 3/4" plywood (if I did it again I would go with 1/2", the larger thickness is kind of overkill, and heavier). These were $40-50 each, and we still have approximately 75% of the second sheet left for drawers.
Two 22" sliding drawer rails (with ball bearing slides) maybe $20 each
Assorted things like screws, woodglue, brackets, bolts, drawer pulls etc.
I regret not documenting the build as much, but we have a ways to go. Final fit and finish will be a few coats of paint, and rubber or carpet up top with duplicate tie-down points.
Last edited by DavC; 10-11-2015 at 05:21 PM.
#2
09-09-2015 | 10:48 PM
Winching
Joined: Aug 2008
Posts: 594
Likes: 40
From: Newport, Rhode Island
You could just put down laminate strips for the drawer to slide on. Here's a link to my drawer build. Your drawers are looking good, so far 
DISCO3.CO.UK - View topic - My new LR3 drawers... half hour to put together
DISCO3.CO.UK - View topic - My new LR3 drawers... half hour to put together
#3
09-13-2015 | 05:09 PM
Thread Starter
|
Recovery Vehicle
Joined: Oct 2014
Posts: 1,222
Likes: 130
You could just put down laminate strips for the drawer to slide on. Here's a link to my drawer build. Your drawers are looking good, so far
DISCO3.CO.UK - View topic - My new LR3 drawers... half hour to put together
DISCO3.CO.UK - View topic - My new LR3 drawers... half hour to put together
Tell you what though, laminate strips don't sound half bad on the bottom of the whole system to slide it in and out of the truck when mounting!
Thanks!

#4
09-17-2015 | 03:36 PM
Thread Starter
|
Recovery Vehicle
Joined: Oct 2014
Posts: 1,222
Likes: 130
Update: progress since last weekend.
The drawer frame and lid were painted with a few coats of black and textured (photo beforehand)
The mounting points were installed and an attachment problem solved with tiny steel shackles swapped for heavy d rings. (will photograph this later)
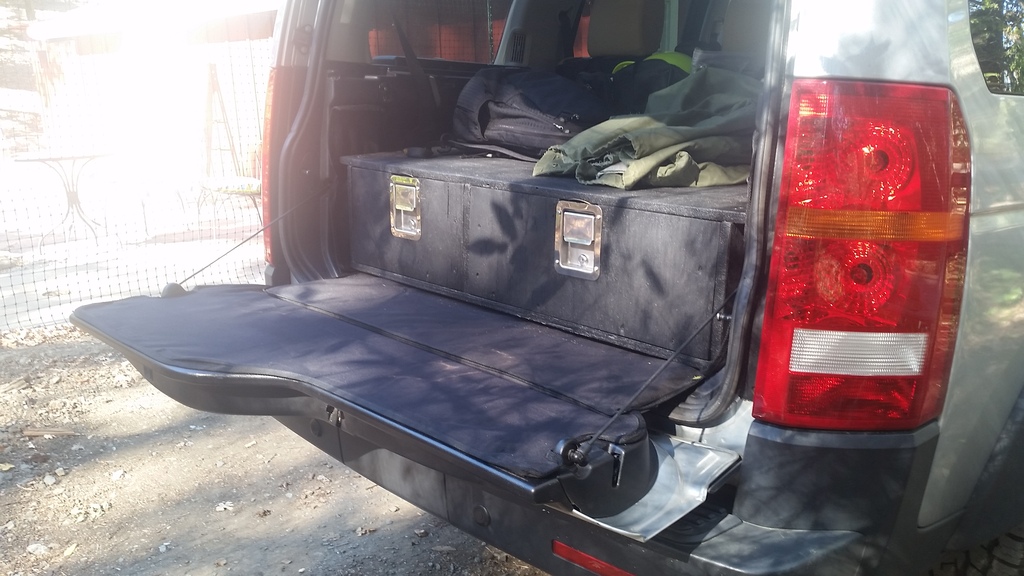
All pieces for the final drawer system were cut and sanded, measured for final fit. The smaller drawer was assembled and installed to check fit and function. We ended up needing to cut very small steel spacers to accommodate the looser tolerances between the drawer and frame (it kept ripping screws out of the drawer-side slide rail).
Small drawer completely installed with pull attached. Drawer front requires paint to match frame.
This weekend we should have the large drawer assembled, fit, and installed. Everything will be painted and the system will have a final coat. I really liked the quality of the plywood we got so the drawers and interior will remain unfinished for now. Final stretch.
More to come.
The drawer frame and lid were painted with a few coats of black and textured (photo beforehand)
The mounting points were installed and an attachment problem solved with tiny steel shackles swapped for heavy d rings. (will photograph this later)
All pieces for the final drawer system were cut and sanded, measured for final fit. The smaller drawer was assembled and installed to check fit and function. We ended up needing to cut very small steel spacers to accommodate the looser tolerances between the drawer and frame (it kept ripping screws out of the drawer-side slide rail).
Small drawer completely installed with pull attached. Drawer front requires paint to match frame.
This weekend we should have the large drawer assembled, fit, and installed. Everything will be painted and the system will have a final coat. I really liked the quality of the plywood we got so the drawers and interior will remain unfinished for now. Final stretch.
More to come.


#6
10-10-2015 | 05:36 PM
Thread Starter
|
Recovery Vehicle
Joined: Oct 2014
Posts: 1,222
Likes: 130
Update: today, 10/10/2015
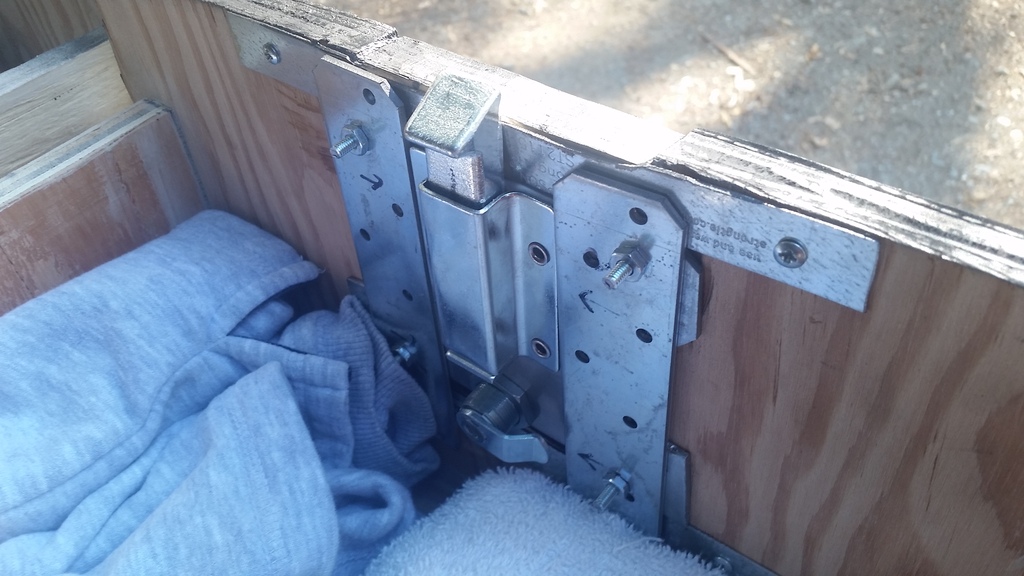
The drawers have been finished for a few weeks now. I ended up not liking the simple drawer pulls and instead went with latches, which upped the total build cost. I haven't had any decent pictures turn out of the system, since I never seem to have good enough lighting. They're great for work and commuting since I have all my tools and emergency equipment in the larger of the two drawers and an assortment of daily use items and clothes in the other. I usually just throw bags on top of the thing. I will install duplicate mounting points on the drawer top and hopefully snag the land rover rubber cargo mat to go up there as well, but for now I am content with what I have. Will add better filler paint to the front of drawers to make them look nicer and avoid the wood grain but I wanted to see how they would wear in day to day use first.
FYI these latches were a major effort to install, and added hours and hours of work to the project. They work wonderfully though.
I secured the system to the factory tie down points with a method widely used by other guys who mounted drawers. Very sturdy.
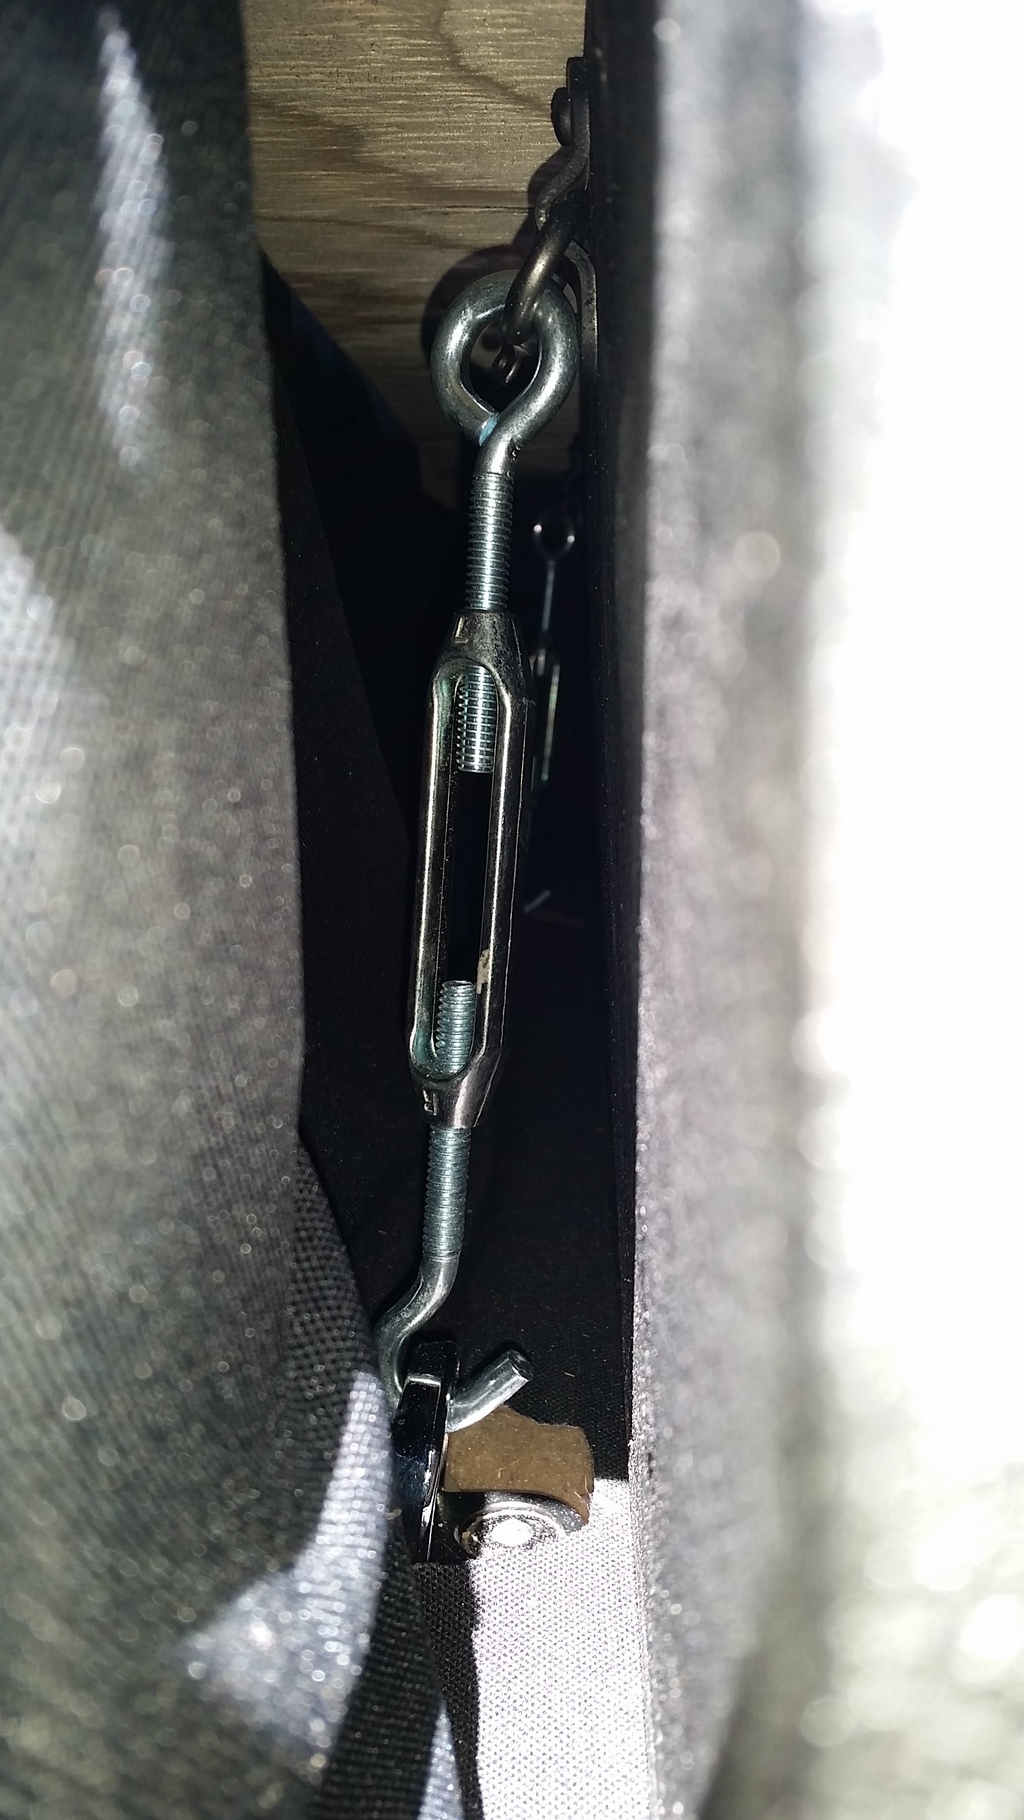

How latches are mounted/supported in drawer front. Not the cleanest but I needed strength and rigidity.
Feel free to ask if you wanted to see something else in detail.
The drawers have been finished for a few weeks now. I ended up not liking the simple drawer pulls and instead went with latches, which upped the total build cost. I haven't had any decent pictures turn out of the system, since I never seem to have good enough lighting. They're great for work and commuting since I have all my tools and emergency equipment in the larger of the two drawers and an assortment of daily use items and clothes in the other. I usually just throw bags on top of the thing. I will install duplicate mounting points on the drawer top and hopefully snag the land rover rubber cargo mat to go up there as well, but for now I am content with what I have. Will add better filler paint to the front of drawers to make them look nicer and avoid the wood grain but I wanted to see how they would wear in day to day use first.
FYI these latches were a major effort to install, and added hours and hours of work to the project. They work wonderfully though.
I secured the system to the factory tie down points with a method widely used by other guys who mounted drawers. Very sturdy.


How latches are mounted/supported in drawer front. Not the cleanest but I needed strength and rigidity.

Feel free to ask if you wanted to see something else in detail.
The following users liked this post:
morrisdl (10-14-2015)


Thread
Thread Starter
Forum
Replies
Last Post
MU ///M3
Retired - Private 'Wanted' Classifieds
0
05-08-2014 09:19 AM
RROJ
General Range Rover Discussion - Archived
3
07-24-2011 07:59 AM
blast20
Discovery II
7
09-03-2010 12:18 AM