

EAS Front Valve Block Disassembly


Thread Starter
|
Recovery Vehicle
Joined: Sep 2013
Posts: 831
Likes: 146
From: Herndon, VA
Finally got around to replacing the front valve block this weekend. It's a little early to tell, but it definitely seems like my front end is no longer sinking when I leave it overnight. It wasn't terrible, but the sinking was visibly noticeable overnight. Now, when I walk out in the morning, it looks just like it did when I parked it!
The first step was obviously to jack the car up and fully support the car with jack stands under the frame. Then, I used my IID tool to deflate the entire system (bags and reservoir).
Next, I removed the front passenger side wheel.

Checked my wheel bearings for good measure and there was no up/down play, but a little in/out play... makes me wonder if it's time for new tie rods and ends.
On the the wheel well liner. Got a 8mm socket, a flat head screwdriver, and a phillips head screwdriver and went to work removing all of the clips that hold the liner. There are a bunch. There is one phillips head screw underneath the rocker panel and one underneath the front bumper cover. Everything else is located in the actual wheel arch. I had to halfway remove the wheel fender moulding in order to pull the liner out, but it came out pretty easily and presented me with the front valve block.
Removed the electrical connector on the outside of the valve block and then came to the most difficult part of this whole endeavor... removing the freaking air lines. I'm pretty familiar with the voss connectors used elsewhere on this car and with the fuel line connectors, etc. that you push in to release. However, I could not for the life of me figure out how to get the airlines out of these voss connectors. There was nothing to push. I tried pushing the air hoses into the valve block, but it didn't get me anywhere, I tried pulling, wiggling, rotating... nothing worked. So, I just used a (12mm I think) wrench to unscrew the voss connectors from the valve block.
In the end, I started this in the evening and it was already getting dark, so I opted to just cut the air lines. After I finished, I took a look at the Voss connectors and snapped some pictures.
This is what they look like.

After a lot of fiddling, I finally realized that there is a brass compression ring on the inside... similar to those you find on plumbing fixtures. Here's a pic disassembled.

I don't think you can remove the air lines while the voss connector is attached to the valve block. I think you would need to unscrew it, and then using some needle nose pliers, pull this brass compression ring back and away from the connector itself and off the end of the hose (this is easier said than done), then you can slide the hose out. I think the brass ring has a sharp edge that grips the hose, then when you try to pull the hose back out of the connector, then brass ring seats into the voss connector itself and forms a seal. In addition, there are rubber o-rings inside the voss connector that provide the actual air seal.
Anyway... on to the valve block itself. To remove it from the car, simply slide it up to remove it from it's mounts on the bumper.
This is what it looked like on my table. There are four small torx screws that need to be undone to separate the two halfs of the block.

Once separated, you're presented with this.

The upper part of the valve block doesn't seem to be serviceable. It's just chambers for the valves themselves to sit in. The lower part of the valve block is where all of the action is.
It seems to me that the middle valve is probably the supply line coming from the reservoir valve block and the outer two valves feed each of the front wheels. Therefore, the outer two valves are identical and the middle one is slightly different.
EDIT: I looked at the EAS service diagram again and I think the center valve is the "cross-link valve" that connects the two front shocks together. The other two valves both feed pressure to/from the main system and each shock (one feeds the left shock and one feeds the right shock).
The first thing I did was to remove and clean the orange o-rings that seal the two halves of the valve block.
Next thing was to remove the valves themselves. This is what the two outer valves looked like.

If you rotate the black plastic part and pry it apart slightly, it will separate. Then, you will be able to isolate this metal valve.

And this.

Further decomposition yields two parts of the valve with a spring that allows movement of the inner piece. There is also one black o-ring, which I cleaned thoroughly.

Here is the upper part of the black plastic piece that we separated. Don't worry about the orange o-ring... that's the one we talked about earlier that sealed the two halves of the valve block.

There were a total of two black o-rings on the lower plastic part that the valve was connected two. A large o-ring and a very small one at the tip. (I don't think the small one is in this picture... I think it stayed in my valve block and I had to pry it out)

The center valve was a little different from the others. It looked like this.

Separated. (What you don't see is that there is a tiny little spring inside as well. I didn't get a pic of that though)

All in all, I think there are a total of 11 o-rings inside the valve block. I thoroughly cleaned each, cleaned all of the mating surfaces, and then reassembled the valve block.
I have no idea if it will work any better, but there were certainly a couple of o-rings that had a very fine particulate dust on them (perhaps desiccant??)... almost like a very fine sand. I think there is a good chance that this will be a good, functioning valve block again. The biggest problem is that I would need to source three new voss connectors now.
Hope this helps or at least provides an interesting read for anybody thinking about replacement or refurbishment.
The first step was obviously to jack the car up and fully support the car with jack stands under the frame. Then, I used my IID tool to deflate the entire system (bags and reservoir).
Next, I removed the front passenger side wheel.
Checked my wheel bearings for good measure and there was no up/down play, but a little in/out play... makes me wonder if it's time for new tie rods and ends.
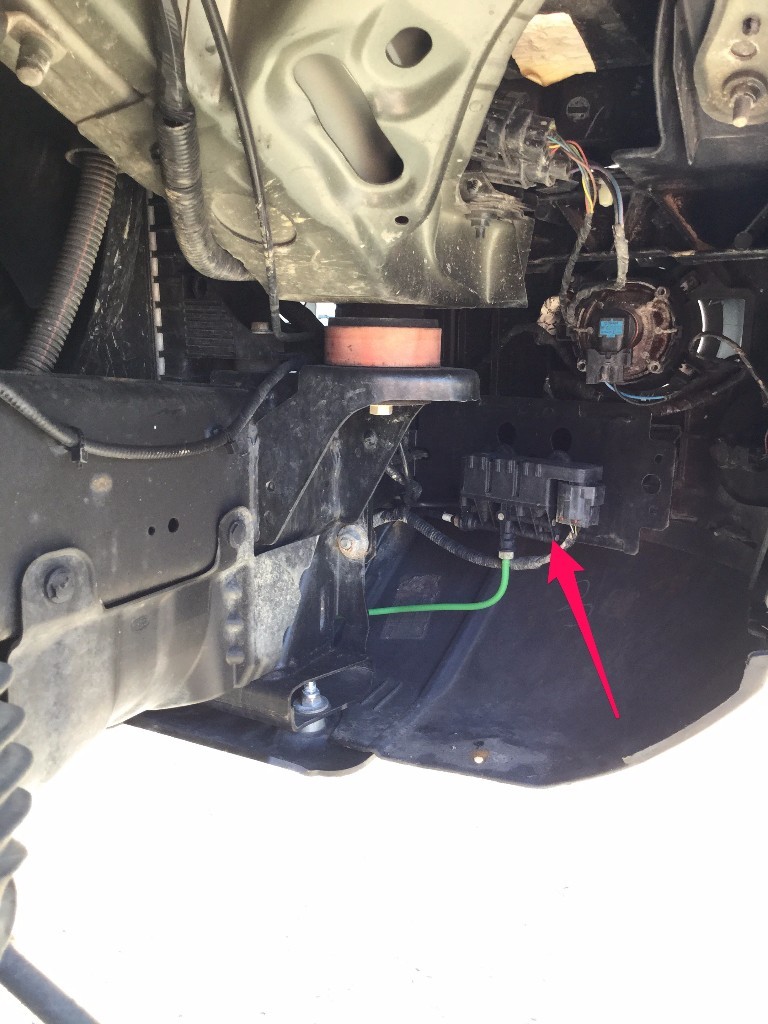
On the the wheel well liner. Got a 8mm socket, a flat head screwdriver, and a phillips head screwdriver and went to work removing all of the clips that hold the liner. There are a bunch. There is one phillips head screw underneath the rocker panel and one underneath the front bumper cover. Everything else is located in the actual wheel arch. I had to halfway remove the wheel fender moulding in order to pull the liner out, but it came out pretty easily and presented me with the front valve block.
Removed the electrical connector on the outside of the valve block and then came to the most difficult part of this whole endeavor... removing the freaking air lines. I'm pretty familiar with the voss connectors used elsewhere on this car and with the fuel line connectors, etc. that you push in to release. However, I could not for the life of me figure out how to get the airlines out of these voss connectors. There was nothing to push. I tried pushing the air hoses into the valve block, but it didn't get me anywhere, I tried pulling, wiggling, rotating... nothing worked. So, I just used a (12mm I think) wrench to unscrew the voss connectors from the valve block.
In the end, I started this in the evening and it was already getting dark, so I opted to just cut the air lines. After I finished, I took a look at the Voss connectors and snapped some pictures.
This is what they look like.
After a lot of fiddling, I finally realized that there is a brass compression ring on the inside... similar to those you find on plumbing fixtures. Here's a pic disassembled.
I don't think you can remove the air lines while the voss connector is attached to the valve block. I think you would need to unscrew it, and then using some needle nose pliers, pull this brass compression ring back and away from the connector itself and off the end of the hose (this is easier said than done), then you can slide the hose out. I think the brass ring has a sharp edge that grips the hose, then when you try to pull the hose back out of the connector, then brass ring seats into the voss connector itself and forms a seal. In addition, there are rubber o-rings inside the voss connector that provide the actual air seal.
Anyway... on to the valve block itself. To remove it from the car, simply slide it up to remove it from it's mounts on the bumper.
This is what it looked like on my table. There are four small torx screws that need to be undone to separate the two halfs of the block.
Once separated, you're presented with this.
The upper part of the valve block doesn't seem to be serviceable. It's just chambers for the valves themselves to sit in. The lower part of the valve block is where all of the action is.
It seems to me that the middle valve is probably the supply line coming from the reservoir valve block and the outer two valves feed each of the front wheels. Therefore, the outer two valves are identical and the middle one is slightly different.
EDIT: I looked at the EAS service diagram again and I think the center valve is the "cross-link valve" that connects the two front shocks together. The other two valves both feed pressure to/from the main system and each shock (one feeds the left shock and one feeds the right shock).
The first thing I did was to remove and clean the orange o-rings that seal the two halves of the valve block.
Next thing was to remove the valves themselves. This is what the two outer valves looked like.
If you rotate the black plastic part and pry it apart slightly, it will separate. Then, you will be able to isolate this metal valve.
And this.
Further decomposition yields two parts of the valve with a spring that allows movement of the inner piece. There is also one black o-ring, which I cleaned thoroughly.
Here is the upper part of the black plastic piece that we separated. Don't worry about the orange o-ring... that's the one we talked about earlier that sealed the two halves of the valve block.
There were a total of two black o-rings on the lower plastic part that the valve was connected two. A large o-ring and a very small one at the tip. (I don't think the small one is in this picture... I think it stayed in my valve block and I had to pry it out)
The center valve was a little different from the others. It looked like this.
Separated. (What you don't see is that there is a tiny little spring inside as well. I didn't get a pic of that though)
All in all, I think there are a total of 11 o-rings inside the valve block. I thoroughly cleaned each, cleaned all of the mating surfaces, and then reassembled the valve block.
I have no idea if it will work any better, but there were certainly a couple of o-rings that had a very fine particulate dust on them (perhaps desiccant??)... almost like a very fine sand. I think there is a good chance that this will be a good, functioning valve block again. The biggest problem is that I would need to source three new voss connectors now.
Hope this helps or at least provides an interesting read for anybody thinking about replacement or refurbishment.
Last edited by cmb6s; Aug 27, 2015 at 10:16 PM.
Thread Starter
|
Recovery Vehicle
Joined: Sep 2013
Posts: 831
Likes: 146
From: Herndon, VA
After doing a bit of research (and knowing what to look for now that I've disassembled the voss connectors), it seems like the connectors used on the valve block are the Voss Quick Connect 203 fittings.
More info can be found here.
Although... those have a max operating pressure of 188 psi. I don't know what the pressure is at the shocks, but I know it's higher than that at the reservoir.
More info can be found here.
Although... those have a max operating pressure of 188 psi. I don't know what the pressure is at the shocks, but I know it's higher than that at the reservoir.

Baja
Joined: Aug 2013
Posts: 6,877
Likes: 786
From: Huntington Beach CA
Great write up. I think I need to rebuild mine or buy new. When I go over a speed bump I can here a release of air at the passenger front.
At night the front seems to go down(evenly) first then followed by the rear.
At night the front seems to go down(evenly) first then followed by the rear.


Pro Wrench
Joined: Sep 2008
Posts: 1,673
Likes: 153
From: Edmonton Alberta Canada
Towards the bottom of the files on this link are three or four files specific to these Voss connector - there are other styles as you have noted.
While it is a bit late now to mention it, and I suppose you have since figured it out, all you had to do was unscrew at the metric brass hex. The same style Voss connector is at the top of each air spring - all you do is take a wrench to the brass hex and rotate to undo. The air compressor has the other push in style.
DISCO3.CO.UK Photo Gallery - FASKIT Air Suspension Installation
I must complement you on the pictures and the effort doing up the post - it is much appreciated.
The orifices in the block valve can get plugged or the O rings scratched from breakup of the air dryer desiccant beads. With age, the ***** turn to power and contaminate the system. The fix is new dryer beads.


Rock Crawling
Joined: Jan 2011
Posts: 351
Likes: 22
From: Pacific Northwest
I'm curious how much time you spent rebuilding the valve, vs. how well it will stand up to the test of time considering a brand new part is only $170 from AB
EAS Valve Block For The Front Axle | Land Rover Air Suspension Parts
EAS Valve Block For The Front Axle | Land Rover Air Suspension Parts
Thread Starter
|
Recovery Vehicle
Joined: Sep 2013
Posts: 831
Likes: 146
From: Herndon, VA
I'm curious how much time you spent rebuilding the valve, vs. how well it will stand up to the test of time considering a brand new part is only $170 from AB
EAS Valve Block For The Front Axle | Land Rover Air Suspension Parts
EAS Valve Block For The Front Axle | Land Rover Air Suspension Parts

Thanks for the voss connector links bbyer. There's some great info in your album. Every time I visit it, I think I need to keep trolling around and find more info that I didn't know existed.
I had no idea that you could actually purchase those connectors as individual items from LR.
I realize that removing the actual voss connector from the valve block is a fairly simple affair of using a 12mm wrench and unscrewing it. However, it was not straightforward or apparent as to how to release the hose from the connector... even when both are out of the block already. That brass "washer" looked to be part of the connector and it took a while to realize that it was a separate piece. Then, after realizing it was separate, I still couldn't get it to release its death grip on the hose.
I ended up trying to turn it (it has a flat spot where you can kind of almost get a wrench on it), trying to use needle nose pliers to pry it apart, etc. In the end, it just ended up breaking and that was the only way to get it off the hose. :P
Thread Starter
|
Recovery Vehicle
Joined: Sep 2013
Posts: 831
Likes: 146
From: Herndon, VA
I ended up buying them after I got the car. I seem to remember I had like 1 out of 4 of the rubber boots still left on the car... the rest had vanished before I ever took ownership. They're available as separate items from Land Rover, but like everything else, aren't exactly cheap. Also a bit of a pain as you have to remove the lower shock mounting bolt in order to slip them on and I seem to remember that the included ottinger type bands/clamps were not the correct size.