When you click on links to various merchants on this site and make a purchase, this can result in this site earning a commission. Affiliate programs and affiliations include, but are not limited to, the eBay Partner Network.
First, this is not a full DIY, I dont go through every single step. But there really is not a ton of info on how replacement is done. So I have a few pics and some tips. I also took the old one apart and have pics of that below. The job itself is not easy but not terribly hard. Just a very tight working area. Total time was about 2 hours but I was not moving at a frantic pace.
Summary:
When the Rover powers down you might hear the "tail end" of a chirping sound that fades off. Its subtle but there, that likely is an indication your actuator is on the way out. Also you may hear an occasional "clank" when the diff is in full lock and you are out having fun off-road. You may also get two codes. One for actuator stuck and the other for actuator position not learnt. P186D may also be stored as a code. If the actuator is really dead/stuck you can burn up the clutches if its stuck in a position other than full open clutch. You may also get a huge variety of errors with sub systems. A transmission fault, stop safely (there is no actual transmission fault stored). Your ABS light, EAS, etc. While the truck will operate, you may end up in access height as soon as you start moving. Theses are ALL faults caused by the rear differential locking actuator failing and are not actual faults of those systems. If you cycle teh key three times before starting, you can sometimes get around all those faults and only have one trans fault display on the info screen. ABS and EAS will all work as they should.
You may be able to prevent total actuator failure but it appears that a good number are also caused by actuator motor failure. If you want to possibly prevent this issue, you need a software update from the dealer. GAP IID Tool may also be able to update things. If you replace the actuator, you should get the software update ASAP.
Tech Bulletin LTB00228NAS4:Situation: The driver warning message 'Transmission Fault Stop Safely' may be displayed in the instrument cluster message center, Diagnostic Trouble Code (DTC) P186D and possibly P080A / P0806 may be stored in the electronic rear differential control module, and the Dynamic Suspension may lower. These issues may be caused by the Electronic Torque Managed (ETM) rear differential motor being energized while the motor brake is still partially engaged, resulting in mechanical wear of the motor assembly which may lead to a stuck actuator and DTC P186D.
NOTE: After the new differential motor has been installed, it is imperative that the new software is downloaded to the Rear differential control module. Failure to carry out this instruction will result in a future repeat repair. Once the new software has been downloaded, the software stored in the Rear differential control module should show 7H42-4C045-A(D) or a higher alphabetical character for vehicles pre-2010MY and 9W83-4C045-A(D) or a higher alphabetical character for vehicles 2010MY- onwards.
NOTE: To complete the repair the new software must be downloaded and the on demand self test (ODST) concluded. SDD will run the ODST automatically as part of the software download to the Rear differential control module; follow all on-screen instructions to ensure the ODST is successfully completed. The ODST configures the Rear differential control module to ensure that it knows where the clutch biting point is internal to the axle assembly. After the ODST has completed successfully, clear DTCs and perform an ignition cycle; read DTCs and confirm none are present. If DTCs remain, follow normal SDD diagnostic procedures.
Action: In the event of a customer concern of the above, refer to the Repair Procedure outlined below to replace the rear differential locking motor assembly and update the Rear differential control module software.
What is the actuator, what does it do?
Its just a small motor that operates are larger toothed gear which varies the clutch position in the differential as needed. Keep in mind your rear locking diff is always working by regulating its clutch pack, just like the center diff. Depending on the terrain mode you select, there is more or less slippage allowed. And of course it can go "full" lock, which is indicated on the 4x4 info display if equip. So the actuator is also working both itself and the clutches eventually wear. With most motors the brushes wear out to the point they make poor/random contact. My motor brushes looked fine with plenty of life on them. I will go into more on that below.
Tools needed:
I only used a small ratchet socket wrench, an 8mm socket and a short 3 inch extension. The extension is not always needed. You will also want some sealant to apply when installing the new actuator. You will not be able to drive the Rover until the sealant has cured, of course.
Getting it done:
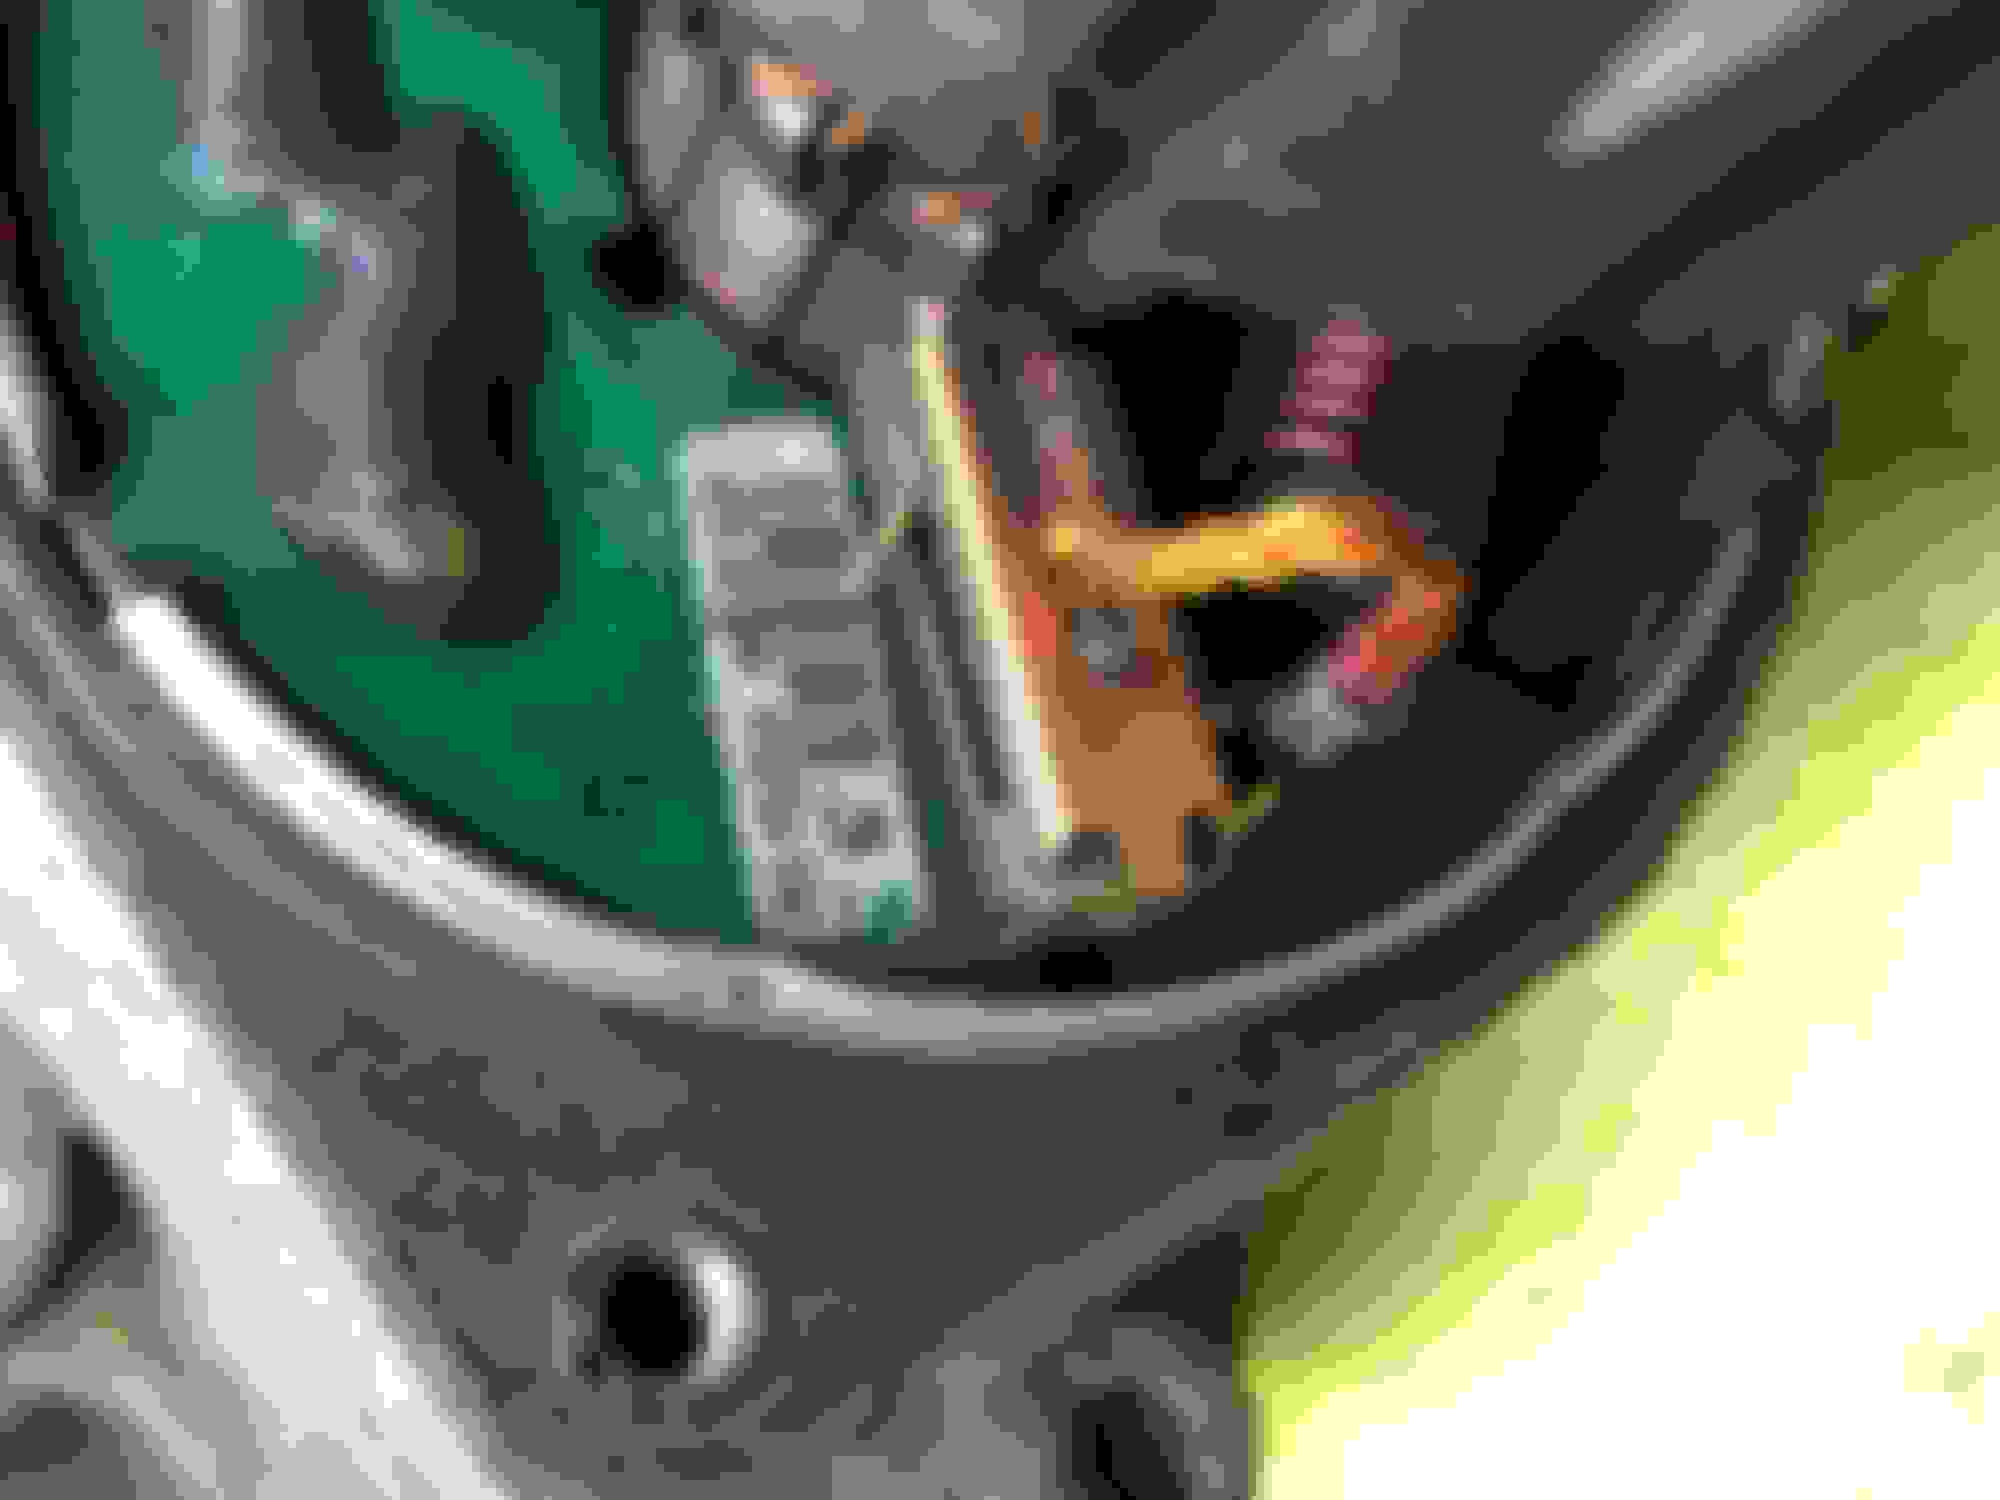
First I tricked the truck into super extended mode for ride height, plenty of working room underneath that way. The connector for the actuator is on the driver side and is a twist and pull type. Twist the lock 90 degrees to the left (counter clockwise) and gently pull. If you have rear AC the coupling really gets in the way! I suggest you you gently move the soft brake line out of the way (forward) and also pull up on the rear EAS valve block to free it and let it drop down. This give you a little more room to reach deep into there. I actually found my left arm worked better because of the angle. I could not find a good way from below to get to the connector. From the read of the truck I slid under until my face was forward of the rear diff. During this entire job I was pretty much hugging the rear diff, left arm over one side and right arm up past the exhaust. Its not super easy to get to. If you can drop the exhaust, more power to you. It may make the job a lot easier!
The harness for the actuator is secured on the diff and very close to the actuator, you may have to pop its push clip to move it out of the way. Helps give you a little more room. Loosen the four 8mm bolts. I suggest leaving the two lower ones loosely installed so when the upper ones are out there is no chance of the actuator moving/sliding and having one of those upper bolts fall inside the diff. It would be impossible to retrieve without taking the entire diff apart (it will not fall into the main body but will be trapped on the side). The trickiest bolt is the upper left one near the actuator connector. But if you use the hugging technique like I did, you can get both hands up there and sorta guide the socket onto the nut with your left hand. Once all the bolts are out the actuator is probably stuck onto the diff via sealant and corrosion. Just a gently pry with something and it will pop off.
Dont ask me hot to get it out, I just happened to find a way. It came out on the passenger side. Basically I worked it up and over the diff as best I could. Had to push the fuel filler hose a little to make room.
Install is pretty much reverse of above. I put a very, very thin layer of sealant on the new actuator some time before install. Gives it time to tack up. But I did clean the diff mounting surface and put a generous amount of sealant there just prior to install. If you put too much on the actuator you may end up with just a mess as you try to snake it up and around the diff for getting it into install position. Also my locating pins seemed to be just a touch off with the new actuator. If the upper pin was in the lower pin was not and so forth. So I installed it with the lower locating pin out and snugged up (finger tight) the two upper bolts first. Then I worked to the two lower which cause the soft aluminum locating pin to properly seat in place. If you dont secure the uppers first then when you tighten the lower two bolts the upper pin might pop out. Because of this, make sure when install is complete that the actual is flush at the top and bottom. Then reconnect the actuator, move the brake line and EAS valve block back into position.
I did not do a hard reset. But upon startup I had no ABS, EAS, etc. faults. I only had a transmission fault on the info display. I restarted a couple times and no major faults so the actuator appeared to be working or working in a way that was not causing issues. After a hard reset (pulled negative at battery for 10 minute) the trans fault was gone and I can start the vehicle with no faults at all. I cant really drive until the sealer is cured so I won't be able to put the actuator under any real world design just yet.
Pics:
Soft brake line gently moved against body to the left. Rear EAS valve block just lifts up out of its support then can hang there. The actuator connect is in teh back at center, you can see some of the wires entering it. DO NOT LOWER TRUCK WITH EAS BLOCK THERE, IT CAN GET CRUSHED WHEN LOWERING.
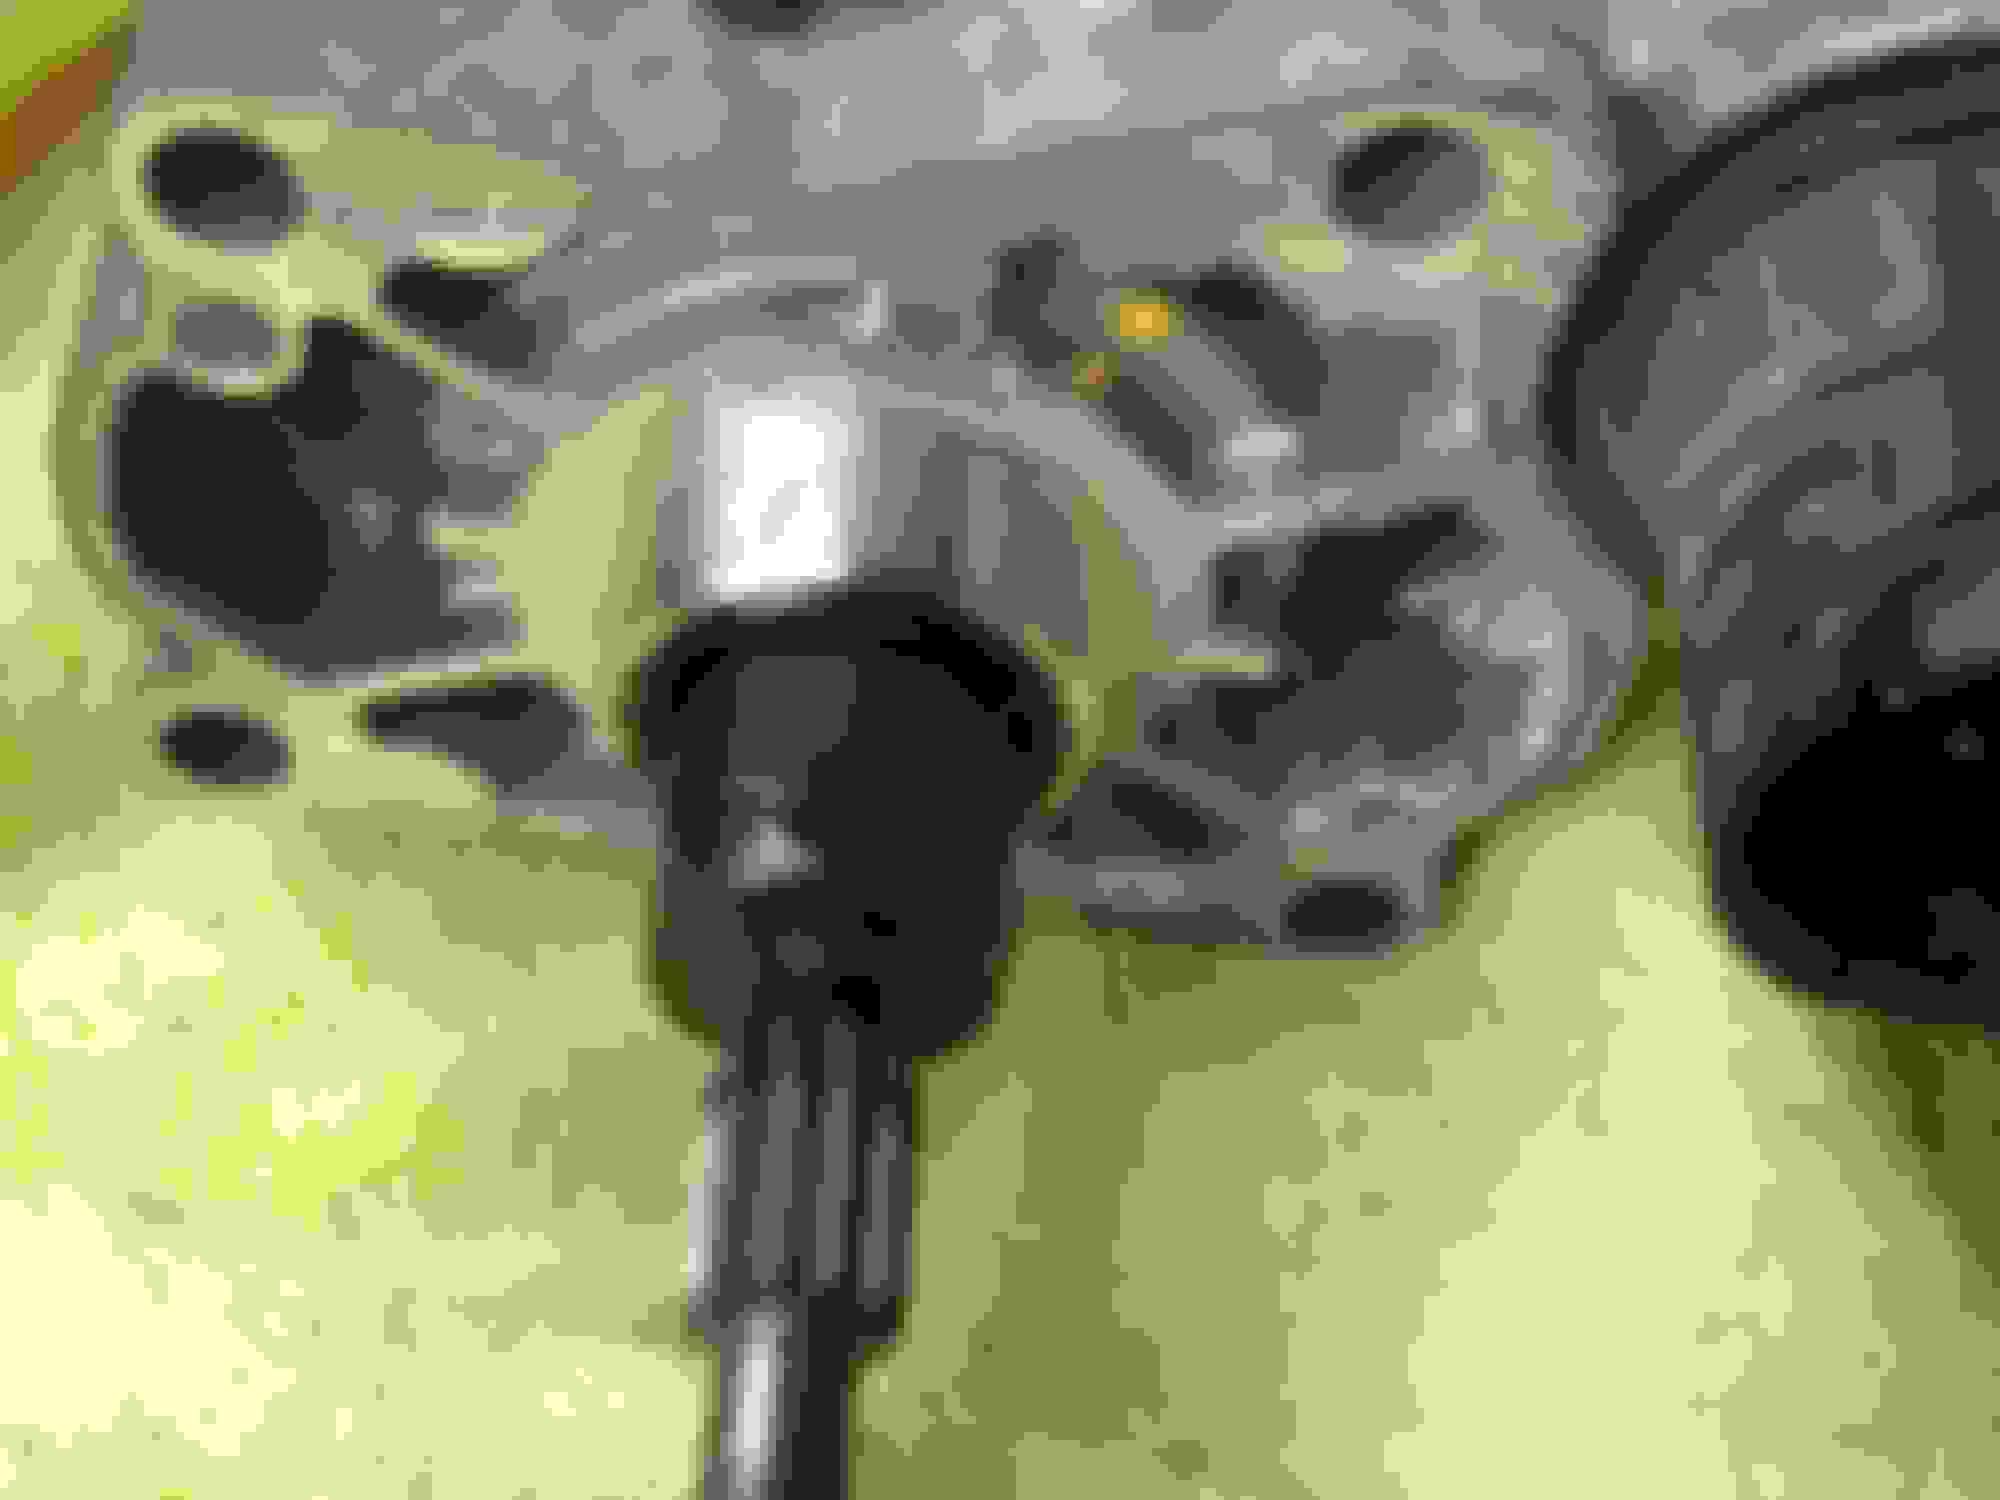
Looking upwards from below and towards the back of the truck. The actuator is not easy to fully view when installed.
Matting surface cleaned as best I could before applying sealant. If I could drop the diff, I would have loved to REALLY clean er up nice. This will do for now. New actuator installed.
Dissection pics:
There was not a noticeable difference between my $150 generic actuator and the OEM unit. If you shop around you can locate the OEM unit for about $300 UDS plus shipping. For now I am being cheap because I may replace my entire rear diff with a rebuilt. Pics are just random to show the various bits that make it all up. What was interesting is when working the two by hand the new one was not super easy to rotate the gear, but not hard. The old was was rather bound up, very difficult to move and would actually squeak when doing so. Yet when I remove just the motor cover (the black part) it spun super easy. And the end nearing was good too. When I put the cover back on, it also spun well. So I am a bit confused were the being was because even the brushes are not in rough shape.
Great information. Thank you. Please keep us posted on how the new actuator works after you drive the truck.
I have the fading chirping sound coming from underneath after shutdown and had no idea what it was until I read your post. Looks like I have this job coming up.
Small update. On a longer drive today I was getting a random "Transmission Fault, Reduced Traction" on the info display. No other faults or any illuminated icons, etc. Sometimes at startup, sometimes after driving a little bit. Pulled the codes and getting "Clutch Position Not Learnt" and a new one, "Transmission Component Slipping". Those codes are from the diff locking module. The engine and transmission themselves have no codes. So contrary to some discussion, the actuator may not be self adjusting at startup and thus self-calibrating. But no one has said for sure that GAP can trigger calibration and my IID Tool is not here yet. I may email them to get a straight answer. On one forum, a post from 2015 said: "I'm hoping GAP makes this calibration available because I'm sure at some point it'll need replacing. I messaged them less than two weeks ago before I bought the IIDTooL BT. They replied that it's coming."
A bit worried about the slipping fault though, not sure exactly what that may mean if anything.
Tracks with what other people are saying.... Please let us know if IIDGap is able to calibrate the actuator. Does the truck lower to the bumps when you get the "reduced traction" message?
Nope, everything is fine. No other system issues. It just comes up, sometimes after driving miles.
edit on 8-18-20: GAP Tool arrived, I have no located a calibration section for the rear diff but I have located a self-test option. I did so, twice to be safe, and I *think* it resolved the actuator position not learnt error. So to re-cap, before I was getting two errors. Not learnt and actuator stuck. Since replacement, the stuck error was basically replacing with transmission component slipping. The transmission itself is clear of code, so this would be a rear diff problem and may indicate my actuator was stuck in a very bad position, one that had the clutches engaging enough to possible wear them out. But since the self-test with the GAP tool I am don't seem to be getting the position error anymore, that error would come up instantly even after a full rest with zero driving/engine starts. The only code I get now is the slipping one. Will get some more miles to see for sure of any other codes, etc. Sadly I fear I need a new rear locking diff. The fluid in it is correct and replaced recently. But I will no drain any to inspect, just assume the worst for now.
Last edited by DakotaTravler; 08-18-2020 at 07:18 PM.
So besides the rear diff reporting that is slipping, all seems well. The self-test does "calibrate" the new actuator motor position, etc. So that is where I am at now, a rear diff that appears to have used up clutches. Still works and the fault does not seem to disable any other systems or cause any collateral codes.
Thanks for the update. Helps a lot. I am in a similar situation, chirping sound present, not all the time, but does happen here and there. No errors on the display.
Good to know that Gap can calibrate the actuator.
Sorry to hear about the rear diff. It's not an easy, or inexpensive job. I have swapped my front by myself on my back in the garage. Let's just say the only reason that happened is that I love driving the thing. I have never killed myself for any car as much as I did/do for the LR.
Good luck and thank you again for all the knowledge you share with us. Makes owning this beast a lot easier.
I am very keen on making a way to manually operate the rear locker. I wheel in Moab a lot and it can be a much greater strain on components to lose traction before the locker engages than to begin a challenge with the vehicle locked from the start. I may start this another thread but very interested if you've had any take on this. It seems that if the transmission is monitoring this and can throw faults if you "fake out" the system and actuate the motor manually that the rest of the system will freak out trying to compensate.
Well you best best would be to just remove the rear locking diff from the configuration file of the truck, then it won't even know there is one there and should not throw faults - at least I would think. So if you can do that, then you can find a way to manually manipulate the diff. I am not sure exactly how it works, but its essentially a variable clutch setup. I think when a certain percentage of slip reduction is commanded, its then considered locked. But the rear diff is almost always in some state of "lock", meaning that since its variable more or less slip is commanded depending on conditions. So for making your own way to override, you would have to have some way of knowing the actuator motor position and the position for full open to full lock.

 08-08-2020, 08:04 PM