When you click on links to various merchants on this site and make a purchase, this can result in this site earning a commission. Affiliate programs and affiliations include, but are not limited to, the eBay Partner Network.
Tools
7mm socket (or flat screwdriver) for hose clamps
Hose pick
Hose clamp pliers
Bent nose pliers
Long ⅜ ratchet to release tension on belt tensioner
15mm socket with long ratchet to remove belt tensioner
T30 torx for water pump bolts
36mm Fan removal wrench (reverse or Left handed thread!)
Optional: Airlift vacuum coolant filling tool with compressed air
Parts
Water pump LR097165
2x gaskets LR049370
Water pump bolts
Serpentine belt LR064185
Oil cooler tube LR028136
Oil cooler tube o ring LR030593
WSS-M97B44-D Coolant (1-2 gallons)
Steps
1. Remove the cover with V8 stamped on it, by lifting the front edge and pulling towards you.
2. Remove air intakes (3 hose clamps - yellow arrows)
Remove the air hose quick release fastener from under the left intake.
3. Remove large top radiator hose (2 hose clamps indicated by red arrows). Then pull 2x electrical fasteners (yellow arrows) from fan shroud cover with pliers, then remove shroud.
4. Remove the fan using fan removal tool. Be careful, it is a LEFT HAND thread.
5. Disconnect small L shaped hose from water pump by pushing black plastic collar inwards while pulling hose outwards. I used bent nose pliers and a small screwdriver. (Be careful not to break this plastic hose, it may be brittle.)
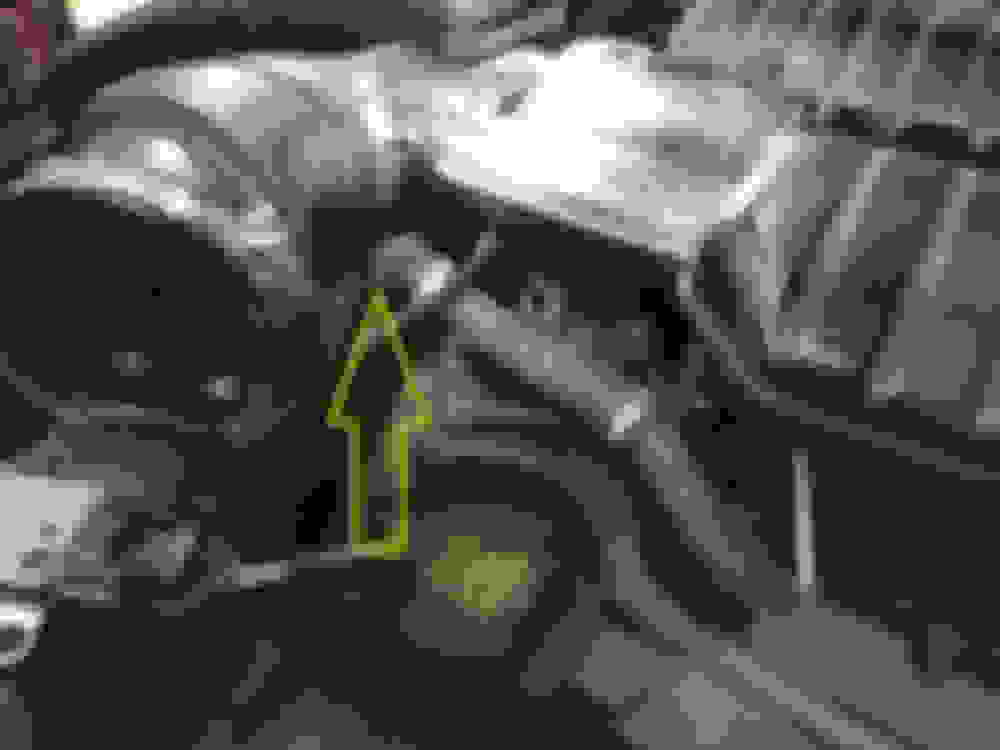
6. Relieve the tension on the serpentine belt by inserting a long handle ⅜ ratchet in the square hole on the belt tensioner (red arrow) and turning it clockwise as if to tighten it. Slip the belt off the alternator pulley and then off the water pump pulley. Then remove bolt from the belt tensioner (yellow arrow) using a 15mm socket and long ratchet. Remove the belt tensioner and inspect the pulley bearing for free spinning.
7. If replacing the serpentine belt, cut it and remove it completely, otherwise leave it in position.
8. Remove the 4 T30 torx bolts from the water pump then remove the water pump from the engine
9. Remove the old water pump gaskets (yellow arrows), oil cooler tube (red arrow) and old o ring from the engine behind the water pump. Clean the area thoroughly.
10. Install new oil cooler o ring and oil cooler tube onto engine.
11. Fit new water pump gaskets and install the new pump onto the engine, making sure to correctly engage the oil cooler connection port on the back of the water pump onto the new oil cooler tube. (I ended putting the bolts through the water pump bolt holes before fitting it into location, then threading 3 or 4 turns of the bolts into the gaskets to hold them in place while trying fit the pump onto the oil cooler tube.)
12. Torque the water pump bolts to 12NM or 9 ft-lb.
13. Check all the pulleys are rotating smoothly, and replace any that are not.
14. If replacing the serpentine belt, you will need to remove the smaller viscous coupling belt and pulley (shown as part 2 in the diagram below) in order to get the new accessory belt in place.
15. Reinstall the belt tensioner.
16. Reassemble the rest of the parts in reverse order.
17. I used an Airlift vacuum fill to top up the coolant. It took about a gallon.You may also be able to fill the expansion tank, run the engine, and gradually add more coolant as the bubbles come out of the system.
18. Check for coolant leaks carefully, then regularly monitor your coolant level for the next couple of hundred miles.
hi, I�m just curious on peoples thoughts on the brand of water pump you�ve used. I�m seeing this one from metrix for 90 dollars and the oem one for 300. Just wondering which one you guys have used. If the 90 dollar one has good record then I�ll save the 200 dollars. Thanks, nick
Serious problems removing fan clutch bolt. Need help
Hey everyone,
I really enjoyed this thread. However I’m having major problems removing fan clutch bolt. It’s to the point now that it’s ridiculous. I have even broke the pneumatic fan clutch remover tool that I broke down and purchased thinking that would help. Heck I even got an air compressor and air hammer. Nothing is working. I would like to confirm my 2011 lr4 is in the USA and the fan blades are while looking from front down on the fan facing \\\ direction should be reversed thread and remove CW. That is what I have been told any way. I have recorded a video if it gets uploaded actually showing me break the tool. It has been a week and it won’t come off, And I’m so at a loss just don’t know what to do now? Any help would be appreciated.
I posted the video on youtube please any help on this?
I�m having major problems removing fan clutch bolt. It�s to the point now that it�s ridiculous. I have even broke the pneumatic fan clutch remover tool that I broke down and purchased thinking that would help. Heck I even got an air compressor and air hammer. Nothing is working. I would like to confirm my 2011 lr4 is in the USA and the fan blades are while looking from front down on the fan facing \\\ direction should be reversed thread and remove CW. That is what I have been told any way. I have recorded a video if it gets uploaded actually showing me break the tool. It has been a week and it won�t come off, And I�m so at a loss just don�t know what to do now? Any help would be appreciated
Hey everyone,
I really enjoyed this thread. However I�m having major problems removing fan clutch bolt. It�s to the point now that it�s ridiculous. I have even broke the pneumatic fan clutch remover tool that I broke down and purchased thinking that would help. Heck I even got an air compressor and air hammer. Nothing is working. I would like to confirm my 2011 lr4 is in the USA and the fan blades are while looking from front down on the fan facing \\\ direction should be reversed thread and remove CW. That is what I have been told any way. I have recorded a video if it gets uploaded actually showing me break the tool. It has been a week and it won�t come off, And I�m so at a loss just don�t know what to do now? Any help would be appreciated.
I posted the video on youtube please any help on this? Youtube
Update: I had tried everything to break that nut loose, I finally ordered the tools from amazon that fit the 2011 LR4 like 49.00, but in like 2 minutes it broke free and got the fan off. Insane. Now I cannot get the stupid stretch fan belt back on shredded 2 already. I'm going to try again once I can find a couple belts in stock near me, but Im not about to spend almost 300 for the special tool..
The l-shaped tube coming out the front of the water pump. Do they sell just the grommet. The new pump did not bring it and the clip on the grommet broke on the other one. Was very brittle any suggestions Any part number on the plastic grommet that is on the water pump.

 11-09-2020, 08:41 PM