

LR4 project build - Here we go again.


Thread Starter
|
Mudding
Joined: Feb 2014
Posts: 205
Likes: 16
From: Atlanta, GA
Well, I have to admit it has been a long time since I have been in here. Back in 2014 I picked up a blown motor 2004 Disco II and rebuilt/replaced the engine. Build thread. https://landroverforums.com/forum/di...venture-65653/
I had that in Alaska for a bit as a daily driver. Great car. Really loved the ice and snow. Ended up being a bit $$ to drive everyday 100 miles round trip and I ended up hating the swing gate on the back. Tough to load anything big in it when you can't really leave the back open. I ended up trading it to a local guy straight up for an Audi A3. Great MPG.
Since then I have actually had a LR3 and now drive a Range Rover Evoque. Great MPG, has some good scoot when needed, and most of all it is easy to get around Atlanta when I have client meetings. Once of the most comfortable and easy to drive cars I've ever had.
So....here we go again. I talked myself into wanting to go back to something bigger and something I could buy for cash. I really like the Evoque but I'd love to lose a car payment and regain some ability to carry more and also we'd like to get a camper to pull not too far down the road. I really enjoyed my LR3 but there were certain aspects that really dated the car, it had some technical functions missing I really enjoy on a newer vehicle, and there were some personal reasons I wanted to move to something else. At the time those reason has a manual transmission and twin turbo's....
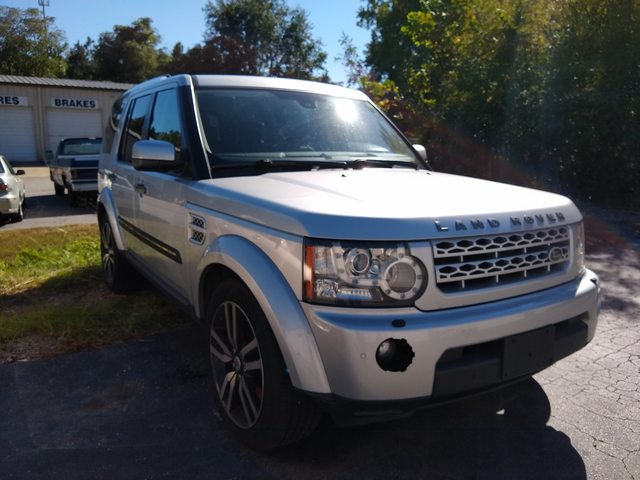
Well, I found myself browsing around the internet randomly last week, I'm not even sure if I was even looking at LR4 material, but I find a link to a LR4 on eBay for $3,500. Why not give it a click... Silver 2012 HSE LUX with the black interior(I cant do tan ever again). Figured it was totaled, salvage title, etc etc. Talks about a blown motor due to overheating. But that price is just so nice....So, just for giggles I reach out to the seller expecting to hear back from a service shop. Actual owner got back with me. Sitting at the shop after they found out what was wrong. Coolant leak lead to overheating. Too much to repair. Clean title. Excellent condition.
I pass it by the wife....you know how it goes. Doesn't help that I have an e92 BMW project car in the garage I am currently building for track weekends. No gripes there as that thing can take as long it it takes to finish. She gave me the go-ahead based on the cost and she has personally seen me rebuild about 4 different cars in the last 6 years. Plus, she actually really enjoyed the Disco II and the LR3. Short women just seem to enjoy the commanding position the driver seat has. You can see the hood and know where the car is. I love the field of view. You can see everything.
Anyways, we went back and forth on an offer. She had several offers, had to relist it due to a buy it now that bailed in 5 minutes, then I just pulled the trigger for full price getting a bit scared I was going to lose it over $300. Click and done. Seriously still can't believe it.
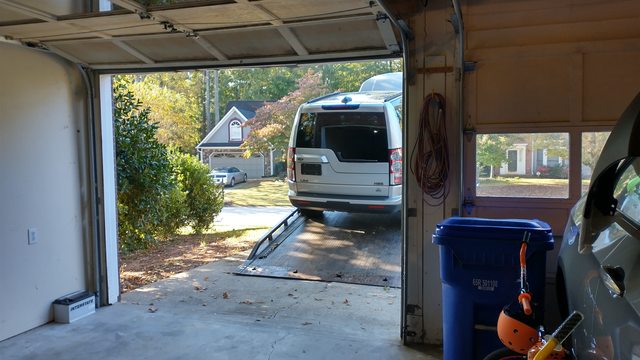
It was over in South Carolina so I got a tow company to quote me out. $375. I went up on Saturday to look it over myself and pay cash. Great couple. Tough spot to be in having to basically fire sale the car. Excellent condition. 2 keys. It was delivered yesterday and we got them to help roll it right into the garage. I would have liked it nose first but that may help me get the engine in and out with enough space.


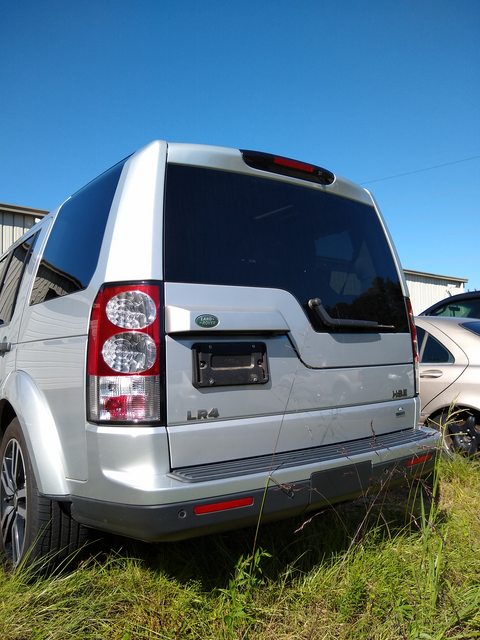
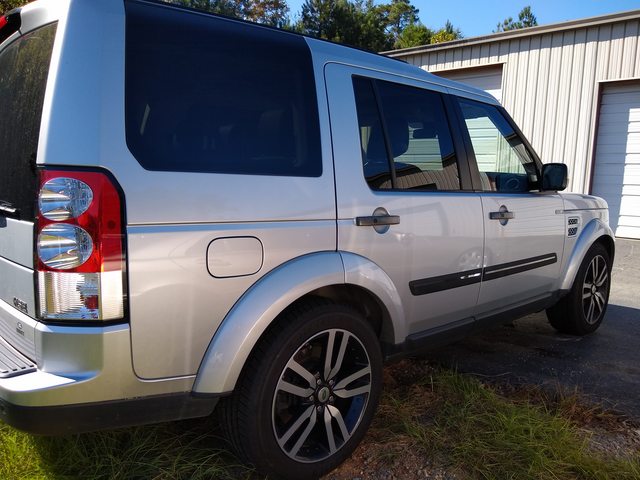
The only real thing that needs replacing on the entire body. It is just missing that fog light surround.
Well now. Here we go.
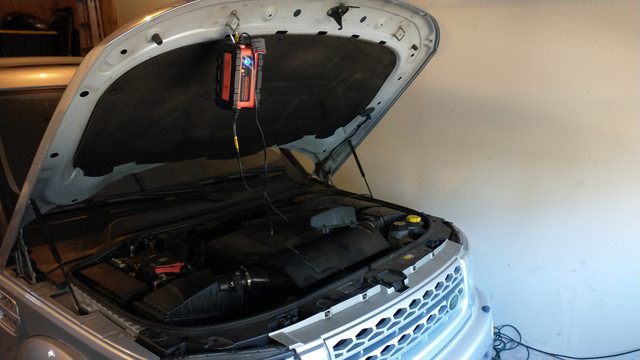
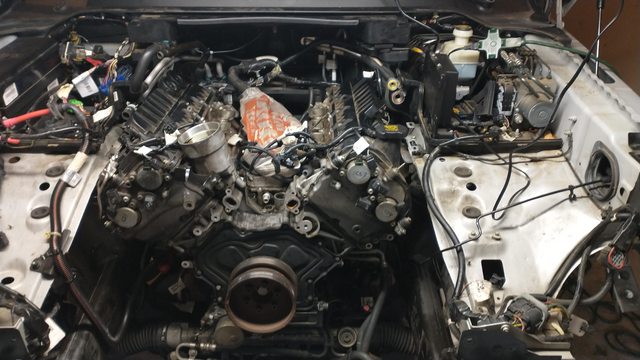
So I got the air filter boxes off last night and we started to look over things.
- Original spark plugs and coil packs it looks like. Sad to think as this thing was at the dealership for service so many times.
- Put a scope down the first cyl and saw some water droplets. Nothing major.
- Scoped the second cyl and saw about 1/8 cup of coolant sitting on the piston.
Well that is a hard no on rebuilding this motor. As I figured. I say that as for what it costs to DIY rebuild a 5.0 in parts alone is tough to swallow.
Fret not. Today we ordered a whole used engine assembly from LKQ for about $4,400, 53k miles, from a 2012 XF Jaguar. Love the 6mo warranty these come with. We will strip it down to the long block and just swap over the LR4 accessories. Plus some much needed preventative items. Like new water pump, valve cover gaskets, coolant lines, etc etc.
Let the fun begin while we wait. I'm going to start to work on getting the current engine out after some research. This is no Disco II and it is a very different engine than the LR3 and I never really had to mess with the LR3.
I had that in Alaska for a bit as a daily driver. Great car. Really loved the ice and snow. Ended up being a bit $$ to drive everyday 100 miles round trip and I ended up hating the swing gate on the back. Tough to load anything big in it when you can't really leave the back open. I ended up trading it to a local guy straight up for an Audi A3. Great MPG.
Since then I have actually had a LR3 and now drive a Range Rover Evoque. Great MPG, has some good scoot when needed, and most of all it is easy to get around Atlanta when I have client meetings. Once of the most comfortable and easy to drive cars I've ever had.
So....here we go again. I talked myself into wanting to go back to something bigger and something I could buy for cash. I really like the Evoque but I'd love to lose a car payment and regain some ability to carry more and also we'd like to get a camper to pull not too far down the road. I really enjoyed my LR3 but there were certain aspects that really dated the car, it had some technical functions missing I really enjoy on a newer vehicle, and there were some personal reasons I wanted to move to something else. At the time those reason has a manual transmission and twin turbo's....
Well, I found myself browsing around the internet randomly last week, I'm not even sure if I was even looking at LR4 material, but I find a link to a LR4 on eBay for $3,500. Why not give it a click... Silver 2012 HSE LUX with the black interior(I cant do tan ever again). Figured it was totaled, salvage title, etc etc. Talks about a blown motor due to overheating. But that price is just so nice....So, just for giggles I reach out to the seller expecting to hear back from a service shop. Actual owner got back with me. Sitting at the shop after they found out what was wrong. Coolant leak lead to overheating. Too much to repair. Clean title. Excellent condition.
I pass it by the wife....you know how it goes. Doesn't help that I have an e92 BMW project car in the garage I am currently building for track weekends. No gripes there as that thing can take as long it it takes to finish. She gave me the go-ahead based on the cost and she has personally seen me rebuild about 4 different cars in the last 6 years. Plus, she actually really enjoyed the Disco II and the LR3. Short women just seem to enjoy the commanding position the driver seat has. You can see the hood and know where the car is. I love the field of view. You can see everything.
Anyways, we went back and forth on an offer. She had several offers, had to relist it due to a buy it now that bailed in 5 minutes, then I just pulled the trigger for full price getting a bit scared I was going to lose it over $300. Click and done. Seriously still can't believe it.
It was over in South Carolina so I got a tow company to quote me out. $375. I went up on Saturday to look it over myself and pay cash. Great couple. Tough spot to be in having to basically fire sale the car. Excellent condition. 2 keys. It was delivered yesterday and we got them to help roll it right into the garage. I would have liked it nose first but that may help me get the engine in and out with enough space.
The only real thing that needs replacing on the entire body. It is just missing that fog light surround.
Well now. Here we go.
So I got the air filter boxes off last night and we started to look over things.
- Original spark plugs and coil packs it looks like. Sad to think as this thing was at the dealership for service so many times.
- Put a scope down the first cyl and saw some water droplets. Nothing major.
- Scoped the second cyl and saw about 1/8 cup of coolant sitting on the piston.
Well that is a hard no on rebuilding this motor. As I figured. I say that as for what it costs to DIY rebuild a 5.0 in parts alone is tough to swallow.
Fret not. Today we ordered a whole used engine assembly from LKQ for about $4,400, 53k miles, from a 2012 XF Jaguar. Love the 6mo warranty these come with. We will strip it down to the long block and just swap over the LR4 accessories. Plus some much needed preventative items. Like new water pump, valve cover gaskets, coolant lines, etc etc.
Let the fun begin while we wait. I'm going to start to work on getting the current engine out after some research. This is no Disco II and it is a very different engine than the LR3 and I never really had to mess with the LR3.

Thread Starter
|
Mudding
Joined: Feb 2014
Posts: 205
Likes: 16
From: Atlanta, GA
So, thinking out loud here, I'd like to resolve some problems and gain some peace of mind even with a low mileage engine swap. I'm going to target implementing these when dropping in the new motor.
- New water pump
- New radiator
- All new coolant hoses.
- New t-stat. In the Disco2 there was an option to get a 180 t-stat instead of the one that opened at 190. This really helped drop temps down and gave a buffer. Any way to do this on a LR4?
- New temperature sensors
- New coolant res and cap.
- I have an Ultraguage I may use, but I'd like to add a temp gauge to the car and set an alarm. Something that will run every time I use the car. I thought about a Bluetooth OBD reader and an app but I can see that not running all the time.
- New valve cover gaskets.
- New PCVs
I come from the BMW world of N54s and they have direct injection as well. I would imagine even with 53k miles that the new engine will need some carbon buildup cleaned off the intake valves.
Last edited by knightmetro; Oct 22, 2020 at 08:43 AM.
Thread Starter
|
Mudding
Joined: Feb 2014
Posts: 205
Likes: 16
From: Atlanta, GA
Well, soemwhere in the towing process and storage, the air suspension has got set to about as low as it can go. So no hopes really of starting any work on the underside withput getting this thing off the ground. I have a nice QuickJack setup, which the 335i is on, but it's only rated for 5k pounds. Plus, it's not exactly going to get soemthing like the Rover too high up in the first place.
I have been eyeing these stands for a long time, before the QuickJack, and realized they would be perfect for this project and future work.
About the tallest and safest stands I have ever come by. Min 13in, max about 2 feet. These will be here tomorrow. I looked at my 3 ton Harbor Freight stands, looked at the LR4, and just went "Nope"....
I did have a chance to peek my head down as much as I could to look at the underside of the front and was pretty impressed. No signs of any scraping, ever. No oil leak signs. In fact, with a quick cleaning, the underside gives you the impression of almost looking new. My LR3 I had until about a year ago.....grew up in Canada. What I found when I finally got to inspecting the underside was....unsettling.....after spending years on salted roads. I'm glad to see the LR4 shows some real signs of being well taken care of.

Thread Starter
|
Mudding
Joined: Feb 2014
Posts: 205
Likes: 16
From: Atlanta, GA
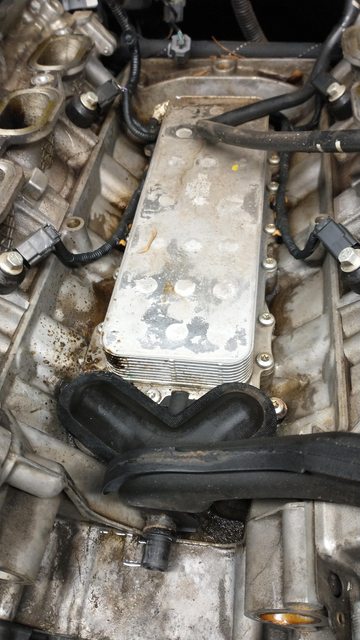
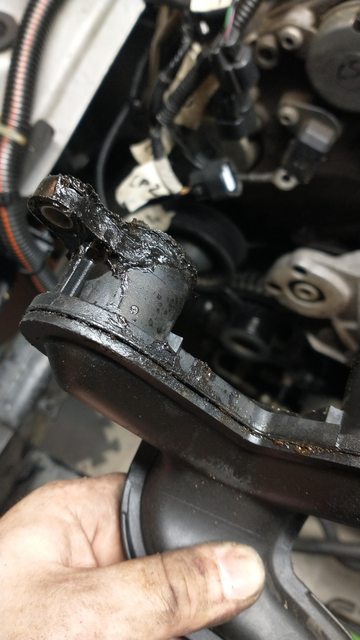
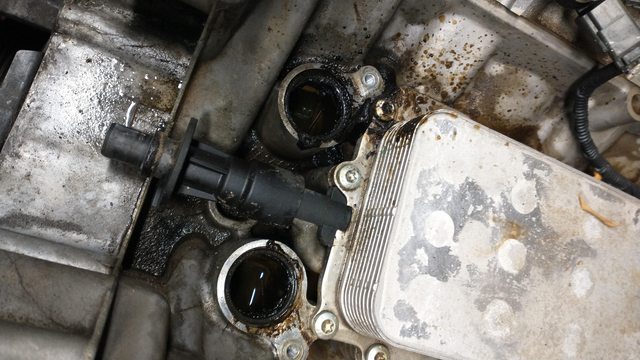
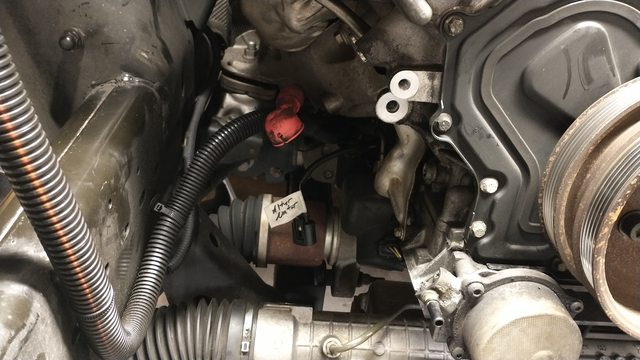
Well I found the problem. That front main plastic coolant pipe that comes out of the block.
Looks like it failed the same way they all claim to. The two tube ends where it went into the block are absolutely cooked. Over time you could actually see channels melted into the plastic where coolant was trying to escape. All around the left area there is molten plastic bonded to the engine in a splatter pattern. Even more than that you can see where the molding decided to split open as well. It is a little disturbing to see how hot the water must have been to melt the plastic like that. Even my wife was baffled why this part was not made of metal.
I'm getting all of the coolant line plastics replaced at FCP Euro. That way about every 30k miles, I just go in and replace them.
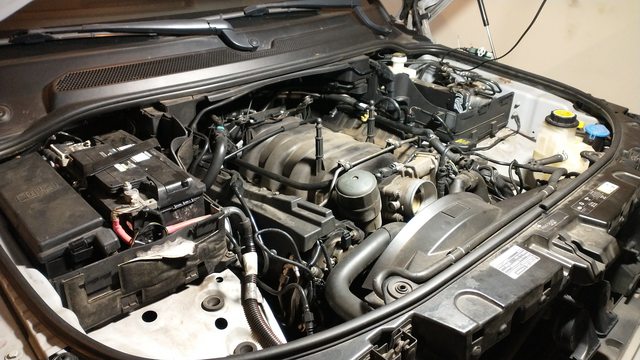
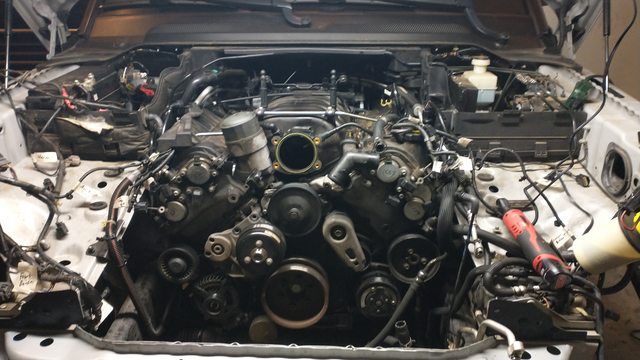
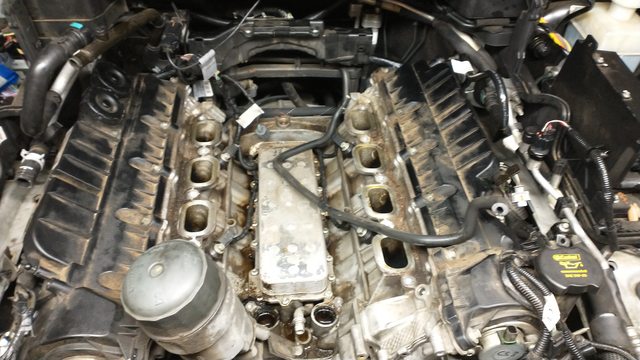
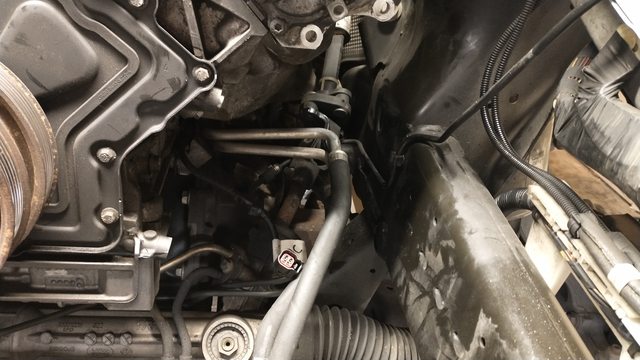
I got some more work done this weekend as well. Slowly getting the space I need to find out how to lift this beast out. Truth is, the more accessories you pull off the more you find there is a good deal of room. When you take off the intake manifold you gain some pretty decent access to the backside of the engine. Time will tell how much of a pain it'll be to get the bell housing bolts off.
Dropped about $1,600 at FCP Euro for all the parts I think will benefit with the lifetime replacement. I also ordered there complete brake rotor and pad kit. That's a good deal at $400 and we'll just swap them out when they wear down. That order will arrive end of this next week.
Engine is now scheduled to arrive n Thursday. We shall see what is what when it gets here.
Looks like it failed the same way they all claim to. The two tube ends where it went into the block are absolutely cooked. Over time you could actually see channels melted into the plastic where coolant was trying to escape. All around the left area there is molten plastic bonded to the engine in a splatter pattern. Even more than that you can see where the molding decided to split open as well. It is a little disturbing to see how hot the water must have been to melt the plastic like that. Even my wife was baffled why this part was not made of metal.
I'm getting all of the coolant line plastics replaced at FCP Euro. That way about every 30k miles, I just go in and replace them.
I got some more work done this weekend as well. Slowly getting the space I need to find out how to lift this beast out. Truth is, the more accessories you pull off the more you find there is a good deal of room. When you take off the intake manifold you gain some pretty decent access to the backside of the engine. Time will tell how much of a pain it'll be to get the bell housing bolts off.
Dropped about $1,600 at FCP Euro for all the parts I think will benefit with the lifetime replacement. I also ordered there complete brake rotor and pad kit. That's a good deal at $400 and we'll just swap them out when they wear down. That order will arrive end of this next week.
Engine is now scheduled to arrive n Thursday. We shall see what is what when it gets here.
Thread Starter
|
Mudding
Joined: Feb 2014
Posts: 205
Likes: 16
From: Atlanta, GA
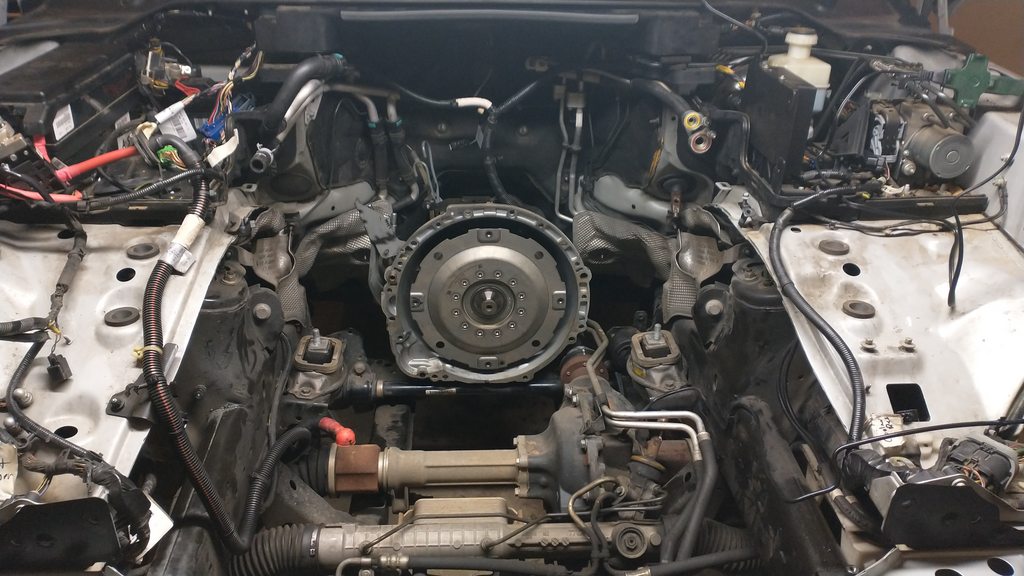
A lot done over the last few days.
Removed all of the accessories around the block.
Removed the cats from behind the exhaust manifolds down to the first muffler section. Gives you the access you need for the bell housing bolts.
I've got about 10 of the bell housing bolts out.
New engine comes in today at some point. Hoping they can help me pull it up the driveway to the garage or I'll be hoofing it up. We'll get a good inspection and start to list what we need for the swap.
I think a solid day worth of work and I'll have the engine out. There is about 2 inches of space between the oil pan lowest point and the front axle. I think once we get the 4 bolts removed from the flywheel to torque converter, all we will need is a couple inches to free the engine. My plan it to pull it forward and then angle it up and out. Trick it the engine mounts and their brackets to the block will have to be moved.
If this all works, I'll put together kind of a step by step to help anyone successfully yank the engine without having to pull the body.
Thread Starter
|
Mudding
Joined: Feb 2014
Posts: 205
Likes: 16
From: Atlanta, GA
And there you go...
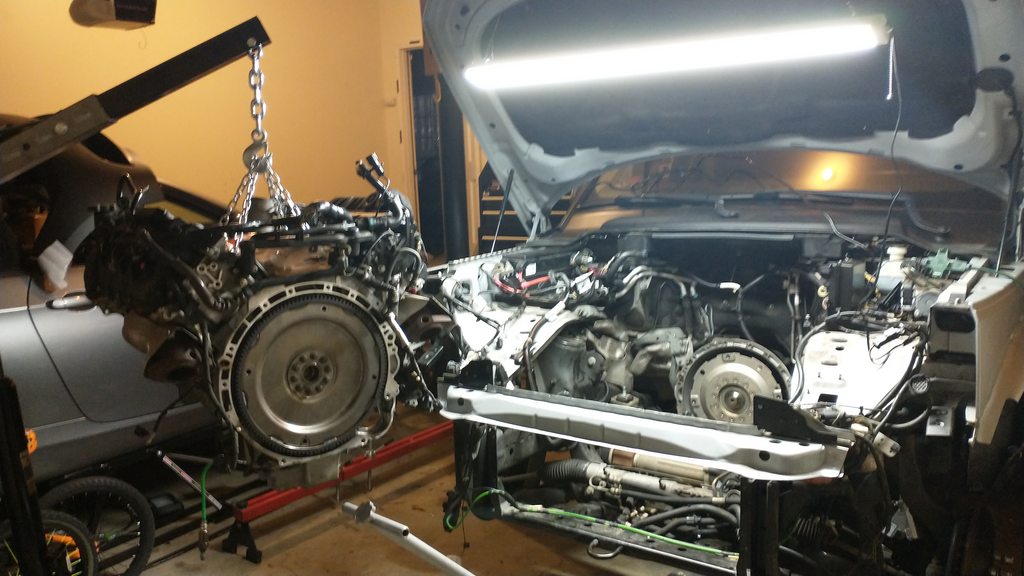
Honestly, it's pretty easy. You disconnect everything, pull it forward, and then pull it up and out.
New engine got delayed due to the 70mph gusting storm that bowled through last night. Should be here tomorrow. Finger ready to order the rest of the parts. They are starting to trickle in.
Honestly, it's pretty easy. You disconnect everything, pull it forward, and then pull it up and out.
New engine got delayed due to the 70mph gusting storm that bowled through last night. Should be here tomorrow. Finger ready to order the rest of the parts. They are starting to trickle in.