

LR4 project build - Here we go again.


Thread Starter
|
Mudding
Joined: Feb 2014
Posts: 205
Likes: 16
From: Atlanta, GA
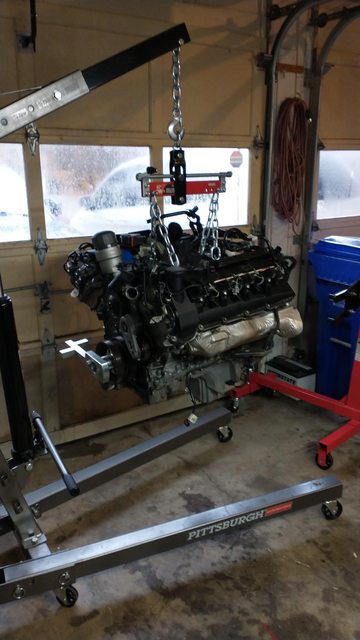
Sorry guys. I got a bit carried away and the project drug on pretty quickly.
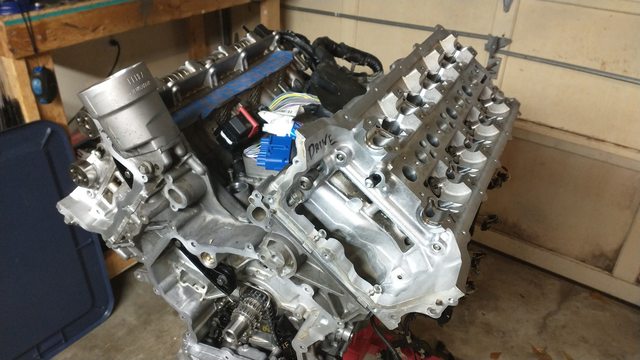
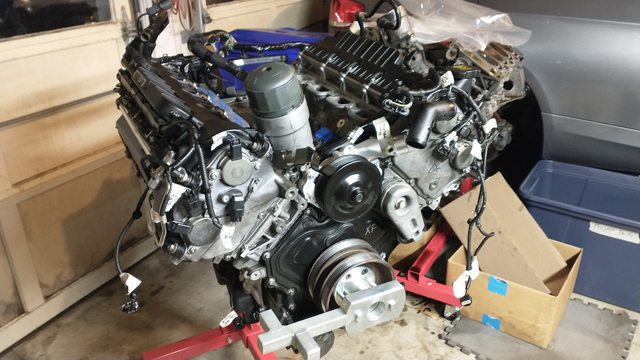
That said, it has all gone wrong. I had the new engine about 95% back together with the new parts and almost ready to drop back in when I found this....
This is the driver side head. That is where the power steering pump bracket is supposed to be.
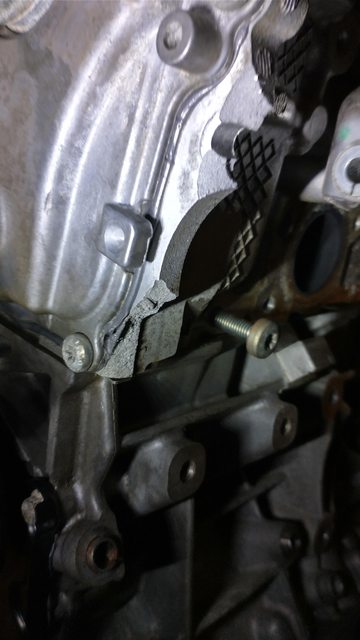
This is from the old heat damaged engine.
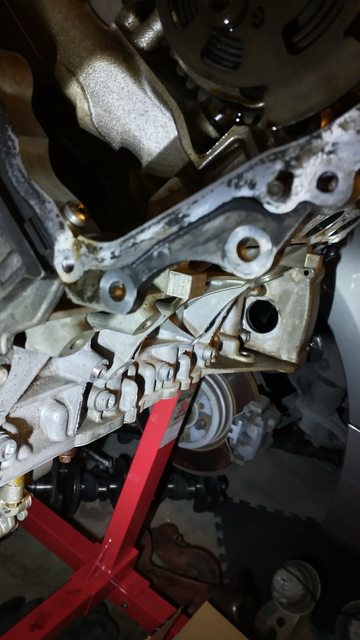
That is what is supposed to be there.
SOooo.....this engine is now useless without a replacement head. Kind of defeating the purpose of why I got a low mileage long block to begin with so I did not need to rebuild any of the internals. Hence the near $5k I invested with LKQ for a good engine.
They closed early on Friday so I could not get a hold of anyone. I'll have to hit them up on Monday. I can only see one of two options to appease the issue through their warranty.
1- They send me a low mileage used head and a head gasket under the warranty to replace what is damaged.
2- They send me another engine at the same or lower mileage.
Both options will put the project at least out another 2 months and I will probably have to replace a few of the gaskets I used in the new engine as they are all torqued down. Like a few of the crush gaskets for instance.
Not happy.
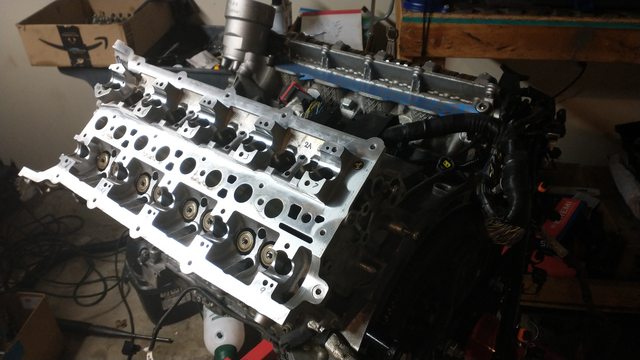
So I yanked the head off the other block, just to see how bad it was from overheating.
A quick look at the inside. Yuck.
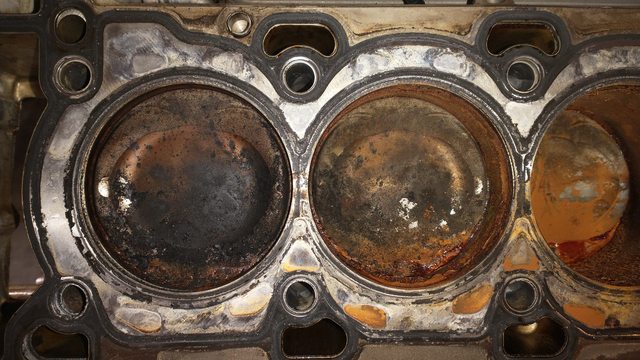

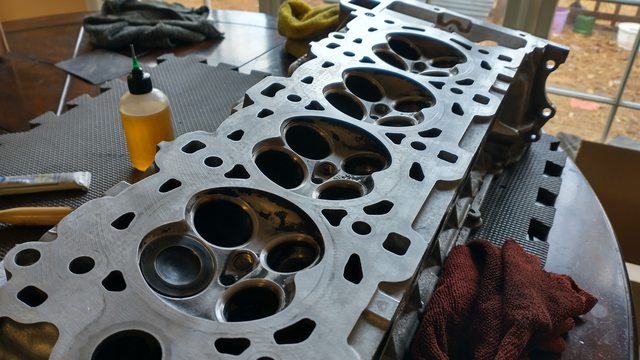
The head has a nasty warp. At least .25mm off across the entire middle. All 4 cylinders had coolant in them and rusted so the head gasket blew across the entire head.
That unfortunately rules out, I'm pretty sure, me taking in my head and getting it machined back to spec. I don't see anyone that sells .25 or .50 thicker head gaskets. This head would need a bit removed to work again.
At this point I am sure LKQ will do something for me, due to the warranty, but I have a feeling it will involve me yanking off the head and replacing it. Not the best warm and fuzzy feeling after hearing the horror stories of the head bolts pulling out block threads due to age/heat. Having to put new head bolts in will only weaken the stock threads in the block.
That said, it has all gone wrong. I had the new engine about 95% back together with the new parts and almost ready to drop back in when I found this....
This is the driver side head. That is where the power steering pump bracket is supposed to be.
This is from the old heat damaged engine.
That is what is supposed to be there.
SOooo.....this engine is now useless without a replacement head. Kind of defeating the purpose of why I got a low mileage long block to begin with so I did not need to rebuild any of the internals. Hence the near $5k I invested with LKQ for a good engine.
They closed early on Friday so I could not get a hold of anyone. I'll have to hit them up on Monday. I can only see one of two options to appease the issue through their warranty.
1- They send me a low mileage used head and a head gasket under the warranty to replace what is damaged.
2- They send me another engine at the same or lower mileage.
Both options will put the project at least out another 2 months and I will probably have to replace a few of the gaskets I used in the new engine as they are all torqued down. Like a few of the crush gaskets for instance.
Not happy.
So I yanked the head off the other block, just to see how bad it was from overheating.
A quick look at the inside. Yuck.
The head has a nasty warp. At least .25mm off across the entire middle. All 4 cylinders had coolant in them and rusted so the head gasket blew across the entire head.
That unfortunately rules out, I'm pretty sure, me taking in my head and getting it machined back to spec. I don't see anyone that sells .25 or .50 thicker head gaskets. This head would need a bit removed to work again.
At this point I am sure LKQ will do something for me, due to the warranty, but I have a feeling it will involve me yanking off the head and replacing it. Not the best warm and fuzzy feeling after hearing the horror stories of the head bolts pulling out block threads due to age/heat. Having to put new head bolts in will only weaken the stock threads in the block.
Last edited by knightmetro; Nov 28, 2020 at 05:19 PM.

Thread Starter
|
Mudding
Joined: Feb 2014
Posts: 205
Likes: 16
From: Atlanta, GA
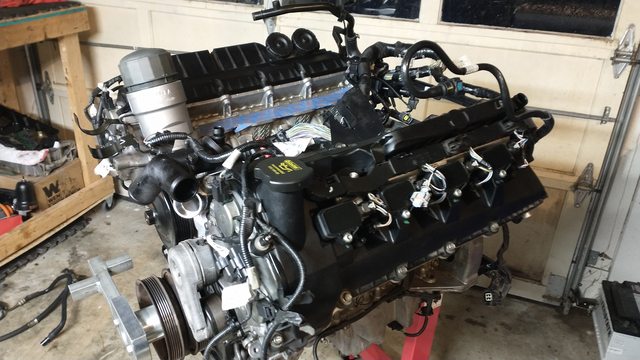
A few good updates.
Before I got word back from LKQ, I decided that I was not going to send this engine back. It has 52k miles, is in great internal shape, and the cheapest engine with around the same mileage from LKQ is over $1,000 more than what I paid for mine.
So I found a low mileage LH head assembly on ebay, with 52k miles, complete and he accepted $500 for it shipped. I went ahead and ordered a head gasket and head bolts from FCP Euro. Ended up only being around $80.
LKQ did get back with me yesterday afternoon and agreed to give me a $2,475 credit back for the damage to the engine. So, 50% of total price shipped plus tax. I would say that is a fair discount and all I could have hoped for.
If we do the math quick and simple like, that means we could end up having this beautiful LR4 back up and running for less than $8k invested overall.
I'm going to try and do a better job documenting the next steps. I'll have to remove the LH head, reinstall the new one, and then re-time everything back up. I am trying to not remove the oil pan again as that is all brand new black RTV.
More to come. I don't think that head will arrive until sometime late next week.
Last edited by knightmetro; Dec 2, 2020 at 08:54 AM.
Thread Starter
|
Mudding
Joined: Feb 2014
Posts: 205
Likes: 16
From: Atlanta, GA
Ok, so after some pushing and pulling, the tracking number for the head finally says that it is on the way. It hadn't shown any signed of life for over a week.
Head gasket came in and the head bolts. I took one look at the bolts and noticed they looked kind of thin. So I broke out the micrometer caliper and they turned out to be 10MM threads. The ones that came off the block to indeed have 11MM threads ut a 10MM shaft. I measure the wrong area when I verified. So I put in an order with AM for 11MM head bolts. Those will be here on Friday.
Head should be here Monday or Tuesday I would imagine. Maybe we'll have this thing back together in a couple weeks.
Thread Starter
|
Mudding
Joined: Feb 2014
Posts: 205
Likes: 16
From: Atlanta, GA
OK, sorry for the delay but the holidays happened and it took a bit for the new head to actually get to me.
The head turned out to be in great condition. After I cleaned it up it turned out to be 100% flat. I got a 24" straight edge to make sure. I ended up with a further delay when I realized when I was soaking the intake valves to remove the buildup I was getting a small leak in a couple of them that showed they weren't sealing al the way. Decided to order some valve seals and rebuild the head. Did a quick and easy valve job on all of them and put it all back together.
I did drop a camshaft during the rebuild and it snapped right in half. Luckily I still had an entire spare low mileage set.
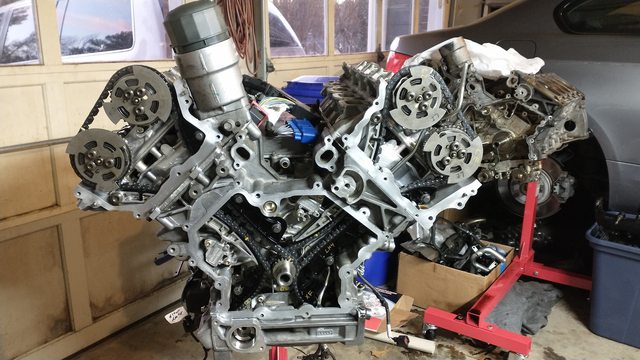
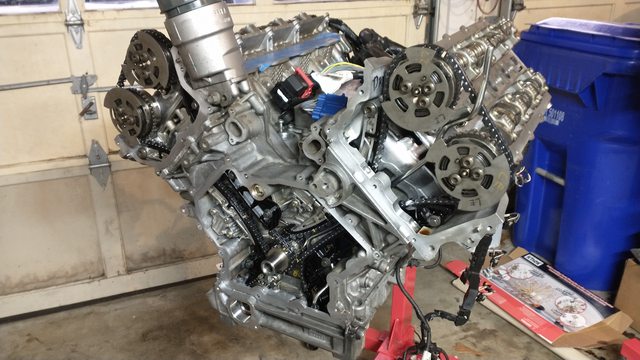
I got all the timing back together but I ran into some problems.
- When rotating the engine twice for check, the pass side tensioner would collapse and not spring back.
- After a few checks I just pulled it out and compressed it a few times full cycle while completely submerged in new oil. That helped but it still gave me issues when I put it back on.
- I noticed when you got about 3/4 a full rotation the pass side tensioner blade would collapse still but now spring back. Like during the rotation the chain had extra load on it. Never happened on the driver side.
- I switched the tensioners from side to side to see if the tensioner itself needed replaced. Same thing happened. BTW, both of the tensioners and blades are the new design so they are not old.
- So I got it all back together and am just kind of nervously aware that once the chamber behind the tensioner fills with oil, it will be hydraulically stiffened and wont collapse. I am worried though about the rotations of the engine on that first start up before that hydraulic tensioner fills with oil.
I don't want a timing issue....
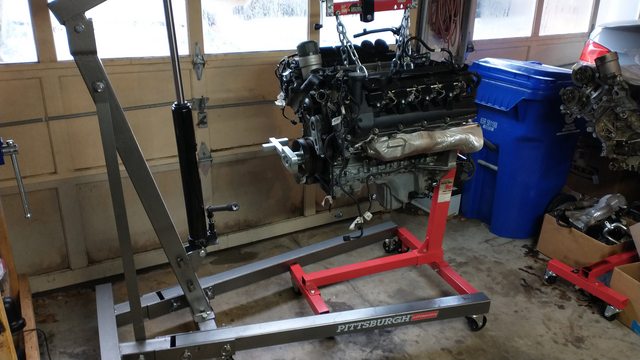
I do now have the front main timing cover back on and the crank hub. I have not torqued down the main crank bolt yet and I am feeling I may only get the proper torque when the engine it bolted back into the car. All that torque and rotation I don't think the engine stand is going to handle.
I am going to spend the weekend getting the timing covers back on, valve covers, etc, and work on getting the engine back in the car. Getting closer. Just a little uneasy about that timing tension.
The head turned out to be in great condition. After I cleaned it up it turned out to be 100% flat. I got a 24" straight edge to make sure. I ended up with a further delay when I realized when I was soaking the intake valves to remove the buildup I was getting a small leak in a couple of them that showed they weren't sealing al the way. Decided to order some valve seals and rebuild the head. Did a quick and easy valve job on all of them and put it all back together.
I did drop a camshaft during the rebuild and it snapped right in half. Luckily I still had an entire spare low mileage set.
I got all the timing back together but I ran into some problems.
- When rotating the engine twice for check, the pass side tensioner would collapse and not spring back.
- After a few checks I just pulled it out and compressed it a few times full cycle while completely submerged in new oil. That helped but it still gave me issues when I put it back on.
- I noticed when you got about 3/4 a full rotation the pass side tensioner blade would collapse still but now spring back. Like during the rotation the chain had extra load on it. Never happened on the driver side.
- I switched the tensioners from side to side to see if the tensioner itself needed replaced. Same thing happened. BTW, both of the tensioners and blades are the new design so they are not old.
- So I got it all back together and am just kind of nervously aware that once the chamber behind the tensioner fills with oil, it will be hydraulically stiffened and wont collapse. I am worried though about the rotations of the engine on that first start up before that hydraulic tensioner fills with oil.
I don't want a timing issue....
I do now have the front main timing cover back on and the crank hub. I have not torqued down the main crank bolt yet and I am feeling I may only get the proper torque when the engine it bolted back into the car. All that torque and rotation I don't think the engine stand is going to handle.
I am going to spend the weekend getting the timing covers back on, valve covers, etc, and work on getting the engine back in the car. Getting closer. Just a little uneasy about that timing tension.
Thread Starter
|
Mudding
Joined: Feb 2014
Posts: 205
Likes: 16
From: Atlanta, GA
OK. WE ARE DONE!
Have to fast forward a bit, sorry guys. I spent about 72 hours straight just burning through everything. I spent all day Friday, Sat, and Sunday getting the engine back in, accessories, and Sunday night.....fired it up.
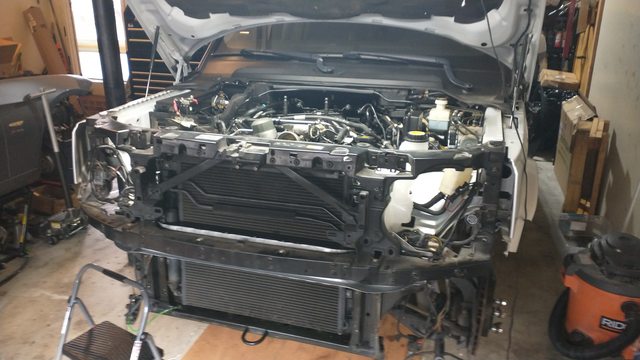
I stopped taking pictures at that point as it was Sunday and I had a much smaller window of time to get it at least up to test time. So I pulled the fuel pump fuse, got the battery back in, and gave it a couple turn overs. No issues.
Then popped that fuse back in and gave it a try. Fired up in about 5 seconds. Only bad sounds I got was from the pwr steering pump as I had to refill it and it sucked the red dry before I could top off. Topping it off solved that issue. All the pwr steering lines had been replaced.
It did take me a few hours to properly get the coolant bled and the temps to go down. It was at 215-230 for a while. Had to shut it off and keep getting the air out of the lines. Now it runs at around 186-188 when driving. I have not seen it go above 194 but it is pretty cool out. Used Zerex G05.
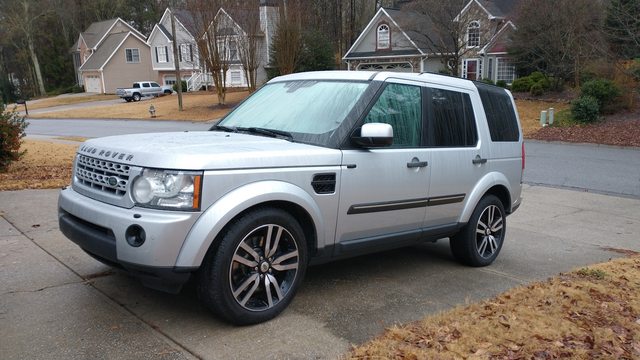
Car is all back together now and driving. Got emissions done after putting 100 miles on it. Got the tax and tag taken care of.
The only warning light I have is a TPMS fault. I topped off all of the tires but that had not gone away. May have to go into a tire shop and see if they can find out what the deal is.
More pictures when I get the chance. Very happy with the result so far.
Have to fast forward a bit, sorry guys. I spent about 72 hours straight just burning through everything. I spent all day Friday, Sat, and Sunday getting the engine back in, accessories, and Sunday night.....fired it up.
I stopped taking pictures at that point as it was Sunday and I had a much smaller window of time to get it at least up to test time. So I pulled the fuel pump fuse, got the battery back in, and gave it a couple turn overs. No issues.
Then popped that fuse back in and gave it a try. Fired up in about 5 seconds. Only bad sounds I got was from the pwr steering pump as I had to refill it and it sucked the red dry before I could top off. Topping it off solved that issue. All the pwr steering lines had been replaced.
It did take me a few hours to properly get the coolant bled and the temps to go down. It was at 215-230 for a while. Had to shut it off and keep getting the air out of the lines. Now it runs at around 186-188 when driving. I have not seen it go above 194 but it is pretty cool out. Used Zerex G05.
Car is all back together now and driving. Got emissions done after putting 100 miles on it. Got the tax and tag taken care of.
The only warning light I have is a TPMS fault. I topped off all of the tires but that had not gone away. May have to go into a tire shop and see if they can find out what the deal is.
More pictures when I get the chance. Very happy with the result so far.

5th Gear
Joined: Jul 2018
Posts: 5
Likes: 2
Your post, especially including the step by step progress has restored my faith in tackling this project. My LR4 had catastrophic engine failure back at the end of 2019 and there was simply no way I could afford the 10k+ the shop quoted me for a used engine swap. After some research into the AJ133 I even attempted to get that number down by suggesting a Jaguar engine as opposed to a Land Rover one but they told me that they weren�t compatible. I figured I would end up doing the swap myself in the end but I was hesitant to pull the trigger since everywhere I read said that it was necessary to lift the body off the frame. Not only have you shown that it is indeed possible to do the swap without a lift but you have also settled any questions I had about the cross compatibility of the Jaguar 5.0!
You have no idea just how much your post has helped me! Thank you for sharing everything!
You have no idea just how much your post has helped me! Thank you for sharing everything!
Thread Starter
|
Mudding
Joined: Feb 2014
Posts: 205
Likes: 16
From: Atlanta, GA
When you get it down to the long block, the only part that you really have to make sure is which part version to order is the rear main oil seal. There are two different plates and even the manual tells you it could be one or the other.
1. 100% truth - The Jag engine sells for almost half of what the LR4 engine sells for on the open market. So do not buy a used engine marketed as LR4 unless the price is good.
2. LKQ charges a good amount of $$ but their 6mo warranty for parts is well worth it and they will work on compensating you if anything is wrong.
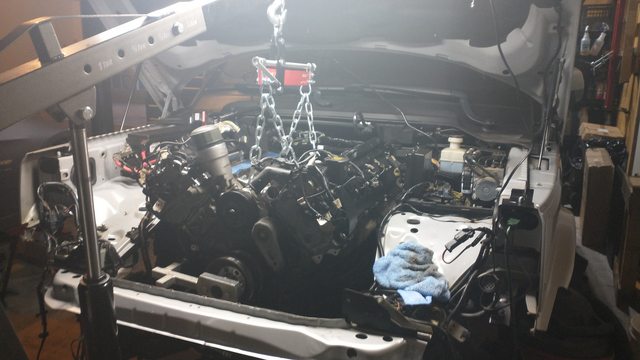
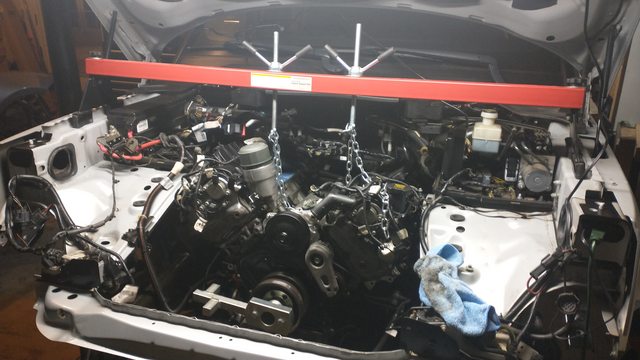
3. When pulling and especially dropping back in, get one of those cheap engine levelers. It will aid A LOT when you are trying to get it back in. Sink 1 or 2 of the lower bell housing bolts in and it'll all just come together.
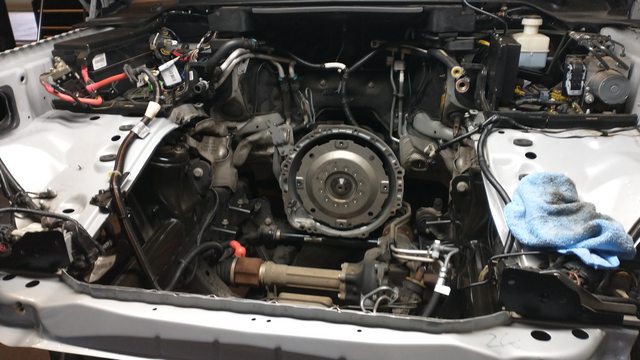
4. Remove accessories, support engine, remove engine mounts and their brackets, remove steering bar, remove catalytic converters, remove bell housing bolts, and it'll pop right out.
5. ALL of the special tools for crank hub/bolt, timing, and the injectors are on Amazon for dirt cheap compared to Atlantic British.
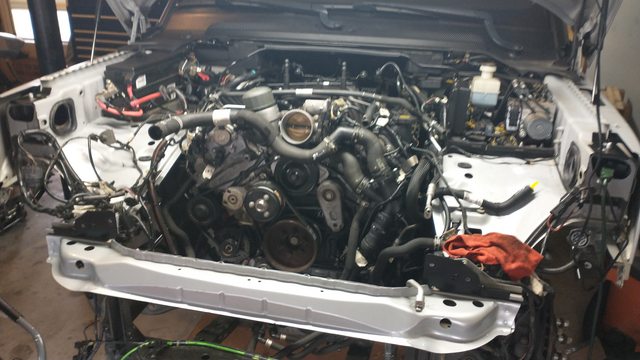
I found pretty much zero write ups on how to pull this engine out of the LR4 without a body lift, so if anyone has any questions, I am more than happy to help.
I was pleasantly surprised how easy it is to work on this engine once you understand how to gain the space you need.
1. 100% truth - The Jag engine sells for almost half of what the LR4 engine sells for on the open market. So do not buy a used engine marketed as LR4 unless the price is good.
2. LKQ charges a good amount of $$ but their 6mo warranty for parts is well worth it and they will work on compensating you if anything is wrong.
3. When pulling and especially dropping back in, get one of those cheap engine levelers. It will aid A LOT when you are trying to get it back in. Sink 1 or 2 of the lower bell housing bolts in and it'll all just come together.
4. Remove accessories, support engine, remove engine mounts and their brackets, remove steering bar, remove catalytic converters, remove bell housing bolts, and it'll pop right out.
5. ALL of the special tools for crank hub/bolt, timing, and the injectors are on Amazon for dirt cheap compared to Atlantic British.
I found pretty much zero write ups on how to pull this engine out of the LR4 without a body lift, so if anyone has any questions, I am more than happy to help.
I was pleasantly surprised how easy it is to work on this engine once you understand how to gain the space you need.