Discovery II Talk about the Land Rover Discovery II within.
Sponsored by:
Sponsored by:

4.6 Rear Main Seal

Thread Tools
 
Search this Thread
 
  #11  
Old 07-27-2018, 11:51 AM
Best4x4's Avatar
Super Moderator
Join Date: Apr 2015
Location: Beaumont, TX
Posts: 7,737
Received 2,297 Likes on 1,688 Posts
Default

Are you on a mobile device? Viewing the website as a full site vs mobile site fixed the image uploading for me. The mobil site uploader is buggy!


My latest Lego 94 D90 with off road roof rack & all off road gear. Posted as a test image.
 

Last edited by Best4x4; 07-27-2018 at 11:55 AM.
The following users liked this post:
Sixpack577 (07-27-2018)
  #12  
Old 07-27-2018, 01:05 PM
Sixpack577's Avatar
TReK
Thread Starter
Join Date: Jul 2017
Posts: 3,388
Received 483 Likes on 406 Posts
Default

I have tried it as a mobile site too, same issue.
On my phone I always view the full site, not the mobile.
Thanks.

The picture I was trying to post really doesn't help anyway.
 
  #13  
Old 07-27-2018, 02:01 PM
Best4x4's Avatar
Super Moderator
Join Date: Apr 2015
Location: Beaumont, TX
Posts: 7,737
Received 2,297 Likes on 1,688 Posts
Default

Andriod or iPhone? I use an iPhone with Safari browser. Will have to try my personal Andriod when I get home (don’t take it to work to get stolen/broken).
 
  #14  
Old 07-27-2018, 02:25 PM
abran's Avatar
Baja
Join Date: Aug 2013
Location: Huntington Beach CA
Posts: 6,729
Received 721 Likes on 626 Posts
Default

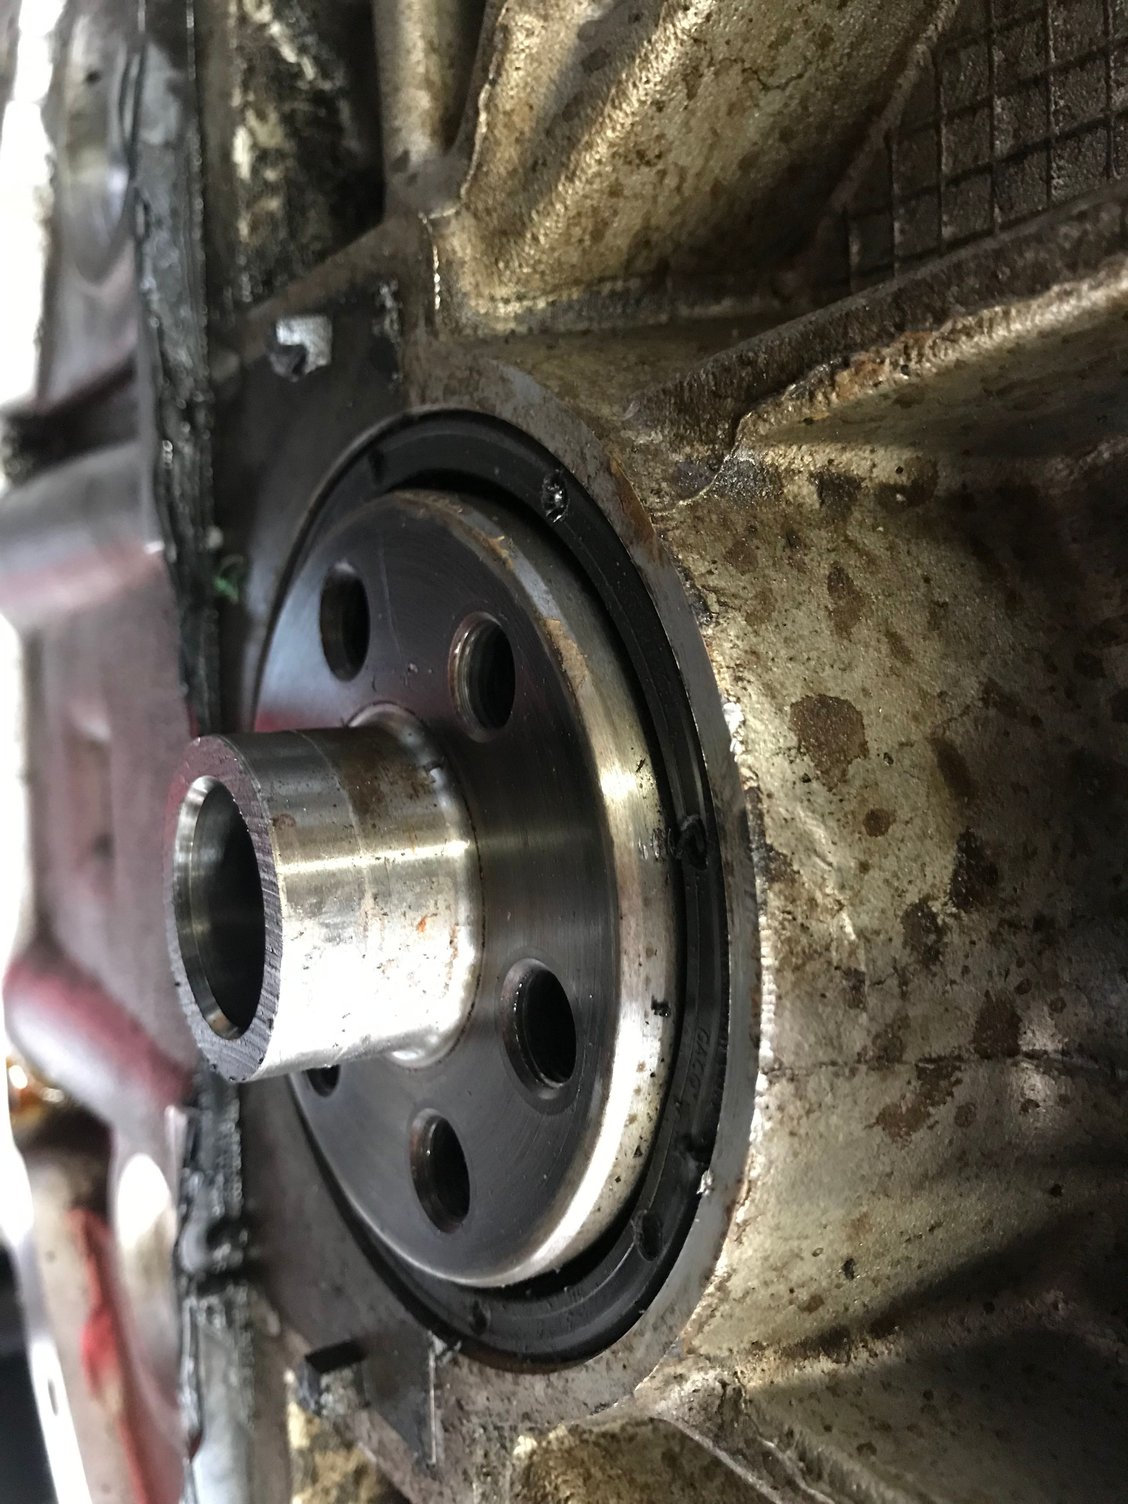
This is what mine looks like from outside.

I was told that the bearing end cap needs to come off prior to pushing seal on.


Last edited by abran; 07-27-2018 at 02:27 PM.
The following users liked this post:
Sixpack577 (07-27-2018)
  #15  
Old 07-27-2018, 04:20 PM
The Deputy's Avatar
Camel Trophy
Join Date: Oct 2016
Location: Michigan
Posts: 4,690
Received 1,275 Likes on 896 Posts
Default

This installation ^^^^ looks correct to me. Flush along outside edge and on the crank mating surface sufficiently.

Sixpack, did the seal actually bottom out against a machined surface/land inside the block. If there is no surface/land that the seal rest against once installed, l'd say flush is correct. It was two years ago that I did my wife's 03 (with 04 engine swap) and truth be told...can't remember what it looked like in there. But, the picture supplied by Abran looks correct and probably what l did. I've never used the Rave, besides the electrical edition, so...l'm unfamiliar with their installation process.

This is just a bugger, having to jerk that thing out again.

​​​​​​​ Brian.
 
  #16  
Old 07-27-2018, 05:26 PM
No Doubt's Avatar
Recovery Vehicle
Join Date: Jun 2017
Location: Alabama + Vegas + Texas
Posts: 1,236
Received 235 Likes on 172 Posts
Default

That rear main seal looks rubber. Man, maybe my memory is shot to heck but I thought I tapped in some sort of metal gasket for my rear main seal. Whatever it was it was so trivial to install that I never thought about it again.


Now, my 4.6 leaks... but not from the rear!
 
  #17  
Old 07-27-2018, 05:48 PM
Sixpack577's Avatar
TReK
Thread Starter
Join Date: Jul 2017
Posts: 3,388
Received 483 Likes on 406 Posts
Default

Originally Posted by abran
This is what mine looks like from outside.

I was told that the bearing end cap needs to come off prior to pushing seal on.


Yep, just how I installed mine.
The previous one was the same, only as said, cocked at an angle with the top side nearly out.
Thanks for the picture to confirm.
Per the Rave, the rear seal goes in after the rear main cap is already in.
My rear main seal tapped in the same depth as the picture without removing the cap.
I think installing the seal before the cap will damage the seal, because it could go deeper than it's supposed to, and possibly prevent the cap from seating completely, and causing the rear main bearing to spin.
Deputy, there is no edge that the rear seal butts against. Instead, it seems to be a very gradual taper, until the seal diameter is too large to go any deeper.
Hence the reason not to install the seal before the cap.
Thank all you guys again for your input.
 
  #18  
Old 07-28-2018, 08:58 PM
BackInA88's Avatar
Mudding
Join Date: Apr 2010
Location: Troy Michigan
Posts: 248
Received 25 Likes on 22 Posts
Default

Excessive crankcase pressure because of a problem with Land Rovers goofy crankcase ventilation set up?
 
  #19  
Old 07-29-2018, 03:00 AM
No Doubt's Avatar
Recovery Vehicle
Join Date: Jun 2017
Location: Alabama + Vegas + Texas
Posts: 1,236
Received 235 Likes on 172 Posts
Default

Originally Posted by abran
This is what mine looks like from outside.

I was told that the bearing end cap needs to come off prior to pushing seal on.


OK, mine really does look entirely different. I went back through my old pics and the closest that I could find was this post-rebuild pic as I was about to hoist the motor back into the Disco 2.
 
Attached Thumbnails 4.6 Rear Main Seal-motorbolt.jpg  
  #20  
Old 07-29-2018, 08:23 AM
abran's Avatar
Baja
Join Date: Aug 2013
Location: Huntington Beach CA
Posts: 6,729
Received 721 Likes on 626 Posts
Default

Your photo has the flywheel, flex plate, and spacers on it.

my photo is without those.
 
The following users liked this post:
Sixpack577 (07-29-2018)


Quick Reply: 4.6 Rear Main Seal


All times are GMT -5. The time now is 05:11 PM.