When you click on links to various merchants on this site and make a purchase, this can result in this site earning a commission. Affiliate programs and affiliations include, but are not limited to, the eBay Partner Network.
I can't believe I forgot to post this here, but about six months ago, I decided to cut a hole in the plastic panel to expose the front recovery point. I am not a huge fan of how the OEM front undershield looks, nor was I willing to pay $3,700 for the part and labor that my dealer quoted me for the install, so I decided to take the matter into my own hands. I measured the panel, and drew a square to cut out. The sides are both 14 1/2" from the sides of the panel and 3 1/4" from the top and bottom of the panel. I then used a Sawzall to cut the hole and wrapped some trim around it. to reinforce the plastic trim on the bottom, I screwed in an aluminum bar to strengthen it. I think it turned out quite well! Six months later the trim is still on there and looks as good as they day I installed it!
Last edited by CincyRovers; May 10, 2024 at 10:17 AM.
I can't believe I forgot to post this here, but about six months ago, I decided to cut a hole in the plastic panel to expose the front recovery point. I am not a huge fan of how the OEM front undershield looks, nor was I willing to pay $3,700 for the part and labor that my dealer quoted me for the install, so I decided to take the matter into my own hands. I measured the panel, and drew a square to cut out. The sides are both 14 1/2" from the sides of the panel and 3 1/4" from the top and bottom of the panel. I then used a Sawzall to cut the hole and wrapped some trim around it. to reinforce the plastic trim on the bottom, I screwed in an aluminum bar to strengthen it. I think it turned out quite well! Six months later the trim is still on there and looks as good as they day I installed it!
any images of the reinforcement bar you added, trying to understand what you're referencing. Thanks for sharing
any images of the reinforcement bar you added, trying to understand what you're referencing. Thanks for sharing
I don't have any photos unfortunately, and I had to get a new front panel after removing the last one and breaking some of the clips in the process. I cut a new hole, but didn't add the aluminum bar on my new one, as it wasn't necessary at all. But what I used was just a 1/8" thick aluminum bar from Home Depot, and cut it down to evenly fit across behind the bottom of the panel and then screwed it in.
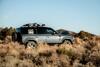
I will say, you have enabled your recovery point access but that hideously expensive and invasive to install $3700 LR plate also provides another function which is as a bash plate. If you’re going to do hard trails, you might want to consider a bash plate up there. The LR one does more than just make the recovery point visible -- mine has battle scars after several years of offroading. It’s gnashed and has taken a beating. It’s extremely tough and durable.
If you don�t want to spend the money, that�s fine, but to say that you�re not a fan of something that looks great is a lame excuse not to do it properly.
I went with a chinese skid plate and installed it myself. Was certainly a PIA, but at the end I�m very satisfied.
I don't have any photos unfortunately, and I had to get a new front panel after removing the last one and breaking some of the clips in the process. I cut a new hole, but didn't add the aluminum bar on my new one, as it wasn't necessary at all. But what I used was just a 1/8" thick aluminum bar from Home Depot, and cut it down to evenly fit across behind the bottom of the panel and then screwed it in.
I will say, you have enabled your recovery point access but that hideously expensive and invasive to install $3700 LR plate also provides another function which is as a bash plate. If you’re going to do hard trails, you might want to consider a bash plate up there. The LR one does more than just make the recovery point visible -- mine has battle scars after several years of offroading. It’s gnashed and has taken a beating. It’s extremely tough and durable.
I think like almost all the off-road oriented accessories that actually benefit the user when off-road, the OEM bash plate has been discontinued and/or baked into some front end protection garbage at a whopping fee. It was $1000 port installed when I got mine in 2021. Now it's about the cost of a good front metal bumper and winch cradle. Pass.
Good plate. I'm on my second. They take a beating well.