4.6 engine build
#31
 02-18-2015, 10:07 PM


machine shop put the rods and pistons together, so I had to check that I had 4 and 4.....all good.checked all ring and piston clearances.
using federal mogul geotze rings. all were within spec. no filing needed. only issue was one top groove clearance. it had a little fold in/dent but was small enough that I could easily file and polish it back to clearance.
tried to find a good drawing to reference for gap orientation, based on rave description. this is as close as I could find..
4. Position oil control expander ring joint and ring rail gaps all at one side, between gudgeon pin and away from left hand (thrust) side of piston viewed from front of piston. Space gaps in ring rails approximately 25 mm (1.0 in) each side of expander ring joint. 5. Position compression rings with ring gaps on opposite sides of piston between gudgeon pin and right hand side of piston - viewed from front of piston.
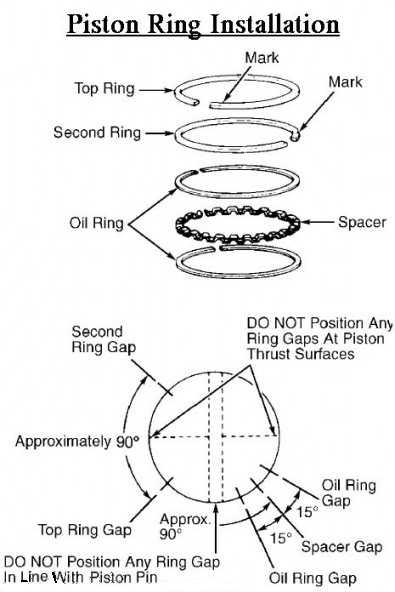
pretty close. just keep gaps off of the thrust side for initial start up.... no control after that.
hoping my cam bearings get here this week, so I can make some progress
using federal mogul geotze rings. all were within spec. no filing needed. only issue was one top groove clearance. it had a little fold in/dent but was small enough that I could easily file and polish it back to clearance.
tried to find a good drawing to reference for gap orientation, based on rave description. this is as close as I could find..
4. Position oil control expander ring joint and ring rail gaps all at one side, between gudgeon pin and away from left hand (thrust) side of piston viewed from front of piston. Space gaps in ring rails approximately 25 mm (1.0 in) each side of expander ring joint. 5. Position compression rings with ring gaps on opposite sides of piston between gudgeon pin and right hand side of piston - viewed from front of piston.
pretty close. just keep gaps off of the thrust side for initial start up.... no control after that.
hoping my cam bearings get here this week, so I can make some progress
Last edited by dusty1; 02-19-2015 at 02:09 PM.
#32
02-19-2015, 12:40 PM
#33
02-28-2015, 09:25 PM

#36
03-02-2015, 06:32 AM
#37
03-02-2015, 08:41 AM

Baja
#38
03-02-2015, 08:52 AM
#39
03-03-2015, 09:22 PM
okay slid the cam in before I do final crank install. I purchased but did not install finished cam bearings from ab.......turns out I had new ones installed at machine shop.....anywho,
I went with the crower 53231 cam.
bought from crower directly. they have 4 options for this engine. listed with specs and rated performance levels 1-4. this is the #3.
all of these are machined for this engine and accept the thrust plate and have the recess for timing sprocket.
so before I do my final torque on the crank bolts, I have a question....well 2 questions, but both concern the rear seals.
1st. rave says to hylomar (I will rtv) the bottom inside corner of the last cap.
I read to "rtv the crap out of it" does this mean more than recommended? perhaps chase up the back of the crucifi ? or is it crucifixes?
2nd. which way does the rear main go? tension spring towards the block or smooth side towards block? no lip protector came with the seal so I kind of think that the spring goes out, but ordinarily i'd think it to be the other way

Last edited by dusty1; 03-27-2015 at 12:41 PM.
#40
03-04-2015, 06:53 AM
Baja
basically i go under the premise I have used for 40 years, that is any place the is a gasket, there should be gasket cement. In the last 20 years i have come to believe that RTV works much better than gasket cement. the crucifixes would be a big yes. what are you using for assembly lube permatex make a great one.
the crucifixes would be a big yes. what are you using for assembly lube permatex make a great one.