When you click on links to various merchants on this site and make a purchase, this can result in this site earning a commission. Affiliate programs and affiliations include, but are not limited to, the eBay Partner Network.
I am a known idiot at engine building. I apparently dropped a bolt in my intake while rebuilding it and only discovered it last week. No ****. I'm serious. It got pounded against the valves. Now THAT causes a nasty misfire. Anyway, I have had alot of experience with misfires, both self-inflicted and other, and my Disco has not been to the dealership since 9/11/01 (for an oil change). I have basic tools and a RAVE.
First thing I notice is that 1 and 6 are on the same coil. That coil could be weak. For advice on how to electrically test it, look elsewhere because I have no idea. First, I would check the gap on the 1 and 6 plugs, make any necessary adjustment, clear the codes, and fire it up. Not fixed? Swap the 1 plug with the 3 plug, and the 6 plug with the 4 plug, and see if the misfire moves to 3 and 4 from 1 and 6. No? Okay, then it gets harder: pull the upper intake, spray the plenum gasket with some copper coat gasket compound and set it aside to dry, swap the 1 and 2 wires at the plugs and coils, then the 6 and 5 wires, put it back together, and see if the misfire moves? No? Set aside spark concerns for a moment, because we are trying to NOT spend money.
Pull the intake again. Swap the injectors on 1 and 6 to other cylinders. Put it back together, clear the codes, see what happens. Still a problem?
Now we have to spend a little money because we have to pressure test the cylinders. Go to harbor freight or equivalent and get a pressure tester (cheap). Pull the plugs and check the pressure on each cylinder; write them down. If they are all close (and they are probably real close on a new engine), be glad--you have eliminated lots of problems (valves and ring eliminated as a problem, probably).
Take the harbor freight pressure tester back. Now go to autozone or some parts shop and buy a new coil or coil set (locally)--keep the receipt. Swap it in. If that doesn't solve the problem then take the coils back. I don't return stuff that I use but to each his own.
All of the foregoing assumes a good exhaust flow and since cats are suspect, I would do those tests with the exhaust dropped from the manifold. 6 nuts.
I assume you are not losing coolant.
I also assume that your spark plug wires are well laid out and not cross-firing to each other or something metal. You can check that in the dark with the engine running. If you see sparks, separate the wires from whatever they are sparking to.
Finally, I am assuming you haven't gotten any codes indicating a vacuum leak or rich/lean conditions.
Since you have had persistent misfires, I would also check your oil BEFORE you start the test. It doesn't take much gasoline to turn oil into dirty water, and you want to have good oil for the compression test (and everything else).
If the compression test reveals low numbers on 1 and 6, you may have to do a leak down test. That's another topic and since you have a new engine that is unlikely to be necessary.
I am betting that you will find a solution in one of these steps. But if you don't and have returned everything you bought, go get a MAF or borrow a known good one for thirty minutes. You could also get a can of MAF cleaner, but let your MAF cool OVERNIGHT before trying that. Failing MAF's can cause all sort of mischief without giving any explaining codes.
Removing the intake I easy with normal tools and basic mechanical skill like righty tighty, lefty loosy; a paid mechanic is an unnecessary luxury for that operation. You need some extensions for sockets. An 8mm removes the top coil bolts. Have a magnet handy because they fall. Loosen but don't remove the bottom bolts so you can tip the coil away from the intake. Use a 10mm , remove the front and back short intake bolts. Then remove the four middle bolts. You will have to loosen the hose clamp on the IACV valve on top to get one bolt. You'll see it. Go to the driver side. Unclip the throttle position sensor connection, which is hidden from view on the back of the throttle body. Unclip the IACV and purge valve connections. Squeeze the purge valve hose where it meets the throttle body and take the entire hose out of the keepers. Remove the little hose clamps and the big one on the intake. Get everything free. Unclip the MAF and pull the intake hose out. Go to the other side and remove the two vacuum connections. The one with the red ring... Hold the ring to the intake and pull the hard plastic line straight out. Check that you are free of everything except the throttle and cruise cables. Put some cardboard down, pick the intake up and flop it on its head (onto the cardboard). Boom. There are the coils. Pm me your number and I'll talk you through it or I can point and shoot a quick video. You'll be done in 30 minutes on the first try. It is dead simple.
Don't drop anything in the lower intake, like a bolt. Cover it with a clean towel. You can also remove the throttle and cruise cables. You'll see what to do. 8mm aa work the ends out. Set aside.
All of it is easier with the hood off. 4 13mm bolts.
My post was long but I had swapping no new coils in right after returning the harbor freight pressure tester.
The coils can also be swapped left to right to put 1 and 6 on different posts, but if you do that I would remove them from the frame, flip them, and put them in the right spot, because keeping the spark plugs going to the right spot can be confusing and if you mess it up the intake has to come off again to easily access the the wires.
I have posted problems many times over the years and spent ALOT of effort shooting down suggestions (it can't be that, I did this, I was careful) but, with the exception of the bolt in the intake, I was always wrong somewhere, because the misfires were always solved. I now think it is best to start at the beginning and do it all over just like a mechanic would.
This thread has been a tough read. It is unfortunate that so many problems came with the new engine. Trying to sort through the possible causes of a misfire can be very frustrating but you need to start with looking at the most common and easiest to check possible causes and work your way through them from there. Check only one thing at a time so that you can isolate the cause.
Red cats is from too much fuel so you are getting fuel from the injectors, it just isn't being burned in the cylinder. You mention a weak spark from one plug. Could that wire have been damaged during installation? The clips on the ends which connect to the coils and the plugs are just crimped on. When you pull the wires it is relatively easy to pull those off as well. I would pull the boot off the wire to Cylinder #1 and check to see that it is still properly crimped. Also check the the wire for #6. If they are good, then as recommended previously check the coils by swapping them, then move on from there.
Good luck. This can be solved. The engine itself should not be damaged by all of this so all this screwing around will be worth it for you.
I am a known idiot at engine building. I apparently dropped a bolt in my intake while rebuilding it and only discovered it last week. No ****. I'm serious. It got pounded against the valves. Now THAT causes a nasty misfire. Anyway, I have had alot of experience with misfires, both self-inflicted and other, and my Disco has not been to the dealership since 9/11/01 (for an oil change). I have basic tools and a RAVE.
First thing I notice is that 1 and 6 are on the same coil. That coil could be weak. For advice on how to electrically test it, look elsewhere because I have no idea. First, I would check the gap on the 1 and 6 plugs, make any necessary adjustment, clear the codes, and fire it up. Not fixed? Swap the 1 plug with the 3 plug, and the 6 plug with the 4 plug, and see if the misfire moves to 3 and 4 from 1 and 6. No? Okay, then it gets harder: pull the upper intake, spray the plenum gasket with some copper coat gasket compound and set it aside to dry, swap the 1 and 2 wires at the plugs and coils, then the 6 and 5 wires, put it back together, and see if the misfire moves? No? Set aside spark concerns for a moment, because we are trying to NOT spend money.
Pull the intake again. Swap the injectors on 1 and 6 to other cylinders. Put it back together, clear the codes, see what happens. Still a problem?
Now we have to spend a little money because we have to pressure test the cylinders. Go to harbor freight or equivalent and get a pressure tester (cheap). Pull the plugs and check the pressure on each cylinder; write them down. If they are all close (and they are probably real close on a new engine), be glad--you have eliminated lots of problems (valves and ring eliminated as a problem, probably).
Take the harbor freight pressure tester back. Now go to autozone or some parts shop and buy a new coil or coil set (locally)--keep the receipt. Swap it in. If that doesn't solve the problem then take the coils back. I don't return stuff that I use but to each his own.
All of the foregoing assumes a good exhaust flow and since cats are suspect, I would do those tests with the exhaust dropped from the manifold. 6 nuts.
I assume you are not losing coolant.
I also assume that your spark plug wires are well laid out and not cross-firing to each other or something metal. You can check that in the dark with the engine running. If you see sparks, separate the wires from whatever they are sparking to.
Finally, I am assuming you haven't gotten any codes indicating a vacuum leak or rich/lean conditions.
Since you have had persistent misfires, I would also check your oil BEFORE you start the test. It doesn't take much gasoline to turn oil into dirty water, and you want to have good oil for the compression test (and everything else).
If the compression test reveals low numbers on 1 and 6, you may have to do a leak down test. That's another topic and since you have a new engine that is unlikely to be necessary.
I am betting that you will find a solution in one of these steps. But if you don't and have returned everything you bought, go get a MAF or borrow a known good one for thirty minutes. You could also get a can of MAF cleaner, but let your MAF cool OVERNIGHT before trying that. Failing MAF's can cause all sort of mischief without giving any explaining codes.
Removing the intake I easy with normal tools and basic mechanical skill like righty tighty, lefty loosy; a paid mechanic is an unnecessary luxury for that operation. You need some extensions for sockets. An 8mm removes the top coil bolts. Have a magnet handy because they fall. Loosen but don't remove the bottom bolts so you can tip the coil away from the intake. Use a 10mm , remove the front and back short intake bolts. Then remove the four middle bolts. You will have to loosen the hose clamp on the IACV valve on top to get one bolt. You'll see it. Go to the driver side. Unclip the throttle position sensor connection, which is hidden from view on the back of the throttle body. Unclip the IACV and purge valve connections. Squeeze the purge valve hose where it meets the throttle body and take the entire hose out of the keepers. Remove the little hose clamps and the big one on the intake. Get everything free. Unclip the MAF and pull the intake hose out. Go to the other side and remove the two vacuum connections. The one with the red ring... Hold the ring to the intake and pull the hard plastic line straight out. Check that you are free of everything except the throttle and cruise cables. Put some cardboard down, pick the intake up and flop it on its head (onto the cardboard). Boom. There are the coils. Pm me your number and I'll talk you through it or I can point and shoot a quick video. You'll be done in 30 minutes on the first try. It is dead simple.
Don't drop anything in the lower intake, like a bolt. Cover it with a clean towel. You can also remove the throttle and cruise cables. You'll see what to do. 8mm aa work the ends out. Set aside.
All of it is easier with the hood off. 4 13mm bolts.
Thank you. I took the day off from work, its a sunny day and Im going to give this a try step by step as you have laid out. I also already have a compression tested but I need to pick up a spark plug gap tool and the copper seal compound from Advanced Auto. Im tempted to buy to additional spark plugs and throw them in cylinder 1 and 6.
Picked up afew things at Advanced Auto Parts. 2 new Denso double platinum oem spark plugs, to be used in cylinder 1 and 6. A gap tool. Die electric grease and a tube of cooper sealant compound as recommend.
Before doing anything I checked the fault codes once more: P0306 = Cylinder 6 misfire detected, P0300 = Random/multiple cylinder detected, P0301 = Cylinder 1 misfire detected, P0306 = Cylinder 6 misfire detected, P1300 = Misfire detected sufficient to cause catalyst damage. Cleared the codes and began troubleshooting as suggested above.
Swapped out cylinder 1 and 6 spark plugs with the Denso plugs. I noted how the old plug for cylinder 1 had some die electric grease on the terminal on the end of the plug and even on the terminal inside the boot of the ignition wire. Cleaned inside the wire with a q-tip and ensured no grease was on the terminals. Applied fresh grease but only on the rubber boot and on the ceramic portion of the plug. Cylinder 6 plug and wire did not appear to have any grease on terminals. New plugs installed I started the truck and let her idle fore maybe 5 minutes. Next wave of codes popped up: P0300 = generic random/multiple cylinder misfire detected , P0303 = cylinder 3 misfire detected, P0306 = cylinder 6 misfire detected and P0305 = cylinder 5 misfire detected. I did not take the truck for a test drive nor did I let her idle for much longer. But I noted how cylinder 1 misfire appeared to be gone?
Next I decided to pull off the intake manifold so I could inspect the fuel injector wires as suggested, flip the coils around and look for any other visible issues. I did not see anything that would suggest the wiring to the injectors was bad or lose connections. The upper intake manifold plenum gasket looked a little bent and dirty and luckily I had a spare so I decided to fit the new plenum gasket for safe measures. Torqued all 6 intake manifold bolts to 18 foot pounds. While swapping the coils around I noted how one of the pegs has debris inside and the connector was dirty. Looked like shavings from whatever the material is of the pegs themselves. Looks as though the connectors on the wires scratched the walls inside the peg. This was only apparent in the peg corresponding to cylinder 7; bottom row, closest to the fender. I cleaned out all the pegs using a q-tip then applied a light layer of die electric grease inside each peg, ensuring no grease got on the terminals themselves. Also applied some grease on the exterior of each peg. I connected the bottom row of ignition wires first, then the top; ensuring that each wire "snapped" into place. Then I bolted the coil pack/bracket to the block and ensured both coils were fully plugged in. Put everything back together, inspected/cleaned each and every spark plug to ensure no grease was on the connectors, cleared the codes once more and let the truck idle for 15 minutes. The next wave of codes popped up: P0300, P0304, P0303, P0306 and P0305.
Cleared the codes again and took the truck for a 35 minute drive around down. Ranged in speeds from 30-50 MPH. Played with sport mode and without. Went up steep hills etc. No check engine light, no flashing check engine light. Got back home, checked the Ultra Gauge for any pending codes just to be sure and 0. Turned truck off and let it sit for a moment, meanwhile I got underneath the truck and examined the cats. They are hot but I see no signs of them over heating/glowing red. After afew minutes turned truck back on and let it idle for 15 minutes. The following "Pending codes" popped up: P0300, P0303, P0306 and P0305. Left the codes and took the truck for another drive for maybe 15 minutes, again up hills and reached speeds of around 50 mph. No "Check Engine codes" and no flashing check engine light. Ultra gauge alert reminders for the above mentioned pending codes but no actual check engine codes have appeared. My observation while driving was that the vehicle runs normal, feels normal, acceleration feels normal, am able to reach higher speeds with ease etc. No popping sounds from exhaust.
Returned home and again let the truck idle for maybe 20 minutes, waiting to see if the cats would start glowing or if the "check engine codes" would appear along with CEL - nothing. It would appear as though the steps I took today have had a significant impact on the overall operation of the vehicle. I do not understand why the check engine light/codes have not returned along with the pending codes. Typically the Ultra Gauge alerts you of "pending" fault codes just before picking up on the actual "check engine" codes, in which case you will get additional reminders of "check engine faults. Furthermore lately even after clearing the codes, they return immediately along with the check engine light, once you turn on the ignition and start the truck - often times followed by the flashing check engine light.
Cleared the pending codes for a final time, using the Icarsoft tool and let the truck idle again for 20 minutes. No pending fault codes, so I took her for a final test drive around and still no pending fault codes. By this time its 9pm and dark out. First thing I did when I got back home was inspect the cats and they are dark as anything else underneath the truck. No glowing cats. Truck still runs normal and feels normal. To soon to count my chickens and declare the issue resolved.
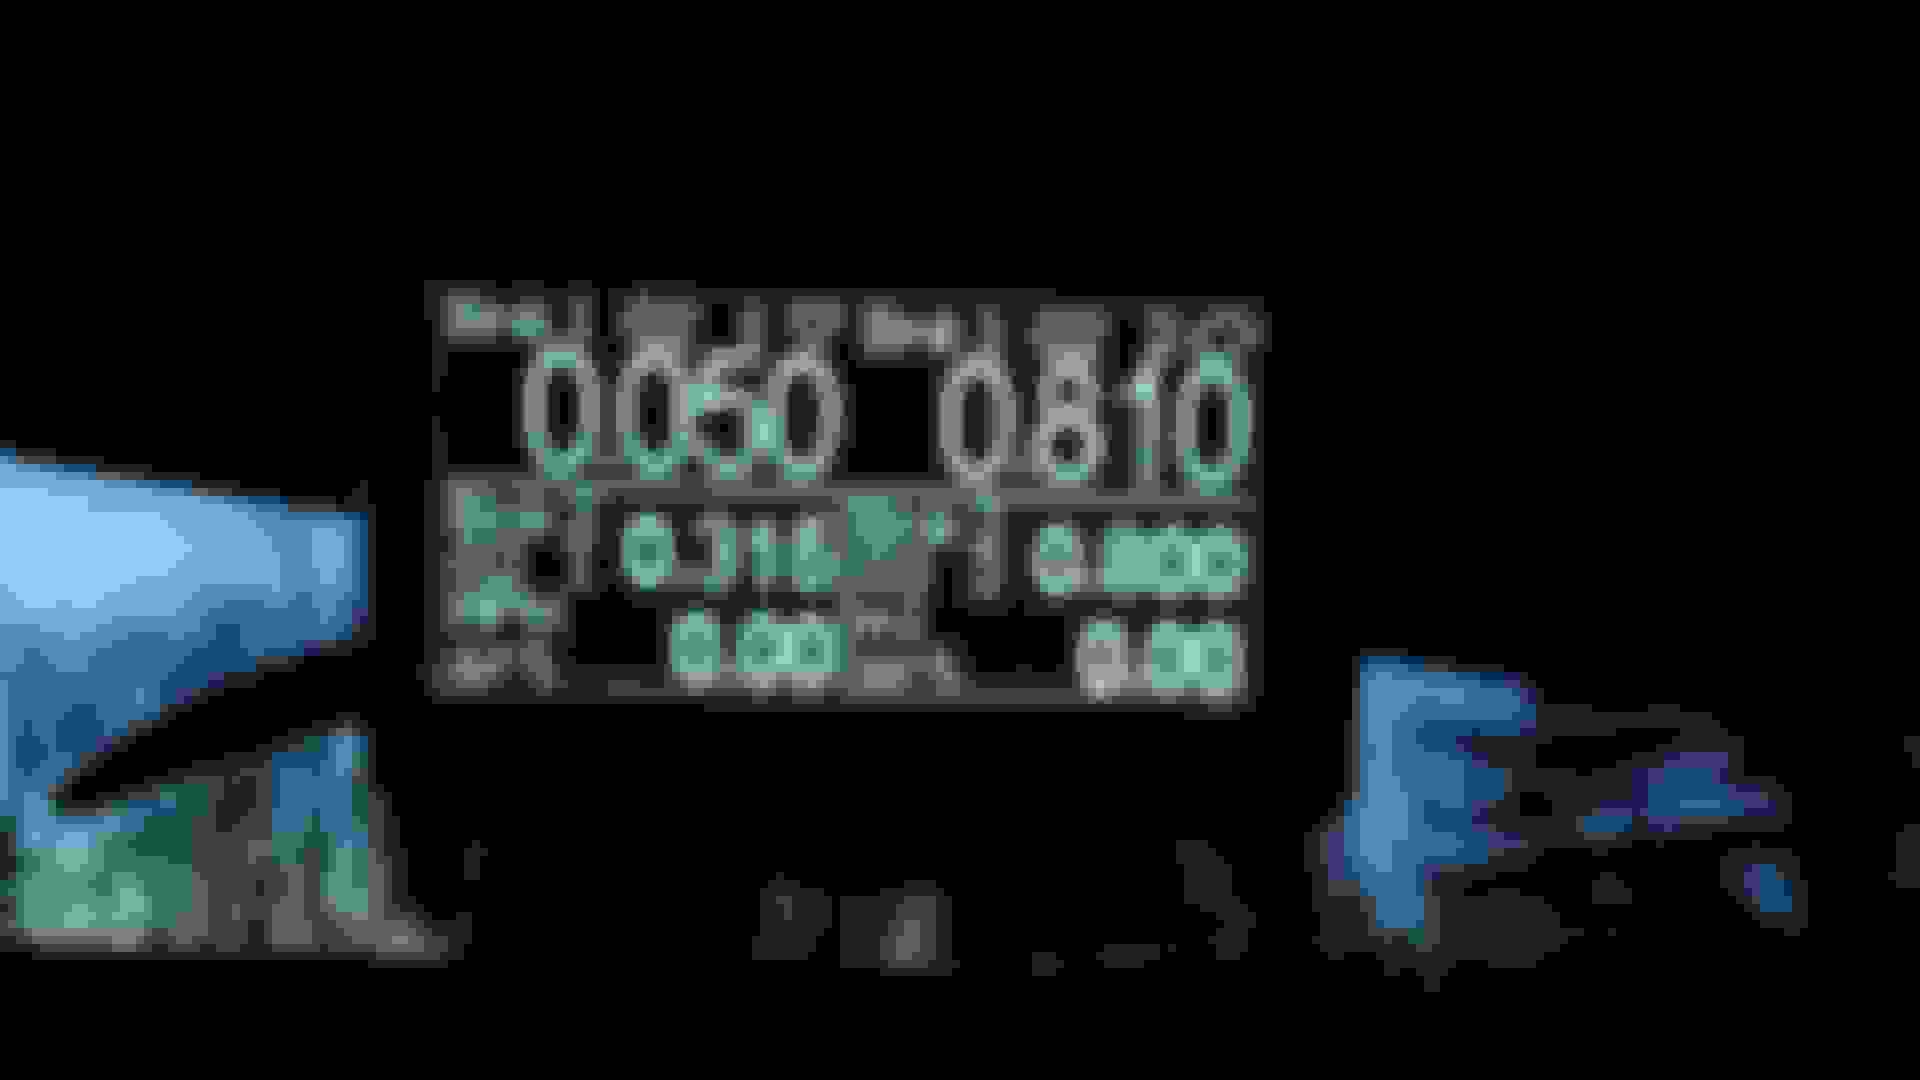
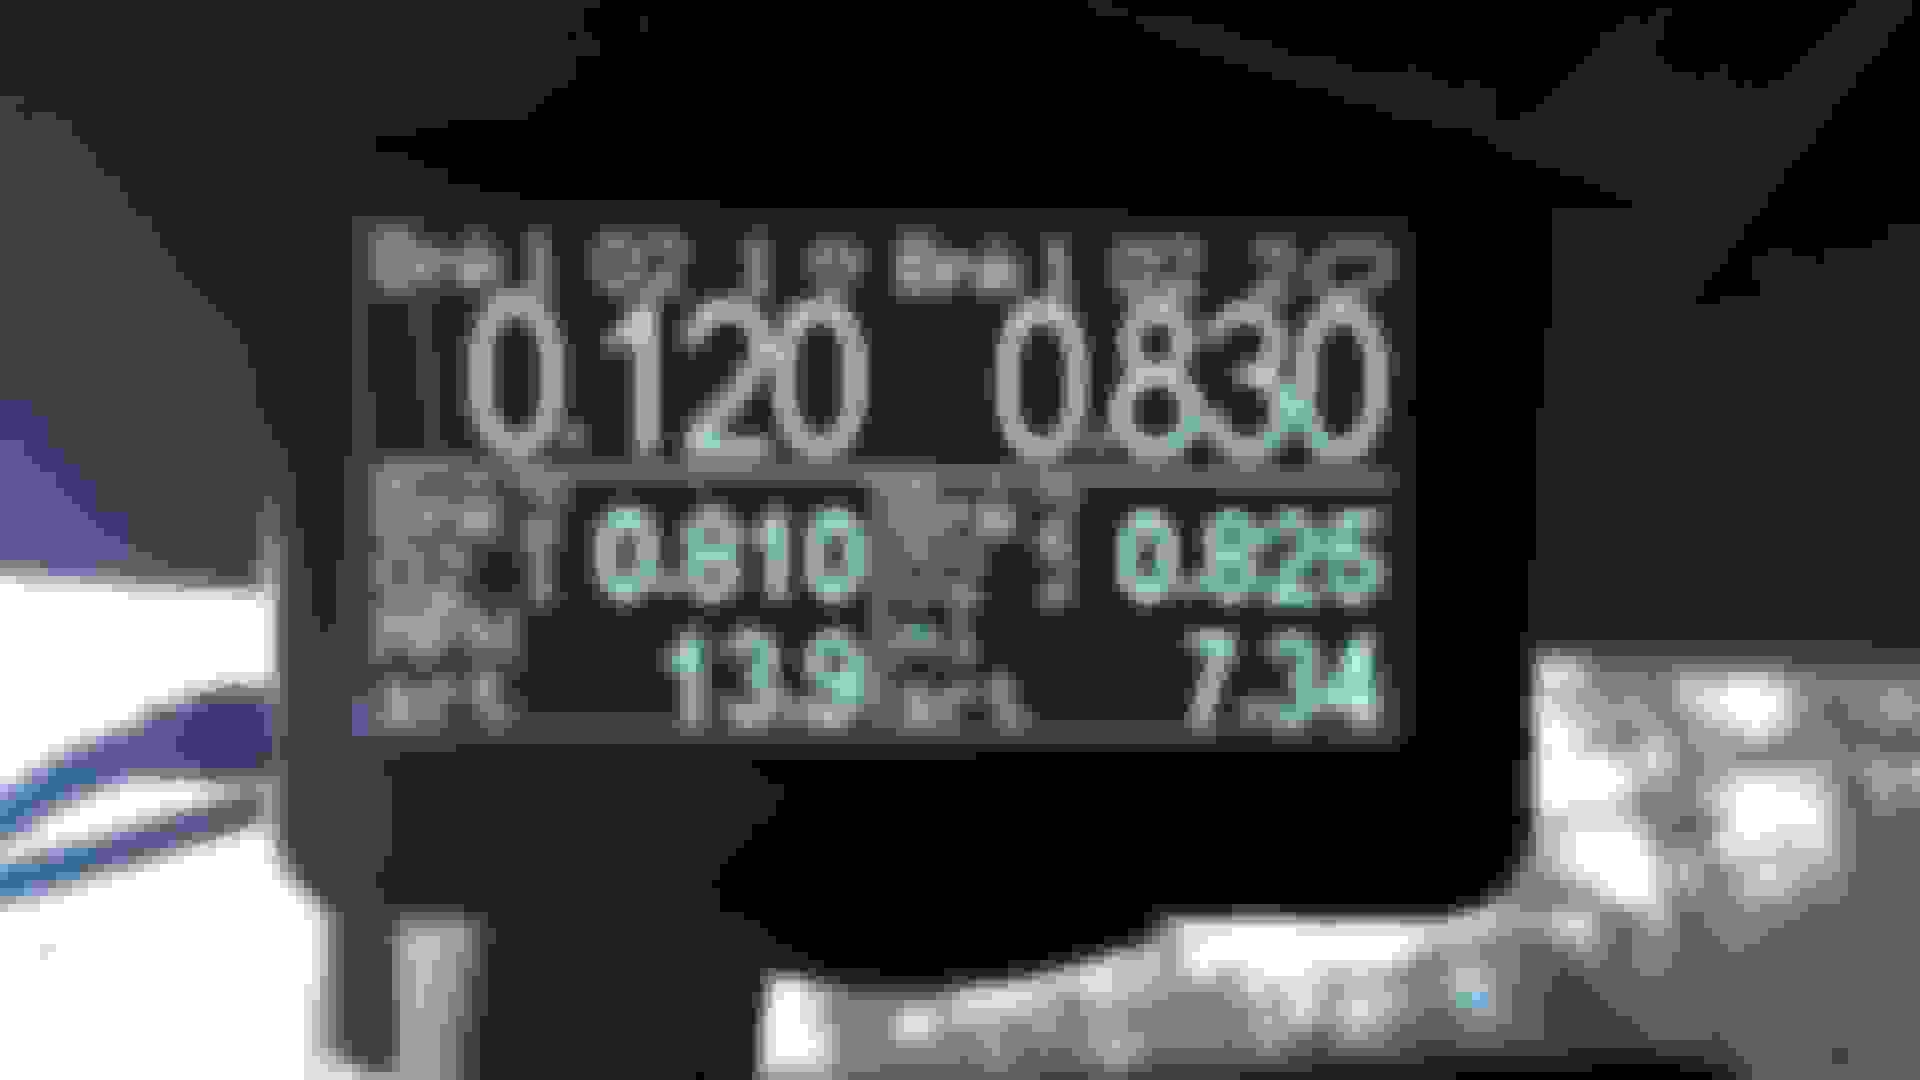
To answer afew other questions: As far as I can tell there is no coolant loss nor has there been any coolant loss since the new block and cooling system were installed. There have been no fault codes of any kind relating to any kind of air leaks in the system. And since I had one of the rear cat back o2 sensors properly installed, there have been no more o2 sensor related fault codes. As for the o2 sensor live date, the Icarsoft diagnostic tool I purchased apparently does not support that function on this vehicle so I will have to rely on the Ultra Gauge for it. I believe fishEH recommended some Android app and I will purchase it on payday. See below for pics of o2 sensor live data.
Ill keep close tabs on everything for now on and see what comes up. I hope the issue is resolved and I know it sure feels that way, but again I wont count my chickens yet. If and when the misfire and codes return my next move will be unbolting the cats. They were disconnected from the exhaust manifolds during the engine swap. i recall seeing the manifolds attached to the block while it was on the engine stand so the bolts should not be to bad to deal with... Thank you so much everyone for your support and advice on the matter. I learn as I go. I'm no longer terrorized by the idea of tearing the upper portion of the engine apart. Took me a FRACTION of the time to remove the upper intake manifold plenum today as compared to my first attempt which took me hours. Did not even need the rave, knew exactly where and how everything goes back together etc. Have afew new handy tools in my tool box now so that is something to be happy about I guess.
Someone above hit it on the nail though. When I invested in the new block and all the other **** I had replaced during the job, I never imagined Id have any issues like this thereafter. I thought id never have to deal with any more engine issues, no more misfires, no more leaks, no more ticking etc. In that moment I had alot of money and man I felt like 10000000 bucks. I was confident. The thing that sucks about being a seasonal fisherman is the off season when your looking for work, or working a job that pays jack **** in comparison. Suddenly you no longer feel like your wallet is bottomless and any little issue that pops up with your vehicle becomes a nightmare. Since I picked up the truck in late January early Feb Ive been dealing with constant check engine codes. Codes for o2 sensors and of course the engine misfiring. AS SOON as the o2 sensor issue was resolved the misfire began - immediately same ****ing day! The other day I realized my front driver side axle shaft seal is leaking. I replaced both front hubs and seals maybe last year? My first attempt at replacing the seal failed so I brought it to my mechanic and his first attempt also failed as the seal did not seat properly. He ordered another seal and got it in properly. Now here we are back at square one with a failed axle shaft seal... I imagine once Ive replaced the 3 something else will come up to bite me in the ***. Later this year I will be replacing the entire exhaust system with stainless steel.


 04-27-2016, 12:18 AM