
How to Change Your Front Rotors w/ Wheel Bearings


Three Wheeling
Joined: Jan 2007
Posts: 93
Likes: 0
From:
Hello.
My front bearings are suspect cause of a front wheel vertical play, though they don't seem to whine yet. A shop tried to rob me blind on replacement, but I just took the car and ran (so to speak), TIMKEN bearings in hand. 1992 Disco 200Tdi. This thread is probably a better guide on how to do them than the old workshop manual that I have. One question: what grease to use? I'm in Russia, but despite all the bears and babushkas with balalaikas and all roaming our streets the autoparts stores are full of various products, including graphite and silicon lubricants, and stuff by Liqui Moly and what not, made in Germany, France and so on. And then, on the bottom shelf, there is the old mechanical grease that costs next to nothing. So which lubricant would I be wiser to use possibly to extend the life expectancy of the bearings? Also, I don't think I have access to a caliper like in the pic, so is that critical?
Thanks


Mudding
Joined: Nov 2011
Posts: 162
Likes: 11
From: St. Augustine, FL.
My right front wheel wobbles really bad. I took off all the retaining nuts, etc. in the photos above and caliper, but disc will not come off. Does it have to be forced with a big hammer? (98 Disco). I believe my bearings are shot, makes an occasional scrapping noise.
Thanks
Thanks

TReK
Joined: Feb 2013
Posts: 2,514
Likes: 656

Things you will need:
-Time (a lot of this)
-Patience (not so much as time, you are allowed to throw things and cuss)
-Lift (1.5 Ton is what I used)
-Socket for lug nuts (1 1/16" or bigger if you have screwed ones like me)
-13mm (12pt) socket for brake calipers
-14mm (12pt) socket for bolts holding the rotor to hub assembly
-Zip ties (for attaching brake caliper to springs so they don't dangle)
-Long Flat head screw driver (removing dust cap and removing bearing race and removing)
or
Chisel
-Cir-clip Pliers(C-Clip)
-17mm Socket for drive member bolts
-2 1/16" socket for lock nuts
or
Joint Pliers (I used since I lost my socket)
-2 rotors
-2 drive member paper gaskets
-2 lock washers
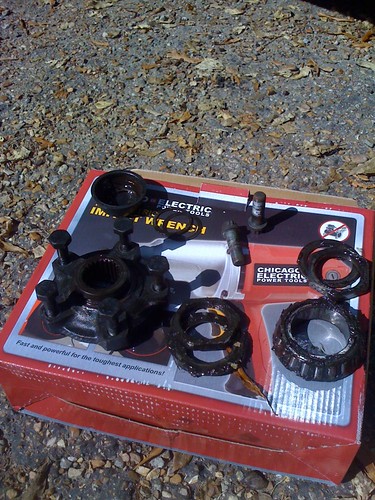
-4 wheel bearings (I used Timken Set37)
-2 inner grease seals (I used RTC3511)
-Wheel bearing grease
-Hammer or mallet
Optional:
Impact gun
Gloves to keep that dirt off your hands (I used a crap load)
Rags or old Tshirt
1. Loosen front wheel nuts, jack up vehicle and
lower onto axle stands and remove road wheel.

2. Release brake hose clips and remove brake
caliper. Secure to one side.
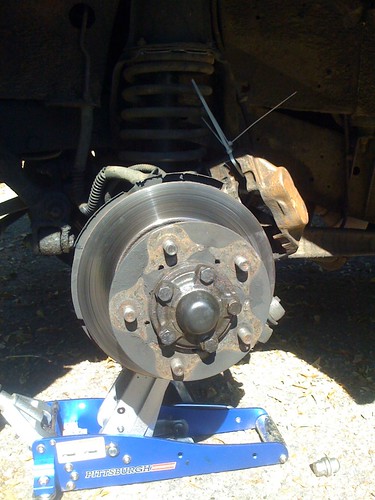
(Two 13mm bolts on the top and bottom of the caliper)
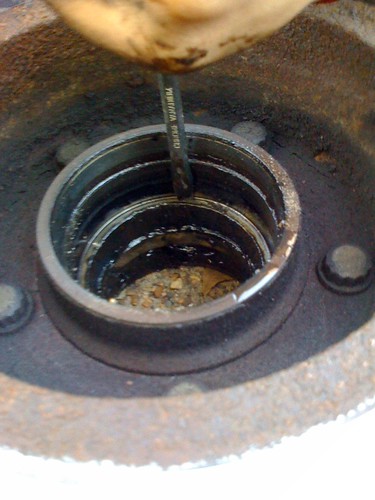
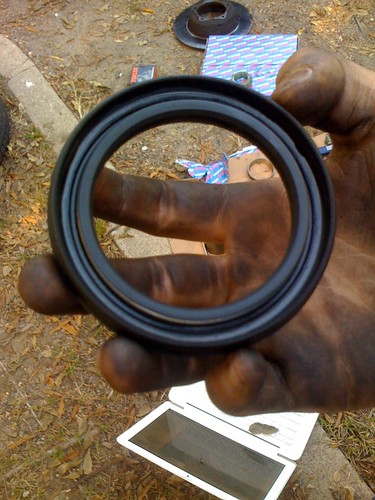
3. Lever off dust cap.
(That black thing in the center of the last picture)
4. Remove circlip and drive shaft shim from
driveshaft.
(Use the C-Clip Plier, put the two ends in the two holes and separate)
5. Remove five bolts and withdraw driving member
and joint washer.
(17mm socket)
6. Bend back lock washer tabs.
I didn't have to so idk.. use the flathead?
7. Remove locknut and lock washer.
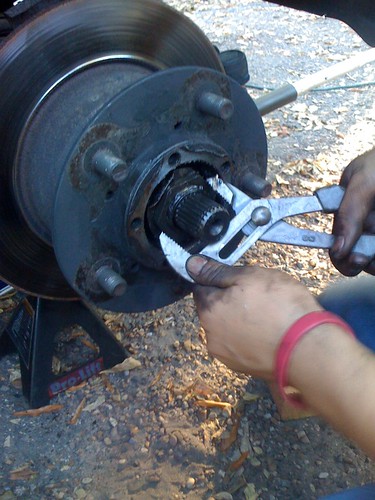
(Use the 2 1/16" socket, which I lost, or the joint pliers)
8. Remove hub adjusting nut.
(same instructions as previous step)
9. Remove spacing washer.
(if you can't remove this, give up and sell your rover.. just kidding. Just pull the darn thing)
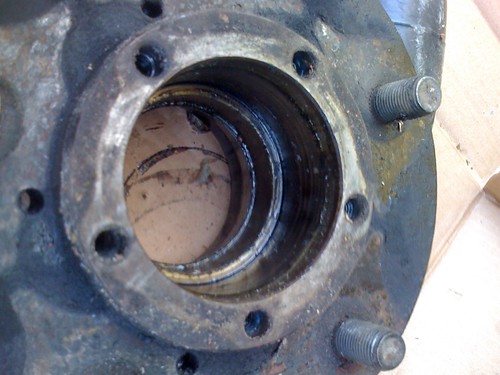
-Drive member with 5 bolts (bottom left)
-Lock nut with lock washer (center bottom)
-Outer bearing (bottom right)
-Hub adjusting nut with spacing washer (top right)
-Brake caliper mounting bolts (top center)
-Dust cap with C-Clip inside (Top Left)
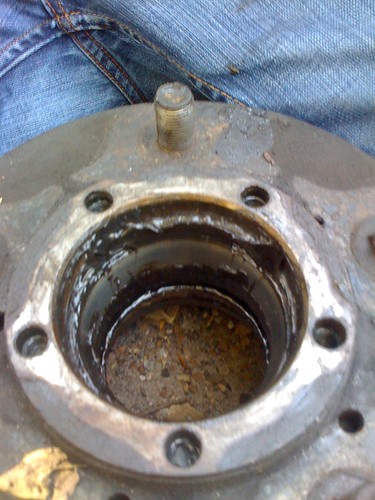
10. Remove hub and brake disc assembly complete
with bearings.
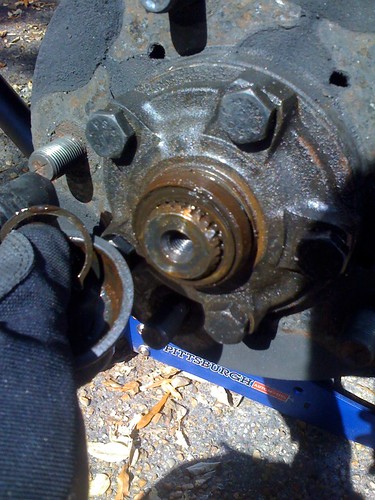
2. Remove five hub to disc bolts.
(use the 14mm socket here)
**As you can see I cheated and used my Impact Gun, if you do not have one you can insert your long flathead in between the bolts on the opposite end as a hold point** Above one bolt, below the following one in order (sorry didn't take a pic)
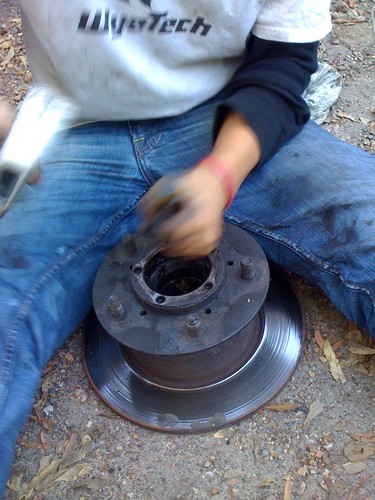
3. Tap disc to separate from hub.
(um...hit it?)
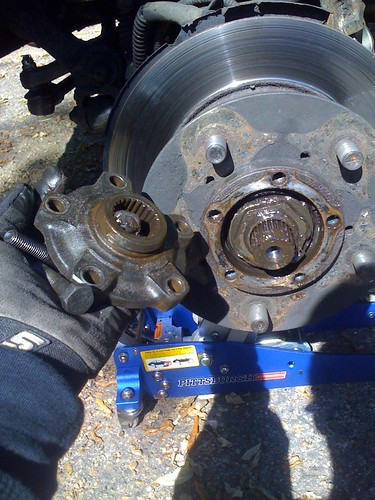
NOW TO THE FUN PART!
(Knocking out the bearing races..)
**Race: that round thing your bearing goes into when you open the box
1) lay your hub with the bolts facing down
(You should have just the hub, since you knocked off the rotor)
2) See the two races? Well in between the two races is a metal median. You are placing the flathead (chisel) between that median and the race
(Silver shiny part a little past the median is the race)
(sorry it was hard to take a picture)
3) Knock on it once or twice, but you have to take it out evenly or it's a PITA!
**Like a clock, hit it on opposite sides
so 12 then 6
then 3 then 9
repeat..
4) race falls out, flip over the hub and repeat steps 2 and 3 for other side
**keep the races and wipe them clean
5) clean out the gunk in hub with a rag or tshirt
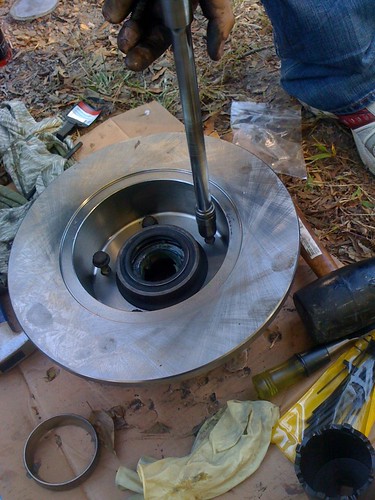
HARD, MADE SIMPLE
(Installing new races)
So taking out the races was a pain in the butt.. no fear I learned how to put them in UBER easy
1) after you cleaned it, place the new race inside (doesn't matter which side of the hub since you are doing both.
Make sure the race is going in right
------------
I00000I - RACE
-----
The thick bottom part goes in facing down, if in doubt just put the bearing in the race and place it in the hub. The tip of the cone is going IN the hub like a bullet goes through an unwanted trespasser
2) Remember those two races you saved? Place one, in the same way as if you are installing it with the thick part facing down and use that as a guide for the new race you are installing. Hammer evenly, 12 to 6 and 3 to 9.
3) Once flush with the hub, place the other saved old race on top of the two already installed races. Hammer evenly.
4) now flip it over and hammer the old races out, really you only need to hammer the second one since it will push the 3rd one out also. And if you noticed you have a nice spot to place your chisel or flathead.
5) repeat for other side
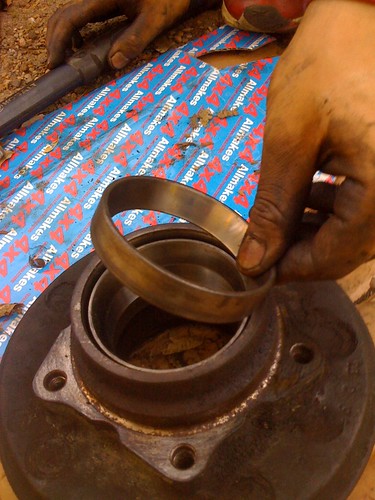
GREAT! Now to grease your bearings
1) Get your grease
2) Place some in the palm of your hand (nice glob)
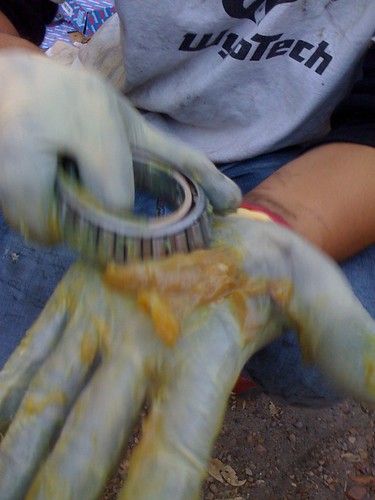
3) Take your bearing (larger circumference on bottom) and press the edge in the middle of it forcing it into the grease
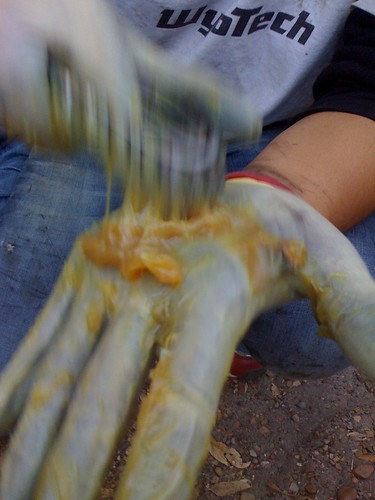
4) Repeat till the grease comes through the top
5) Go around the entire bearing
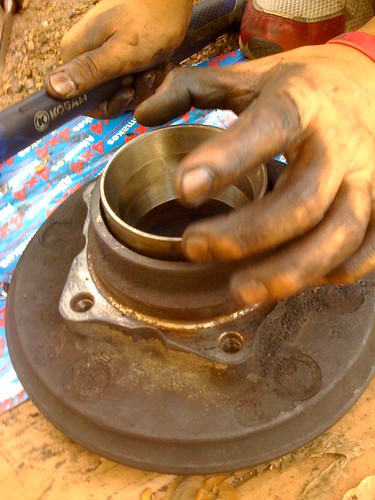
Insert your bearing into the race and prepare for the inner seal install!
Inner seal top
IMG_0271 by calebmbo, on Flickr
Inner Seal Bottom
Place the seal into the hub, after the bearing, with the inner seal bottom going INTO the hub.
**Make sure you are doing the correct side of the hub, the bolts should be on the floor.

(Inner Seal Top...is on top..)
I think I'm done for tonight, I will finish this later. If I mistyped something or misinformed please tell me, it's been a long day and I tried to remember everything I did.
-Time (a lot of this)
-Patience (not so much as time, you are allowed to throw things and cuss)
-Lift (1.5 Ton is what I used)
-Socket for lug nuts (1 1/16" or bigger if you have screwed ones like me)
-13mm (12pt) socket for brake calipers
-14mm (12pt) socket for bolts holding the rotor to hub assembly
-Zip ties (for attaching brake caliper to springs so they don't dangle)
-Long Flat head screw driver (removing dust cap and removing bearing race and removing)
or
Chisel
-Cir-clip Pliers(C-Clip)
-17mm Socket for drive member bolts
-2 1/16" socket for lock nuts
or
Joint Pliers (I used since I lost my socket)
-2 rotors
-2 drive member paper gaskets
-2 lock washers
-4 wheel bearings (I used Timken Set37)
-2 inner grease seals (I used RTC3511)
-Wheel bearing grease
-Hammer or mallet
Optional:
Impact gun
Gloves to keep that dirt off your hands (I used a crap load)
Rags or old Tshirt
1. Loosen front wheel nuts, jack up vehicle and
lower onto axle stands and remove road wheel.
2. Release brake hose clips and remove brake
caliper. Secure to one side.
(Two 13mm bolts on the top and bottom of the caliper)
3. Lever off dust cap.
(That black thing in the center of the last picture)
4. Remove circlip and drive shaft shim from
driveshaft.
(Use the C-Clip Plier, put the two ends in the two holes and separate)
5. Remove five bolts and withdraw driving member
and joint washer.
(17mm socket)
6. Bend back lock washer tabs.
I didn't have to so idk.. use the flathead?
7. Remove locknut and lock washer.
(Use the 2 1/16" socket, which I lost, or the joint pliers)
8. Remove hub adjusting nut.
(same instructions as previous step)
9. Remove spacing washer.
(if you can't remove this, give up and sell your rover.. just kidding. Just pull the darn thing)
-Drive member with 5 bolts (bottom left)
-Lock nut with lock washer (center bottom)
-Outer bearing (bottom right)
-Hub adjusting nut with spacing washer (top right)
-Brake caliper mounting bolts (top center)
-Dust cap with C-Clip inside (Top Left)
10. Remove hub and brake disc assembly complete
with bearings.
2. Remove five hub to disc bolts.
(use the 14mm socket here)
**As you can see I cheated and used my Impact Gun, if you do not have one you can insert your long flathead in between the bolts on the opposite end as a hold point** Above one bolt, below the following one in order (sorry didn't take a pic)
3. Tap disc to separate from hub.
(um...hit it?)
NOW TO THE FUN PART!
(Knocking out the bearing races..)
**Race: that round thing your bearing goes into when you open the box
1) lay your hub with the bolts facing down
(You should have just the hub, since you knocked off the rotor)
2) See the two races? Well in between the two races is a metal median. You are placing the flathead (chisel) between that median and the race
(Silver shiny part a little past the median is the race)
(MEDIAN)
(RACE)IIIIIII(RACE)
flathead between race and median
(RACE)IIIIIII(RACE)
flathead between race and median
(sorry it was hard to take a picture)
3) Knock on it once or twice, but you have to take it out evenly or it's a PITA!
**Like a clock, hit it on opposite sides
so 12 then 6
then 3 then 9
repeat..
4) race falls out, flip over the hub and repeat steps 2 and 3 for other side
**keep the races and wipe them clean
5) clean out the gunk in hub with a rag or tshirt
HARD, MADE SIMPLE
(Installing new races)
So taking out the races was a pain in the butt.. no fear I learned how to put them in UBER easy
1) after you cleaned it, place the new race inside (doesn't matter which side of the hub since you are doing both.
Make sure the race is going in right
------------
I00000I - RACE
-----
The thick bottom part goes in facing down, if in doubt just put the bearing in the race and place it in the hub. The tip of the cone is going IN the hub like a bullet goes through an unwanted trespasser
2) Remember those two races you saved? Place one, in the same way as if you are installing it with the thick part facing down and use that as a guide for the new race you are installing. Hammer evenly, 12 to 6 and 3 to 9.
3) Once flush with the hub, place the other saved old race on top of the two already installed races. Hammer evenly.
4) now flip it over and hammer the old races out, really you only need to hammer the second one since it will push the 3rd one out also. And if you noticed you have a nice spot to place your chisel or flathead.
5) repeat for other side
GREAT! Now to grease your bearings
1) Get your grease
2) Place some in the palm of your hand (nice glob)
3) Take your bearing (larger circumference on bottom) and press the edge in the middle of it forcing it into the grease
4) Repeat till the grease comes through the top
5) Go around the entire bearing
Insert your bearing into the race and prepare for the inner seal install!
Inner seal top
IMG_0271 by calebmbo, on Flickr
Inner Seal Bottom
Place the seal into the hub, after the bearing, with the inner seal bottom going INTO the hub.
**Make sure you are doing the correct side of the hub, the bolts should be on the floor.
(Inner Seal Top...is on top..)
I think I'm done for tonight, I will finish this later. If I mistyped something or misinformed please tell me, it's been a long day and I tried to remember everything I did.
OK, it's safe to assume you didn't read the first post. It's a very good write- up.
The Brake Rotors are attached to the hub with 5 bolts (#16 in the RAVE pic). You need to remove the drive member, etc. first to get access to the bolts ( remove 1-11 in the RAVE pic).
Good Luck!
Mudding
Joined: Nov 2011
Posts: 162
Likes: 11
From: St. Augustine, FL.
Picture from Rave, I see the #16 bolt (5 0f those?), but you have to remove the whole hub assembly to get to that, right? I can not get the hub assembly off the axle, far as I get is #9 in the foto, hub adjusting nut. #10 , spacing washer, seems to be stuck in there, how does it come out? I tapped on it mildly, but nada. Am I not seeing the forest because of the trees?
I went out and pulled the other wheel off and got it out. The spacing washer,#10 on diagram, has the one flat side on the inner hole. On the side stuck, that washer is on cockeyed, flat part is not aligned with the flat side of the threaded axle shaft.
I went out and pulled the other wheel off and got it out. The spacing washer,#10 on diagram, has the one flat side on the inner hole. On the side stuck, that washer is on cockeyed, flat part is not aligned with the flat side of the threaded axle shaft.
Last edited by reboot; Feb 23, 2017 at 09:40 PM.

Camel Trophy
Joined: Jan 2010
Posts: 4,245
Likes: 402
From: Traverse City MI
Once both nuts are off the entire hub should slide off the spindle by pulling the rotor with your hands. Ignore the washer, it'll slide out with the outer bearing. If it doesn't want to allow the hub to slide use a hooked pick to pull it out.
TReK
Joined: Feb 2013
Posts: 2,514
Likes: 656
+1 ihscouts is right. If you have #9 off look at the spacer (might want to hit it with some brake cleaner) to be sure the index (the flat part) is sitting flush/flat with the stub axle. It can bind if the nut was torqued too tight. The pic is the spacer (FTC3185) and with #9 Hub nut off that's what you should see. If not flat, adjust it's position with a pic or screwdriver.... AND then pull the damn thing off! Yes this has to come off to access the 5 bolts.
You'll get it.
TReK
Joined: Feb 2013
Posts: 2,514
Likes: 656
Picture from Rave, I see the #16 bolt (5 0f those?), but you have to remove the whole hub assembly to get to that, right? I can not get the hub assembly off the axle, far as I get is #9 in the foto, hub adjusting nut. #10 , spacing washer, seems to be stuck in there, how does it come out? I tapped on it mildly, but nada. Am I not seeing the forest because of the trees?
I went out and pulled the other wheel off and got it out. The spacing washer,#10 on diagram, has the one flat side on the inner hole. On the side stuck, that washer is on cockeyed, flat part is not aligned with the flat side of the threaded axle shaft.
I went out and pulled the other wheel off and got it out. The spacing washer,#10 on diagram, has the one flat side on the inner hole. On the side stuck, that washer is on cockeyed, flat part is not aligned with the flat side of the threaded axle shaft.
Were you able to get the washer in the right position and off? It can be a PITA (had this happen a few times), but it's not hard to get it sorted. Post a pic if you can or need more help.
Camel Trophy
Joined: Jan 2010
Posts: 4,245
Likes: 402
From: Traverse City MI
Well nail the cocka washer with a punch to rotate it. Not open heart surgery here, just a flat washer holding up all of Penn Station.