
iPod / MP3 player integration in a D1


Thread Starter
|
TReK
Joined: Mar 2010
Posts: 2,787
Likes: 628
From: NYC
For the longest time I have searched high a low for a simple way to connect my ipod / mp3 player to my factory stereo. I believe I have figured out the simplest way to do so.
The first catch... YOU MUST HAVE A WORKING CD PLAYER IN YOUR TRUCK!
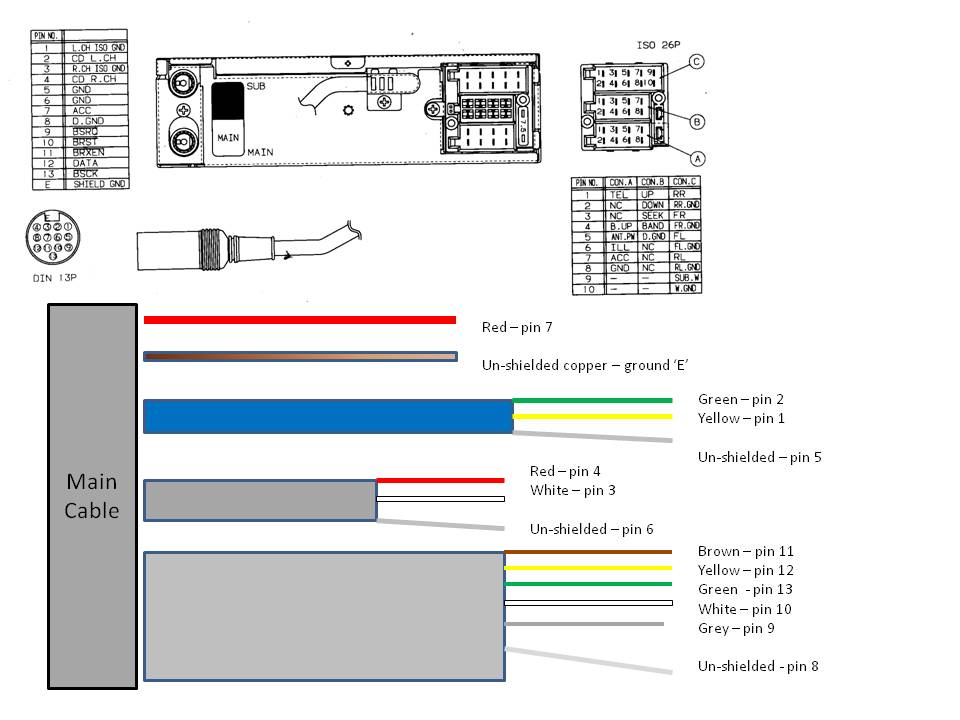
The main cable between the factory head unit and the CD player has 13 wires in it (plus a ground). Using the diagram we see that pins 1,2,3 & 4 carry the audio signals.
1. Left channel ground
2. Left channel positive signal
3. Right channel ground
4. Right channel positive signal
Put a switch along wires 1,2,3, & 4 we can add an input for an audio device and fool the factory head unit into thinking it is playing a CD when, in fact, the audio is coming from our new inputs.
The other 9 of the 13 wires carry control codes so I just put jumpers in between them so the CD and head unit can continue to ‘talk’ to each other.
Finally there is the ground which again can simply be re-connected.
Below is the key for figuring out which wire inside the main cable goes to which pin.
Inside the main cable there are two grey, a blue, and a red wire as well as an unshielded ground. The grey wires and the blue wire have wires inside them so in reality you have three ‘layers’ of wire.
When I did mine I needed a ground loop isolator between the MP3 player and the switch to eliminate alternator noise completely.
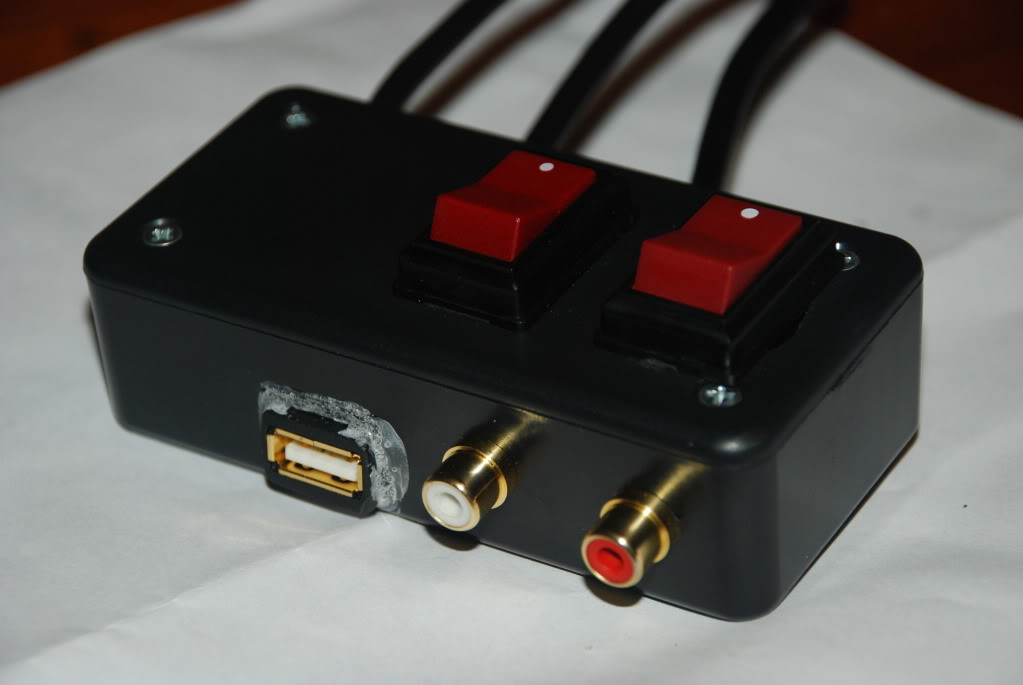
The project box I built on which to mount the switch is in my cubby and I drilled a hole in the cubby to get the wires under the passenger seat where the CD player is located. I used two DPDT witches. One for each channel of audio but I believe if you just tie all the negative audio lines together from both inputs and the wires back to the head unit, you can switch only the positives and get away with one rocker switch. Notice that I put RCA jacks on my project box in order to accommodate any type of MP3 player. I also installed a female USB port in order to power the MP3 player (which happens to be an iPod in this case).
The result is crystal clear sound from my iPhone and it charges it at the same time!
The first catch... YOU MUST HAVE A WORKING CD PLAYER IN YOUR TRUCK!
The main cable between the factory head unit and the CD player has 13 wires in it (plus a ground). Using the diagram we see that pins 1,2,3 & 4 carry the audio signals.
1. Left channel ground
2. Left channel positive signal
3. Right channel ground
4. Right channel positive signal
Put a switch along wires 1,2,3, & 4 we can add an input for an audio device and fool the factory head unit into thinking it is playing a CD when, in fact, the audio is coming from our new inputs.
The other 9 of the 13 wires carry control codes so I just put jumpers in between them so the CD and head unit can continue to ‘talk’ to each other.
Finally there is the ground which again can simply be re-connected.
Below is the key for figuring out which wire inside the main cable goes to which pin.
Inside the main cable there are two grey, a blue, and a red wire as well as an unshielded ground. The grey wires and the blue wire have wires inside them so in reality you have three ‘layers’ of wire.
When I did mine I needed a ground loop isolator between the MP3 player and the switch to eliminate alternator noise completely.
The project box I built on which to mount the switch is in my cubby and I drilled a hole in the cubby to get the wires under the passenger seat where the CD player is located. I used two DPDT witches. One for each channel of audio but I believe if you just tie all the negative audio lines together from both inputs and the wires back to the head unit, you can switch only the positives and get away with one rocker switch. Notice that I put RCA jacks on my project box in order to accommodate any type of MP3 player. I also installed a female USB port in order to power the MP3 player (which happens to be an iPod in this case).
The result is crystal clear sound from my iPhone and it charges it at the same time!
Last edited by WaltNYC; Sep 10, 2012 at 12:37 PM.


Thread Starter
|
TReK
Joined: Mar 2010
Posts: 2,787
Likes: 628
From: NYC
Fish, I started my project with a different design in mind, but have since come to the conclusion that I did too much work.
If I were to do it again I'd snip the CD cable about 2 feet from the CD player under the passengers seat. Then reconnect all the pins/wires #5-13 (and ground). How you connect them will vary based on how much slack you have and how much soldering/shrink tubing/electrical taping you want to do.
Then toss some female RCA's on both sides (one side on those wires leading to the head unit and the other side leading to the CD player) of audio lines (wires 1-4). Using standard 'RCA patch cords' which can be found in any Radioshack, I'd run them to a switch box in the cubby. On that box I'd have three sets of female RCA's. One set to go the head unit, another to go to the CD player, and the third to accept the input of the MP3 (or any other audio device for that matter). You could always hard wire those audio lines from the CD player cable to the switch box but I prefer to have something modular which I can remove.
I couldn't find a switch which would handle three wires each from two inputs (and send it to one output), so mine has two switches. One for the right and one for the left channel of audio.
Finally, for power, I tapped the cigarette lighter, installed another receptacle, bought a charger that would accept a USB cable. A USB cable with a female end at the switch box carries power to the device.
In the end I have R+L RCA jacks and a powered USB (get a 2.0 amp charger if you want to run iPad or latest iPhones) on the switch box in the cubby.
Hope that helps clear up some of the details.
Thread Starter
|
TReK
Joined: Mar 2010
Posts: 2,787
Likes: 628
From: NYC
I believe you need to have a 'heartbeat' (digital control codes) from the CD to the head unit or the head unit won't recognize/accept input from those wires. That is why I said you need to have a functioning CD player. This method just intercepts the audio and replaces it with a external input. Pins 5-13 carry those codes.

Mudding
Joined: Apr 2009
Posts: 102
Likes: 1
This is a blast from the past but any chance you still have this working? I'd appreciate it if you could do a quick drawing of how you connected the RCA's to the switch and what it looks like in the box. I think i understand what you've achieved here but to see a diagram would clear it up for me. Thank you in advance!
Thread Starter
|
TReK
Joined: Mar 2010
Posts: 2,787
Likes: 628
From: NYC
I've re-done the project and added another USB power source on the box. Here is how it goes...
1. Cut the data cable.
2. ID the four audio wires
3. Put female RCA plugs on the CD side AND the head unit side of the wires.
4. Reconnect the other 9 wires in the cable.
(I suppose you could 'dissect' the data cable and cut only the four audio wires. You'd just need to be careful).
Now you have two sets of female RCA's. One goes to the CD, the other to the head unit.
Grab two male to male RCA cables from any stereo store and slap one on each of the females. How those cables enter the box is up to you. If you want to make the installation totally 'modular' you can add two more sets of female RCA's to the box, one for each of the CD and output to the head unit. You'll then have a total of three sets when you consider the input for the iPod/aux device.
The other way to go is to run wires into the box, cut off the plugs and connect the wires to the switch directly. You're project box will then have three wires hanging off it... 1. to the CD 2. to the head unit 3. power.
There are switches which will handle two inputs (each with four wires) and one output. I think I'd go with a rotary switch next time. All available on Amazon/ebay etc. I'm not entire knowledgeable of all the different types and I just grabbed what they had at Radio Shack (RIP).
The USB power comes from one of these...
While I was working in/around the cubby I added another of the same USB port behind the cubby facing the rear seat (in the space between the actual black cubby and the beige plastic) above the ash tray.
If that isn't clear don't hesitate to ask more.
Three Wheeling
Joined: Mar 2018
Posts: 93
Likes: 10
Hi all,
I know this is a very old thread, but im just getting into the Disco game. Does anyone know if the CD player requires the cartridge in order for this mod to work? Have the CD changer and it powers on, but no cartridge for to load CDs. I'm happy with the stock system, except for the lack or bluetooth capability and think this will meet my requirements.
Cheers,
johnny

